
Popular categories
Looking for a yarn?


Comments / Questions (84)
![]() Hannah wrote:
Hannah wrote:
Vielen Dank für das niedliche Muster. Starte ich bei der Erhöhung am Rundenbeginn in der Mitte mit den 9 Maschen oder versuche ich sie so zu platzieren, dass sie in etwa mittig sind (fange also 4 Maschen vor dem Rundenbeginn an)?
14.06.2025 - 10:42DROPS Design answered:
Liebe Hannah, die Runden bei der Hose beginnen in der hinteren Mitte = in der Mitte von den neu angeschlagenen Maschen zwischen den Beinen, so beginnen die verkürzten Reihen an der hinteren Mitte, so bei der 1. Hin-Reihe stricken Sie nur die ersten 9 M, wenden Sie und dann stricken Sie 18 M (=9 M beidseitig der hinteren Mitte), usw. Vile Spaß beim Stricken!
16.06.2025 - 07:34
![]() Laura wrote:
Laura wrote:
Hei! Det står at: «Fell slik på hver (0.) 8.-3.-6.-4. (8.-10.)cm totalt (0) 2-5-3-4 (3-2) ganger = (96) 112-120-136-144 (156-164) masker. Strikk glattstrikk til arbeidet måler (11) 13-14-17-18 (19-20) cm fra der delene ble satt sammen.» Jeg strikker for 6/9 mnd. Hvis jeg feller hver 6.cm totalt 3 ganger blir arbeidet 18 cm. Men det står også at arbeidet måler nå 17 cm fra der delene ble satt sammen… Det blir feil høyde. Kan dere forklare bedre?takk!
31.05.2025 - 07:04DROPS Design answered:
Hei Laura, Du har allerede felt av 1 gang, deretter felles det når arbeidet måler 8 cm, og når arbeidet måler 14 cm (felt 3 ganger totalt). God fornøyelse!
02.06.2025 - 06:43
![]() Grace wrote:
Grace wrote:
Loved knitting this cute jumpsuit! Great that it has extra leg length built in. Was so quick and satisfying. I added a few more short rows to the lower seat area as I cloth diaper. Can’t wait for baby to get here!
06.02.2025 - 03:25
![]() Sanna wrote:
Sanna wrote:
Neulotaanko lahkeen silmukat neljällä puikolla suljettuna neuleena vai kahdella ja lopuksi yhdistetään lahkeen reunat?
26.01.2025 - 12:33DROPS Design answered:
Lahkeet neulotaan suljettuna neuleena neljällä puikolla.
27.01.2025 - 19:36
![]() Annelise Kindt wrote:
Annelise Kindt wrote:
Jeg er meget glad for de skønne Drops opskrifter og anvender for det meste Drops garn. Men jeg savner - i oversigten over garntyper - angivelse af garngruppe. Det ville være en hjælp, hvis det kunne tilføjes!
02.09.2024 - 13:29
![]() Melinda Fülöp wrote:
Melinda Fülöp wrote:
Hej Har delat fram och bakstycke. Antalet till framstycket stämmer, men till bakstycket får jag antalet till 26, inte 25. Jag har gjort som det står. 2 aviga, 3 räta, 2 aviga, 3 räta, 1 m. Maska av 39, 2 m rätstickning, resår över 53, 2 m rätstickning. Maska av 39m, 1 m rätstickning och resår över de sista 13. Men på den sista biten har jag totalt 15 m kvar. Tänker jag fel eller är det felräkning i beskrivningen?
15.08.2024 - 17:42DROPS Design answered:
Hej Melinda. Om du har 160 maskor (storlek 2 år) så ska antalet maskor bli riktigt. 2+3+2+3+1, avmaska 39 m, 2+53+2, avmaska 39 m, 1+13 m. Du ska då ha 25 m till bakstycke och 57 till framstycke. Mvh DROPS Design
16.08.2024 - 07:30
![]() Marie Madeleine wrote:
Marie Madeleine wrote:
Merci beaucoup . Bonne fin d\'après-midi 🌿🌷🌿
19.06.2024 - 17:18
![]() Marie Madeleine wrote:
Marie Madeleine wrote:
Bonjour ,je fais cette jolie salopette ,mais voilà pour décaler les mailles où cela se trouve ? au milieu d s augmentations que j'ai faites je ne comprends pas trop bien (car l'extérieur de la jambe se trouve sur les côtés,et non l'entrejambe ? J'aimerai que vous m'éclairez un peu quel côté où il faut décaler le marqueur . Merci de votre réponse.ce modèle est très mignon ,j'aimerai le réussir .
19.06.2024 - 15:33DROPS Design answered:
Bonjour Marie-Madeleine, les tours commencent au niveau de l'intérieur des jambes, on va donc placer un marqueur après la moitié des mailles = ce marqueur se trouve sur le côté extérieur de la jambe = côté de la salopette. Bon tricot!
19.06.2024 - 16:28
![]() Aimee wrote:
Aimee wrote:
Just started on the elevation. I'm confused on what to do for the elevation. I finished the first bit of elevation. Just finished pulling 34 stitches. It says continue like this, working 8 more stitches each time you turn. Do I start again from knit 9 just adding 8 stitches at the turn?
16.05.2024 - 08:13
![]() Hannah wrote:
Hannah wrote:
Thanks for the very cute free pattern. Although, this seems a very odd shape! I followed the pattern exactly and the legs are alarmingly long compared to the torso. I see that the cuffs are turned up in the modelled pictures, but still. I made the 1-3 months size. Are the rest like this?
17.03.2024 - 22:25DROPS Design answered:
Dear Hanna, please check your knitting gauge, and compare your piece to the measurements given on the schematic drawing at the bottom of the pattern. At the same time, we have to note that the legs are intentionally longer than usual, because they are turned up, so the garnment fits the small ones for longer time. Happy Knitting!
17.03.2024 - 22:55
|
||||
Afternoon Playdate#afternoonplaydatejumpsuit |
||||
 |
 |
|||
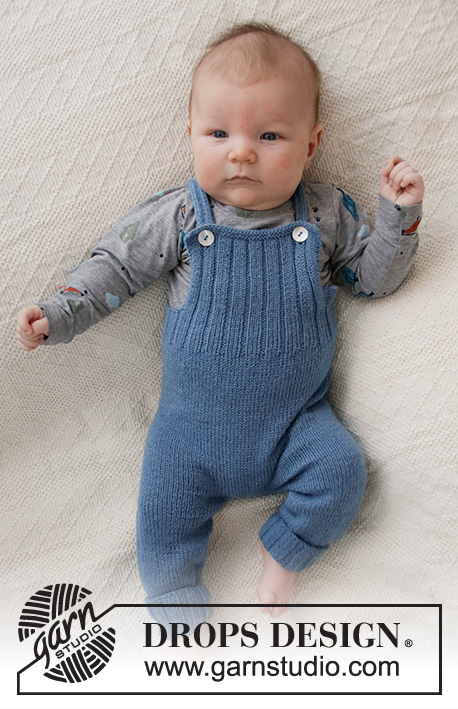
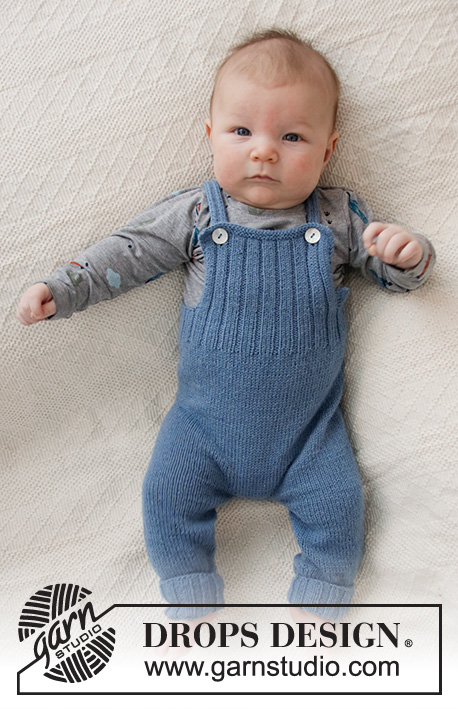
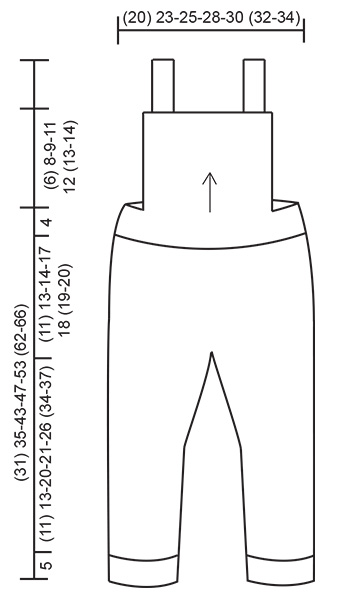
Knitted jumpsuit for babies in DROPS Flora. The piece is worked with rib and stocking stitch. Sizes: Premature – 4 years.
DROPS Baby 36-4 |
||||
|
------------------------------------------------------- EXPLANATIONS FOR THE PATTERN: ------------------------------------------------------- RIDGE/GARTER STITCH (worked back and forth): 1 ridge in height = Knit 2 rows. INCREASE TIP (for sides of legs): Work until there is 1 stitch left before the marker, 1 yarn over, knit 2 (marker sits between these 2 stitches), 1 yarn over. On the next round knit the yarn overs twisted to avoid holes. Then work the new stitches in stocking stitch. DECREASE TIP: Decrease 1 stitch on each side of the marker as follows: Work until there are 3 stitches left before the marker, knit 2 together, knit 2 (marker sits between these 2 stitches), slip 1 stitch as if to knit, knit 1, pass the slipped stitch over the knitted stitch. Decrease like this at both markers. ------------------------------------------------------- START THE PIECE HERE: ------------------------------------------------------- TROUSERS – SHORT OVERVIEW OF THE PIECE: Each leg is worked separately with double pointed needles before putting them together and casting on stitches for the crutch. The piece is continued in the round with short circular needle. Front and back pieces are worked back and forth. LEG: Cast on (40) 44-48-48-56 (60-64) stitches with double pointed needles size 2.5 mm and Flora. Knit 1 round. Then work rib (= knit 2, purl 2). When the piece measures 5 cm, change to double pointed needles size 3 mm and continue with stocking stitch. Insert 1 marker at the beginning of the round. Allow the marker to follow your work onwards; it marks the inside of the leg and will be used when increasing later. REMEMBER THE KNITTING TENSION! When the piece measures 10 cm, increase (0) 1-1-1-1 (1-1) stitch on each side of the marker – read INCREASE TIP. Increase like this every (0) 2-2-2-3 (5-7) cm a total of (0) 4-7-8-7 (6-5) times = (40) 52-62-64-70 (72-74) stitches. Work stocking stitch until the piece measures (16) 18-25-26-31 (39-42) cm. Move the marker (20) 26-31-32-35 (36-37) stitches (= outside of leg). Allow the marker to follow your work onwards; it marks the outside of the leg and will be used when decreasing later. Cut the strand. Work the other leg in the same way. JUMP SUIT: Now place both legs on circular needle size 3 mm and continue in the round as follows: Cast on (8) 8-8-10-10 (12-12) stitches, work the stitches from the one leg, cast on (8) 8-8-10-10 (12-12) stitches and work the stitches from the other leg = (96) 120-140-148-160 (168-172) stitches. The round starts mid-back, between the first (8) 8-8-10-10 (12-12) stitches. Continue in the round with stocking stitch. When the piece measures 2 cm from where the legs were joined, decrease (0) 1-1-1-1 (1-1) stitch on each side of both markers – read DECREASE TIP. Decrease like this every (0) 8-3-6-4 (8-10) cm a total of (0) 2-5-3-4 (3-2) times = (96) 112-120-136-144 (156-164) stitches. Work stocking stitch until the piece measures (11) 13-14-17-18 (19-20) cm from the join. Now work an elevation at the back as follows: Knit (7) 7-9-9-9 (9-9), turn, tighten the strand and purl (14) 14-18-18-18 (18-18) stitches, turn, tighten the strand and knit (20) 20-26-26-26 (26-26) stitches, turn, tighten the strand and purl (26) 26-34-34-34 (34-34) stitches back. Continue like this, working (6) 6-8-8-8 (8-8) more stitches each time you turn and until you have worked over a total of (50) 50-66-66-82 (82-82) stitches. Turn, work to beginning of the round (= mid back). Knit 1 round and adjust the number of stitches to (95) 115-120-140-145 (160-165) stitches (i.e. increase (0) 3-0-4-1 (4-1) stitches and decrease (1) 0-0-0-0 (0-0) stitch). To make sure the front piece and back piece are placed correctly, the start of the round is now displaced as follows: Move size premature: Knit until 1 stitch remains on round, now round starts here. Move size 0/1 - 1/3 - 6/9 - 12/18 months (2 - 3/4) years: Knit 1, now round starts here. Change to short circular needle size 2.5 mm. Work as follows in all sizes: Work rib (= purl 2, knit 3) over all stitches. When the rib measures 4 cm, cast off stitches as follows: Purl 2, knit 3, purl 2, knit 3, work 1 stitch in GARTER STITCH – read description above, cast off the next (19) 24-24-34-34 (39-39) stitches, work 2 stitches in garter stitch, continue with rib over the next (33) 38-43-43-48 (53-58) stitches, work 2 stitches in garter stitch (= front piece), cast off the next (19) 24-24-34-34 (39-39) stitches, work 1 stitch in garter stitch and work rib over the remaining (8) 13-13-13-13 (13-13) stitches. BACK PIECE: = (20) 25-25-25-25 (25-25) stitches. Continue back and forth with rib and 1 edge stitch in garter stitch on each side until the piece measures (2) 3-3-4-4 (5-5) cm from the division. The next row is worked as follows: Work 1 stitch in garter stitch, knit 3, purl 2, knit 3, 1 stitch in garter stitch, cast off the next (0) 5-5-5-5 (5-5) stitches, work 1 stitch in garter stitch, knit 3, purl 2, knit 3 and 1 stitch in garter stitch = 10 stitches left for each shoulder strap. SHOULDER STRAP: Continue with rib and 1 edge stitch in garter stitch on each side, back and forth until the strap measures approx. 18-24 cm (or to desired length). Cast off and repeat on the other side. FRONT PIECE: = (37) 42-47-47-52 (57-62) stitches. Continue back and forth with rib and 2 edge stitches in garter stitch on each side until the piece measures (4) 6-7-9-10 (11-12) cm, work 2 buttonholes from the right side as follows: Work 2 stitches in garter stitch, knit 3, purl 2, knit 2 together, 1 yarn over, work as before until there are 10 stitches left, knit 2 together, 1 yarn over, knit 1, purl 2, knit 3, 2 stitches in garter stitch. When the piece measures (5) 7-8-10-11 (12-13) cm, change to circular needle size 2.5 mm and work 2 ridges over all stitches. Cast off. ASSEMBLY: Sew together the stitches in the crutch. Sew 1 button on each strap. |
||||
Diagram explanations |
||||
|
||||
|
||||
Have you finished this pattern?Tag your pictures with #dropspattern #afternoonplaydatejumpsuit or submit them to the #dropsfan gallery. Do you need help with this pattern?You'll find 26 tutorial videos, a Comments/Questions area and more by visiting the pattern on garnstudio.com. © 1982-2025 DROPS Design A/S. We reserve all rights. This document, including all its sub-sections, has copyrights. Read more about what you can do with our patterns at the bottom of each pattern on our site. |
||||


With over 40 years in knitting and crochet design, DROPS Design offers one of the most extensive collections of free patterns on the internet - translated to 17 languages. As of today we count 314 catalogues and 11822 patterns translated into English (UK/cm).
We work hard to bring you the best knitting and crochet have to offer, inspiration and advice as well as great quality yarns at incredible prices! Would you like to use our patterns for other than personal use? You can read what you are allowed to do in the Copyright text at the bottom of all our patterns. Happy crafting!
Post a comment to pattern DROPS Baby 36-4
We would love to hear what you have to say about this pattern!
If you want to leave a question, please make sure you select the correct category in the form below, to speed up the answering process. Required fields are marked *.