
Popular categories
Looking for a yarn?


Comments / Questions (98)
![]() Ursula wrote:
Ursula wrote:
Liebes Team, wenn man bei der Ärmelzuname in der Mitte des Ärmels fünf Machen aus einer rechten Masche heraus strickt entsteht dabei ein kleines Loch. Ist das richtig so? Vielen Dank für die Hilfe!
26.02.2020 - 23:52DROPS Design answered:
Liebe Ursula, ja genau so ist es auch richtig. Wenn Sie diese Löcher lieber kleiner möchten, dann können Sie sie vielleicht bei der nächsten Runde verschränkt stricken. Viel Spaß beim stricken!
27.02.2020 - 09:28
![]() Heike wrote:
Heike wrote:
Kommt der Markierungsfaden bei A1 vor oder nach dem Umschlag rein, also 1m re, Markierungsfaden, Umschlag? Oder vor der re M oder nach dem Umschlag?
24.02.2020 - 20:43DROPS Design answered:
Liebe Heike, die Markierungen werden so eingesetzt: Rückenteil endet mit A.1, Markierung, Ärmel = A.2, Markierung, Vorderteil = A.3, glatt rechts, A.1, Markierung, Ärmel = A.2, Markierung, Rückenteil = A.3, glatt rechts. Viel Spaß beim stricken!
25.02.2020 - 09:30
![]() Heike wrote:
Heike wrote:
Ich schließe mich Francoise (25,11,19) an: In der Antwort (für Größe S) findet sich die genaue Abfolge der Maschen und da heißt es A.2=40m, A.2= 1m . Wo kommt A.2= 1m her? Dann sind es A.2=40m + 1m re?
24.02.2020 - 20:39DROPS Design answered:
Liebe Heike, Sie sollen bei den Ärmeln A.2 über 40 M stricken dann die 1. Maschen in A.2 stricken (= 41 M für jeden Ärmel), deshalb haben Sie diese Beschreibung von den Maschen für Größe S in diesem Antwort. Viel Spaß beim stricken!
25.02.2020 - 09:24
![]() Nathalie Perlot wrote:
Nathalie Perlot wrote:
Merci pour votre réponse rapide. je pense avoir compris pourquoi mon A2 est inversé (m.envers+m.endroit) car j'ai commencé le col en rond dés le premier tour en mousse.comme je n'ai pas eu le courage de recommencer au début,j'ai continué en augmentant la maille centrale à l'envers.( le résultat semble correct).
24.02.2020 - 15:54
![]() Nathalie Perlot wrote:
Nathalie Perlot wrote:
Bonjour, j'ai fini le premier tour après les côtes du col,placé mes marqueurs et donc 41 mailles pour les manches et donc le milieu de ma manche correspond à une maille envers. est-ce que l'on tricote sur l'endroit ou l'envers du tricot car la bordure du tricot est plus jolie sur l'envers de l'ouvrage.
24.02.2020 - 11:32DROPS Design answered:
Bonjour Mme Perlot, la maille au milieu des 41 m de la manche doit être une maille comme la 1ère maille de A.2, autrement dit une maille qui a se tricoter tout le temps à l'endroit (et pas comme la 2ème maille qui elle se tricote au point mousse, et donc alternativement à l'endroit et à l'envers). Bon tricot!
24.02.2020 - 13:19
![]() Maria Luisa wrote:
Maria Luisa wrote:
Buona sera, Desidero fare questo modello ma non riesco a capire alcuna cose una di questa è: i schemi A1 e A2 quando li devo fare ? Entrambi separati dal segnali ti o in altro modo?
20.02.2020 - 22:59DROPS Design answered:
Buongiorno Maria Luisa. Dopo aver lavorato il bordo a coste, inizia con i diagrammi e a maglia rasata come indicato nel testo. Il diagramma A1 inizia con una maglia e un gettato, inserisce il segnapunti, ripete A2 sulle 40 m successive, lavora la maglia successiva come indicato per la prima m di A2 e mette un altro segnapunti. Queste sono le maglie della manica. Buon lavoro!
23.02.2020 - 08:29
![]() Joëlle Dupriez wrote:
Joëlle Dupriez wrote:
Bonjour, je tricote la taille s. j’ai tricoté 36 rangs avec 6 x les augmentations manches et les augmentations raglan suivant A1 et A3. Est ce bien correct? Ils disent ensuite : Quand A.1 et A.3 sont terminés, les répéter encore 7fois côté raglan (soit 8 fois au total), puis tricoter les 3premiers tours des diagrammes. Est ce que cela veut dire que je continue les augmentations raglan selon A1 et À 3, sans les augmentations des manches ? Et pendant combien de tour? Merci 😊
14.02.2020 - 22:01DROPS Design answered:
Bonjour Mme Dupriez, vous tricotez A.2 en augmentant 6 fois tous les 8 tours (= 6x 8 = 48 tours) en taille S. En même temps, vous tricotez 8 fois A.1 et A.3 en hauteur total + les 3 premiers tours soit (8 fois 6 tours de A.1 et A.3 + 3 tours = 51 tours). Vous allez donc continuer à augmenter sur le dos/le devant (= A.1 et A.3) mais plus sur les manches. Bon tricot!
17.02.2020 - 13:29
![]() Ayse wrote:
Ayse wrote:
Hi, during the increases on the sleeves should I change the position of the marker to the newly created middle stich? Thanks.
31.01.2020 - 04:08DROPS Design answered:
Dear Ayse, yes you can move the marker so that it's always in the middle stitch on the sleeve. Happy knitting!
31.01.2020 - 07:26
![]() Joelle Dupriez wrote:
Joelle Dupriez wrote:
Bonjour, J'ai une derniere question. lorsqu'on a fait les augmentations des manches, faut-il tricoter les jetés torses au tou suivant ou pas? Merci :-)
28.01.2020 - 17:56DROPS Design answered:
Bonjour Mme Dupriez, dans ce modèle, la styliste a choisi de ne pas tricoter les jetés torse. Bon tricot!
29.01.2020 - 08:30
![]() Joelle Dupriez wrote:
Joelle Dupriez wrote:
Bonjour, ohlala, j'essaie de faire l'augmentation pour les manches mais je n'ai jamais utilisé cette technique et je n'y arrive pas. Auriez-vous une video qui la montre? Sinon : doit-on tricoter la mail du milieu de manche et puis commencer l'augmentation? Ou la maille endroit qui se trouve dans l'asterix est celle du milieu de manche? et donc je tric 1 m endroit puis je fais un jeté ca, c'est ok! mais ensuite? merci pour votre aide!
28.01.2020 - 17:14DROPS Design answered:
Bonjour Mme Dupriez, ce n'est pas tout à fait le même point, mais cette vidéo montre comment augmenter 4 mailles en tricotant plusieurs fois la même maille (la vôtre sera une maille "normale", sans jeté, mais la technique pour augmenter est la même). Autrement dit, vous tricotez plusieurs fois la même maille ainsi: 1 m end, 1 jeté, 1 m end, 1 jeté, 1 m end = 5 mailles dans la même maille. Bon tricot!
29.01.2020 - 08:29
|
||||||||||
Winter Wheat#winterwheatsweater |
||||||||||
 |
 |
|||||||||
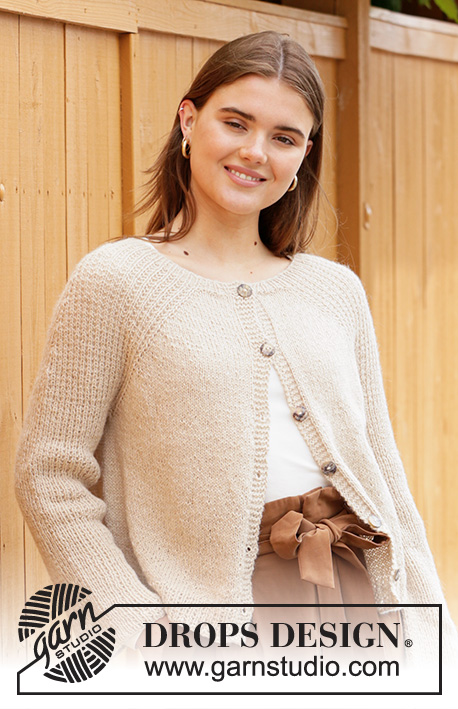
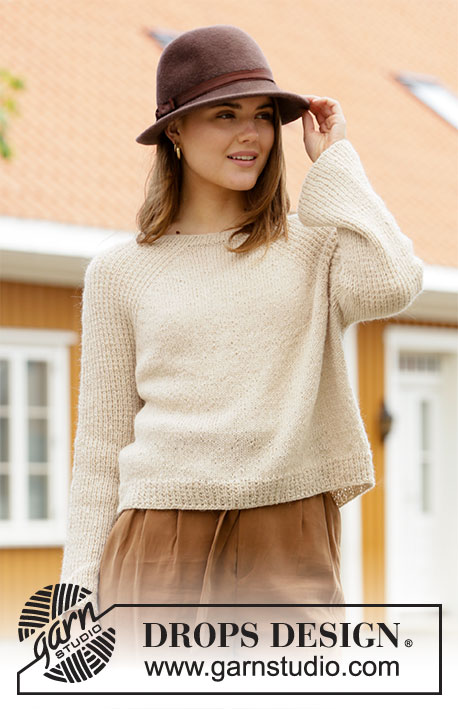
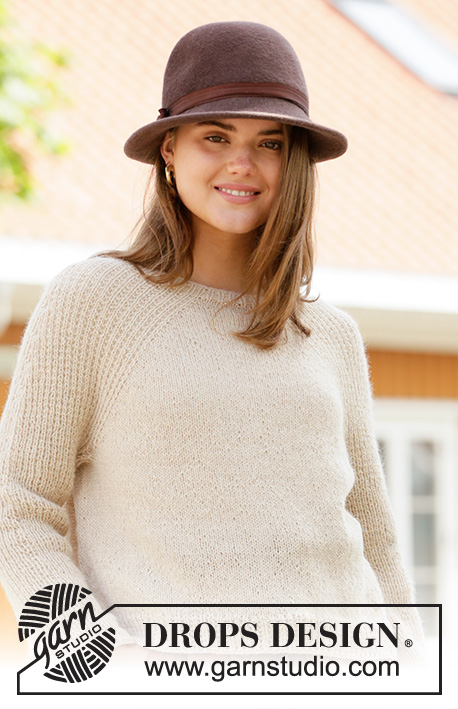
Knitted sweater with raglan in DROPS Puna. The piece is worked top down with textured pattern on the sleeves. Sizes S - XXXL.
DROPS 206-48 |
||||||||||
|
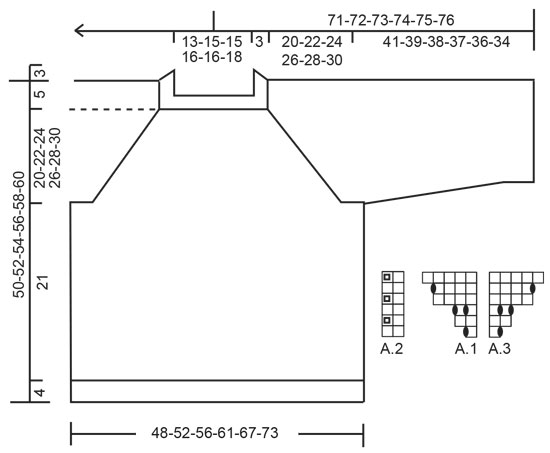
------------------------------------------------------- EXPLANATIONS FOR THE PATTERN: ------------------------------------------------------- PATTERN: See diagrams A.1 to A.3. INCREASE TIP (evenly spaced): To work out how to increase evenly, count the total number of stitches to be increased over (e.g. 4 stitches) and divide by the number of increases to be made (e.g. 4) = 1. In this example, increase by making 1 yarn over after each stitch. On the next round work the yarn overs twisted to avoid holes. INCREASE SLEEVES: Work as far as the mid-stitch on the sleeve (= stitch with marker), * knit 1, make 1 yarn over *, work from*-* a total of 2 times in the same stitch, knit 1 in the same stitch (= 4 stitches increased in the same stitch). Repeat on the other sleeve. The new stitches are worked into pattern A.2. DECREASE TIP (for sleeves): Decrease in the different sizes as follows: Sizes L and XXXL: Work until there are 2 stitches left before the stitch with the marker, knit 2 together, purl 1 (marker in this stitch), slip 1 stitch as if to knit, knit 1 and pass the slipped stitch over (= 2 stitches decreased). Sizes XL and XXL: Work until there are 3 stitches left before the stitch with the marker, knit 2 together, knit 3 (marker in the middle stitch of these 3), slip 1 stitch as if to knit, knit 1 and pass the slipped stitch over (= 2 stitches decreased). ------------------------------------------------------- START THE PIECE HERE: ------------------------------------------------------- SWEATER – SHORT OVERVIEW OF THE PIECE: The piece is worked in the round with circular needle, top down. The sleeves are worked in the round with double pointed needles/short circular needle. Stockinette stitch is worked on the front and back pieces, textured pattern on the sleeves. NECK: Cast on 100-108-108-116-116-124 stitches with circular needle size 3 mm = US 2,5 and Puna. Knit 1 round then work rib (= knit 1 / purl 1) in the round for 3 cm = 1⅛". Insert a marker here. THE PIECE IS NOW MEASURED FROM HERE! YOKE: Change to circular needle size 4.5 mm = US 7 and work pattern as follows: Knit the first 4-6-6-8-8-10 stitches and increase at the same time 4-2-4-2-5-4 stitches evenly spaced – read INCREASE TIP, work A.1 over the next stitch, insert a marker thread here (= transition between half back piece and right sleeve), work A.2 over the next 40 stitches, work the first stitch in A.2, insert a marker thread here (= transition between right sleeve and front piece), work A.3 over the next stitch, knit 7-11-11-15-15-19 stitches and increase at the same time 7-4-7-3-9-7 stitches evenly spaced, A.1 over the next stitch, insert a marker thread here (= transition between front piece and left sleeve), work A.2 over the next 40 stitches, work the first stitch in A.2, insert a marker thread here (= transition between left sleeve and half back piece), work A.3 over the next stitch, knit 3-5-5-7-7-9 stitches and increase at the same time 3-2-3-1-4-3 stitches evenly spaced = 118-120-126-126-138-142 stitches on the needle. There is now 1 marker thread in each transition between body and sleeves (= 4 marker threads). Insert 1 marker in the mid-stitch on each sleeve (= knitted stitch). REMEMBER THE KNITTING GAUGE! Continue in the round with pattern A.2 between the marker threads on the sleeves and A.1/A.3 + stockinette stitch over the stitches on the front and back pieces – AT THE SAME TIME on round 3 in A.1/A.3 start INCREASE SLEEVES – read description above (= 4 stitches increased on each sleeve). Increase like this every 8th-8th-6th-6th-4th-4th round a total of 6-7-10-11-13-14 times. When A.1 and A.3 have been completed in height continue to repeat towards the raglan-lines 7-8-9-10-11-12 more times (a total of 8-9-10-11-12-13 times), then work the first 3-3-1-1-0-0 rounds in the diagrams. When all the increases to sleeves and front and back pieces are finished there are 302-328-366-390-430-458 stitches on the needle (24-28-40-44-52-56 stitches increased on each sleeve and 35-39-41-45-48-52 stitches increased on each side of the front and back pieces). The piece now measures 20-22-24-26-28-30 cm = 8"-8¾"-9½"-10¼"-11"-11¾" from the marker on the neck. If the piece is shorter than this continue working to the correct length. The next round is worked as follows: Work the first 44-48-52-56-62-67 stitches (= approx. half back piece), place the next 65-69-81-85-93-97 stitches on 1 thread for sleeve and cast on 9-9-9-11-11-13 new stitches on the needle (= in side under the sleeve), work the next 86-95-102-110-122-132 stitches (= front pieces), place the next 65-69-81-85-93-97 stitches on 1 thread for sleeve and cast on 9-9-9-11-11-13 new stitches on the needle (= in side under the sleeve) and work the remaining 42-47-50-54-60-65 stitches (= approx. half back piece). Body and sleeves are finished separately. THE PIECE IS NOW MEASURED FROM HERE! BODY: There are 190-208-222-242-266-290 stitches on the body. Continue in the round with stockinette stitch until the piece measures 21 cm = 8¼". Work an edge with pattern A.2 in the round. When the edge measures 4 cm = 1½", Bind off with knit over knit and purl over purl. The sweater measures approx. 50-52-54-56-58-60 cm = 19¾"-20½"-21¼"-22"-22¾"-23⅝" from the shoulder down. SLEEVE: Place the 65-69-81-85-93-97 stitches from the thread on the one side of the piece on short circular needle size 4.5 mm = US 7 and knit up 1 stitch in each of the 9-9-9-11-11-13 stitches cast on under the sleeve = 74-78-90-96-104-110 stitches. Work pattern A.2 in the round as before. The pattern should fit on the round. Work as follows in the different sizes: Sizes S, M: Work textured pattern until the sleeve measures 41-39 cm = 16⅛"-15¼" from the division. Bind off with knit over knit and purl over purl. Sizes L, XL, XXL and XXXL: Work textured pattern until the sleeve measures 4 cm = 1½" from the division. Insert a marker in the middle stitch under the sleeve. On the next round begin to decrease under the sleeve – read DECREASE TIP. Decrease like this every 2nd round a total of 4-4-4-4 times = 82-88-96-102 stitches. Continue with textured pattern until the sleeve measures 38-37-36-34 cm = 15"-14½"-14¼"-13⅜". Bind off with knit over knit and purl over purl. Work the other sleeve in the same way. |
||||||||||
Diagram explanations |
||||||||||
|
||||||||||
 |
||||||||||
Have you finished this pattern?Tag your pictures with #dropspattern #winterwheatsweater or submit them to the #dropsfan gallery. Do you need help with this pattern?You'll find 25 tutorial videos, a Comments/Questions area and more by visiting the pattern on garnstudio.com. © 1982-2026 DROPS Design A/S. We reserve all rights. This document, including all its sub-sections, has copyrights. Read more about what you can do with our patterns at the bottom of each pattern on our site. |
||||||||||


With over 40 years in knitting and crochet design, DROPS Design offers one of the most extensive collections of free patterns on the internet - translated to 17 languages. As of today we count 324 catalogs and 12290 patterns - 12280 of which are translated into English (US/in).
We work hard to bring you the best knitting and crochet have to offer, inspiration and advice as well as great quality yarns at incredible prices! Would you like to use our patterns for other than personal use? You can read what you are allowed to do in the Copyright text at the bottom of all our patterns. Happy crafting!
Post a comment to pattern DROPS 206-48
We would love to hear what you have to say about this pattern!
If you want to leave a question, please make sure you select the correct category in the form below, to speed up the answering process. Required fields are marked *.