
Popular categories
Looking for a yarn?


Comments / Questions (75)
![]() Ingela wrote:
Ingela wrote:
Min picotkant känns för tät och rullar sig väldigt. Jag undrar om jag gjort fel. Jag har använt 2 m från stycket i varje picot. Har jag missuppfattat?
14.05.2022 - 10:34DROPS Design answered:
Hei Ingela. Litt usikker hvorfor du ikke får picot kanten som du ønsker. Du kan prøve å dampe den lett eller fukte kanten og så blokken jakkekanten til den er tørr. Ta også en titt på denne hjelpevideoen Hur man gör en avmaskningskant med picot mvh DROPS Design
16.05.2022 - 08:34
![]() Alison wrote:
Alison wrote:
I’m working on A3A on a 158 stitch row on the body. I’ve finished a repetition at stitch 37 (st36 yo). So my next repetition runs into the added stitches on either side of the first marker. The increased stitches are st40 and st45. So I start st 38,39, 40, 41, 42, 43. St44-45 I should knit together. I thought I’m meant to ignore st 45 so pattern is not displaced, but how can I if it is part of the knit together? Thanks!
13.02.2022 - 17:57DROPS Design answered:
Dear Alison, after you have increased the first time, the pattern doesn't fit anymore on the whole row, this means you have to continue to work pattern A.3 so that it fits in height and width in each piece but just work the extra stitches increased in stocking stitch, not in the lace pattern. Happy knitting!
14.02.2022 - 10:52
![]() Monika wrote:
Monika wrote:
Danke für die schnelle Antwort. :-))
24.01.2022 - 12:44
![]() Monika wrote:
Monika wrote:
Frage zur Hose: vor der Teilung für die Beine heißt es in der Anleitung: je 4 Machen an der vorderen und hinteren Mitte für den Zwickel abketten. Welche Maschen sind gemeint? die Maschen über den Zunahmen? oder davor bzw. danach? Grüße, Monika
23.01.2022 - 11:25DROPS Design answered:
Liebe Monika, Sie werden 2 Maschen vor der Markierung an der hinteren/vorderen Mitte + 2 Maschen vor dieser Markierung = je 4 Maschen an der vorderen + an der hinteren Mitte (diese 4 Maschen werden danach zusammengenäht). Viel Spaß beim stricken!
24.01.2022 - 09:27
![]() Alexandra wrote:
Alexandra wrote:
Was ich bei den Hosen nie verstehe: Näht man die Öffnung im Schritt, also die abgeketteten Maschen, quer zusammen, also von der Innenseite des einen Oberschenkels zur Innenseite des anderen Oberschenkels ? Oder von vorne nach hinten?
30.12.2021 - 10:34DROPS Design answered:
Liebe Alexandra, die 4 abgekettenen Maschen werden zusammengenäht, dh die 4 vorne mit den 4 hinten. Viel Spaß beim zusammenstellen!
03.01.2022 - 10:06
![]() Alison wrote:
Alison wrote:
Hi thanks for your reply! So just to clarify, I knit them as normal, but when I get to the lace pattern I pretend the additional stitches aren’t there and ship them when counting the repetition? Thanks so much, you guys have been really helpful
09.12.2021 - 16:28DROPS Design answered:
Dear Alison, yes you work these additionnal stitches in stocking stitch and continue the lace pattern exactly as before, so that it will be repeated in height as before and not displaced. Happy knitting!
10.12.2021 - 08:10
![]() Alison wrote:
Alison wrote:
I’m up to 158 stitches (increased once so far) and knitting the A3A section, onto the second row of holes in the pattern. Since I have 158 stitches, the repetition of 8 (excluding band) leaves me with 4 stitches unaccounted for. What do I do with those 4 stitches?
08.12.2021 - 17:57DROPS Design answered:
Dear Alison, when increasing on the sides of the jacket, work the new sts in stocking stitch and continue working the lace pattern as before (as these sts were not there) so that lace pattern is lined up as before. Happy knitting!
09.12.2021 - 07:16
![]() Alison wrote:
Alison wrote:
Hi I’m about the finish the yoke for 12/18 size I’m finishing off on 203 stitches. It says to adjust to 202 stitches so I just decrease one somewhere along the row, is that right?
25.11.2021 - 17:35DROPS Design answered:
Hi Alison, Yes, that is right. Happy knitting!
26.11.2021 - 07:01
![]() Marie Sirlin wrote:
Marie Sirlin wrote:
Depuis quelques jours j'éprouve des difficultés à accéder au contenu de votre site : certaines pages ne présentent aucune image, les diagrammes n'apparaissent plus, voir certains modèles sont inaccessibles (les lavettes en fil safran). J'ai enlevé le bloqueur de publicité ABP de mon ordinateur, j'ai consulté le site depuis mon téléphone ... Rien à faire. Que dois-je effectuer pour avoir à nouveau accès à l'intégralité du site ? Cordialement, Marie
05.10.2021 - 15:12
![]() Winnie wrote:
Winnie wrote:
Kan jeg få opskrift på dansk
25.08.2021 - 15:44
|
|||||||||||||||||||||||||
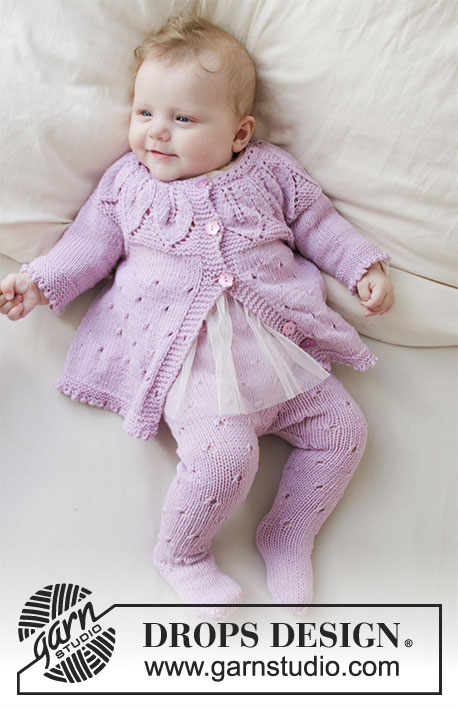
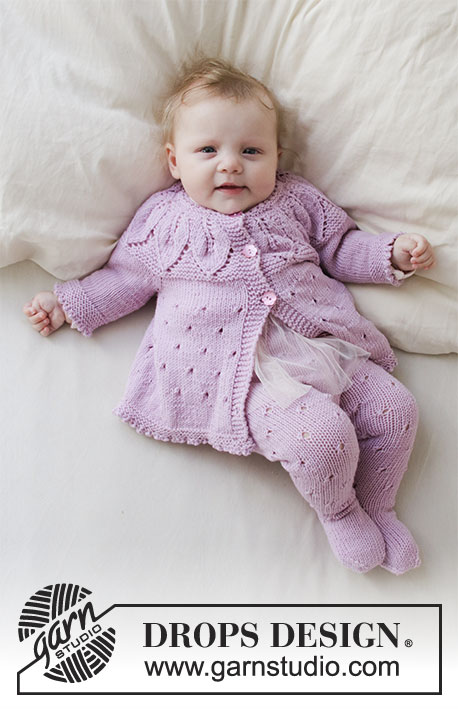
Pink Petals#pinkpetalsjacket |
|||||||||||||||||||||||||
 |
 |
||||||||||||||||||||||||
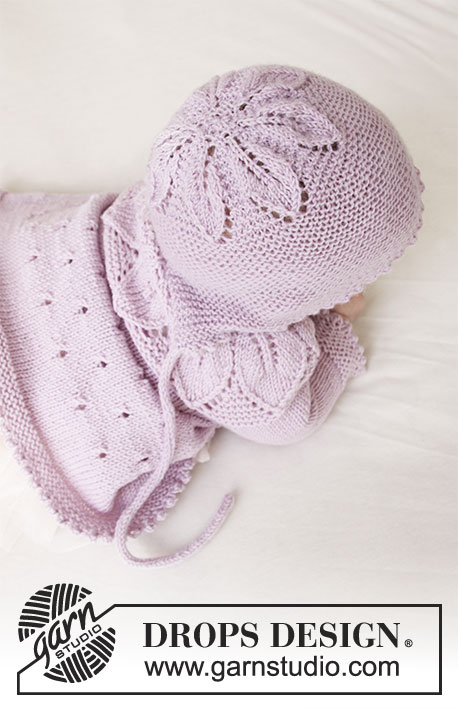
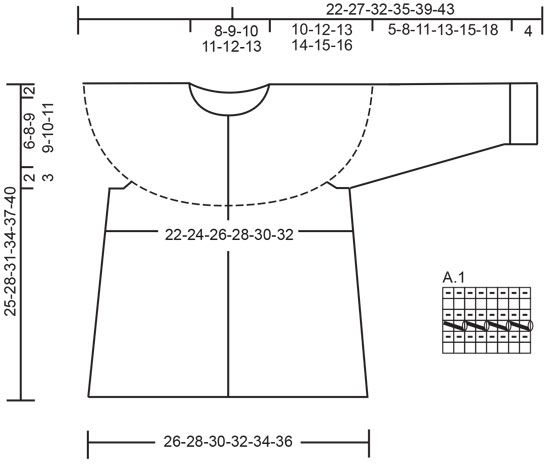
Knitted jacket and tights in DROPS BabyMerino. Jacket is knitted top down with leaf pattern, round yoke and A-shape. Tights is knitted top down with lace pattern. Size: Premature - 2 years.
DROPS Baby 33-13 |
|||||||||||||||||||||||||
|
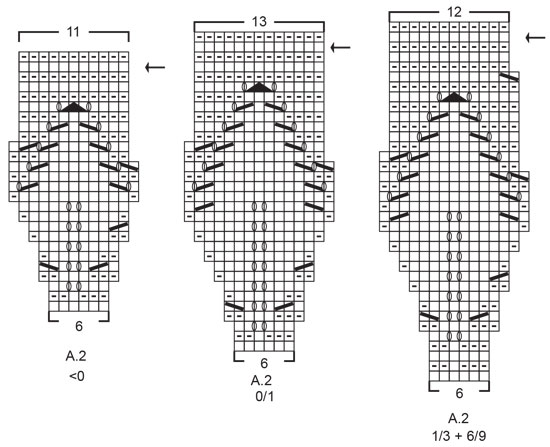
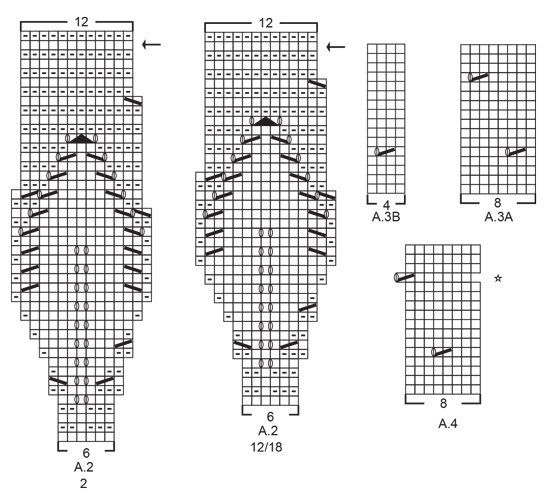
---------------------------------------------------------- EXPLANATION FOR THE PATTERN: ---------------------------------------------------------- JACKET: GARTER STITCH (back and forth): 1 ridge = knit 2 rows. GARTER STITCH (worked in the round): 1 ridge= knit 1 round and purl 1 round. INCREASE TIP-1 (evenly): To calculate how to increase, use the total number of stitches on row (e.g. 70 stitches), minus bands (e.g. 10 stitches) and divide the remaining stitches by number of increases to be done (e.g. 13) = 4.6. In this example increase by making 1 yarn over after alternately approx. every 4th and 5th stitch. On next row work yarn overs twisted to avoid holes. Do not increase over bands. PATTERN: See diagrams A.1 to A.3. Choose diagram for your size (applies to A.2). Diagrams show all rows in pattern seen from the right side. RAGLAN: All increases are done from the right side. Increase for raglan on each side of the 4 marker threads in every transition between body and sleeves (= 8 stitches increased on every increase row). Work until 1 stitch remains before marker thread, make 1 yarn over, knit 2 (marker thread is in the middle of these 2 stitches), make 1 yarn over (= 2 stitches increased). On next row (wrong side) purl yarn overs twisted to avoid holes. INCREASE TIP-2 (applies to sides of body): All increases are done from the right side! Work until 2 stitches remain before marker thread, make 1 yarn over, knit 4 (marker thread is in the middle of these 4 stitches), make 1 yarn over (= 2 stitches increased). On next row (wrong side) purl yarn overs twisted to avoid holes. DECREASE TIP (applies to mid under sleeve): Begin 3 stitches before marker and knit 2 together, knit 2 (marker is between these 2 stitches), slip 1 stitch knitwise, knit 1, pass slipped stitch over stitch worked (= 2 stitches decreased). BUTTONHOLES: Decrease for buttonholes on right band when garment is worn: 1 buttonhole = work from right side until 3 stitches remain on needle, make 1 yarn over, knit 2 together and finish by knitting 1. On next row (wrong side) knit the yarn over to make a hole. Decrease for first buttonhole on first row from right side after A.1. Then decrease the next (4) 4-5-5-6 (6) buttonholes, approx. 5 cm = 2" between each. TIGHTS: PATTERN: See diagram A.4. INCREASE TIP (applies to gusset mid front and mid back): Work until 1 stitch remains before marker thread, make 1 yarn over, knit 2 (marker thread is in the middle of these 2 stitches), make 1 yarn over (= 2 stitches increased). On next round knit yarn overs twisted to avoid holes. Work increased stitches in stockinette stitch till they fit the pattern again. DECREASE TIP (applies to inside of legs): Begin 3 stitches before marker and knit 2 together, knit 2 (marker is between these 2 stitches), slip 1 stitch knitwise, knit 1, pass slipped stitch over stitch worked (= 2 stitches decreased). HEEL DECREASE: Worked back and forth in stockinette stitch as follows: ROW 1 (= right side): Knit until 1 stitch remains on row, turn piece. ROW 2 (= wrong side): Slip first stitch purlwise, tighten yarn and purl until 1 stitch remains on row, turn piece. ROW 3 (= right side): Slip first stitch knitwise, tighten yarn and knit until 2 stitches remain on row, turn piece. ROW 4 (= wrong side): Slip first stitch purlwise, tighten yarn and purl until 2 stitches remains on row, turn piece. Continue decrease the same way until (6) 7-8-8-7 (8) stitches remain in the middle of row. Insert 1 marker in the middle stitch Continue in stockinette stitch back and forth but now work 1 stitch more on every turn. NOTE! To avoid holes at the turns, lift the yarn before stitch to be worked and slip it twisted on the left needle. Work the twisted yarn together with stitch before turning piece. Continue like this until all heel stitches have been worked. ---------------------------------------------------------- START THE JACKET HERE: ---------------------------------------------------------- JACKET - SHORT OVERVIEW OF THE PIECE: Work yoke and body back and forth on circular needle from mid front, work top down. Work sleeves in the round on double pointed needles, top down. NECK EDGE: Cast on (68) 70-78-82-86 (92) stitches (including 5 band stitches in each side towards mid front) on circular needle size 2.5 mm = US 1,5 with Baby Merino. Work A.1 with 5 band stitches in GARTER STITCH - see explanation above, in each side towards mid front. When A.1 has been worked, switch to circular needle size 3 mm = US 2,5. Knit 1 row from right side while increasing(15) 13-17-19-21 (21) stitches evenly - read INCREASE TIP-1 and remember BUTTONHOLES on right band - see explanation above = (83) 83-95-101-107 (113) stitches. Purl 1 row from wrong side inside 5 band stitches in garter stitch in each side. Then work yoke as explained below. YOKE: Work first row as follows from right side: 5 band stitches in garter stitch, work A.2 until 6 stitches remain on row (= (12) 12-14-15-16 (17) repetitions of 6 stitches) and finish with 1 stitch in garter stitch (to make the pattern the same at beginning and end towards bands) and 5 band stitches in garter stitch. Continue pattern like this and increase and decrease as shown in diagram. REMEMBER THE KNITTING GAUGE! On row marked with arrow in A.2 adjust number of stitches to (150) 174-182-194-202 (214). Now insert 4 marker threads in the piece (without working the stitches): Insert first marker thread after the first (26) 29-30-32-33 (35) stitches(= front piece), insert 2nd marker thread after the next (28) 34-36-38-40 (42) stitches (= sleeve), insert 3rd marker thread after the next (42) 48-50-54-56 (60) stitches (= back piece) and insert fourth marker thread after the next (28) 34-36-38-40 (42) stitches (= sleeve). There are (26) 29-30-32-33 (35) stitches after last marker thread on front piece. Then work in stockinette stitch with 5 band stitches in garter stitch in each side towards mid front. AT THE SAME TIME on first row (right side) increase for RAGLAN on each side of the 4 marker threads - see explanation above (= 8 stitches increased). Increase like this every other row (i.e. on every row from right side) (3) 3-3-4-4 (4) times in total. After last increase for raglan there are (174) 198-206-226-234 (246) stitches on needle. Work until piece measures (10) 12-13-14-15 (16) cm = (4") 4¾"-5⅛"-5½"-6" (6¼") from cast-on edge mid front. Work next row as follows from wrong side: Work (29) 32-33-36-37 (39) as before (= front piece), slip the next (34) 40-42-46-48 (50) stitches on 1 stitch holder for sleeve, cast on (4) 4-6-6-8 (8) new stitches on row (= in the side under sleeve), purl (48) 54-56-62-64 (68) (= back piece), slip the next (34) 40-42-46-48 (50) stitches on 1 stitch holder for sleeve, cast on (4) 4-6-6-8 (8) new stitches on row (= in the side under sleeve) and work the last (29) 32-33-36-37 (39) stitches as before (= front piece). Finish body and sleeves separately. NOW MEASURE THE PIECE FROM HERE! BODY: = (114) 126-134-146-154 (162) stitches. Insert 1 marker thread (31) 34-36-39-41 (43) stitches in from each side (= (52) 58-62-68-72 (76) stitches between marker threads on back piece) and move marker threads upwards when working. Work first row as follows from right side: 5 band stitches in garter stitch, work A.3A until (5) 9-9-5-5 (5) stitches remain on row (= (13) 14-15-17-18 (19) repetitions of 8 stitches), work A.3B over the next (0) 4-4-0-0 (0) stitches and finish with 5 band stitches in garter stitch. Continue pattern back and forth like this. When piece measures 2 cm = ¾" from division, increase 1 stitch on each side of both marker threads - read INCREASE TIP-2 (= 4 stitches increased). Increase like this every (2) 2½-3-3½-4 (4½) cm = (3/4") 1"-1⅛"-1¼"-1½" (1¾") 5 times in total in each side = (134) 146-154-166-174 (182) stitches- NOTE: Work the increased stitches in stockinette stitch so that there are more stitches between holes in each side of body. AT THE SAME TIME when piece measures (10) 11-13-15-17 (19) cm = (4") 4⅜"-5⅛"-6"-6¾" (7½"), continue in stockinette stitch and 5 band stitches in garter stitch. Work until piece measures (12) 13-15-17-19 (21) cm = (4¾") 5⅛"-6"-6¾"-7½" (8¼") from division. Work 4 ridges over all stitches. Bind off with picot as explained below. BIND-OFF EDGE WITH PICOT: Switch to circular needle size 2.5 mm = US 1,5 and work from right side as follows: Knit 1, (* insert right needle in between the first 2 stitches on left needle i.e. between stitches on needle, not through stitches, make 1 yarn over on right needle, pull yarn over forwards between stitches and slip yarn over on to left needle *, repeat from *-* 2 more times = 3 new stitches on left needle. ** Knit first stitch on left needle, pass first stitch on right needle over last stitch worked **), repeat from **-** 5 times in total and repeat from (-) along the entire edge until 1 stitch remains on left needle. Cut the yarn and pull it through last stitch. SLEEVE: Slip the (34) 40-42-46-48 (50) stitches from stitch holder in one side of piece on double pointed needles size 3 mm = US 2,5 and pick in addition up 1 stitch in each of the (4) 4-6-6-8 (8) new stitches cast on under sleeve = (38) 44-48-52-56 (58) stitches. Insert 1 marker thread in the middle of the (4) 4-6-6-8 (8) stitches. Begin round at the marker thread and work stockinette stitch in the round. When piece measures 2 cm = ¾" from division, decrease 2 stitches mid under sleeve - read DECREASE TIP. Decrease like this every (2) 2-1½-1½-1½ (1½) cm = (3/4") ¾"-½"-½"-½" (1/2") (2) 4-6-7-9 (9) times in total = (34) 36-36-38-38 (40) stitches. Work until sleeve measures (5) 8-11-13-15 (18) cm = (2") 3⅛"-4⅜"-5⅛"-6" (7") from division. Switch to double pointed needle size 2.5 mm = US 1,5 and work in GARTER STITCH - see explanation above. When sleeves measures (8) 11-14-16-18 (21) cm = (3⅛") 4⅜"-5½"-6¼"-7" (8¼"), bind off with picot the same way as on body. Work the other sleeve the same way. ASSEMBLY: Sew the buttons on to the left band. ---------------------------------------------------------- START THE TIGHTS HERE: --------------------------------------------------------- TIGHTS - SHORT OVERVIEW OF THE PIECE: Worked in the round on circular needle, top down division for legs. Then work each leg in the round on double pointed needles top down until finished measurements. WAISTBAND: Cast on (88) 96-104-120-128 (136) stitches on circular needle size 3 mm = US 2,5 with Baby Merino. Work 2 cm = ¾" in stockinette stitch for folding edge. Work next round as follows: * Knit 2 together, make 1 yarn over*, work from *-* the entire round (= folding edge). MEASURE PIECE FROM FOLDING EDGE! Work 2 cm = ¾" in stockinette stitch. For better fit work an elevation at the back on pants under as explained below. ELEVATION AT THE BACK - ALL SIZES: Insert 1 marker thread at beginning of round = mid back. Work from right side and knit 8 past marker thread, turn piece, tighten yarn and purl 16 stitches. Turn, tighten yarn and knit 24 stitches, turn, tighten yarn and purl 32 stitches. Turn, tighten yarn and knit 40 stitches, turn, tighten yarn and purl 48 stitches. Turn piece, tighten yarn and knit until mid back. PANTS: Work A.4 in the round over all stitches (= (11) 12-13-15-16 (17) repetitions of 8 stitches). REMEMBER THE KNITTING GAUGE! NOTE! On every round marked with star in A.4 displace the beginning of round 1 stitch to the left, i.e. pass the first stitch on to right needle without working stitch, work A.4 in the round. Work stitch passed on to right needle in last repetition of A.4. Begin next round as before. When piece measures (9) 11-12-15-16 (17) cm = (3½") 4⅜"-4¾"-6"-6¼" (6¾") from folding edge mid front, insert 1 marker thread mid front so that there is 1 marker thread mid front and 1 marker thread mid back (= (44) 48-52-60-64 (68) stitches in each side between marker threads). Continue A.4 in the round. AT THE SAME TIME on next round increase 1 stitch on each side of both marker threads – read INCREASE TIP (= 4 stitches increased). Increase like this every other round 8 times in total = (120) 128-136-152-160 (168) stitches. Continue A.4 in the round until piece measures (15) 18-18-21-22 (23) cm = (6") 7"-7"-8¼"-8¾" (9") from folding edge mid front. Now bind off 4 stitches mid front and mid back. Finish each leg separately. Work right leg as explained below. RIGHT LEG: = (56) 60-64-72-76 (80) stitches. Switch to double pointed needles size 3 mm = US 2,5. Insert 1 marker thread at inside of leg, and move the marker thread upwards when working. NOW MEASURE THE PIECE FROM HERE! Begin round at the marker thread and continue A.4 in the round - work in stockinette stitch where repetition does not fit. When 2 rounds have been worked, decrease 1 stitch on each side of marker thread on inside of leg– read DECREASE TIP (= 2 stitches decreased). Decrease like this on every round 6 times in total and then on every other round 4 times in total times and finally every (5th) 6th-6th-6th-7th (7th) round (4) 5-6-8-9 (10) times in total = (28) 30-32-36-38 (40) stitches. Work until piece measures (13) 17-20-23-26 (31) cm = (5⅛") 6¾"-8"-9"-10¼" (12¼") from division. Now work foot as explained below. FOOT: = (28) 30-32-36-38 (40) stitches. Keep the first (14) 15-16-18-19 (20) stitches on needle for heel (it is important that the heel does not come mid on top of foot), slip the remaining (14) 15-16-18-19 (20) stitches on a stitch holder (= mid on top of foot). Work HEEL DECREASE in stockinette stitch - see explanation above. After heel decrease slip the (14) 15-16-18-19 (20) stitches from stitch holder mid on top of foot back on needles = (28) 30-32-36-38 (40) stitches. Work in stockinette stitch in the round over all stitches. When foot measures (8) 9-10-11-12 (13) cm = (3⅛") 3½"-4"-4⅜"-4¾" (5⅛") from marker on heel (approx. 2 cm = ¾" remain until finished measurements), distribute stitches so that there are (14) 15-16-18-19 (20) stitches both on top of foot and under foot. Insert 1 marker thread in each side. Work in stockinette stitch in the round over all stitches. AT THE SAME TIME on first round decrease 1 stitch on each side of both marker threads – read DECREASE TIP (= 4 stitches decreased). Decrease like this every other round (4) 4-4-5-5 (5) times in total = (12) 14-16-16-18 (20) stitches remain on needles. Cut the yarn so that it is long enough to sew the piece tog. Place the piece flat and sew the (6) 7-8-8-9 (10) stitches on top of foot against the (6) 7-8-8-9 (10) stitches under foot with grafting/kitchener stitches. Foot measures approx. (10) 11-12-13-14 (15) cm = (4") 4⅜"-4¾"-5⅛"-5½" (6") from marker on heel. Slip the (56) 60-64-72-76 (80) stitches from stitch holder in the other side of piece back on double pointed needles size 3 mm = US 2,5 and work leg and foot the same way, but make sure that foot is the correct way so that heel does not come mid on top of foot (slip the first (14) 15-16-18-19 (20) stitches on a stitch holder (= mid on top of foot), keep the last (14) 15-16-18-19 (20) stitches on needle for heel). ASSEMBLY: Fold the hem over towards wrong side and fasten neatly by sewing, let there be a small opening to thread the elastic through. Thread the elastic through, and sew shut the opening. Sew the 4 stitches that were bind off between legs together. |
|||||||||||||||||||||||||
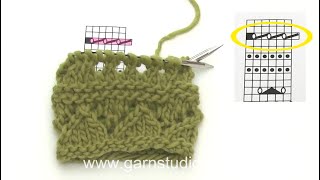
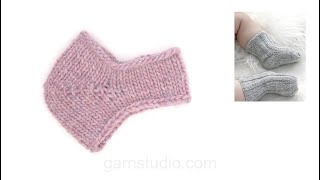
Diagram explanations |
|||||||||||||||||||||||||
|
|||||||||||||||||||||||||
 |
|||||||||||||||||||||||||
 |
|||||||||||||||||||||||||
 |
|||||||||||||||||||||||||
 |
|||||||||||||||||||||||||
Have you finished this pattern?Tag your pictures with #dropspattern #pinkpetalsjacket or submit them to the #dropsfan gallery. Do you need help with this pattern?You'll find 33 tutorial videos, a Comments/Questions area and more by visiting the pattern on garnstudio.com. © 1982-2026 DROPS Design A/S. We reserve all rights. This document, including all its sub-sections, has copyrights. Read more about what you can do with our patterns at the bottom of each pattern on our site. |
|||||||||||||||||||||||||


With over 40 years in knitting and crochet design, DROPS Design offers one of the most extensive collections of free patterns on the internet - translated to 17 languages. As of today we count 325 catalogs and 12298 patterns - 12288 of which are translated into English (US/in).
We work hard to bring you the best knitting and crochet have to offer, inspiration and advice as well as great quality yarns at incredible prices! Would you like to use our patterns for other than personal use? You can read what you are allowed to do in the Copyright text at the bottom of all our patterns. Happy crafting!
Post a comment to pattern DROPS Baby 33-13
We would love to hear what you have to say about this pattern!
If you want to leave a question, please make sure you select the correct category in the form below, to speed up the answering process. Required fields are marked *.