
Popular categories
Looking for a yarn?


Comments / Questions (150)
![]() Mamie Rudd wrote:
Mamie Rudd wrote:
My measurements for the neckline are smaller, and I'm afraid sweater will fall off shoulders. I'm making the large. So, how do I adjust neckline and still make a large size? Thanks!
25.06.2020 - 20:13DROPS Design answered:
Dear Mrs Rudd, does your tension match the 21 sts x 28 rows in stocking stitch = 10 x 10 cm ? You could maybe try to make sure the cast on edge is not too tight and/or try to cast on and work neck with the larger needle. Happy knitting!
26.06.2020 - 07:21
![]() Annette Kjær wrote:
Annette Kjær wrote:
Kan man strikke den højere i nakken....
18.06.2020 - 20:46DROPS Design answered:
Hei Annette. Du kan evnt strikke slik at det blir flere riller bak med en forhøyning. God Fornøyelse!
22.06.2020 - 11:03
![]() Susanne Strandvoll wrote:
Susanne Strandvoll wrote:
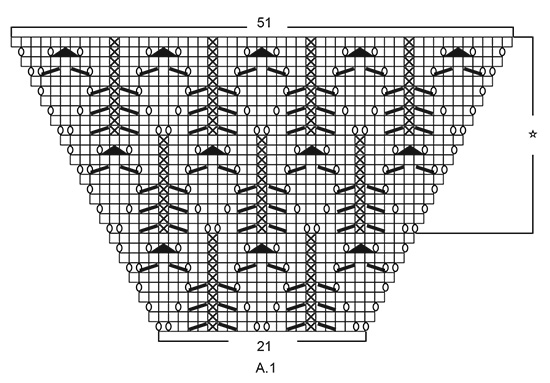
Vedr. Diagram A1: hvad betyder indramningen med stjernen? På forhånd tak!
19.05.2020 - 13:48DROPS Design answered:
Hei Susanne. Stjernen viser 1 rapport i høyden og hvordan hullmønsteret plasseres over hverandre. mvh DROPS design
25.05.2020 - 12:48
![]() Patricia wrote:
Patricia wrote:
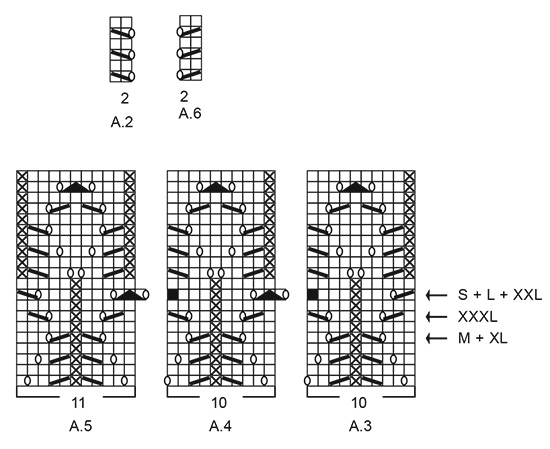
Hej igen Jag har stickat klart A1 med ökningarna och ska börja med A2... Vad menas med 2-0-2-0-2-1?
11.05.2020 - 22:43DROPS Design answered:
Hej Det visar hur många maskor du ska sticka i de olika storlekarna S - M - L - XL - XXL - XXXL. Dvs stickar du tex storlek L så är det den tredje siffran som gäller din storlek; 2 m. Mvh DROPS Design
12.05.2020 - 07:24
![]() Patricia wrote:
Patricia wrote:
Hej. Jag kan inte få ihop det på första raden på A1, hur får ni det till 21 masker??
23.04.2020 - 14:38DROPS Design answered:
Hej Den ska stickas över 21 m, när du stickat varv 1 så kommer 1 rapport bestå av 23 m. Mvh DROPS Design
24.04.2020 - 10:10
![]() Ingrid wrote:
Ingrid wrote:
Jeg synes halsåbningen er meget stor, - hvordan kan jeg gøre den mindre, så den ikke går så langt ud over skuldrene?
20.04.2020 - 15:22DROPS Design answered:
Hej Ingrid, du kan strikke selve kanten på en mindre pind, eller så kan du vælge den mindste størrelse, men følge målene i den størrelse du egentlig bruger. God fornøjelse!
21.04.2020 - 14:03
![]() Julie wrote:
Julie wrote:
Bonjour J'ai un souci de compréhension avec cette phrase: On augmente de chaque côté du devant et du dos avec des jetés, avant/après les 2 mailles jersey Est-ce qu'il faut augmenter en jeté ? Et quand vous arrivez sur l'A1 , à un moment il faut faire 2 jetés d'affilée ? Merci d'avance
18.04.2020 - 08:44DROPS Design answered:
Bonjour Julie, tout à fait, pour augmenter pour le raglan, on fait 1 jeté de chaque côté des 2 m ailles jersey à la transition entre les manches et le dos/le devant. Le jeté des manches figure dans le diagramme A.1, ceux du devant et du dos sont à faire, ainsi, au début du devant/dos, après ces 2 m jersey vous faites 1 jeté puis vous faites 1 autre jeté juste avant les 2 m jersey à la fin du devant/dos. Bon tricot!
20.04.2020 - 09:31
![]() Tove Jensen wrote:
Tove Jensen wrote:
Ang. sk-026 Blue nostalgia Jeg får for mange masker. Skal der ikke tages ud hver anden omgang? Forstår ikke det med at der skal være 2 masker glatmasker mellem hver raglan udtagning. Jeg har 40 masker for meget efter at have strikket mønstret igennem 1 gang. Håber at høre fra jer. Hilsen tove
06.03.2020 - 21:30DROPS Design answered:
Hei Tove. For at det skal bli en fin raglansøkning, økes det til raglan på hver side av 2 glattstrikkede masker. Usikker hvorfor du får for mange masker. Når du begynner på mønster og økningene har du 110-114-118-126-130-134 masker. Diagrammet går over 30 pinner og det økes 8 masker pr øke omgang/hver 2. omgang. Så ved hver øke omgang / hver 2. pinne skal du ha 8 masker mer. Når diagrammet er strikket 1 gang i høyden har du økt på 15 pinner, 8 økte masker på hver pinne = 15 x 8 = 120 økte masker. Du startet med 110-114-118-126-130-134 masker + 120 økte masker = 230-234-238-246-250-254 masker. Tell gjerne etter hver øke omgang at du har 8 masker mer. God Fornøyelse!
09.03.2020 - 11:30
![]() Francine Lapointe wrote:
Francine Lapointe wrote:
Bonjour je voudrais savoir si le modèle drops 199-3, il y a une ouverture dans le dos, moi je veux le dos comme le devant, merci de me répondre
06.03.2020 - 19:37DROPS Design answered:
Bonjour Mme Lapointe, dans ce modèle, le dos et le devant sont identiques. Bon tricot!
09.03.2020 - 09:37
![]() Isabelle wrote:
Isabelle wrote:
La laine est fantastique, douce et reste régulière au travail. Le pull se fait vite (une dizaine de jours). Le patron est clair et facile à suivre. Le pull n'a pas bougé au blocage.
26.02.2020 - 10:40
|
|||||||||||||||||||||||||
Blue Nostalgia#bluenostalgiasweater |
|||||||||||||||||||||||||
 |
 |
||||||||||||||||||||||||
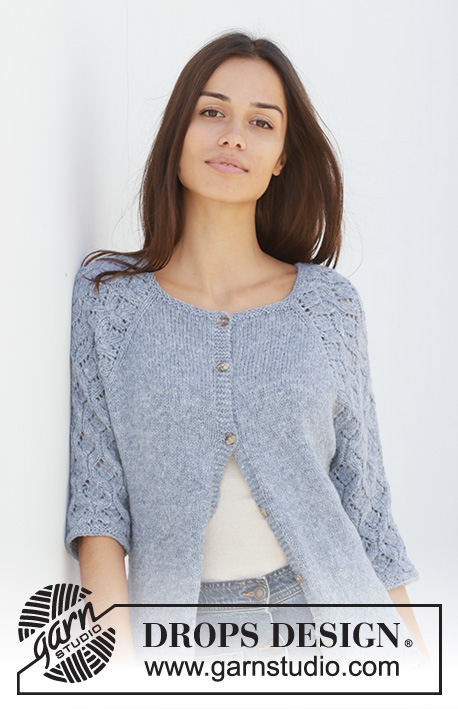
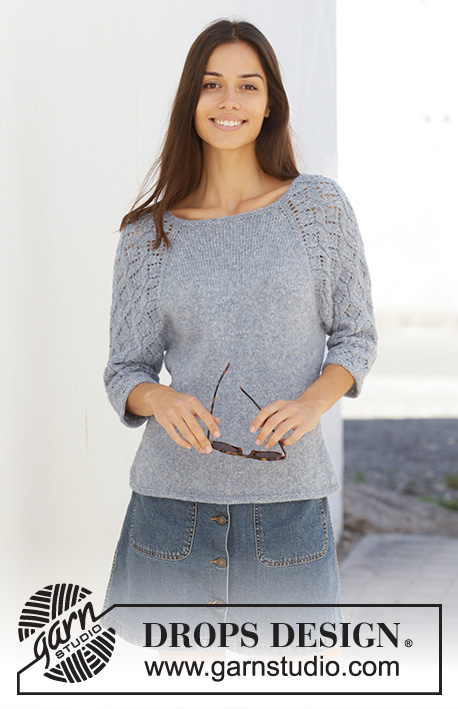
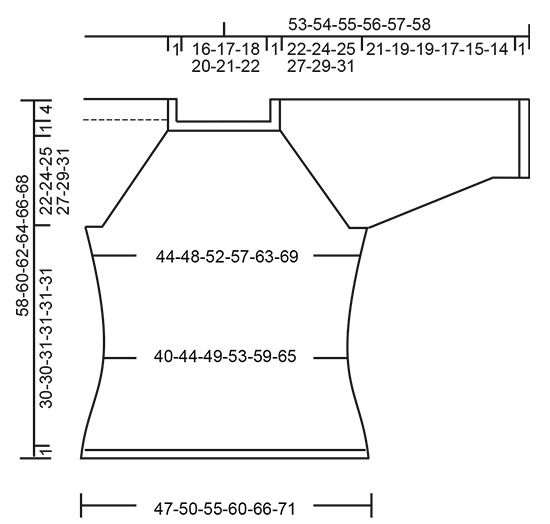
Knitted sweater with raglan in DROPS Sky. The piece is worked top down with lace pattern on sleeves. Sizes S – XXXL.
DROPS 199-3 |
|||||||||||||||||||||||||
|
------------------------------------------------------- EXPLANATIONS FOR THE PATTERN: ------------------------------------------------------- RIDGE/GARTER STITCH (worked in the round): 1 ridge in height = 2 rounds; knit 1 round and purl 1 round. INCREASE TIP-1 (evenly spaced): To work out how to increase evenly, count the total number of stitches on the needle (e.g. 100 stitches), and divide by the number of increases to be made (e.g. 10) = 10. In this example, increase by making 1 yarn over after each 10th stitch. On the next round work the yarn overs twisted to avoid holes. PATTERN: See diagrams A.1 to A.6. Find your size in the diagrams (applies to A.3 to A.5). The diagrams show all rows in the pattern seen from the right side. DECREASE TIP (for sides of body and sleeves): Work until there are 3 stitches left before marker thread, knit 2 together, knit 2 (marker thread sits between these stitches), slip 1 stitch, knit 1 and pass the slipped stitch over the knitted stitch. INCREASE TIP-2 (for sides of body): Work until there are 2 stitches left before marker thread, 1 yarn over, knit 4 (marker thread sits in the middle of these stitches), 1 yarn over. On the next round work the yarn overs twisted to avoid holes. Then work the new stitches in stockinette stitch. ------------------------------------------------------- START THE PIECE HERE: ------------------------------------------------------- SWEATER - SHORT OVERVIEW OF THE PIECE: Yoke and body are worked in the round with circular needle from mid back, top down. Sleeves are worked in the round with short circular needle/double pointed needles, top down. YOKE: Cast on 100-106-110-116-120-126 stitches with circular needle size 3.5 mm = US 4 and Sky. Work 2 RIDGES – read description above. Knit 1 round where you increase 10-8-8-10-10-8 stitches evenly spaced – read INCREASE TIP-1 = 110-114-118-126-130-134 stitches. Change to circular needle size 4 mm = US 6. Knit 1 round. The next round is worked as follows: Work stockinette stitch over the first 15-16-17-19-20-21 stitches (= half back piece), 1 yarn over, 2 stitches in stockinette stitch, work A.1 over 21 stitches (= sleeve), 2 stitches in stockinette stitch, 1 yarn over, work 30-32-34-38-40-42 stitches in stockinette stitch (= front piece), 1 yarn over, 2 stitches stockinette stitch, work A.1 over 21 stitches (= sleeve), 2 stitches in stockinette stitch, 1 yarn over, work stockinette stitch over the last 15-16-17-19-20-21 stitches (= half back piece). There are now 118-122-126-134-138-142 stitches on the needle. Continue this pattern onwards; i.e. on the sleeves increase on each side as shown in A.1. On the next round knit the yarn overs (= holes) and the increased stitches are worked into the pattern as you go as shown in A.1. On front and back pieces increase with yarn overs before/after the 2 stitches in stockinette stitch in each side (there will be 2 stitches stockinette stitch between each raglan increase). On the next round knit the yarn overs twisted (= no holes) and the increased stitches are worked in stockinette stitch. Increase like this every 2nd round. You increase a total of 8 stitches on each increase-round (= 4 yarn overs + 4 stitches increased in A.1). REMEMBER THE KNITTING GAUGE! When A.1 has been worked 1 time in height there are 230-234-238-246-250-254 stitches on the needle. Continue this pattern onwards, i.e. the pattern repeats itself as shown in A.1. Each time you have worked 20 rounds there will be room for 1 more repeat of lace pattern in width on each sleeve. When you have increased a total of 24-27-29-32-34-38 times there are 302-330-350-382-402-438 stitches on the needle and the piece measures 18-20-22-24-25-28 cm = 7"-8"-8¾"-9½"-9¾"-11" from the cast-on edge mid front. Continue with stockinette stitch and pattern as before, but without increasing; i.e. the 69-75-79-85-89-97 stitches in A.1 are worked as follows: Work A.2 (= 2 stitches), 2-0-2-0-2-1 stitches in stockinette stitch, starting on the round marked with an arrow for your size work A.3 (= 10 stitches), A.4 over the next 40-50-50-60-60-70 stitches (= 4-5-5-6-6-7 reports of 10 stitches), A.5 (= 11 stitches), 2-0-2-0-2-1 stitches in stockinette stitch and A.6 (= 2 stitches). Continue until the piece measures approx. 23-25-26-28-30-32 cm = 9"-9¾"-10¼"-11"-11¾"-12½" from the cast-on edge mid front. The next round is worked as follows: Work 41-45-49-54-59-65 stitches in stockinette stitch (= half back piece), place the next 69-75-77-83-83-89 stitches on 1 thread for sleeve, cast on 10-10-12-12-14-14 new stitches on the needle (= in side under sleeve), work 82-90-98-108-118-130 stitches stockinette stitch (= front piece), place the next 69-75-77-83-83-89 stitches on 1 thread for sleeve, cast on 10-10-12-12-14-14 new stitches on the needle (= in side under sleeve) and work the remaining 41-45-49-54-59-65 stitches in stockinette stitch (= half back piece). Body and sleeves are finished separately. THE PIECE IS NOW MEASURED FROM HERE! BODY: = 184-200-220-240-264-288 stitches. Insert 1 marker thread on each side in the middle of the 10-10-12-12-14-14 stitches cast on under each sleeve. Allow them to follow your work onwards; they will be used a little later when decreasing/increasing. Work stockinette stitch. When the piece measures 2 cm = ¾" from the division decrease 1 stitch on each side of both marker threads - read DECREASE TIP = 4 stitches decreased. Decrease like this every 3 cm = 1⅛" a total of 4 times = 168-184-204-224-248-272 stitches. Continue working until the piece measures 14 cm = 5½" from the division. Now increase 1 stitch on each side of both marker threads – read INCREASE TIP-2 = 4 stitches increased. Increase like this every 2 cm = ¾" a total of 7 times = 196-212-232-252-276-300 stitches. Continue working until the piece measures 30-30-31-31-31-31 cm = 11¾"-11¾"-12¼"-12¼"-12¼"-12¼" from the division. Change to circular needle size 3.5 mm = US 4 and work 2 ridges. Loosely bind off, but to avoid the bind-off edge being tight you can bind off with needle size 4 mm = US 6. The sweater measures approx. 58-60-62-64-66-68 cm = 22¾"-23⅝"-24⅜"-25¼"-26"-26¾" from the shoulder down. SLEEVE: Place the 69-75-77-83-83-89 stitches from the thread on the one side of the piece on short circular needle/double pointed needles size 4 mm = US 6 and knit up 1 stitch in each of the 10-10-12-12-14-14 stitches cast on under the sleeve = 79-85-89-95-97-103 stitches. Insert 1 marker thread in the middle of the 10-10-12-12-14-14 stitches cast on under the sleeve and allow it to follow your work onwards; it will be used a little later when decreasing. Start the round at the marker thread. Start on the correct round in the diagrams so that the pattern continues from the yoke and work as follows: Work 4-2-4-2-3-1 stitches in stockinette stitch, A.3 (= 10 stitches), A.4 over the next 50-60-60-70-70-80 stitches (= 5-6-6-7-7-8 repeats of 10 stitches), A.5 (= 11 stitches) and 4-2-4-2-3-1 stitches in stockinette stitch. Continue this pattern. When the piece measures 2 cm = ¾" from the division, decrease 2 stitches mid under sleeve – remember DECREASE TIP. Decrease like this every 3rd-3rd-3rd-2nd-2nd-2nd round a total of 14-15-15-16-15-16 times = 51-55-59-63-67-71 stitches. The stitches which do not fit into the pattern as you decrease are worked in stockinette stitch, but make sure that if decreases are in the pattern you also make a yarn over. Continue working until the piece measures 21-19-19-17-15-14 cm = 8¼"-7½"-7½"-6¾"-6"-5½" from the division (shorter measurements in larger sizes due to longer yoke). Change to double pointed needles size 3.5 mm = US 4 and work 2 ridges. Loosely bind off, but to avoid the bind-off edge being tight you can bind off with needle size 4 mm = US 6. Sleeve measures approx. 22-20-20-18-16-15 cm = 8¾"-8"-8"-7"-6¼"-6" from the division. Work the other sleeve in the same way. |
|||||||||||||||||||||||||
Diagram explanations |
|||||||||||||||||||||||||
|
|||||||||||||||||||||||||
 |
|||||||||||||||||||||||||
 |
|||||||||||||||||||||||||
 |
|||||||||||||||||||||||||
Have you finished this pattern?Tag your pictures with #dropspattern #bluenostalgiasweater or submit them to the #dropsfan gallery. Do you need help with this pattern?You'll find 26 tutorial videos, a Comments/Questions area and more by visiting the pattern on garnstudio.com. © 1982-2026 DROPS Design A/S. We reserve all rights. This document, including all its sub-sections, has copyrights. Read more about what you can do with our patterns at the bottom of each pattern on our site. |
|||||||||||||||||||||||||


With over 40 years in knitting and crochet design, DROPS Design offers one of the most extensive collections of free patterns on the internet - translated to 17 languages. As of today we count 325 catalogs and 12298 patterns - 12288 of which are translated into English (US/in).
We work hard to bring you the best knitting and crochet have to offer, inspiration and advice as well as great quality yarns at incredible prices! Would you like to use our patterns for other than personal use? You can read what you are allowed to do in the Copyright text at the bottom of all our patterns. Happy crafting!
Post a comment to pattern DROPS 199-3
We would love to hear what you have to say about this pattern!
If you want to leave a question, please make sure you select the correct category in the form below, to speed up the answering process. Required fields are marked *.