
Popular categories
Looking for a yarn?


Comments / Questions (150)
![]() Bente Jensen wrote:
Bente Jensen wrote:
Hei😊kan noen forklare meg hvordan man raglanfeller på denne genseren, steg for steg. Den strikkes ovenfra og ned. Takksom for svar😊
26.01.2023 - 14:59DROPS Design answered:
Hei Bente. På denne modellen øker du på annenhver omgang til raglan. Du strikker A.1 over hvert erme og i diagram A.1 vises økningene, så hver gang du strikker A.1 økes det med 4 masker. Samtidig økes det også med 1 kast før eller etter de to maskene som strikkes i glattstrikk = 4 økte masker. Så du øker med 8 masker annenhver omgang til du har det maskeantallet du skal ha i den str. du strikker. For en bedre oversikt kan du sette 4 maskemarkør i arbeidet, mellom de 2 glattstrikkede maskene før og etter A.1. Da vet du at du skal øke med kast 1 maske før merket og 1 kast 1 maske etter maskemarkøren = 8 økninger på omgangen. mvh DROPS Design
30.01.2023 - 11:51
![]() Uschi wrote:
Uschi wrote:
Hallo liebe Helferin, ich habe problemlos 34 x zugenommen( gr. XXL)und bin jetzt bei folgender Anleitung —Weiter glatt rechts und im Muster wie zuvor stricken, jedoch ohne Zunahmen. — diesen Satz habe ich noch verstanden, aber was danach kommt habe ich auch nach mehrmaligen lesen nicht verstanden. Ich hoffe, dass sie den Knoten in meinem Kopf lösen können. Liebe Grüße Uschi
08.11.2022 - 21:16DROPS Design answered:
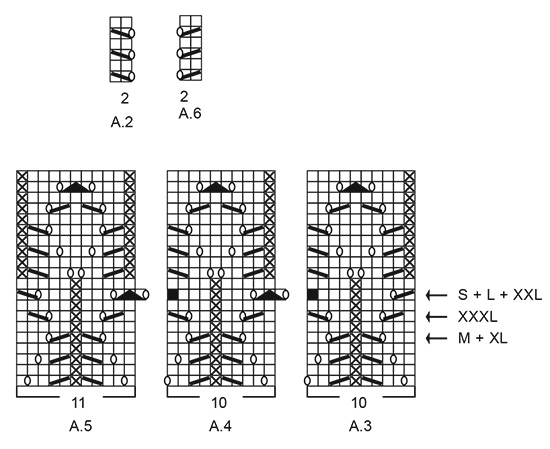
Liebe Uschi, nach allen Raglanzunahmen sind es 89 Maschen für jede Ärmel, diese 89 Maschen stricken Sie jetzt so: A.2 (= 2 Maschen), 2 Masche glatt rechts, mit der mit einem Pfeil für die gewünschte Größe markierten Runde beginnen und A.3 stricken (= 10 Maschen), A.4 über die nächsten 60 Maschen (= 6 Rapporte à 10 Maschen), A.5 (= 11 Maschen), 2 Maschen glatt rechts und A.6 (= 2 Maschen) =2+2+10+60+11+2+2=89 Maschen; die anderen Maschen stricken Sie wie zuvor. Viel Spaß beim stricken!
09.11.2022 - 08:25
![]() Franziska wrote:
Franziska wrote:
Liebes Drops Team Ich habe eine Frage zu den Aermeln: Es heisst man soll die Aermelmaschen auf ein Nadelspiel nehmen und zusätzlich 10 Maschen aufnehmen, der Rundenbeginn sei in der Mitte der 10 Maschen beim Markierungsfaden. Wo beginne ich mit dem aufnehmen der 10 Maschen? In der Mitte? Also 5 Maschen aufnehmen, dann die Maschen auf dem Nadelspiel abstricken und dann wieder fünf Maschen aufnehmen? Oder alle 10 Maschen auf einmal aufnehmen und in der Mitte anfangen? Vielen Dank!
04.10.2022 - 10:16DROPS Design answered:
Liebe Franziska, Sie können entweder in der Mitte von den 10 Maschen beginnen, oder die 10 Maschen auffassen und dann die Runden in der Mitte dieser 10 Maschen beginnen. Dieses Video zeigt ab ca 9:40, wie man die Maschen der Ärmel auffasst. Viel Spaß beim stricken!
04.10.2022 - 13:23
![]() KJERSTI EDLAND wrote:
KJERSTI EDLAND wrote:
Hei. Har nå kommet til at jeg skal strikke videre på ermene. Har tatt opp 14 masker fra det som ble lagt opp under ermet. Skjønner ikke mønsteret videre. Starter ved merketråden, har da 7 masker + 6 masker frem til vrangmasken, som er maske 6 i A3. Men så står det :strikk 3 (str XXL) masker glattstrikk, A3. Dette stemmer jo ikke. Kan dere hjelpe meg?
22.03.2022 - 21:23DROPS Design answered:
Hej, det er svært at vide hvordan det ser ud, men du skal tælle ud fra det mønster du allerede har strikket, så det fortsætter på ærmerne, de masker som ikke går op mod midterste maske under ærmet, strikkes i glatstrik. God fornøjelse!
30.03.2022 - 14:16
![]() Hege wrote:
Hege wrote:
Jeg strikker i str L, har skiftet til pinne 4 og strikket 1 omgang rett. Men når jeg strikker neste pinne, får jeg ikke det til å stemme. Når jeg er kommet rundt ender jeg opp med 122 masker og ikke 126? (17m+ 1k +2m +21m (erme)+ 2m+1k+34m (forstykke) +1k +2m+ 21m(erme)+2m + 1k +17m = 122m? Skal være 126 i str L? Hva gjør jeg feil? Og hvordan begynner jeg mønstert? Er det 2 kast etter hverandre? Eller kast, r, kast,... Skriv gjerne første linje i mønster :)
17.03.2022 - 09:16DROPS Design answered:
Hej Hege. Det är riktigt som du skriver. Men när du stickar A.1 så ökar du också 2 maskor enligt diagrammet så det är dessa 4 maskor du inte har med när du teller (21 m blir 23 m i A.1 efter första pinne). Diagram A.1 börjar med kast, r, kast osv. Mvh DROPS Design
17.03.2022 - 14:45
![]() Myriam wrote:
Myriam wrote:
Oups! Dans ma question précédente c’est plutôt 6 jetés moins les 4 diminution dans A1. Pour les rang 7,9 etc.
01.03.2022 - 21:15
![]() Myriam wrote:
Myriam wrote:
Bonjour, pouvez-vous valider?(M*=marqueur)Rg 7: 21end,1J,2 end,M*, A1,M*,2end,1j,42 end,1j,2end,M*, A1,M*,2end,1j,21end,M*.(augm.totales de 4m:4jeté dans raglan et 6j moins 6 dim.dans A1.)Rg 8: tricoter les jeté à l’end., on aug. avant et après les manches avec 1 jeté suivi de 2 end.et 2 end suivi de 1 j). Mais pas d’augm. dans A1. (Aug totale de 4mJeté sur ce tour ds Raglan)Rang 9: comme rang 7 en suivant A1.(6j et 6dim)Tric. les jeté torse.)total Aug de 4m pour raglan.)Merci
01.03.2022 - 21:00DROPS Design answered:
Bonjour Myriam, vous devez augmenter 8 mailles tous les 2 tours, 4 sont des jetés qui figurent au début et à la fin de A.1 (manches) et les 4 autres sont les jetés faits avant les 2 m jersey à la fin du dos, après les 2 m jersey au début du devant + avant les 2 m jersey à la fin du devant et après les 2 m jersey au début du dos. Pour les manches, suivez simplement le diagramme, vous augmenterez tous les 2 rangs comme indiqué. Les jetés du dos/des devants se tricotent torse mais ceux de A.1 doivent faire des trous. Bon tricot!
02.03.2022 - 09:46
![]() Giuseppe wrote:
Giuseppe wrote:
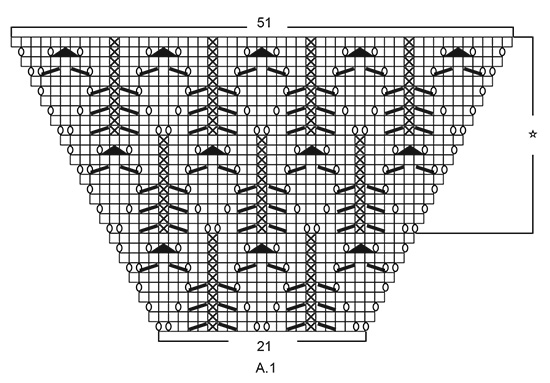
Sono arrivata alla fine del diagramma A1 cioe' a 51 punti, ma non capisco cosa devo fare, cosa vuol dire la linea a destra con la stellina, la spiegazione e' incomprensibile per me. Grazie
30.12.2021 - 20:11DROPS Design answered:
Buonasera Giuseppe, deve continuare a lavorare nello stesso modo fino alla lunghezza indicata. Buon lavoro!
30.12.2021 - 22:05
![]() Lucia wrote:
Lucia wrote:
Buongiorno, vorrei fare questa maglia in lana ma è troppo scollata, come posso fare per farla più accollata? Grazie della risposta
29.12.2021 - 10:07DROPS Design answered:
Buonasera Lucia, per un'assistenza così personalizzata può rivolgersi al suo rivenditore DROPS di fiducia. Buon lavoro!
29.12.2021 - 22:17
![]() Véronique wrote:
Véronique wrote:
Bonjour je ne comprends pas le diagramme A1 que signifie les deux ronds cote à cote 2 jetés ? Merci
15.12.2021 - 06:56DROPS Design answered:
Bonjour Véronique, 1 ovale = 1 jeté à faire entre 2 mailles, autrement dit, au tout début de A.1 vous tricotez: 1 jeté, 1 m end, 1 jeté, 2 m end etc... au milieu vous avez: 1 jeté, 1 m end, 1 jeté, et vous terminez A.1 par 2 m end, 1 jeté, 1 m end, 1 jeté. Bon tricot!
15.12.2021 - 08:20
|
|||||||||||||||||||||||||
Blue Nostalgia#bluenostalgiasweater |
|||||||||||||||||||||||||
 |
 |
||||||||||||||||||||||||
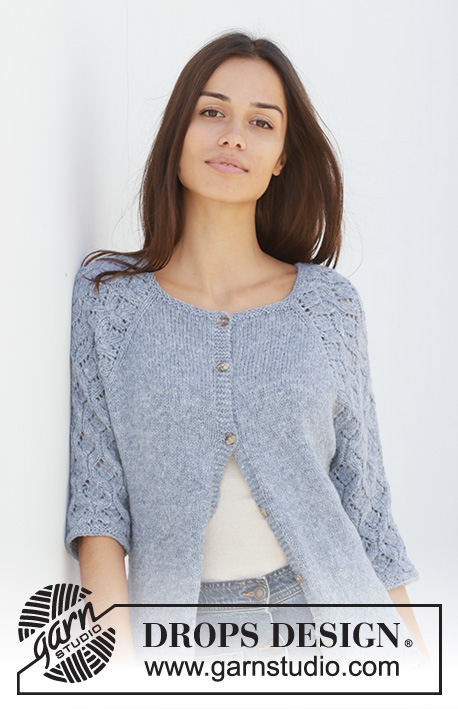
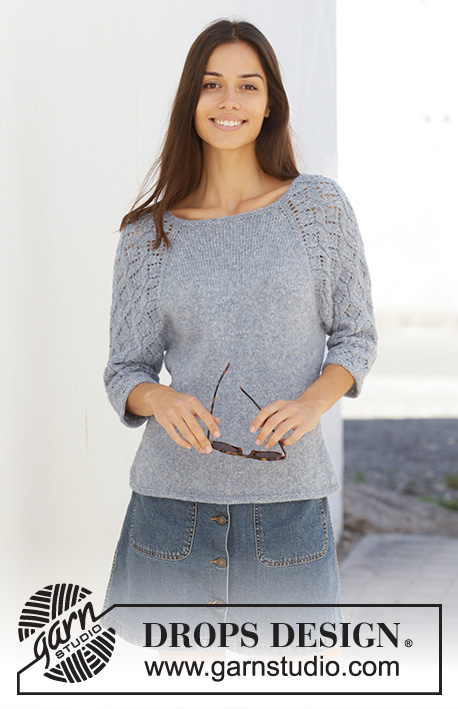
Knitted sweater with raglan in DROPS Sky. The piece is worked top down with lace pattern on sleeves. Sizes S – XXXL.
DROPS 199-3 |
|||||||||||||||||||||||||
|
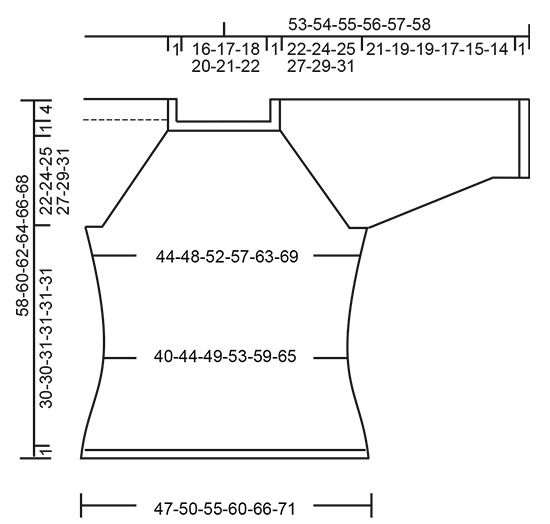
------------------------------------------------------- EXPLANATIONS FOR THE PATTERN: ------------------------------------------------------- RIDGE/GARTER STITCH (worked in the round): 1 ridge in height = 2 rounds; knit 1 round and purl 1 round. INCREASE TIP-1 (evenly spaced): To work out how to increase evenly, count the total number of stitches on the needle (e.g. 100 stitches), and divide by the number of increases to be made (e.g. 10) = 10. In this example, increase by making 1 yarn over after each 10th stitch. On the next round work the yarn overs twisted to avoid holes. PATTERN: See diagrams A.1 to A.6. Find your size in the diagrams (applies to A.3 to A.5). The diagrams show all rows in the pattern seen from the right side. DECREASE TIP (for sides of body and sleeves): Work until there are 3 stitches left before marker thread, knit 2 together, knit 2 (marker thread sits between these stitches), slip 1 stitch, knit 1 and pass the slipped stitch over the knitted stitch. INCREASE TIP-2 (for sides of body): Work until there are 2 stitches left before marker thread, 1 yarn over, knit 4 (marker thread sits in the middle of these stitches), 1 yarn over. On the next round work the yarn overs twisted to avoid holes. Then work the new stitches in stockinette stitch. ------------------------------------------------------- START THE PIECE HERE: ------------------------------------------------------- SWEATER - SHORT OVERVIEW OF THE PIECE: Yoke and body are worked in the round with circular needle from mid back, top down. Sleeves are worked in the round with short circular needle/double pointed needles, top down. YOKE: Cast on 100-106-110-116-120-126 stitches with circular needle size 3.5 mm = US 4 and Sky. Work 2 RIDGES – read description above. Knit 1 round where you increase 10-8-8-10-10-8 stitches evenly spaced – read INCREASE TIP-1 = 110-114-118-126-130-134 stitches. Change to circular needle size 4 mm = US 6. Knit 1 round. The next round is worked as follows: Work stockinette stitch over the first 15-16-17-19-20-21 stitches (= half back piece), 1 yarn over, 2 stitches in stockinette stitch, work A.1 over 21 stitches (= sleeve), 2 stitches in stockinette stitch, 1 yarn over, work 30-32-34-38-40-42 stitches in stockinette stitch (= front piece), 1 yarn over, 2 stitches stockinette stitch, work A.1 over 21 stitches (= sleeve), 2 stitches in stockinette stitch, 1 yarn over, work stockinette stitch over the last 15-16-17-19-20-21 stitches (= half back piece). There are now 118-122-126-134-138-142 stitches on the needle. Continue this pattern onwards; i.e. on the sleeves increase on each side as shown in A.1. On the next round knit the yarn overs (= holes) and the increased stitches are worked into the pattern as you go as shown in A.1. On front and back pieces increase with yarn overs before/after the 2 stitches in stockinette stitch in each side (there will be 2 stitches stockinette stitch between each raglan increase). On the next round knit the yarn overs twisted (= no holes) and the increased stitches are worked in stockinette stitch. Increase like this every 2nd round. You increase a total of 8 stitches on each increase-round (= 4 yarn overs + 4 stitches increased in A.1). REMEMBER THE KNITTING GAUGE! When A.1 has been worked 1 time in height there are 230-234-238-246-250-254 stitches on the needle. Continue this pattern onwards, i.e. the pattern repeats itself as shown in A.1. Each time you have worked 20 rounds there will be room for 1 more repeat of lace pattern in width on each sleeve. When you have increased a total of 24-27-29-32-34-38 times there are 302-330-350-382-402-438 stitches on the needle and the piece measures 18-20-22-24-25-28 cm = 7"-8"-8¾"-9½"-9¾"-11" from the cast-on edge mid front. Continue with stockinette stitch and pattern as before, but without increasing; i.e. the 69-75-79-85-89-97 stitches in A.1 are worked as follows: Work A.2 (= 2 stitches), 2-0-2-0-2-1 stitches in stockinette stitch, starting on the round marked with an arrow for your size work A.3 (= 10 stitches), A.4 over the next 40-50-50-60-60-70 stitches (= 4-5-5-6-6-7 reports of 10 stitches), A.5 (= 11 stitches), 2-0-2-0-2-1 stitches in stockinette stitch and A.6 (= 2 stitches). Continue until the piece measures approx. 23-25-26-28-30-32 cm = 9"-9¾"-10¼"-11"-11¾"-12½" from the cast-on edge mid front. The next round is worked as follows: Work 41-45-49-54-59-65 stitches in stockinette stitch (= half back piece), place the next 69-75-77-83-83-89 stitches on 1 thread for sleeve, cast on 10-10-12-12-14-14 new stitches on the needle (= in side under sleeve), work 82-90-98-108-118-130 stitches stockinette stitch (= front piece), place the next 69-75-77-83-83-89 stitches on 1 thread for sleeve, cast on 10-10-12-12-14-14 new stitches on the needle (= in side under sleeve) and work the remaining 41-45-49-54-59-65 stitches in stockinette stitch (= half back piece). Body and sleeves are finished separately. THE PIECE IS NOW MEASURED FROM HERE! BODY: = 184-200-220-240-264-288 stitches. Insert 1 marker thread on each side in the middle of the 10-10-12-12-14-14 stitches cast on under each sleeve. Allow them to follow your work onwards; they will be used a little later when decreasing/increasing. Work stockinette stitch. When the piece measures 2 cm = ¾" from the division decrease 1 stitch on each side of both marker threads - read DECREASE TIP = 4 stitches decreased. Decrease like this every 3 cm = 1⅛" a total of 4 times = 168-184-204-224-248-272 stitches. Continue working until the piece measures 14 cm = 5½" from the division. Now increase 1 stitch on each side of both marker threads – read INCREASE TIP-2 = 4 stitches increased. Increase like this every 2 cm = ¾" a total of 7 times = 196-212-232-252-276-300 stitches. Continue working until the piece measures 30-30-31-31-31-31 cm = 11¾"-11¾"-12¼"-12¼"-12¼"-12¼" from the division. Change to circular needle size 3.5 mm = US 4 and work 2 ridges. Loosely bind off, but to avoid the bind-off edge being tight you can bind off with needle size 4 mm = US 6. The sweater measures approx. 58-60-62-64-66-68 cm = 22¾"-23⅝"-24⅜"-25¼"-26"-26¾" from the shoulder down. SLEEVE: Place the 69-75-77-83-83-89 stitches from the thread on the one side of the piece on short circular needle/double pointed needles size 4 mm = US 6 and knit up 1 stitch in each of the 10-10-12-12-14-14 stitches cast on under the sleeve = 79-85-89-95-97-103 stitches. Insert 1 marker thread in the middle of the 10-10-12-12-14-14 stitches cast on under the sleeve and allow it to follow your work onwards; it will be used a little later when decreasing. Start the round at the marker thread. Start on the correct round in the diagrams so that the pattern continues from the yoke and work as follows: Work 4-2-4-2-3-1 stitches in stockinette stitch, A.3 (= 10 stitches), A.4 over the next 50-60-60-70-70-80 stitches (= 5-6-6-7-7-8 repeats of 10 stitches), A.5 (= 11 stitches) and 4-2-4-2-3-1 stitches in stockinette stitch. Continue this pattern. When the piece measures 2 cm = ¾" from the division, decrease 2 stitches mid under sleeve – remember DECREASE TIP. Decrease like this every 3rd-3rd-3rd-2nd-2nd-2nd round a total of 14-15-15-16-15-16 times = 51-55-59-63-67-71 stitches. The stitches which do not fit into the pattern as you decrease are worked in stockinette stitch, but make sure that if decreases are in the pattern you also make a yarn over. Continue working until the piece measures 21-19-19-17-15-14 cm = 8¼"-7½"-7½"-6¾"-6"-5½" from the division (shorter measurements in larger sizes due to longer yoke). Change to double pointed needles size 3.5 mm = US 4 and work 2 ridges. Loosely bind off, but to avoid the bind-off edge being tight you can bind off with needle size 4 mm = US 6. Sleeve measures approx. 22-20-20-18-16-15 cm = 8¾"-8"-8"-7"-6¼"-6" from the division. Work the other sleeve in the same way. |
|||||||||||||||||||||||||
Diagram explanations |
|||||||||||||||||||||||||
|
|||||||||||||||||||||||||
 |
|||||||||||||||||||||||||
 |
|||||||||||||||||||||||||
 |
|||||||||||||||||||||||||
Have you finished this pattern?Tag your pictures with #dropspattern #bluenostalgiasweater or submit them to the #dropsfan gallery. Do you need help with this pattern?You'll find 26 tutorial videos, a Comments/Questions area and more by visiting the pattern on garnstudio.com. © 1982-2026 DROPS Design A/S. We reserve all rights. This document, including all its sub-sections, has copyrights. Read more about what you can do with our patterns at the bottom of each pattern on our site. |
|||||||||||||||||||||||||


With over 40 years in knitting and crochet design, DROPS Design offers one of the most extensive collections of free patterns on the internet - translated to 17 languages. As of today we count 325 catalogs and 12298 patterns - 12288 of which are translated into English (US/in).
We work hard to bring you the best knitting and crochet have to offer, inspiration and advice as well as great quality yarns at incredible prices! Would you like to use our patterns for other than personal use? You can read what you are allowed to do in the Copyright text at the bottom of all our patterns. Happy crafting!
Post a comment to pattern DROPS 199-3
We would love to hear what you have to say about this pattern!
If you want to leave a question, please make sure you select the correct category in the form below, to speed up the answering process. Required fields are marked *.