
Popular categories
Looking for a yarn?


Comments / Questions (150)
![]() Cecilia Storelv wrote:
Cecilia Storelv wrote:
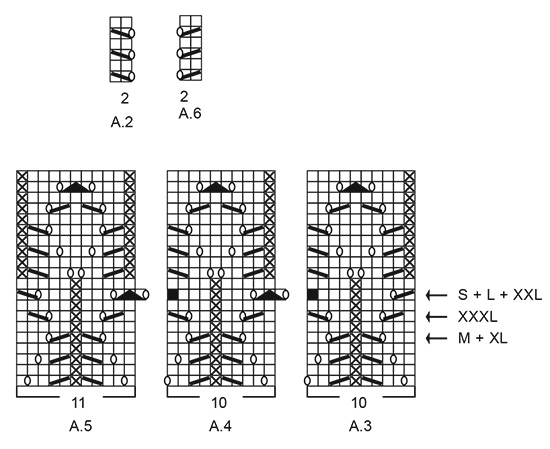
Hei. Jeg forstår ikke hvordan jeg skal finne min størrelse i mønstet? "MÖNSTER: Se diagram A.1 till A.6. Finn din storlek i diagrammet (gäller A.3 till A.5). Diagrammen visar alla varv i mönstret sett från rätsidan."
16.02.2020 - 14:38DROPS Design answered:
Hej Cecilia, jo du finder de førskellige størrelser ved pilen til højre for A.3. god fornøjelse!
18.02.2020 - 11:10
![]() Lynn Ashby wrote:
Lynn Ashby wrote:
How many skeins do I need for size small
30.12.2019 - 15:39DROPS Design answered:
Hi Lynn, you need 250 g of DROPS SKY (5 skeins). Happy knitting!
30.12.2019 - 17:01
![]() Lucia Milti wrote:
Lucia Milti wrote:
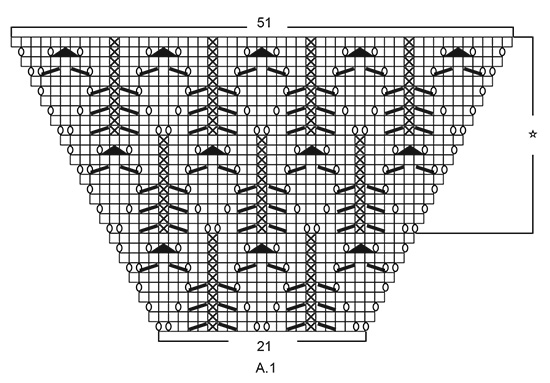
Scusate ma la risposta non mi aiuta io ho chiesto come faccio a proseguire A1 con 51 punti se nella descrizione dite di ripetere dall'asterisco dove ci sono 31 punti?
24.11.2019 - 20:42DROPS Design answered:
Buongiorno Lucia. Dopo l'ultima gettata, riprende con: 2 m dir, passa 1 m a dir senza lavorarla, 1 m dir, accavalla la m passata, 1 m rov e così via (se può aiutarla riprende dalla 12a m della riga con 31 maglie). Verifichi che il motivo sia incolonnato correttamente. Buon lavoro!
25.11.2019 - 09:13
![]() Lucia wrote:
Lucia wrote:
Sono arrivata alla fine del A1 mi dite di ricominciare dalla ruga con l'asterisco ma ci sono 31 punti e io ne ho 51 come faccio? e poi di fianco alla A3 ci sono tutte le taglie cosa vuol dire io ho una L quale devo scegliere? grazie urgente
23.11.2019 - 19:25DROPS Design answered:
Buonasera Lucia, deve continuare a lavorare A.1 sulle maglie a disposizione. La freccia di fianco al diagramma A.3 indica il punto di inizio per le diverse taglie come indicato nelle spiegazioni. Buon lavoro!
24.11.2019 - 17:32
![]() Marleen Lowel wrote:
Marleen Lowel wrote:
Heeft iemand oplossing voor probleem dat blouse van schouders valt?
07.10.2019 - 16:59
![]() Chris Hannes wrote:
Chris Hannes wrote:
Lieve Dropsdame, ik vrees dat ik nog niet helemaal mee ben. Dat is de eerste keer dat ik dit meemaak en ik heb al veel Dropspatronen gebreid. Je zegt gewoon verder doen maar als A1 (21 steken)opnieuw gebreid wordt komt dit niet echt uit met de afgewerkte A1 (51 steken).Kan je mij helpen aub? Vriendelijke groeten Chris
04.10.2019 - 20:35DROPS Design answered:
Dag Chris,
Na 1 herhaling van A.1 in de hoogte is A.1 51 steken breed, daarna brei je verder met patroon A.1, dus wordt hij natuurlijk breder dan 51 steken. (De ster naast telpatroon A.1 laat een herhaling van A.1 in de hoogte zien). Op hoeveel steken je uiteindelijk uitkomt hangt af van je maat en wanneer je op de juiste hoogte van de pas zit zit qua cm.
06.10.2019 - 16:37
![]() Chris Hannes wrote:
Chris Hannes wrote:
Ik heb de pas gebreid tot 1keer patroon A1(238 steken) , dan lukt het niet verder nl vanaf ga zo verder met de patroonherhaling in A1. Brei ik dan 2x A1 op de eerste gebreide want het stekenaantal voor rug-en voorpand blijven hetzelfde denk ik. Groetjes Chris
26.09.2019 - 21:16DROPS Design answered:
Dag Chris,
Je gaat gewoon verder zoals je daarvoor bezig was en patroon A.1 wordt steeds breder. De meerderingen op het lijf gaan ook verder. Pas als je 24-27-29-32-34-38 keer aan beide kanten van A.t hebt gemeerderd ga je verder met tricotsteek zonder te meerderen zoals beschreven in het patroon.
03.10.2019 - 18:43
![]() Sissel wrote:
Sissel wrote:
Hei Er disse strikke pakkene stor på størrelsene. Hvilke størrelser passer for meg som bruker mellom L eller XL.
23.09.2019 - 08:45DROPS Design answered:
Hei Sissel. Ta en titt på målskissen til denne genseren nederst på siden og sjekk målene i forhold til dine mål. God Fornøyelse!
23.09.2019 - 14:50
![]() Carine wrote:
Carine wrote:
Bonjour j’ai commencé le modèle hier et depuis je n’arrête pas de faire et de défaire, j’ai un sérieux problème avec le premier rang du diagramme A1. Faut il commencer avec 2 jetés? J’ai tout essayé sur 21 mailles et je ni arrrive pas. Est il’possible d’avoir l.explication écrite du premier rang de A1 svp. Merci d’avance
20.09.2019 - 14:28DROPS Design answered:
Bonjour Carine, au 1er rang de A.1, vous commencez par 1 jeté, 1 m end, 1 jeté, 2 m end, 1 dim, 1 m env, 1 dim, 2 m end, 1 jeté, 1 m end, 1 jeté, 2 m end, 1 dim, 1 m env, 1 dim, 2 m end, 1 jeté, 1 m end, 1 jeté = 6 jetés, 4 diminutions = vous augmentez 2 m et vous avez 23 m. Bon tricot!
23.09.2019 - 07:50
![]() Marjatta Järvikivi wrote:
Marjatta Järvikivi wrote:
Miksi niin monet ohjeet neulotaan ylhäältä alas. Olen tehnyt, mutta istuvuus ylhäällä kaulan ympärillä huono. Kaarroke ei toimi minulla..Korjaaminen melko mahdotonta. Odotan kovasti uusia ohjeita neulottuna alhaalta ylös.
09.09.2019 - 11:31
|
|||||||||||||||||||||||||
Blue Nostalgia#bluenostalgiasweater |
|||||||||||||||||||||||||
 |
 |
||||||||||||||||||||||||
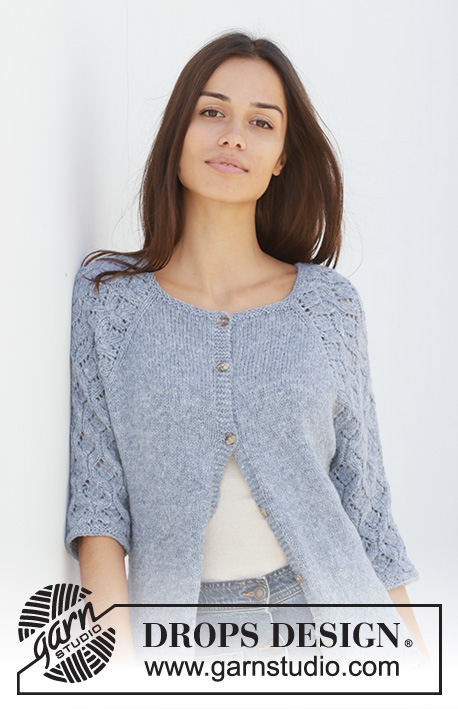
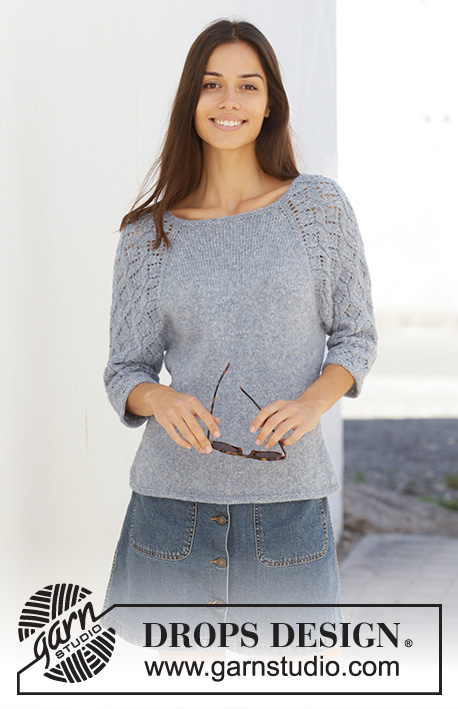
Knitted sweater with raglan in DROPS Sky. The piece is worked top down with lace pattern on sleeves. Sizes S – XXXL.
DROPS 199-3 |
|||||||||||||||||||||||||
|
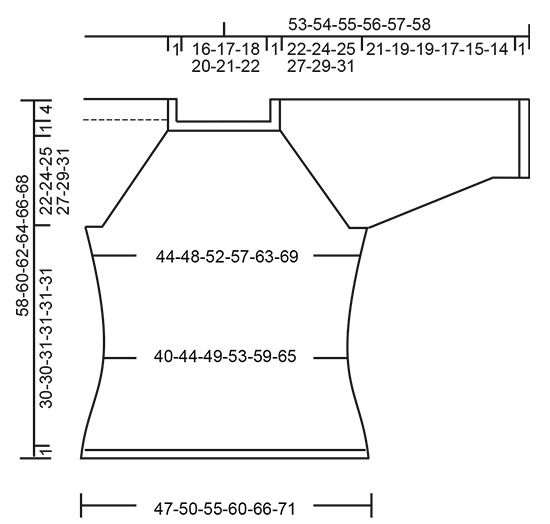
------------------------------------------------------- EXPLANATIONS FOR THE PATTERN: ------------------------------------------------------- RIDGE/GARTER STITCH (worked in the round): 1 ridge in height = 2 rounds; knit 1 round and purl 1 round. INCREASE TIP-1 (evenly spaced): To work out how to increase evenly, count the total number of stitches on the needle (e.g. 100 stitches), and divide by the number of increases to be made (e.g. 10) = 10. In this example, increase by making 1 yarn over after each 10th stitch. On the next round work the yarn overs twisted to avoid holes. PATTERN: See diagrams A.1 to A.6. Find your size in the diagrams (applies to A.3 to A.5). The diagrams show all rows in the pattern seen from the right side. DECREASE TIP (for sides of body and sleeves): Work until there are 3 stitches left before marker thread, knit 2 together, knit 2 (marker thread sits between these stitches), slip 1 stitch, knit 1 and pass the slipped stitch over the knitted stitch. INCREASE TIP-2 (for sides of body): Work until there are 2 stitches left before marker thread, 1 yarn over, knit 4 (marker thread sits in the middle of these stitches), 1 yarn over. On the next round work the yarn overs twisted to avoid holes. Then work the new stitches in stockinette stitch. ------------------------------------------------------- START THE PIECE HERE: ------------------------------------------------------- SWEATER - SHORT OVERVIEW OF THE PIECE: Yoke and body are worked in the round with circular needle from mid back, top down. Sleeves are worked in the round with short circular needle/double pointed needles, top down. YOKE: Cast on 100-106-110-116-120-126 stitches with circular needle size 3.5 mm = US 4 and Sky. Work 2 RIDGES – read description above. Knit 1 round where you increase 10-8-8-10-10-8 stitches evenly spaced – read INCREASE TIP-1 = 110-114-118-126-130-134 stitches. Change to circular needle size 4 mm = US 6. Knit 1 round. The next round is worked as follows: Work stockinette stitch over the first 15-16-17-19-20-21 stitches (= half back piece), 1 yarn over, 2 stitches in stockinette stitch, work A.1 over 21 stitches (= sleeve), 2 stitches in stockinette stitch, 1 yarn over, work 30-32-34-38-40-42 stitches in stockinette stitch (= front piece), 1 yarn over, 2 stitches stockinette stitch, work A.1 over 21 stitches (= sleeve), 2 stitches in stockinette stitch, 1 yarn over, work stockinette stitch over the last 15-16-17-19-20-21 stitches (= half back piece). There are now 118-122-126-134-138-142 stitches on the needle. Continue this pattern onwards; i.e. on the sleeves increase on each side as shown in A.1. On the next round knit the yarn overs (= holes) and the increased stitches are worked into the pattern as you go as shown in A.1. On front and back pieces increase with yarn overs before/after the 2 stitches in stockinette stitch in each side (there will be 2 stitches stockinette stitch between each raglan increase). On the next round knit the yarn overs twisted (= no holes) and the increased stitches are worked in stockinette stitch. Increase like this every 2nd round. You increase a total of 8 stitches on each increase-round (= 4 yarn overs + 4 stitches increased in A.1). REMEMBER THE KNITTING GAUGE! When A.1 has been worked 1 time in height there are 230-234-238-246-250-254 stitches on the needle. Continue this pattern onwards, i.e. the pattern repeats itself as shown in A.1. Each time you have worked 20 rounds there will be room for 1 more repeat of lace pattern in width on each sleeve. When you have increased a total of 24-27-29-32-34-38 times there are 302-330-350-382-402-438 stitches on the needle and the piece measures 18-20-22-24-25-28 cm = 7"-8"-8¾"-9½"-9¾"-11" from the cast-on edge mid front. Continue with stockinette stitch and pattern as before, but without increasing; i.e. the 69-75-79-85-89-97 stitches in A.1 are worked as follows: Work A.2 (= 2 stitches), 2-0-2-0-2-1 stitches in stockinette stitch, starting on the round marked with an arrow for your size work A.3 (= 10 stitches), A.4 over the next 40-50-50-60-60-70 stitches (= 4-5-5-6-6-7 reports of 10 stitches), A.5 (= 11 stitches), 2-0-2-0-2-1 stitches in stockinette stitch and A.6 (= 2 stitches). Continue until the piece measures approx. 23-25-26-28-30-32 cm = 9"-9¾"-10¼"-11"-11¾"-12½" from the cast-on edge mid front. The next round is worked as follows: Work 41-45-49-54-59-65 stitches in stockinette stitch (= half back piece), place the next 69-75-77-83-83-89 stitches on 1 thread for sleeve, cast on 10-10-12-12-14-14 new stitches on the needle (= in side under sleeve), work 82-90-98-108-118-130 stitches stockinette stitch (= front piece), place the next 69-75-77-83-83-89 stitches on 1 thread for sleeve, cast on 10-10-12-12-14-14 new stitches on the needle (= in side under sleeve) and work the remaining 41-45-49-54-59-65 stitches in stockinette stitch (= half back piece). Body and sleeves are finished separately. THE PIECE IS NOW MEASURED FROM HERE! BODY: = 184-200-220-240-264-288 stitches. Insert 1 marker thread on each side in the middle of the 10-10-12-12-14-14 stitches cast on under each sleeve. Allow them to follow your work onwards; they will be used a little later when decreasing/increasing. Work stockinette stitch. When the piece measures 2 cm = ¾" from the division decrease 1 stitch on each side of both marker threads - read DECREASE TIP = 4 stitches decreased. Decrease like this every 3 cm = 1⅛" a total of 4 times = 168-184-204-224-248-272 stitches. Continue working until the piece measures 14 cm = 5½" from the division. Now increase 1 stitch on each side of both marker threads – read INCREASE TIP-2 = 4 stitches increased. Increase like this every 2 cm = ¾" a total of 7 times = 196-212-232-252-276-300 stitches. Continue working until the piece measures 30-30-31-31-31-31 cm = 11¾"-11¾"-12¼"-12¼"-12¼"-12¼" from the division. Change to circular needle size 3.5 mm = US 4 and work 2 ridges. Loosely bind off, but to avoid the bind-off edge being tight you can bind off with needle size 4 mm = US 6. The sweater measures approx. 58-60-62-64-66-68 cm = 22¾"-23⅝"-24⅜"-25¼"-26"-26¾" from the shoulder down. SLEEVE: Place the 69-75-77-83-83-89 stitches from the thread on the one side of the piece on short circular needle/double pointed needles size 4 mm = US 6 and knit up 1 stitch in each of the 10-10-12-12-14-14 stitches cast on under the sleeve = 79-85-89-95-97-103 stitches. Insert 1 marker thread in the middle of the 10-10-12-12-14-14 stitches cast on under the sleeve and allow it to follow your work onwards; it will be used a little later when decreasing. Start the round at the marker thread. Start on the correct round in the diagrams so that the pattern continues from the yoke and work as follows: Work 4-2-4-2-3-1 stitches in stockinette stitch, A.3 (= 10 stitches), A.4 over the next 50-60-60-70-70-80 stitches (= 5-6-6-7-7-8 repeats of 10 stitches), A.5 (= 11 stitches) and 4-2-4-2-3-1 stitches in stockinette stitch. Continue this pattern. When the piece measures 2 cm = ¾" from the division, decrease 2 stitches mid under sleeve – remember DECREASE TIP. Decrease like this every 3rd-3rd-3rd-2nd-2nd-2nd round a total of 14-15-15-16-15-16 times = 51-55-59-63-67-71 stitches. The stitches which do not fit into the pattern as you decrease are worked in stockinette stitch, but make sure that if decreases are in the pattern you also make a yarn over. Continue working until the piece measures 21-19-19-17-15-14 cm = 8¼"-7½"-7½"-6¾"-6"-5½" from the division (shorter measurements in larger sizes due to longer yoke). Change to double pointed needles size 3.5 mm = US 4 and work 2 ridges. Loosely bind off, but to avoid the bind-off edge being tight you can bind off with needle size 4 mm = US 6. Sleeve measures approx. 22-20-20-18-16-15 cm = 8¾"-8"-8"-7"-6¼"-6" from the division. Work the other sleeve in the same way. |
|||||||||||||||||||||||||
Diagram explanations |
|||||||||||||||||||||||||
|
|||||||||||||||||||||||||
 |
|||||||||||||||||||||||||
 |
|||||||||||||||||||||||||
 |
|||||||||||||||||||||||||
Have you finished this pattern?Tag your pictures with #dropspattern #bluenostalgiasweater or submit them to the #dropsfan gallery. Do you need help with this pattern?You'll find 26 tutorial videos, a Comments/Questions area and more by visiting the pattern on garnstudio.com. © 1982-2026 DROPS Design A/S. We reserve all rights. This document, including all its sub-sections, has copyrights. Read more about what you can do with our patterns at the bottom of each pattern on our site. |
|||||||||||||||||||||||||


With over 40 years in knitting and crochet design, DROPS Design offers one of the most extensive collections of free patterns on the internet - translated to 17 languages. As of today we count 325 catalogs and 12298 patterns - 12288 of which are translated into English (US/in).
We work hard to bring you the best knitting and crochet have to offer, inspiration and advice as well as great quality yarns at incredible prices! Would you like to use our patterns for other than personal use? You can read what you are allowed to do in the Copyright text at the bottom of all our patterns. Happy crafting!
Post a comment to pattern DROPS 199-3
We would love to hear what you have to say about this pattern!
If you want to leave a question, please make sure you select the correct category in the form below, to speed up the answering process. Required fields are marked *.