
Popular categories
Looking for a yarn?


Comments / Questions (9)
![]() Benedetta wrote:
Benedetta wrote:
Buongiorno, in merito al berretto vorrei sapere se il grafico si lavora sia sul ferro di andata sia al rovescio. Grazie mille!
08.01.2022 - 13:03DROPS Design answered:
Buongiorno Benedetta, il diagramma mostra sia i ferri di andata che quelli di ritorno. Buon lavoro!
08.01.2022 - 13:20
![]() Séverine wrote:
Séverine wrote:
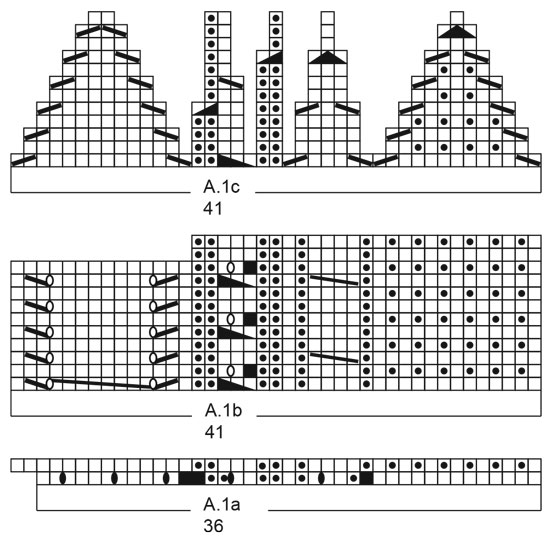
Bonjour Je crois qu’il y a une erreur : le diagramme A1c devrait faire 41 mailles mais il en fait 42, ce qui décale tout et implique 24 mailles à la fin et non 25.
03.06.2020 - 20:09DROPS Design answered:
Bonjour Séverine et merci pour votre retour, le diagramme a été corrigé. Bonne continuation!
16.06.2020 - 13:30
![]() Madeleine wrote:
Madeleine wrote:
Hej! Jag får verkligen inte till mönstret/diagrammet A2a när jag börjar på vantarna. På varv två, räknas då omslagen från varv ett som räta maskor i diagrammet eller blir de liksom utöver räta maskorna i diagrammet? Sen undrar jag också om jag på varv två ska sticka en rät maska först och sen börja gå efter mönsterdiagrammet? Mvh Madeleine
15.11.2019 - 10:55DROPS Design answered:
Hej Madeleine, Ja det stemmer, omslagene strikkes i glatstrik (drejet vrang fra vrangen) God fornøjelse!
03.12.2019 - 14:58
![]() Ivana Poláková wrote:
Ivana Poláková wrote:
Dobrý den, chtěla bych vědět, proč u vzoru A1b v posledních dvou řadách nejsou zakreslené celé řady? Děkuji za odpověď.
08.10.2019 - 20:29DROPS Design answered:
Dobrý den, Ivano, vzhledem k tomu, že ve vzoru A.1 ujímáme, klesne počet ok, a proto jsou tyto dvě řady kratší. Hodně zdaru! Hana
08.10.2019 - 21:06Heather wrote:
I am making the second size. I see that I am to complete A2b over A2a until piece measures 10cm. My question is; the chart cuts off after row 10 it only shows the first 15 stitches. What happens with the remaining 14 stitches? Work them as they appear then once the last 2 rows are done, start at row 1 again?
28.11.2018 - 18:18DROPS Design answered:
Dear Heather, the patterns are not repeated over the same number of rows, when you have worked the first 10 rows in A.2b, repeat A.2b from first row over these 14 sts and continue the first sts in A.2b as shown in diagram. When you have worked all rows in A.2b over the first sts in diagram, repeat pattern from row 1 over these sts. Make sure small and large cable will have the correct number of rows between each (= 5 rows for the small one and 9 rows for the large one). Happy knitting!
29.11.2018 - 08:47
![]() Lene Hasle wrote:
Lene Hasle wrote:
Er der fejl i beskrivelse af aflukning? Hvis man tager 3 masker ind i retstrikmaskerne 6 gange, som der står, så ender man med 6 masker og ikke 12.
19.11.2018 - 19:11DROPS Design answered:
Hei Lene. Det stemmer at du har 6 masker igjen av rillemaskene, men du har også 6 masker igjen av mønsteret = 12 masker totalt på pinnen. Du feller 23 masker i A.2c og 18 masker over rillene. God fornøyelse.
23.11.2018 - 11:33
![]() Janice Paschek wrote:
Janice Paschek wrote:
Ich bin gerade dabei die Fäustlinge zu stricken und habe eine Frage dazu. Es heißt in der Anleitung: Dann wie folgt weiterstricken: 1 M kraus rechts, A.2a (= 24) und 19-22 M kraus rechts. Bis hier hin verstehe ich es noch. Dann folgt: Wenn A.2a 1 x in der Höhe gestrickt wurde, sind 49-52 M auf der Nadel. Wie komme ich auf die 49M? In dem Muster sind in der zweiten Reihe nur 29 M angegeben. Wird der Rest mit linken M aufgefüllt? Vielen Dank und viele Grüße Janice
29.10.2018 - 20:20DROPS Design answered:
Liebe Frau Paschek, in der 1. Reihe von A.2a werden Sie 5 Maschen zunehmen (siehe 5. Symbol), so haben Sie 44-47 M + 5 M = 49-52 M. So habe Sie: 1 M kraus rechts, A.2a (= 29 M ) und 19-22 M kraus rechts. Dann stricken Sie A.2b über die 29 M von A.2a und die anderen Maschen stricken Sie wie zuvor. Viel Spaß beim stricken!
30.10.2018 - 08:30
![]() Eva Sporrong wrote:
Eva Sporrong wrote:
Hej, varför slutar mönstret i A1b mitt i de 2 översta varven? Vad gör jag efter A1b. Börjar med A1a eller fortsätter med A1b till 21cm.Beskrivningen är lite otillräcklig och jag är ändå en van stickare. Vad menas med: ”de olika mönstren stickas på olika varv på höjden? ” hälsningar Eva Sporrong
25.10.2018 - 08:48DROPS Design answered:
Hej, att de olika mönstren stickas på olika varv i höjden betyder att det är färre varv i höjden på rapporten längst till vänster i diagr. Du ska alltså upprepa de 10 varven längst till vänster i diagr A.1b i höjden samtidigt som du upprepar de 12 varven i den längre rapporten längst till höger i diagr. Fortsätt med detta tills arb mäter 21 cm.
25.10.2018 - 17:24
![]() Katarzyna wrote:
Katarzyna wrote:
Czy przy przerobieniu czapki 21 cm wysokosc powtarzac schemat A1a razem z A 1b
24.10.2018 - 17:42DROPS Design answered:
Witaj Katarzyno! Na wys. 21 cm dalej przerabiasz ale tylko schemat A1b. Po zamknięciu oczek w sumie 4-5 razy co 4 rzędy, zaczynasz schemat A1c. Pozdrawiamy!
25.10.2018 - 10:04
|
||||||||||||||||||||||||||||||||||||||||
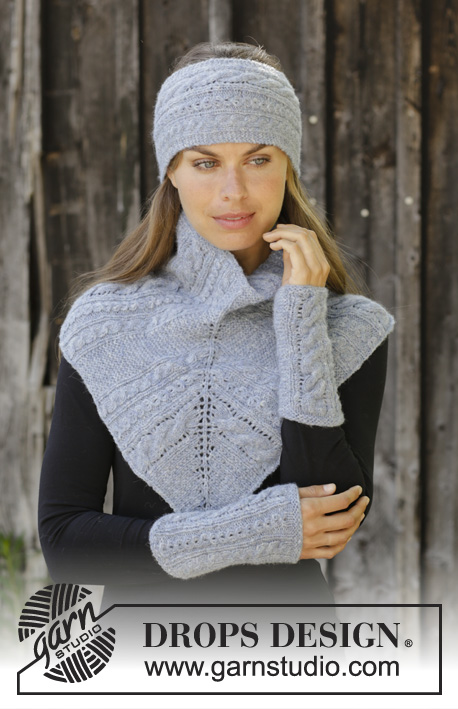
Meet the Dawn#meetthedawnset |
||||||||||||||||||||||||||||||||||||||||
 |
 |
|||||||||||||||||||||||||||||||||||||||
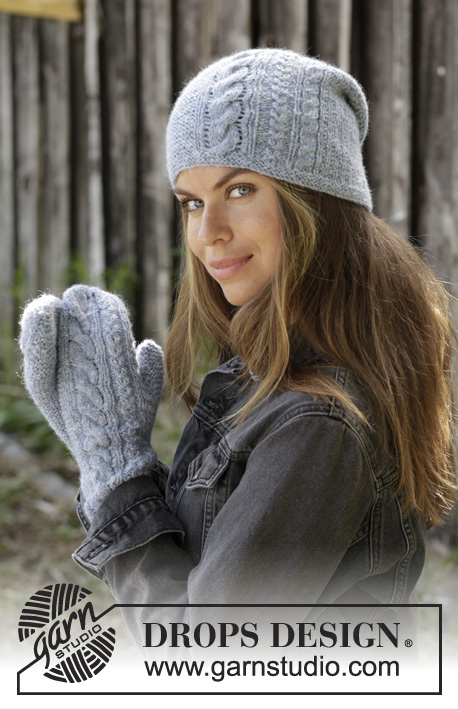
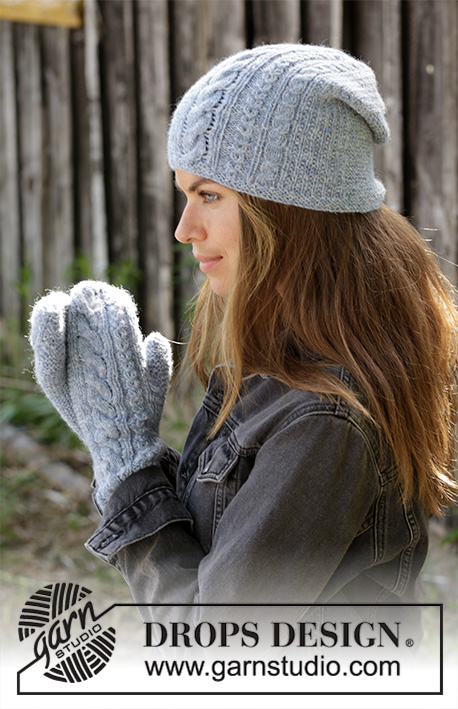
Knitted hat with cables and garter stitch in DROPS Sky. Knitted mittens with cables and garter stitch in DROPS Sky.
DROPS 192-31 |
||||||||||||||||||||||||||||||||||||||||
|
EXPLANATIONS FOR THE PATTERN: ------------------------------------------------------- RIDGE/GARTER STITCH (worked back and forth) – for the hat: 1 ridge = Knit 2 rows. PATTERN: Hat: See diagram A.1. Mittens: See diagrams A.2 and A.3. As you decrease and increase in diagrams A.1b, A.2b and A.3b, the number of stitches can vary in relation to this by 1 stitch, if you have just decreased. DECREASE TIP-1 – for hat: All decreases are made from the right side! Decrease 1 stitch after the marker thread as follows: Slip 1 stitch as if to knit, knit 1, pass the slipped stitch over the knitted stitch. Decrease 1 stitch before the marker thread as follows: Knit 2 together. RIDGE/GARTER STITCH (worked in the round) – for mittens: 1 ridge = 2 rounds. Knit 1 round and purl 1 round. INCREASE TIP – for mittens: Increase 1 stitch by making 1 yarn over; on the next round work the yarn over twisted to avoid holes. The increased stitch is then worked in garter stitch. ------------------------------------------------------- START THE PIECE HERE: ------------------------------------------------------- HAT - SHORT OVERVIEW OF THE PIECE: The piece is worked back and forth and is sewn together to finish. HAT: Cast on 114-120 stitches (including 1 edge stitch in each side of the piece) with circular needle size 3 mm = US 2,5 and Sky. Work 3 RIDGES – read description above. Then work as follows from the right side: Work 39-42 stitches in garter stitch, A.1 (= 36 stitches) and 39-42 stitches in garter stitch. When A.1a has been worked 1 time in height there are 119-125 stitches on the needle. A.1b (= 41 stitches) is then worked over A.1a. REMEMBER THE KNITTING GAUGE! Continue this pattern until the piece measures 21 cm = 8¼" in height (the different patterns are worked over different rows in height). Insert 6 marker threads in the garter stitches in each side of A.1b as follows: Work 3-6 stitches in garter stitch, insert 1 marker thread, * 12 stitches in garter stitch, insert 1 marker thread *, work from *-* a total of 2 times, work 12 stitches in garter stitch, work A.1b as before, work 12 stitches in garter stitch, * insert 1 marker thread, work 12 stitches in garter stitch *, work from *-* a total of 2 times, insert 1 marker thread, work 3-6 stitches in garter stitch (= a total of 6 marker threads). Then decrease 1 stitch after the first 3 marker threads and 1 stitch before the last 3 marker threads - read DECREASE TIP-1. Decrease like this every 4th row a total of 4-5 times, then work A.1c over A.1b and continue decreasing by each marker thread every 2nd row 6 more times = 25 stitches. Then work all stitches together 2 and 2 = 13 stitches. Cut the strand, pull it through the remaining stitches, tighten and fasten well. The hat measures approx. 26-27 cm = 10¼"-10⅝" from the top down. ASSEMBLY: Sew the hat together inside the 1 edge stitch in each side of the piece. ------------------------------------------------------- MITTENS- SHORT OVERVIEW OF THE PIECE: The mittens are worked in the round with double pointed needles. LEFT MITTEN: Cast on 44-47 stitches with double pointed needles size 3 mm = US 2,5 and Sky. Work 3 RIDGES – read description above. Work 1 stitch in garter stitch, A.2a (= 24 stitches) and 19-22 stitches in garter stitch. When A.2a has been worked 1 time in height there are 49-52 stitches on the needles. Then work A.2b over A.2a. When the piece measures 10 cm = 4", increase 4 stitches evenly over the garter stitches = 53-56 stitches The increased stitches are worked in garter stitch. Continue this pattern in height (the different patterns are worked over different rounds in height). REMEMBER THE KNITTING GAUGE! When the piece measures 12-13 cm = 4¾"-5⅛" increase 1 stitch on each side of the first stitch on the round for thumb - read INCREASE TIP. Increase like this on each side of the increased stitches every 2nd round a total of 6-7 times = 65-70 stitches. Now place the 13-15 thumb-stitches on 1 thread. Continue in the round as before and cast on 1 new stitch behind the thumb on the next round = 53-56 stitches. When the mitten measures approx. 25-27 cm = 9¾"-10⅝" (you can try the mitten on; there is 3 cm = 1⅛" left to finished length), decrease as follows: On the next row from the right side work A.2c over A.2b and decrease 3 stitches evenly over the garter stitches every 2nd round a total of 6 times = 12-15 stitches. Work all stitches together 2 and 2 = 6-8 stitches. Cut the strand, pull it through the remaining stitches, tighten and fasten well. The mitten measures a total of approx. 28-30 cm = 11"-11¾". THUMB: Place the 13-15 stitches above the thumb gusset on double pointed needles size 3 mm = US 2,5 and in addition pick up 3 stitches in the edge at the back of the thumb-stitches = 16-18 stitches. Work garter stitch in the round for 6-7 cm = 2⅜"-2¾", then work all stitches together 2 and 2 = 8-9 stitches. Cut the strand, pull it through the remaining stitches, tighten and fasten well. RIGHT MITTEN: Work as for left, but reversed; in other words, work A.3 instead of A.2 and increase to thumb on each side of the first garter stitch after A.3. |
||||||||||||||||||||||||||||||||||||||||
Diagram explanations |
||||||||||||||||||||||||||||||||||||||||
|
||||||||||||||||||||||||||||||||||||||||
 |
||||||||||||||||||||||||||||||||||||||||
 |
||||||||||||||||||||||||||||||||||||||||
 |
||||||||||||||||||||||||||||||||||||||||
Have you finished this pattern?Tag your pictures with #dropspattern #meetthedawnset or submit them to the #dropsfan gallery. Do you need help with this pattern?You'll find 26 tutorial videos, a Comments/Questions area and more by visiting the pattern on garnstudio.com. © 1982-2026 DROPS Design A/S. We reserve all rights. This document, including all its sub-sections, has copyrights. Read more about what you can do with our patterns at the bottom of each pattern on our site. |
||||||||||||||||||||||||||||||||||||||||


With over 40 years in knitting and crochet design, DROPS Design offers one of the most extensive collections of free patterns on the internet - translated to 17 languages. As of today we count 324 catalogs and 12290 patterns - 12280 of which are translated into English (US/in).
We work hard to bring you the best knitting and crochet have to offer, inspiration and advice as well as great quality yarns at incredible prices! Would you like to use our patterns for other than personal use? You can read what you are allowed to do in the Copyright text at the bottom of all our patterns. Happy crafting!
Post a comment to pattern DROPS 192-31
We would love to hear what you have to say about this pattern!
If you want to leave a question, please make sure you select the correct category in the form below, to speed up the answering process. Required fields are marked *.