
Popular categories
Looking for a yarn?


Comments / Questions (64)
![]() Thirza wrote:
Thirza wrote:
Hallo! Ik ben bezig met de jurk patroon 188-3. Hiervoor moet ik bij A1.1 het patroon 2 steken naar links verplaatsen. Op jullie website vind ik alleen een filmpje hoe ik het patroon naar rechts moet verplaatsen. Kunnen jullie mij uitleggen hoe ik het patroon naar links verplaats? Moet ik dan gewoon 2 steken breien zoals ze zich voordoen en dan pas het patroon inzetten? Of moet ik iets anders doen? Met vriendelijke groet, Thirza
29.09.2023 - 13:19
![]() Monjoie wrote:
Monjoie wrote:
Bonjour et merci pour ce joli modèle Dans A1 à la flèche 1 est ce qu il faut glisser 1 maille et tricoter 2 mailles ensembles ou 3 mailles ensembles ?
22.06.2023 - 11:46DROPS Design answered:
Bonjour Mme Monjoie et merci. À la flèche-1, au début du tour, glissez les 2 premières m du tour sans les tricoter (elles seront tricotées au dernier motif du tour), puis tricotez les m suiv. comme indiqué par le diag.: *5 m end, 1 jeté, 1 m end, 5 m end, il reste 2 m du 1er A.1, glissez 1 m à l'endroit, tricotez les 3 m suiv. ensemble à l'endroit (= la dernière m du motif et les 2 premières m du motif suivant) et passez la m glissée par-dessus les 3 m tricotées ens*, répétez de *-* ainsi tout le tour. à la fin du tour, vous tricoterez les 2 dernières m du tour (celles que vous aviez glissées). Bon tricot!
22.06.2023 - 14:19
![]() Anna wrote:
Anna wrote:
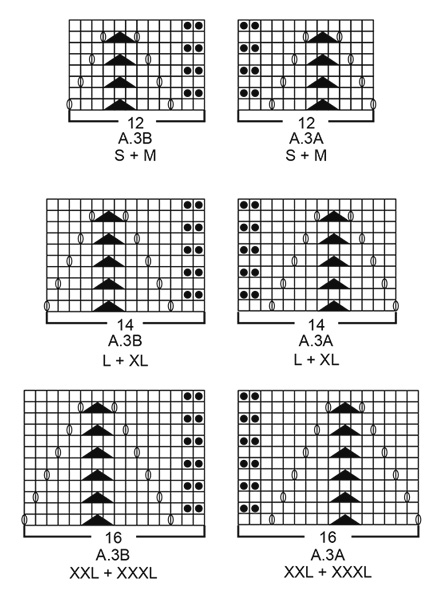
Hello. Can the A.3B and A.3A be worked in the round instead of back and forth, at least until the split? I am not sure what's the purpose of working back and forth before the split. Thank you, Anna
09.06.2023 - 09:53DROPS Design answered:
Dear Anna, it might be possible - working each front piece separately allows you to decide the length of the seam on split. Happy knitting!
09.06.2023 - 13:25
![]() Anna wrote:
Anna wrote:
Hello. Does "displace beginning of round 2 stitches to the left" mean to place first two stitches onto the right needle without working them? Should the marker indicating the beginning of the row be moved too?
23.05.2023 - 23:02DROPS Design answered:
Hi Anna, This means that you start the next round 2 stitches early, at the end of the previous round. And yes, you can move the marker to the new start of the round. Happy knitting!
24.05.2023 - 06:53
![]() Marcia Brown wrote:
Marcia Brown wrote:
Can you clarify if the 1st stitch on round 6, (purl round ) is slipped before completing the round? There are indentations on rounds 24, and 44 in A1 chart and also in A4 chart. Is it possible for me to translate comments from other knitters to English ? These comments may answer my question. Thank you.
09.05.2023 - 11:20DROPS Design answered:
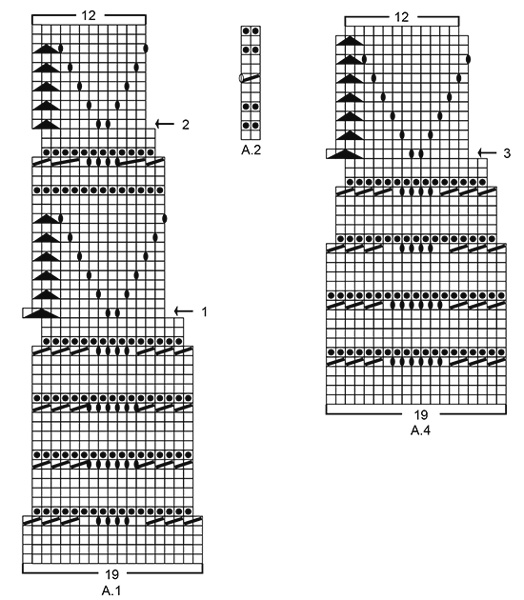
Dear Mrs Brown, On round marked with arrow-1 in A.1 displace beginning of round 2 stitches to the left to make the pattern fit. On round marked with arrow-2 in A.1 displace beginning of round 1 stitch to the left. To displace the beginning of the round, slip the first 2 sts (arrow-1)/ the first st (arrow-2) of the round as if to K, move the marker for beg of round here and continue working diagram. Happy knitting!
09.05.2023 - 16:18
![]() Mariam wrote:
Mariam wrote:
Hallo, Ab dem Teil im Rock im Diagramm A1 mit dem 1. Pfeil geht mein V Muster nicht auf. Können sie nochmal das mit dem nach links verschieben erklären, soll der Rundenbeginn nur für die Runde mit dem Pfeil verschoben werden oder gilt das auch für die darauffolgenden Runden?
25.04.2023 - 01:29DROPS Design answered:
Liebe Mariam, am Anfang der Reihe mit dem Pfeil stricken Sie die 2 ersten Maschen von A.1 und den Markierer legen Sie hier (nach dieser 2 Maschen die früher am Anfang der Runde waren = die sind jetzt die 2 Maschen der Runden); dann stricken Sie A.1 wie im Diagram gezeigt (die 2 letzten Maschen von jedem Rapport sind zusammen mit den 2 ersten Maschen vom nächsten Rapport gestrickt). Beim Pfeil-2 stricken Sie dann die 1. Masche der Runde und legen Sie den Markierer hier = diese Masche ist jetzt die letzte Masche der Runde (und nicht mehr die erste Masche). Viel Spaß beim stricken!
25.04.2023 - 08:24
![]() Helena Šindlerová wrote:
Helena Šindlerová wrote:
Dobrý den, nejsem si jistá, jestli v popisku u ikonek vzoru (schématu) nemá být u černého oválku - 2x nahodíme, v následující řadě upleteme 1 nahození OBRACE, druhé spustíme z jehlice.
24.04.2023 - 19:21
![]() Marcia Brown wrote:
Marcia Brown wrote:
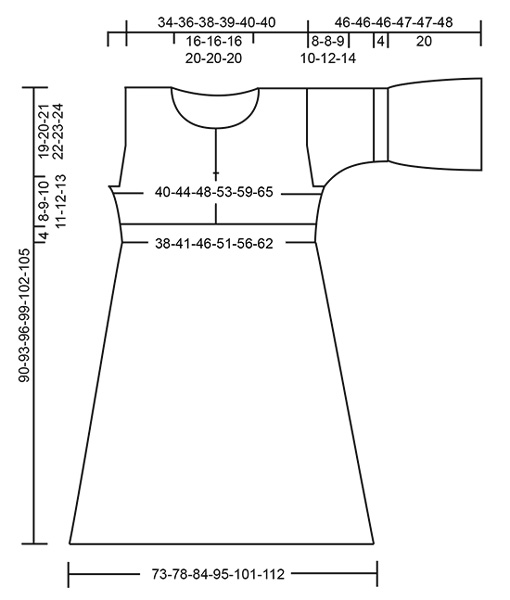
The dress size described in the pattern is S-M_L etc. What bust size relates to the dress size. Thanks
01.04.2023 - 21:29DROPS Design answered:
Dear Marcia, you can see the measurements in cm corresponding to each size in the schematic after the pattern instructions and the charts. Happy knitting!
02.04.2023 - 19:44
![]() Lilian wrote:
Lilian wrote:
Hello,i love this pattern it looks really beautiful.@ Sunny if you want to make xs either use smaller needles depending on your knitting gauge am a loose knitter if i was to make a XS size i would use 4mm if in the pattern says 5mm and make the Small size or even 3.5mm and keep measuring to see if the measurements fit.Thats oneway or else look at the numbers given then minise the smallest size for example for the skirt cast on 247,266.....sts the difference is 19 so 247-19=228 sts=XS just try.
24.08.2022 - 19:56
![]() Tiina wrote:
Tiina wrote:
Ohjeessa sanotaan: kun olet neulonut piiroksen A.1 loppuun työssä on 204 silmukkaa. Jatka neulomalla sileää neuletta. Kun työn pituus on 28 cm, kiinnitä silmukkamerkit. Mitataanko työ helmasta vai mitaanko sileän neuleen pituus?
27.03.2022 - 21:01DROPS Design answered:
Hei, mitta otetaan helmasta (kaaren lyhyimmästä kohdasta).
07.04.2022 - 17:31
|
||||||||||||||||||||||||||||
Love Story#lovestorydress |
||||||||||||||||||||||||||||
|
|
||||||||||||||||||||||||||||
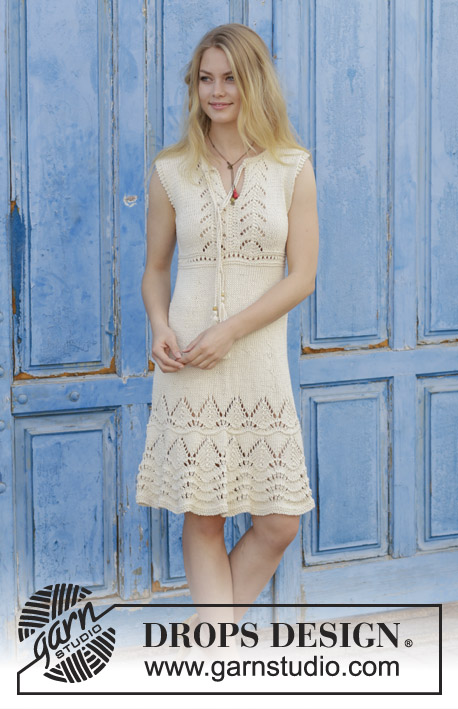
Knitted dress with lace pattern and ¾ sleeves. Size: S - XXXL Piece is knitted in DROPS Paris.
DROPS 188-3 |
||||||||||||||||||||||||||||
|
INFORMATION FOR PATTERN: GARTER STITCH (worked in the round): 1 ridge = 2 rounds. Knit 1 round and purl 1 round. GARTER STITCH (back and forth): 1 ridge = knit 2 rows. PATTERN: See diagrams A.1 to A.4. Choose diagram for your size (applies to A.3). Diagrams show all rows in pattern seen from the right side. MEASURING TIP: When working wave pattern, the piece will curl in bottom edge. All length measurements are done from where curl is shortest. DECREASE TIP-1 (applies to skirt part on dress): Decrease as follows after marker thread: Slip 1 stitch knitwise, knit 1, pass slipped stitch over stitch worked (= 1 stitch decreased). Decrease as follows before marker thread: Begin 2 stitches before marker thread, knit 2 together (= 1 stitch decreased). DECREASE TIP-2 (applies to armholes): Decrease inside 3 edge stitches in garter stitch. All decreases are done from the right side. Decrease after 3 edge stitches as follows: Slip 1 stitch knitwise, knit 1, pass slipped stitch over (= 1 stitch decreased). Decrease before 3 edge stitches as follows: Begin 2 stitches before the 3 edge stitches and knit 2 together (= 1 stitch decreased). DECREASE TIP-3: To calculate how to decrease evenly, use the total number of stitches on row (e.g. 180 stitches) and divide stitches by number of decreases to be done (e.g. 8) = 22.5. In this example work alternately every 21st and 22nd stitch and every 22nd and 23rd stitch together. INCREASE TIP (applies to sides on dress and mid under sleeves): All increases are done from the right side! Increase on each side of marker threads in the sides on dress and on each side of marker thread mid under sleeve as follows: Work until 2 stitches remain before marker, make 1 yarn over, knit 4 (marker thread is in the middle of these 4 stitches), make 1 yarn over (= 2 stitches increased). On next row/round work yarn overs twisted to avoid holes. ---------------------------------------------------------- DRESS: Work in the round on circular needle from bottom edge and up until vent begins mid front, then work piece back and forth from mid front. After decrease for armholes work front and back piece back and forth separately. The sleeves are worked in the round on a short circular needle bottom up, switch to double pointed needles when needed. SKIRT: Cast on somewhat loosely 247-266-285-323-342-380 stitches on circular needle size 5 mm / US 8 with Paris. Work 2 ridges in GARTER STITCH in the round - see explanation above. Then work A.1 (= 13-14-15-17-18-20 repetitions of 19 stitches). REMEMBER THE GAUGE! NOTE! On round marked with arrow-1 in A.1 displace beginning of round 2 stitches to the left to make the pattern fit. On round marked with arrow-2 in A.1 displace beginning of round 1 stitch to the left. When A.1 has been worked, there are 156-168-180-204-216-240 stitches on needle. Then work in stockinette stitch. When piece measures 28 cm / 11" - read MEASURING TIP, insert 4 marker threads in piece as follows: Insert 1st marker thread after the first 18-21-24-30-32-38 stitches, insert 2nd marker thread after the next 42-42-42-42-44-44 stitches, insert 3rd marker thread after the next 36-42-48-60-64-76 stitches and insert 4th marker thread after the next 42-42-42-42-44-44 stitches. 18-21-24-30-32-38 stitches remain on round after last marker thread. Move marker threads upwards when working. On next round, decrease after 1st and 3rd marker thread and before 2nd and 4th marker thread – read DECREASE TIP-1 (= 4 stitches decreased). Decrease like this every 4½-4½-5½-5½-6-6 cm / 1¾"-1¾"-2¼"-2¼"-2½"-2½" 7-7-6-6-6-6 times in total at every marker thread = 128-140-156-180-192-216 stitches. Remove all marker threads. When piece measures 59-60-61-62-63-64 cm / 23¼"-23⅝"-24"-24⅜"-24¾"-25¼" (decreases are now done), knit 1 round while decreasing 0-0-0-8-0-4 stitches evenly = 128-140-156-172-192-212 stitches. Switch to circular needle size 4 mm / US 6 and work A.2 in the round. When A.2 has been done, insert 1 marker thread at the beginning of round (= in the side), insert 1 marker after 32-35-39-43-48-53 stitches (= mid front) and 1 marker thread after 32-35-39-43-48-53 stitches (= in the side), there are 64-70-78-86-96-106 stitches between marker threads on back piece. Switch back to circular needle size 5 mm / US 8. Cut the yarn. Now work piece back and forth on circular needle from marker mid front. Begin first row from right side at marker mid front and work as follows: A.3B (= 12-12-14-14-16-16 stitches), 40-46-50-58-64-74 stitches in stockinette stitch (marker thread in the side is in the middle of these 40-46-50-58-64-74 stitches), work A.3A (= 12-12-14-14-16-16 stitches), A.3B (= 12-12-14-14-16-16 stitches), 40-46-50-58-64-74 stitches in stockinette stitch (marker thread in the side is in the middle of these 40-46-50-58-64-74 stitches) and finish with A.3A (= 12-12-14-14-16-16 stitches). Continue pattern back and forth like this. When piece measures 3 cm / 1" from division, increase 1 stitch on each side of marker threads in the sides - read INCREASE TIP (= 4 stitches increased). Repeat increase when piece measures 6-6-7-7-8-8 cm / 2⅜"-2⅜"-2¾"-2¾"-3"-3" from division = 136-148-164-180-200-220 stitches. When piece measures 70-72-74-76-78-80 cm / 27½"-28⅜"-29⅛"-30"-30¾"-31½, work 2 ridges over the middle 12-12-14-18-22-26 stitches in each side (i.e. work 6-6-7-9-11-13 stitches in garter stitch on each side of both marker threads – work the other stitches as before). On first row from right side after ridges bind off 6-6-8-12-16-20 stitches in each side for armholes (bind off 3-3-4-6-8-10 stitches on each side of both marker threads). Finish front pieces and back piece separately. LEFT FRONT PIECE (when garment is worn): = 31-34-37-39-42-45 stitches. Continue back and forth with A.3A towards mid front, stockinette stitch and 3 edge stitches in garter stitch towards armhole (work first row from wrong side). When 3 rows have been worked back and forth, decrease for armhole on next row from right side - read DECREASE TIP-2. Decrease like this on every other row (i.e. every row from right side) 2-3-5-6-8-11 times in total = 29-31-32-33-34-34 stitches. Continue pattern back and forth as before with 3 edge stitches in garter stitch towards armhole, stockinette stitch and A.3A towards mid front until piece measures approx. 84-87-90-93-96-99 cm / 33"-34¼"-35½"-36½"-37¾"-39" (adjust so that next row is worked from wrong side and adjust to finish after one whole repetition vertically if possible). Now slip the first 7-8-8-9-10-10 stitches on 1 stitch holder for neck but to avoid cutting the yarn work them before slipping them on the stitch holder. Continue to bind off for neck at beginning of every row from mid front (i.e. at beginning of each row from wrong side) as follows: bind off 2 stitches 2 times and 1 stitch 3 times = 15-16-17-17-17-17 stitches remain on shoulder. Work until 1 row remains before piece measures 90-93-96-99-102-105 cm / 35½"-36½"-37¾"-39"-40"-41½", knit 1 row from wrong side and bind off by knitting from right side. RIGHT FRONT PIECE: = 31-34-37-39-42-45 stitches. Continue back and forth with 3 edge stitches in garter stitch towards armhole, stockinette stitch and A.3B towards mid front (work first row from wrong side). When 3 rows have been worked back and forth, decrease for armhole on next row from right side - read DECREASE TIP-2. Decrease like this on every other row (i.e. every row from right side) 2-3-5-6-8-11 times in total = 29-31-32-33-34-34 stitches. Continue pattern back and forth as before with A.3B towards mid front, stockinette stitch and 3 edge stitches in garter stitch towards armhole until piece measures approx. 84-87-90-93-96-99 cm / 33"-34¼"-35½"-36½"-37¾"-39" (adjust so that next row is worked from right side and finish on the same row in A.3 as on left front piece). Now slip the first 7-8-8-9-10-10 stitches on 1 stitch holder for neck but to avoid cutting the yarn work them before slipping them on the stitch holder. Continue to bind off for neck at beginning of every row from mid front (i.e. at beginning of each row from right side) as follows: bind off 2 stitches 2 times and 1 stitch 3 times = 15-16-17-17-17-17 stitches remain on shoulder. Work until 1 row remains until piece measures 90-93-96-99-102-105 cm / 35½"-36½"-37¾"-39"-40"-41½", knit 1 row from wrong side and bind off by knitting from right side. BACK PIECE: = 62-68-74-78-84-90 stitches. Continue back and forth with 3 edge stitches in garter stitch in each side, stockinette stitch and A.3A/A.3B mid back (work first row from wrong side). When 3 rows have been worked back and forth, decrease for armhole in each side on next row from right side - read DECREASE TIP-2 (= 2 stitches decreased). Decrease like this on every other row (i.e. every row from right side) 2-3-5-6-8-11 times in total = 58-62-64-66-68-68 stitches. Continue pattern back and forth as before with A.3A/A.3B mid back, stockinette stitch and 3 edge stitches in garter stitch in each side towards armholes until piece measures 88-91-94-97-100-103 cm / 34½"-35¾"-37"-38¼"-39½"-40½". Now bind off the middle 26-28-28-30-32-32 stitches for neck and finish each shoulder separately. Continue as before over shoulder stitches and bind off 1 stitch for neck on next row from the neck = 15-16-17-17-17-17 stitches remain on shoulder. Work until 1 row remains until piece measures 90-93-96-99-102-105 cm / 35½"-36½"-37¾"-39"-40"-41½", knit 1 row from wrong side and bind off by knitting from right side. Work the other shoulder the same way. SLEEVE: Cast somewhat loosely on 76-76-76-95-95-95 stitches on short circular needle size 5 mm / US 8. Work 2 ridges in the round. Then work A.4 (= 4-4-4-5-5-5 repetitions of 19 stitches). NOTE! On round marked with arrow-3 in A.4 displace beginning of round 2 stitches to the left to make the pattern fit. When A.4 has been worked, there are 48-48-48-60-60-60 stitches on needle. Work in stockinette stitch until piece measures 20 cm / 8" - remember MEASURING TIP. Knit 1 round while decreasing 6-4-2-12-10-8 stitches evenly = 42-44-46-48-50-52 stitches. Switch to double pointed needles size 4 mm / US 6 and A.2. After A.2 switch back to double pointed needles size 5 mm / US 8. Insert 1 marker thread at beginning of round (= mid under sleeve). Work in stockinette stitch in the round. When piece measures 25-25-25-26-26-26 cm / 9¾"-9¾"-9¾"-10¼"-10¼"-10¼", increase 2 stitches mid under sleeve - read INCREASE TIP. Increase 7-9-9-11-12-14 times in S: On every 4th round, in M and L: On every 3rd round, in XL: on every other round, in XXL: Alternately on every and every other round and size XXXL: On every round = 56-62-64-70-74-80 stitches. When piece measures 38-38-37-37-35-34 cm / 15"-15"-14½"-14½"-13¾"-13½", bind off the middle 6 stitches under sleeve (bind off 3 stitches on each side of marker thread). Now work sleeve cap back and forth on circular needle, i.e. continue with stockinette stitch and bind off at beginning of every row in each side as follows: bind off 2 stitches 2 times and 1 stitch 3-3-3-5-6-8 times. Then bind off 2 stitches at beginning of every row in each side until piece measures 45-45-45-46-46-47 cm / 17¾"-17¾"-17¾"-18"-18"-18½". Bind off 3 stitches at beginning of the next 2 rows and then bind off the remaining stitches. Sleeve measures approx. 46-46-46-47-47-48 cm / 18"-18"-18"-18½"-18½"-19". Work another sleeve the same way. ASSEMBLY: Sew the shoulder seams. Sew in sleeves - edge in garter stitch along armholes should be on the outside of sleeve (i.e. place the edge in garter stitch a bit over the edge along sleeve cap). Sew the opening at the mid front, start at the bottom and sew up until 10 cm/4" remain before the neckline (or desired length) –sew in the outermost loop of the outermost stitch so that the seam is flat. NECK EDGE: Begin mid front and pick up from right side approx. 72 to 88 stitches around the neck (including stitches on stitch holders at the front) on circular needle size 4 mm / US 6. Knit 1 row from wrong side, knit 1 row from right side and knit 1 row from wrong side. Bind off knitting from right side. TWINED STRING: Cut 2 strands Paris of 3 metres each. Twine the strands tog until they resist, fold the string double so that it twines again. Make a knot at each end. Fasten a small wooden bead in each end of the tie. Make 2 tassels and fasten one tassel in each end of string, under wooden bead in each side. 1 tassel = cut 12 strands Paris of 11 cm / 4½" each. Cut 1 strand of approx. 25 cm / 9¾" to fasten tassel with and place this strand in the middle of the 12 strands. Fold the thread double and tie a new thread around the tassel (approx. 1 cm / ⅜" from the top), fasten tightly and sew tassel to string as explained below. Make the other tassel the same way. Place string with tassels double and thread loop through a stitch at the top of vent at the front on dress, pull string ends through loop. Make a similar string with wooden beads and tassels and fasten it at the top of vent on the other side. |
||||||||||||||||||||||||||||
Diagram explanations |
||||||||||||||||||||||||||||
|
||||||||||||||||||||||||||||
 |
||||||||||||||||||||||||||||
 |
||||||||||||||||||||||||||||
 |
||||||||||||||||||||||||||||
Have you finished this pattern?Tag your pictures with #dropspattern #lovestorydress or submit them to the #dropsfan gallery. Do you need help with this pattern?You'll find 34 tutorial videos, a Comments/Questions area and more by visiting the pattern on garnstudio.com. © 1982-2026 DROPS Design A/S. We reserve all rights. This document, including all its sub-sections, has copyrights. Read more about what you can do with our patterns at the bottom of each pattern on our site. |
||||||||||||||||||||||||||||


With over 40 years in knitting and crochet design, DROPS Design offers one of the most extensive collections of free patterns on the internet - translated to 17 languages. As of today we count 325 catalogs and 12298 patterns - 12288 of which are translated into English (US/in).
We work hard to bring you the best knitting and crochet have to offer, inspiration and advice as well as great quality yarns at incredible prices! Would you like to use our patterns for other than personal use? You can read what you are allowed to do in the Copyright text at the bottom of all our patterns. Happy crafting!
Post a comment to pattern DROPS 188-3
We would love to hear what you have to say about this pattern!
If you want to leave a question, please make sure you select the correct category in the form below, to speed up the answering process. Required fields are marked *.