
Popular categories
Looking for a yarn?


Comments / Questions (45)
![]() Gitte wrote:
Gitte wrote:
Hej. Jeg kan Ikke få opskriften til , at gå op i 3x XL. Det er i de forhøjning og der hvor mærketråd og mærkerne skal sættes. Vil ikke godt uddybe det for mig. Og skrive hvordan jeg skal starte med forhøjning og hvor de mærketråd og mærker skal være. Håber at i kan hjælpe mig.Hilsen Gitte F.
17.12.2021 - 18:32
![]() Gerd Ingrid Olsen wrote:
Gerd Ingrid Olsen wrote:
Er det forskjell mellom denne og \"Narvik Jacket by DROPS Design\"? hvilken modell er lettest å strikke?
03.01.2020 - 11:38DROPS Design answered:
Hej Gerd, vælg den du synes bedst om, bare du følger opskriften, så skal du nok finde ud af det :)
10.01.2020 - 15:49
![]() Ann-Kristin wrote:
Ann-Kristin wrote:
Om jag gör som det står i mönstret blir knapphålet väldigt litet. Knappen i mönstret är 20 mm o knapphålet mycket mindre.
20.08.2019 - 22:17DROPS Design answered:
Hei Ann- Kristin. Ett kast til knappehull skal være nok til knappen som skal brukes. En strikket stolpe med knappehull er tøyelig, men kan være trang de første gangene. Om du ønsker et større knappehull, kan du gjøre 2 kast om pinnen istedenfor 1 kast. God Fornøyelse.
09.09.2019 - 11:04
![]() Rebecka wrote:
Rebecka wrote:
Hej! Jag förstår inte hur jag ska komma vidare. Jag har precis satt ut de olika markörerna och ska nu börja sticka efter mönstret, A.3. Min fråga är vart jag ska öka för raglan? Förstår inte förklaringen under ökningstipset, att det ska ökas en maska före och efter de 4 maskorna som sitter mellan markörerna på främst/bakst och ärmarna. Skulle ni kunna förklara vart jag ska göra ökningarna? Hur många ökningar blir det på vart annat varv? Stickar st. medium. Tack!
18.08.2019 - 15:10DROPS Design answered:
Hej, du ökar 1 maska på varje sida om de 4 maskorna i raglanlinjen (dessa maskor sitter mellan markörerna). I storlek M ökar du totalt 15 gånger på vartannat varv och 6 gånger på vart 4:e varv på fram -och bakstycket. På ärmarna ökar du 15 gånger på vartannat varv och sedan 6 gånger på vart 4:e varv. Det ökas alltså inte alla gånger samtidigt på fram- och bakst och ärmarna.
19.08.2019 - 18:05
![]() Solvor wrote:
Solvor wrote:
Hei. Hvis jeg ønsker å strikke denne jakken i et tynnere garn, for at jakken ikke skal bli så tykk. Hvordan omregner jeg da mønsteret? Hvilket garn kan da anbefales? Mvh Solvor
05.04.2019 - 12:08DROPS Design answered:
Hei Solvor. Hvis du vil strikke den i et tynnere garn vil du få en annen strikkefasthet enn angitt. Du må derfor regne om alle maskeantall i genseren, og samtidig passe på at mønsteret går opp i hele rapporter. Det er selvfølgelig ikke noe i veien for at du gjør dette, men vær klar over at det krever en del regning. Ta utgangspunkt i strikkefastheten din i det andre garnet, og målene du ønsker på plagget. Cm-målet i bredden kan du gange med strikkefastheten for å få maskeantall. For en oversikt over våre tynneste garn, se på garnene i garngruppe A. God fornøyelse
08.04.2019 - 15:17Christiane wrote:
Danke fuer die Antwort. Wie oft stricke ich 'jede 2. Reihe' bevor ich anfange, 'jede 4. Reihe' zu stricken? (Ich stricke die Jacke in Groesse M) Ist mit 'jede 2. Reihe' jede 2. Hin-Reihe gemeint oder insgesamt jede 2. Reihe? Und kommen diese Zunahmen zusaetzlich zu den Zunahmen fuer die Raglanaermel (je eine M vor und hinter den 4 Raglan M)?
09.03.2018 - 13:46DROPS Design answered:
Liebe Christiane, in der Größe M wird es 15 Mal in jeder 2. Reihe und 6 Mal in jeder 4. Reihe zugenommen. In jeder 2. Reihe = 1 Reihe mit Zunahmen, 1 Reihe ohne Zunahmen stricken, diese beide Reihe insgesamt 15 Mal wiederholen. In jeder 4. Reihe zunehmen = 1 Reihe mit Zunahmen, 3 Reihen ohne Zunahmen stricken, diese 4 Reihe insgesamt 6 Mal wiederholen. Bei den Ärmeln wird es in jeder 2. Reihe 15 x und in jeder 4. Reihe 6x zugenommen, dh unterschiedlich von Rumfteil. Viel Spaß beim stricken!
09.03.2018 - 14:25Christiane wrote:
Hei, wie soll ich diese Anweisung verstehen: 'Am RUMPFTEIL: In jeder R insgesamt 0-0-0-2-10-14 x, danach in jeder 2. R 14-15-17-19-20-20 x' Wie viele solcher Reihen soll man jeweils stricken? Was bedeutet das x am Ende? Herzlichen Dank und viele Gruesse, Christiane
09.03.2018 - 10:28DROPS Design answered:
Liebe Christiane, je nach der Größe werden Sie unterschiedlich stricken, z.B. in der 1. Größe wird es für Raglan in jeder 2. Reihe 14 Mal (= x) zugenommen, in die letzte Größe wird es in jeder Reihe 14 Mal dann in jeder 2. Reihe 20 Mal zugenommen. Viel Spaß beim stricken!
09.03.2018 - 11:31
![]() Christiane Martin wrote:
Christiane Martin wrote:
Hei, wie soll ich diese Anweisung verstehen: 'Am RUMPFTEIL: In jeder R insgesamt 0-0-0-2-10-14 x, danach in jeder 2. R 14-15-17-19-20-20 x' Wie viele solcher Reihen soll man jeweils stricken? Was bedeutet das x am Ende? Herzlichen Dank und viele Gruesse, Christiane
09.03.2018 - 10:27
![]() Torunn Mari Rørvik wrote:
Torunn Mari Rørvik wrote:
Hei, jeg skal strikke denne i str M. Forstår ikke helt hvor jeg skal plassere merketrådene og merkene. kan du prøve å forklare på en enklere måte? er det korrekt å merke etter følgende masker: 25-2-4-7-6-4-24-23-4-7-6-4-25-og nest siste maske?
28.02.2018 - 20:29DROPS Design answered:
Hei Torunn. Husk det er forskjell mellom merketrådene og merkene. Du setter 8 merketråder og 5 merker, merketrådene setter du etter 25.-29.-42.-46.-93.-97.-110. og etter 114. maske. De 5 merkene setter du i 2.-36.-70.-104. og i 138. maske. God Fornøyelse!
07.03.2018 - 08:12Sophia wrote:
Unfortunately at the beginning.i knit size s 111st.ihave 22st in each front side and back side 21st strand 20st .in the front side I have a strand in the 2ndst .pattern say to fit arrow st in stand st , but I have 22 st and patten 12. 12+12= 24st. And the back piece had total41 st with strand in the middle. How to adjust the st with arrow in the middle of st? Sorry , it's the first pattern that I don't understand .thank you for your patience
23.01.2018 - 08:52DROPS Design answered:
Dear Sophia, you can read here how to center a diagram on a piece. Happy knitting!
23.01.2018 - 13:31
|
|||||||
Silver Dream Cardigan#silverdreamcardigan |
|||||||
 |
 |
||||||
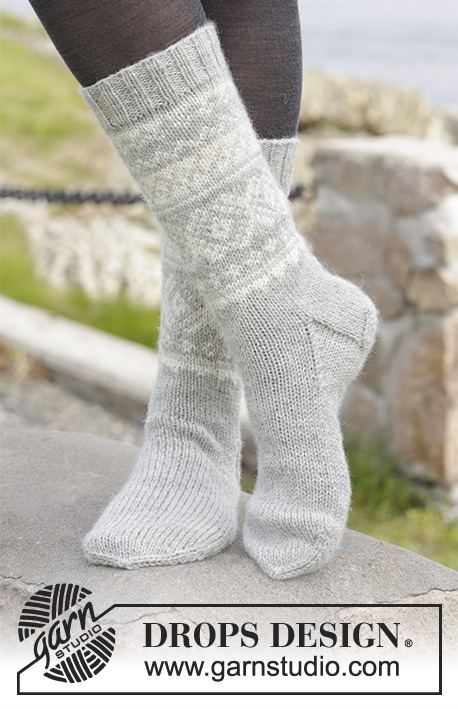
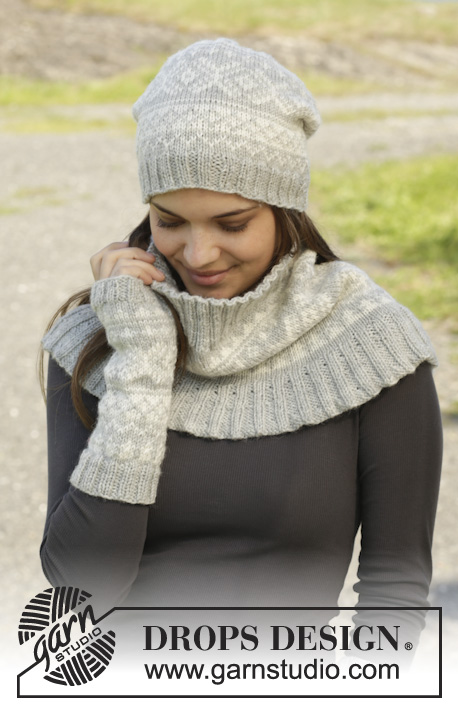
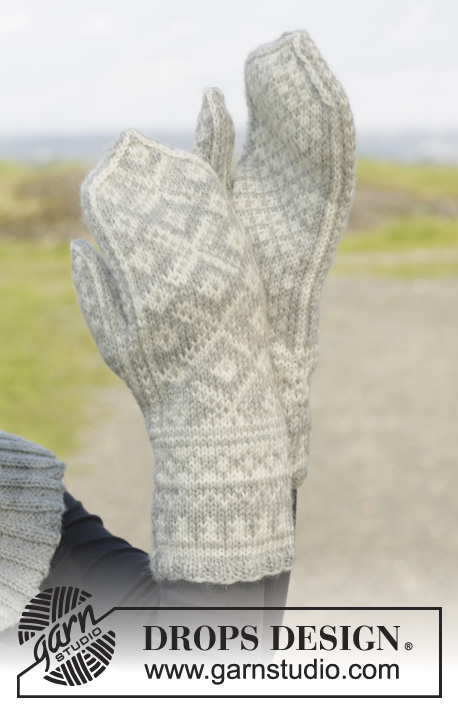
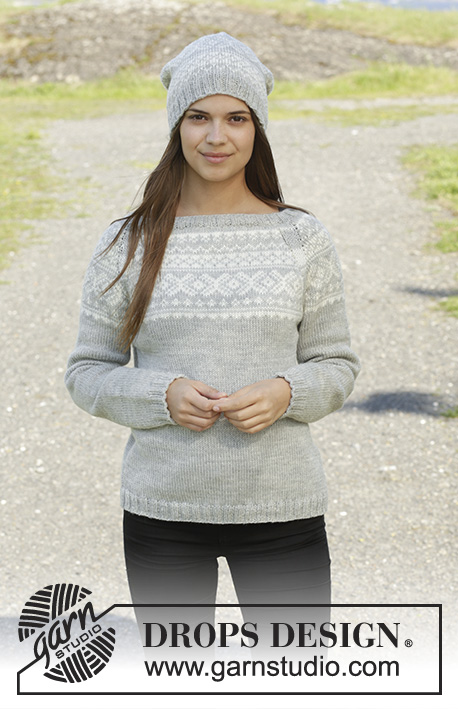
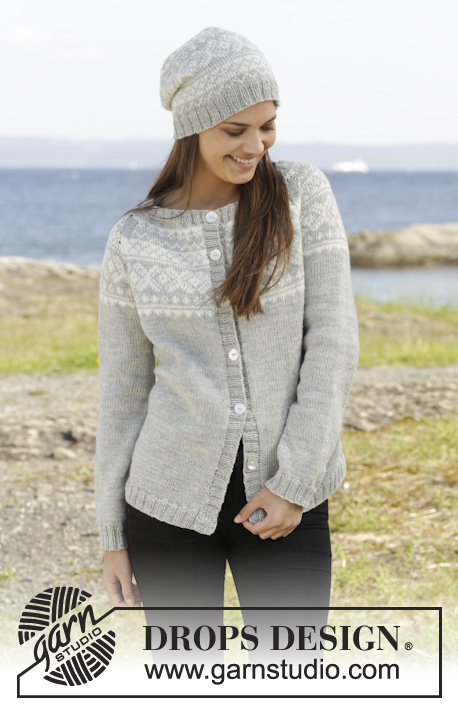
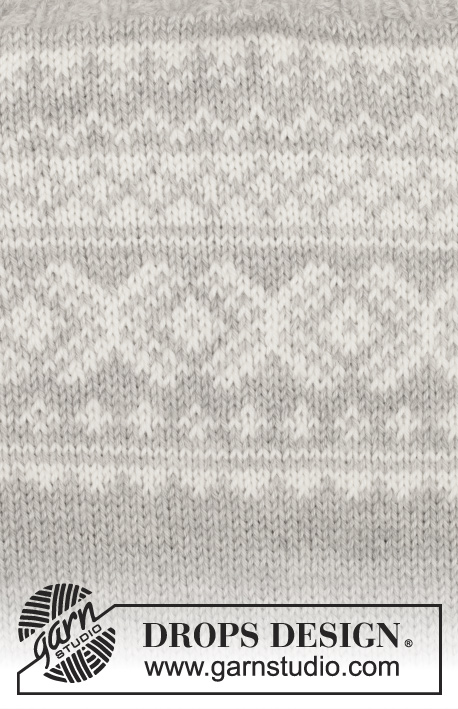
Knitted DROPS jacket and hat with Norwegian pattern, worked top down in ”Karisma”. Size: S - XXXL.
DROPS 157-1 |
|||||||
|
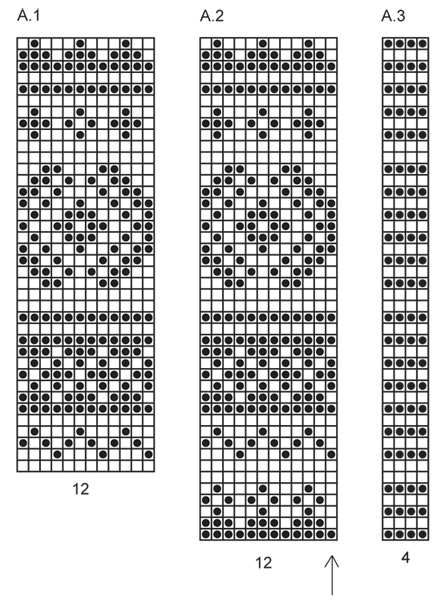
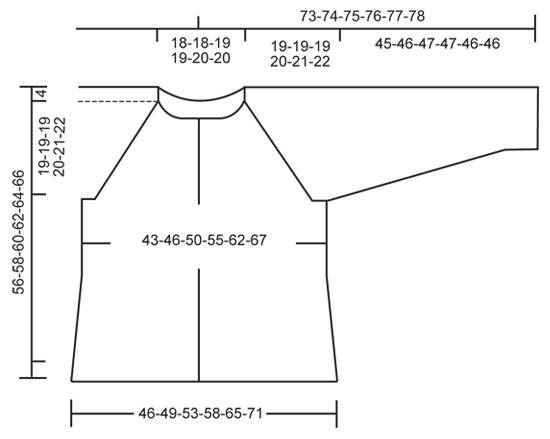
GARTER ST (back and forth on needle): K all rows. 1 ridge = K2 rows. PATTERN: See diagrams A.1-A.3. Work entire pattern in stockinette st. ELEVATION: Work an elevation in the back of neck as follows: NOTE! On every turn in the middle of piece slip 1st st, tighten yarn and continue to work. Beg mid back and work until 22-25-28-29-29-31 sts remain, turn, tighten yarn and work until 22-25-28-29-29-31 sts remain in the other side. Turn, tighten yarn and work until 37-41-46-49-49-53 sts remain, turn, tighten yarn and work until 37-41-46-49-49-53 sts remain in the other side. Turn, tighten yarn and work until 53-58-65-70-70-76 sts remain, turn, tighten yarn and work until 53-58-65-70-70-76 sts remain in the other side. INCREASE TIP (applies to raglan): Inc 1 st by making a YO before and after the 4 sts between markers on front piece/back piece and sleeves. K YO twisted on next row. Work the inc sts in the pattern. PATTERN TIP: Diagram A.3 shows how to work the 4 raglan sts to avoid large spaces between sts. After diagram work piece with light pearl gray until finished. ---------------------------------------------------------- JACKET: Worked back and forth on circular needle, top down. Work neck edge and band at the end. Cast on 111-111-115-119-123-123 sts (includes 1 edge st in GARTER ST - see explanation above) on circular needle size 4 mm / US 6 with light pearl gray. P 1 row from WS. Continue with stockinette st with 1 edge st in garter st in each side until finished measurements - AT THE SAME TIME on next row inc 12-28-36-40-36-52 sts evenly = 123-139-151-159-159-175 sts. P 1 row from WS. Then work ELEVATION - see explanation above - in the neck. REMEMBER THE GAUGE! Then work 2 rows over all sts, next row is from RS. Work 1 row and at the same time insert 8 markers and 5 strands in the piece as follows: Work 22-25-28-29-29-31 sts, insert a marker after these sts and insert a strand in the 2nd st from beg (= mid front on right front piece). Work 4 sts, insert a marker, work 6-7-7-8-8-10 sts, insert a strand in the last st on right needle (= mid st on sleeve). Work 5-6-6-7-7-9 sts, insert a marker. Work 4 sts, insert a marker, work 21-24-27-28-28-30 sts, insert a strand in the last st on right needle (= middle of back piece). Work 20-23-26-27-27-29 sts, insert a marker. Work 4 sts, insert a marker, work 6-7-7-8-8-10 sts, insert a strand in the last st on right needle (= middle of sleeve). Work 5-6-6-7-7-9 sts, insert a marker. Work 4 sts, insert a marker. Work 22-25-28-29-29-31 sts, insert a strand in next to last st (= mid front on left front piece). READ ALL OF THE FOLLOWING SECTION BEFORE CONTINUING: Now work PATTERN according to diagram A.2 - READ PATTERN TIP! NOTE: St with strand on back piece, front piece and sleeves should fit st with arrow in diagram. Count out towards the side (i.e. the pattern will not fit in transitions between body and sleeves). AT THE SAME TIME inc for raglan in every transition between body and sleeves as follows - READ INCREASE TIP: ON BODY: Inc every round 0-0-0-2-10-14 times in total, every other round 14-15-17-19-20-20 times in total and then every 4th round 6-6-5-4-2-2 times in total (= 81-89-97-105-119-131 sts on back piece and 42-46-50-54-61-67 sts on each front piece) ON SLEEVE: Inc every other round 14-15-19-20-25-23 times in total and every 4th round 6-6-4-4-2-4 times in total (= 59-63-67-71-77-81 sts on sleeve). Piece measures approx. 19-19-19-20-21-22 cm / 7½"-7½"-7½"-8"-8¼"-8¾" from cast-on edge at the front, now measure piece from here! After all inc for raglan, there are 283-307-331-355-395-427 sts on needle. Work next row as follows from RS: Work the first 42-46-50-54-61-67 sts (= front piece), slip the next 59-63-67-71-77-81 sts on stitch holder (= sleeve), cast on 8-8-8-10-10-10 new sts, work 81-89-97-105-119-131 sts (= back piece), slip the next 59-63-67-71-77-81 sts on stitch holder (= sleeve), cast on 8-8-8-10-10-10 new sts, work the remaining 42-46-50-54-61-67 sts (= front piece) = 181-197-213-233-261-285 sts. Insert 1 marker in the middle of the 8-8-8-10-10-10 new sts under each sleeve. Then work in stockinette st with 1 edge sts in garter st in each side as before until piece measures approx. 36-37-38-39-40-41 cm / 14¼"-14½"-15"-14¼"-15¾"-16⅛" from cast-on edge at the front. Then inc 1 st by making a YO on each side of the middle 2 sts in each side (marker is in the middle of these sts), P YO twisted on next row (= 4 sts inc). Repeat inc every 4-4-4-5-5-5 cm / 1½"-1½"-1½"-2"-2"-2" 2 more times (= 3 times in total) = 193-209-225-245-273-297 sts. Work until piece measures 52-54-56-58-60-62 cm / 20½"-21¼"-22"-22¾"-23⅝"-24⅜" from cast-on edge at the front. On next row from RS, inc 7 sts evenly in all sizes = 200-216-232-252-280-304 sts. Switch to circular needle size 3.5 mm / US 4. Work rib as follows from WS: 1 edge st in garter st, * P 2, K 2 *, repeat from *-* until 3 sts remain. Finish with P 2 and 1 edge st in garter st. Work until rib measures approx. 4 cm / 1½". Bind off with K over K and P over P. SLEEVE: Work piece in the round on circular needle in stockinette st. Slip sts from one stitch holder back on circular needle size 4 mm / US 6 (= 59-63-67-71-77-81 sts). Work in stockinette st and cast on 8-8-8-10-10-10 new sts at the end of row = 67-71-75-81-87-91 sts. Insert a marker in the middle of the new sts under the sleeve. When piece measures approx. 3 cm / 1", dec 1 st on each side of the middle 2 sts under sleeve (marker is in the middle of these 2 sts). Switch to double pointed needles when needed. Repeat dec every 3½-3½-3-2½-2-2 cm / 1¼"-1¼"-1"-⅞"-¾"-¾" 8-9-10-12-15-16 more times (= 9-10-11-13-16-17 times in total) = 49-51-53-55-55-57 sts. When piece measures 41-42-43-43-42-42 cm / 16"-16½"-17"-17"-16½"-16½", inc 7-5-7-5-9-7 st evenly = 56-56-60-60-64-64 sts. Switch to double pointed needles size 3.5 mm / US 4 and work rib (K 2, P 2) until piece measures 45-46-47-47-46-46 cm / 17¾"-18"-18½"-18½"-18"-18" from where new sts were cast on. Bind off with K over K and P over P. Work the other sleeve the same way. LEFT BAND: Work band back and forth on circular needle size 3.5 mm / US 4. Pick up 120-124-128-132-136-140 sts, (no of sts must be divisible by 4) inside 1 edge st on left front piece with light pearl gray. Work rib as follows from WS: 1 st in garter st, * P 2, K 2 *, repeat from *-*, finish with P 2 and 1 st in garter st. Then work K over K and P over P until rib measures 3 cm / 1". Bind off with K over K and P over P. RIGHT BAND: Work as left band but when band measures approx. 1.5 cm / ½", dec for 5-5-6-6-6-6 buttonholes evenly (dec for buttonholes in P sections seen from RS). 1 buttonhole = P 2 tog and make 1 YO – top buttonhole should be approx. 6 cm / 2⅜" from the top (there should also be 1 buttonhole on neck edge), the other buttonholes should be approx. 8 cm / 3⅛" apart. The distance after last buttonhole down towards edge is larger. NECK EDGE: Beg at the edge on right band at the top. Use circular needle size 3.5 mm / US 4 and pick up 128-128-132-136-140-140 sts (no of sts must be divisible by 4) with light pearl grey around the entire edge and over left band. Work rib as follows (1st row = WS): 1 st in garter st, * P 2, K 2 *, repeat from *-*, finish with P 2 and 1 st in garter st. Continue with K over K and P over P with 1 st in garter st in each side of piece. When neck edge measures 1 cm / ⅜", dec for 1 buttonhole over the other buttonholes on right band. Continue rib until neck edge measures approx. 2 cm / ¾". Bind off with K over K and P over P. ASSEMBLY: Sew holes tog under sleeves and fasten yarn. ---------------------------------------------------------- HAT: Worked in the round on circular needle, switch to double pointed needles when needed. Cast on 116 sts with light pearl gray on circular needle size 3.5 mm / US 4. Work rib = K 2/P 2 until piece measures approx. 4 cm / 1½". Switch to circular needle size 4 mm / US 6. K 1 round with pearl gray while AT THE SAME TIME dec 8 sts evenly = 108 sts. Then work pattern according to diagram A.1 (= 9 repetitions on round). REMEMBER THE GAUGE! When A.1 has been worked 1 time vertically, continue with light pearl gray and stockinette st. Work 1 round AT THE SAME TIME insert 9 markers in the hat with 12 sts between every marker. On next round, dec 1 st after every marker by K 2 tog (= 9 sts dec). Repeat dec every other round 10 times in total = 18 sts. On next round K tog all sts 2 by 2 = 9 sts. Cut the yarn and pull it through the remaining sts, tighten tog and fasten. The hat measures approx. 25 cm / 9¾" vertically. |
|||||||
Diagram explanations |
|||||||
|
|||||||
 |
|||||||
 |
|||||||
Have you finished this pattern?Tag your pictures with #dropspattern #silverdreamcardigan or submit them to the #dropsfan gallery. Do you need help with this pattern?You'll find 33 tutorial videos, a Comments/Questions area and more by visiting the pattern on garnstudio.com. © 1982-2026 DROPS Design A/S. We reserve all rights. This document, including all its sub-sections, has copyrights. Read more about what you can do with our patterns at the bottom of each pattern on our site. |
|||||||


With over 40 years in knitting and crochet design, DROPS Design offers one of the most extensive collections of free patterns on the internet - translated to 17 languages. As of today we count 324 catalogs and 12290 patterns - 12280 of which are translated into English (US/in).
We work hard to bring you the best knitting and crochet have to offer, inspiration and advice as well as great quality yarns at incredible prices! Would you like to use our patterns for other than personal use? You can read what you are allowed to do in the Copyright text at the bottom of all our patterns. Happy crafting!
Post a comment to pattern DROPS 157-1
We would love to hear what you have to say about this pattern!
If you want to leave a question, please make sure you select the correct category in the form below, to speed up the answering process. Required fields are marked *.