
Popular categories
Looking for a yarn?


Comments / Questions (168)
![]() Judy Oro wrote:
Judy Oro wrote:
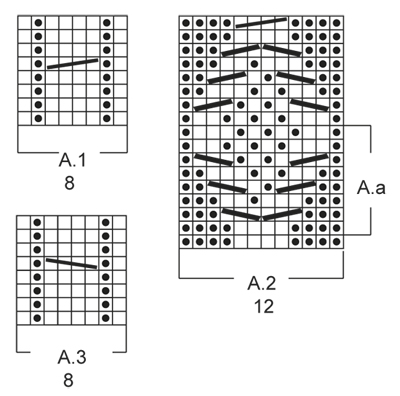
Mistake? A.2 row 3 P3, K2, P, K1 from cable, P, K1, K2 off cable, P3 makes it 14 stitches not the 12 of the pattern. Am I reading it wrong?
15.01.2015 - 21:17DROPS Design answered:
Dear Mrs Oro, 3rd round is worked as follows: P3, cable over the next 3 sts, cable over the next 3 sts, P3 = 12 sts. Happy knitting!
16.01.2015 - 09:56Mareta wrote:
I knitted a pair of the Celtic Dancer socks for my daughter and she absolutely loves them! Now a pair for myself and then the rest of the family. I struggled a little with the pattern in the beginning, but it is actually quite easy. Thanks for a lovely sock pattern! :-)
28.12.2014 - 19:27
![]() Caroline wrote:
Caroline wrote:
Très joli modèle.... Petite précision sur la transition entre le tricot allé retour et le passage en rond que j ai mis bcp de tps a comprendre: il faut tricoter un rang sur l endroit du travail ( 4m env A3 point de riz A1 4m env) monter 4 mailles a la fin de ce rang. A mon sens le tricot en rond commence ici: on tricote les 4 mailles env du début du rg ( et non les 4 m que l on vient de monter comme j ai lgt essayé) . Puis on prend comme début du tour la 1 ère m de A3.
20.12.2014 - 01:40
![]() Fran Hoffman wrote:
Fran Hoffman wrote:
What does "measure in the middle of cable A.1/A.3 mean?" Where is the middle of the cable?
02.12.2014 - 00:12DROPS Design answered:
Dear Mrs Hoffman, we are working here different patterns (seed st, cables...) to be sure you have the correct measurements, measure piece where you worked the cables A.1 or A.3 (in the crossed sts). Happy knitting!
02.12.2014 - 09:17Monika Buro (Canada) wrote:
Hallo drops-team, ich habe schon viele modelle nachgearbeitet, leider muß ich die diagramme immer "abmalen", sie werden nicht ausgedruckt, immer nur die erklärungen. und warum wird immer die "werbeseite" mit ausgedruckt, verschwendet das papier und wird nicht benötigt. vielleicht läßt sich das ändern? habe ein altes muster aus den 80er jahren wie man strümpfe mit 2 nadeln strickt, ist viel einfacher und geht schneller. seid ihr daran interessiert?
01.12.2014 - 11:13DROPS Design answered:
Liebe Monika, die Diagramme werden normalerweise auch mit ausgedruckt, wenn Sie die Schaltfläche "Drucken: Anleitung" verwenden. Überprüfen Sie am besten Ihre Druckeinstellungen. Die Werbeseite gehört zwar auch dazu, Sie können aber in Ihren Druckeinstellungen normalerweise angeben, welche Seiten Sie drucken möchten und welche nicht, damit können Sie dann die Werbung "übergehen".
01.12.2014 - 11:42Dolores wrote:
Como saco el empeine de este modelo , se podria tener un video de principio al final de la prenda gracias
17.11.2014 - 17:40DROPS Design answered:
Hola Dolores. Debido a la limitación del espacio en la web no podemos tener los vídeos para realizar cada patrón. En el apartado VIDEOS (ver encima del patrón - junto con los materiales) tenemos varios videos que te pueden facilitar el trabajo. La parte del empeine tiene dibujos que se trabajan según los diagramas (ver final del patrón)
24.11.2014 - 12:10Dolores wrote:
Es muy dificil sacar este modelo en la parte del empeine en lo personal me gustaria tener un video en donde vea paso a paso de principio a fin la indicacion para concluirlo,soy mexicana agradesco mucho por compartir esta grandiosa pagina ,sin mas por el momento que tengan un hermoso dia.
17.11.2014 - 17:38DROPS Design answered:
Hola Dolores. Debido a la limitación del espacio en la web no podemos tener los vídeos para realizar cada patrón. En el apartado VIDEOS (ver encima del patrón - junto con los materiales) tenemos varios videos que te pueden facilitar el trabajo. La parte del empeine tiene dibujos que se trabajan según los diagramas (ver final del patrón)
20.11.2014 - 09:38Dianne Hanselman wrote:
On the pattern Celtic Dancer slippers how do you do the seed stitch k1 p1 on uneven number.
15.11.2014 - 05:53DROPS Design answered:
Dear Mrs Hanselman, you will work K over P and P over K in the seed stitch section. Happy knitting!
15.11.2014 - 09:48
![]() Marie-Audrey Nadeau Fortin wrote:
Marie-Audrey Nadeau Fortin wrote:
Bonjour, Lorsqu'il faut réaliser A2, doit-on débuter par le bas du diagramme puis continuer chaque rangée vers le haut ou l'inverse (de haut en bas)? Aussi, lorsqu'il faut réaliser les torsades dans A2, que signifie le symbole "/"? Par exemple, lorsqu'il est écrit "reprendre la m en attente et la tricoter à l'env/à l'end ", que dois-je faire? Dois-je tricoter la maille en attente à l'endroit ou à l'envers? Merci beaucoup!
01.11.2014 - 03:20DROPS Design answered:
Bonjour Mme Nadeau, les diagrammes se lisent en commençant en bas à droite vers la gauche les rangs sur l'end (et tous les tours quand on tricote en rond) (voir ici.) Dans les symboles 3 et 4 du diag, tricotez la m à l'end ou à l'env en fonction du motif. Bon tricot!
01.11.2014 - 10:30
![]() Nikoline Pilgaard Larsen wrote:
Nikoline Pilgaard Larsen wrote:
Er der ikke en fejl i A2? Linje tre fra neden eksempelvis: der er kun tre masker til at sætte to masker på hj.pind og strikke to ret, og derefter strikke de to masker.
27.10.2014 - 19:25DROPS Design answered:
Hej Nikoline, ifølge diagramforklaringen sætter du kun 1 m på hj.p. God fornøjelse!
28.10.2014 - 08:26
|
|||||||||||||||||||
Celtic Dancer#celticdancerslippers |
|||||||||||||||||||
 |
 |
||||||||||||||||||
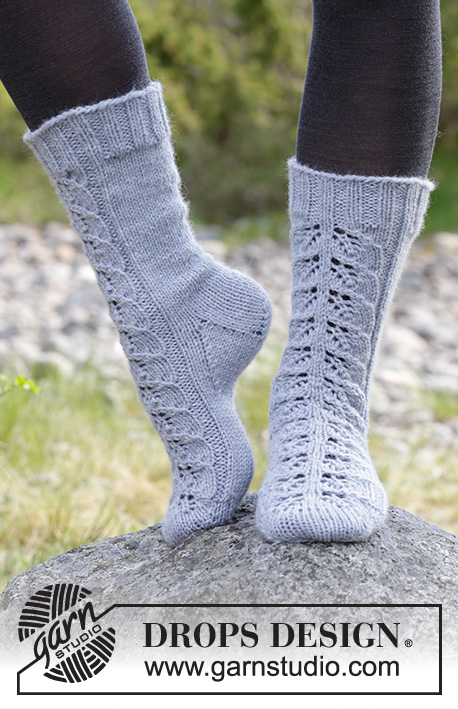
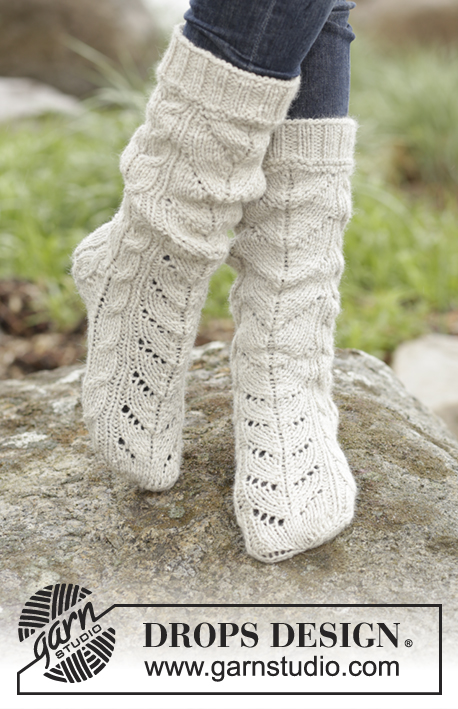
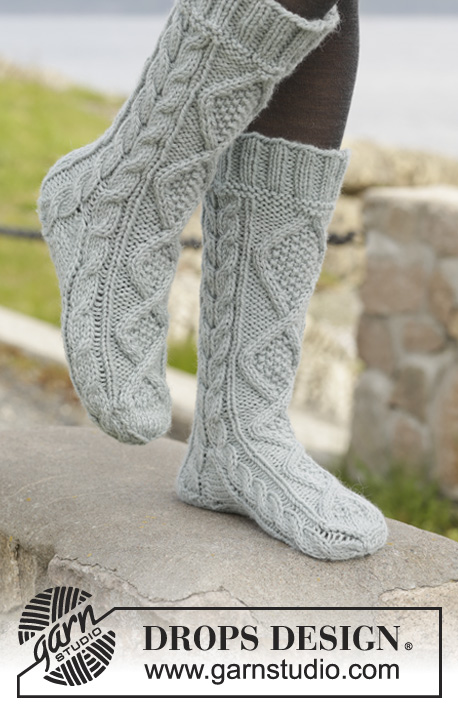
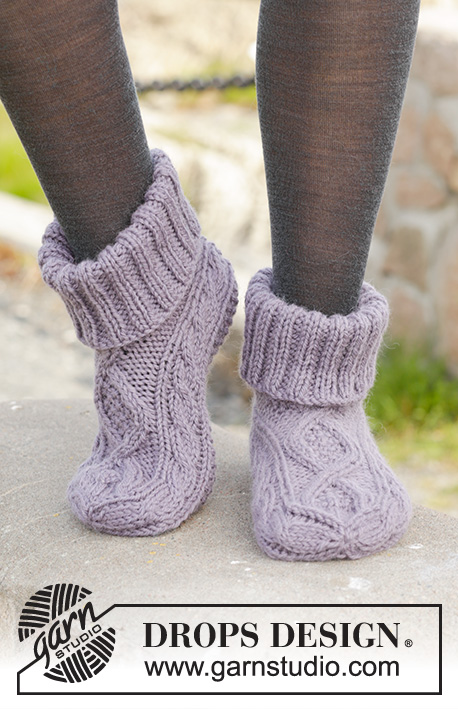
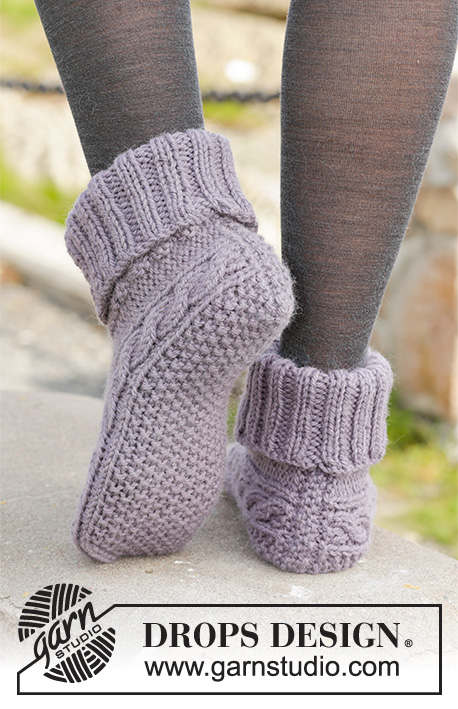
Knitted DROPS slippers with cables in "Nepal".
DROPS 156-55 |
|||||||||||||||||||
|
PATTERN: See diagrams A.1-A.3. The diagrams show the pattern seen from RS. DECREASE TIP: Dec 1 st before marker as follows: K 2 tog. Dec 1 st after marker as follows: K 2 twisted tog. GARTER ST (back and forth on needle): K all rows. 1 ridge = K2 rows. SEED ST: Row/round 1: * K 1, P 1 *, repeat from *-*. Row/round 2: K over P and P over K. Repeat 2nd row/round. MEASURING TIP: Measure in the middle of cable in A.1/A.3. ---------------------------------------------------------- SLIPPER: Worked back and forth from mid back. Cast on 33-33-35 sts on needle size 5 mm / US 8 with Nepal (let the yarn end be approx. 20 cm / 8"; used for assembly). Work 1 ridge in GARTER ST - see explanation above AT THE SAME TIME on last row inc 4 sts evenly = 37-37-39 sts. Then work as follows from RS: P 4, A.3 (= 8 sts), 13-13-15 sts SEED ST – see explanation above, A.1 (= 8 sts), finish with P 4. Continue the pattern like this, work P sts K from WS. Repeat A.1 and A.3 until finished measurements. REMEMBER THE GAUGE! When piece measures 10½-11½-13 cm / 4¼''-4½"-5" – see MEASURING TIP above, work as follows from RS: P 4, A.3, 13-13-15 sts seed st, A.1, P 4, cast on 4 new sts, work the first 4 sts, round beg here = 41-41-43 sts. Now work piece in the round on double pointed needles. Work pattern as before but now work A.2 (= 12 sts) over the 4 P sts in each side of piece and the 4 new sts. When A.2 has been worked 1 time vertically, work A.a until piece measures 17-19-22 cm / 6¾''-7½"-8¾". Now work in stockinette st over sts in A.a, or start stockinette st a bit earlier. Continue A.1 and A.3 until finished measurements. Now insert 4 markers in the piece as follows: Work A.3 but insert 1st marker between 1st and 2nd st and 2nd marker between 7th and 8th st in A.3, work seed st as before, work A.1 but insert 3rd marker between 1st and 2nd st and 4th marker between 7th and 8th st in A.1, K the remaining sts (= 14 sts on top of foot, 15-15-17 sts under foot and 6 sts in each side of piece). Now dec for toe on next round as follows: Dec 1 st after 2nd marker and 1 st before 3rd marker under foot 0-0-1 time in total – READ DECREASE TIP above, work the remaining sts = 14 sts on top of foot and 15 sts under foot (= 41 sts in total). On next round, dec as follows: Dec 1 st before 1st and 3rd marker and 1 st after 2nd and 4th marker (= 4 dec in total). Repeat dec every round 6 times in total AT THE SAME TIME on last dec work cable sts in A.1 and A.3 as follows: K 2 twisted tog, K 2 tog. After all dec there are 13 sts on needle. Piece measures approx. 20-22-25 cm / 8''-8¾"-9¾". Cut the yarn and pull it through the remaining sts, tighten tog and fasten. ASSEMBLY: Fold cast-on edge double (= mid back), use yarn end from beg to sew neatly tog mid back. EDGE: Work edge in the round on double pointed needles around the opening on slipper. Pick up 50-50-54 sts on double pointed needles size 4 mm / US 6 with Nepal. P 1 round. Then K 1 round while AT THE SAME TIME inc 10 sts evenly = 60-60-64 sts. Work rib = K 2/P 2 until piece measures approx. 12-13-14 cm / 4¾''-5"-5½". Bind off sts with K over K and P over P. Fold the edge double. Knit another slipper. |
|||||||||||||||||||
Diagram explanations |
|||||||||||||||||||
|
|||||||||||||||||||
 |
|||||||||||||||||||
Have you finished this pattern?Tag your pictures with #dropspattern #celticdancerslippers or submit them to the #dropsfan gallery. Do you need help with this pattern?You'll find 21 tutorial videos, a Comments/Questions area and more by visiting the pattern on garnstudio.com. © 1982-2026 DROPS Design A/S. We reserve all rights. This document, including all its sub-sections, has copyrights. Read more about what you can do with our patterns at the bottom of each pattern on our site. |
|||||||||||||||||||


With over 40 years in knitting and crochet design, DROPS Design offers one of the most extensive collections of free patterns on the internet - translated to 17 languages. As of today we count 324 catalogs and 12284 patterns - 12274 of which are translated into English (US/in).
We work hard to bring you the best knitting and crochet have to offer, inspiration and advice as well as great quality yarns at incredible prices! Would you like to use our patterns for other than personal use? You can read what you are allowed to do in the Copyright text at the bottom of all our patterns. Happy crafting!
Post a comment to pattern DROPS 156-55
We would love to hear what you have to say about this pattern!
If you want to leave a question, please make sure you select the correct category in the form below, to speed up the answering process. Required fields are marked *.