
Popular categories
Looking for a yarn?


Comments / Questions (168)
![]() Malva wrote:
Malva wrote:
Bonjour ! J'aime beaucoup votre modèle ! Cependant, je suis embêtée sur un détail... Faut-il continuer le motif A2 jusqu'à la fin (même pour les diminutions )? je ne comprends pas pourquoi faire du Jersey au dessus de A.a, esthétiquement, du moins tout le long des diminutions... Merci pour votre aide !
23.01.2018 - 17:54DROPS Design answered:
Bonjour Malva, quand on commence les diminutions de la pointe, on tricote en jersey car on n'aura rapidement plus assez de mailles pour continuer A.2, mais vous pouvez ajuster différemment si vous le souhaitez. Bon tricot!
23.01.2018 - 18:05
![]() Betty Goertzen wrote:
Betty Goertzen wrote:
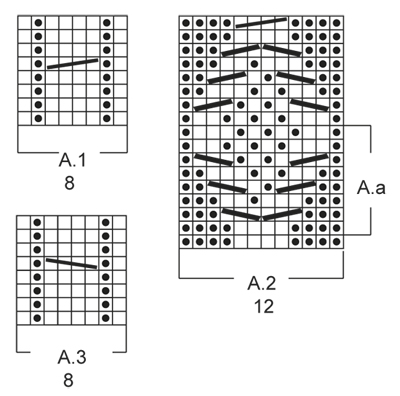
In the fourth row of the directions it says I should have 37 (m) stitches The p4 A.3 =8 stiches and then 13 stitches Should this not be 12 stitches ?
30.10.2017 - 23:06DROPS Design answered:
Dear Mrs Goertzen, you are working over 37 sts: P4, 8 sts in A.3, 13 sts in seed st, 8 sts in A.1 and P 4 = 4+8+13+8+4= 37 sts. Happy knitting!
31.10.2017 - 09:37
![]() Morizot wrote:
Morizot wrote:
Bonjour, j'ai fini mon dernier rang en aller/retour sur l'endroit (soit 4m envers / A3 / 15m au point de riz/ A1/ 4m envers) puis monté mes 4 mailles supplémentaires. Dois-je tricoter ces 4m à l'endroit puis commencer mon 1er tour? Si oui, comment fonctionne A2 (Dois-je tricoter les 4 premières mailles de A2 puis continuer comme avant soit A3/ 15m au point de riz/ A1 et finir par les 8 dernières mailles de A2 comme si nous étions sur l'endroit du travail?)
01.09.2017 - 09:49DROPS Design answered:
Bonjour Mme Morizot, le tour commence après avoir tricoté les 4 premières mailles après les 4 mailles montées, soit: A.3, 15 mailles au point de riz, A.1 et tricotez ensuite A.2 au-dessus des 12 mailles suivantes = 45 mailles. Bon tricot!
01.09.2017 - 15:21
![]() Kimberly wrote:
Kimberly wrote:
Is it just me, or do the cables in A1 & A3 repeat every 8 rows, but look like they should repeat every 6 rows in the pic? I'm trying to count the rows on the pic, and they look to be 6 rows cables. Am I mistaken?
02.02.2017 - 08:26DROPS Design answered:
Dear Kimberly, the cables are done every 8th row in A.1 and in A.3. Happy knitting!
02.02.2017 - 10:16
![]() LUCIA wrote:
LUCIA wrote:
Aiuto!! avviare 4 nuove m, lavorare le prime 4 m, il giro inizia qui . Ora lavorare in tondo con i f a doppia punta. Lavorare il motivo come prima ma ora lavorare A.2 (= 12 m) sulle 4 m rov a ogni lato del lavoro e sulle 4 nuove m. dopo aver avviato 4 nuove maglie alla fine del dritto del lavoro, cosa vuol dire lavorare le prime 4 maglie? quanti ferri devo usare e quanti punti per ferro?Devo usare un segnapunti per capire dove inizia il lavoro? Grazie mille
26.01.2017 - 16:40DROPS Design answered:
Buongiorno Lucia. Dal punto che lei ha riportato, inizia a lavorare in tondo. Potrebbe esserle comodo lavorare già da questo ferro con i ferri a doppia punta. Dopo aver avviato le 4 m alla fine del ferro, chiude in tondo e lavora le prime 4 maglie. Qui può inserire un segno che la aiuta ad individuare l’inizio del giro. Generalmente si distribuiscono le maglie in modo uguale su 4 ferri a doppia punta e si lavora con il quinto. Buon lavoro!
26.01.2017 - 16:59
![]() LUCIA wrote:
LUCIA wrote:
Buongiorno, vorrei chiedere se gli schemi A1 e A 3 si eseguono dal basso verso l'alto e se , nel dritto, devo lavorare il primo ferro di A1 con 1 dritto, un rovescio, 4 dritti, un rovescio ed un dritto. Grazie mille
16.01.2017 - 14:38DROPS Design answered:
Buongiorno Lucia. Sì è corretto. I diagrammi si leggono dal basso verso l'alto e il primo ferro sul diritto si lavora con 1 diritto, 1 rovescio, 4 diritto, 1 rovescio, 1 diritto. Buon lavoro!
16.01.2017 - 16:12
![]() Sarah wrote:
Sarah wrote:
Ich habe nun einen Slipper fertig, aber er ist zu kurz, obwohl ich eher einen zu hohen Maschenwert bei den Reihen habe. Ich habe nach Ende von A.2 bereits 17cm gemessen, sofort mit stockinette stitch weitergemacht, und daher auch die Abnahmen begonnen. War das richtig? "Bei der genannten Gesamtlänge 4 Markierer ... " - heißt das bei 17cm? Oder was ist diese "genannte Gesamtlänge"? Bitte rasch um Hilfe, Weihnachtsgeschenk :)
21.12.2016 - 16:21DROPS Design answered:
Liebe Sarah, Die Gesamtlänge von 17 cm wird in der Mitte des Zopfes A.1./A.3 gemessen. Die 4 Markierer sind bei 17 cm in der Gesamtlänge gemessen, und dann stricken Sie die Spitze wie im nächsten Absatz erklärt ist. Viel Spaß beim stricken!
22.12.2016 - 09:25
![]() Valenzano Hannelore wrote:
Valenzano Hannelore wrote:
Piccolo trucco per una migliore vestibilitá del tallone. Avviare 4 maglie in meno all´inizio. Queste maglie mancanti aumentare ai lati della maglia centrale nel 1. e 2. giro. Facendo la cucitura dietro non risulta quel brutto angolo e il tallone risulta piú arrotondato. C´é qualcun´altra/o che fa cosi`...;-)
26.11.2016 - 18:16
![]() Valenzano Hannelore wrote:
Valenzano Hannelore wrote:
Kleiner trick zur besseren passform. Beim anfang schlage ich 4 maschen weniger an. In der 1. und 2. reihe nehme ich dann die fehlenden maschen beidseitig der mitte wieder auf. Das vermeidet die hässliche ecke unter der ferse beim zusammennähen, denn es ergibt eine rundung, die dann besser passt. Bin neugierig, ob das jemand auch so macht ;-)
26.11.2016 - 18:08
![]() Deborah Davis wrote:
Deborah Davis wrote:
Do I add the 4 markers when it measures 17-19-22 cm or when?
14.11.2016 - 22:13DROPS Design answered:
Dear Mrs Davis, correct, markers are inserted when piece measures 17-19-22 cm. Happy knitting!
15.11.2016 - 09:11
|
|||||||||||||||||||
Celtic Dancer#celticdancerslippers |
|||||||||||||||||||
 |
 |
||||||||||||||||||
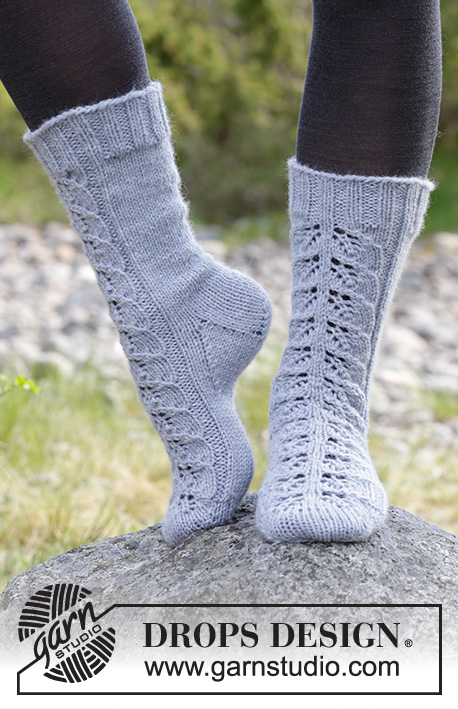
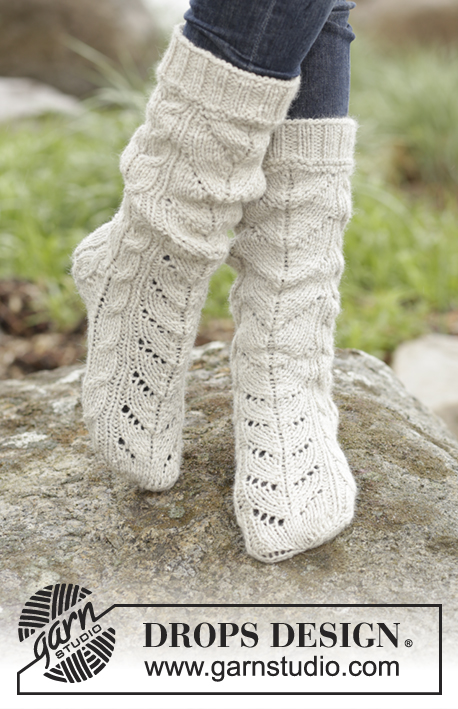
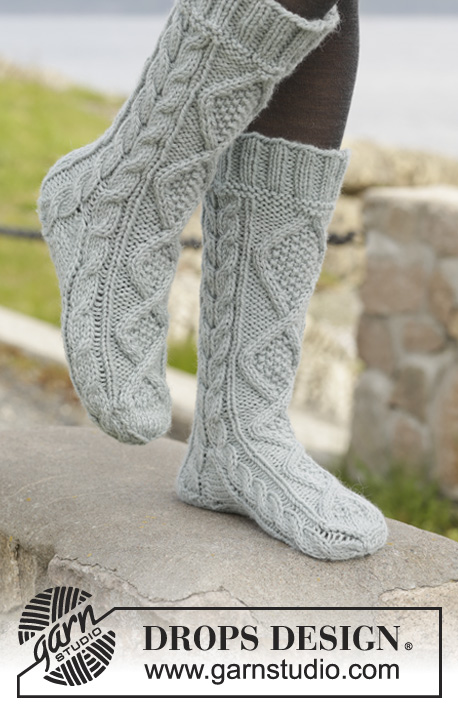
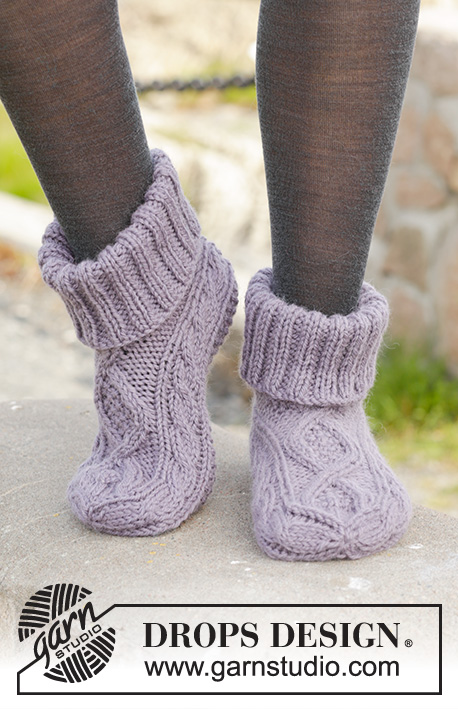
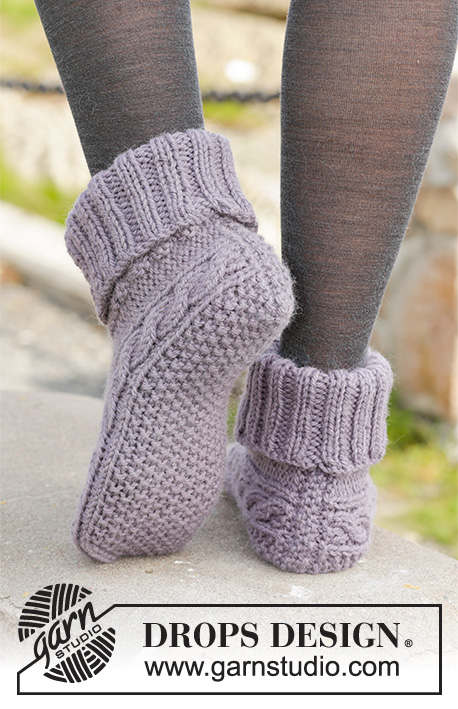
Knitted DROPS slippers with cables in "Nepal".
DROPS 156-55 |
|||||||||||||||||||
|
PATTERN: See diagrams A.1-A.3. The diagrams show the pattern seen from RS. DECREASE TIP: Dec 1 st before marker as follows: K 2 tog. Dec 1 st after marker as follows: K 2 twisted tog. GARTER ST (back and forth on needle): K all rows. 1 ridge = K2 rows. SEED ST: Row/round 1: * K 1, P 1 *, repeat from *-*. Row/round 2: K over P and P over K. Repeat 2nd row/round. MEASURING TIP: Measure in the middle of cable in A.1/A.3. ---------------------------------------------------------- SLIPPER: Worked back and forth from mid back. Cast on 33-33-35 sts on needle size 5 mm / US 8 with Nepal (let the yarn end be approx. 20 cm / 8"; used for assembly). Work 1 ridge in GARTER ST - see explanation above AT THE SAME TIME on last row inc 4 sts evenly = 37-37-39 sts. Then work as follows from RS: P 4, A.3 (= 8 sts), 13-13-15 sts SEED ST – see explanation above, A.1 (= 8 sts), finish with P 4. Continue the pattern like this, work P sts K from WS. Repeat A.1 and A.3 until finished measurements. REMEMBER THE GAUGE! When piece measures 10½-11½-13 cm / 4¼''-4½"-5" – see MEASURING TIP above, work as follows from RS: P 4, A.3, 13-13-15 sts seed st, A.1, P 4, cast on 4 new sts, work the first 4 sts, round beg here = 41-41-43 sts. Now work piece in the round on double pointed needles. Work pattern as before but now work A.2 (= 12 sts) over the 4 P sts in each side of piece and the 4 new sts. When A.2 has been worked 1 time vertically, work A.a until piece measures 17-19-22 cm / 6¾''-7½"-8¾". Now work in stockinette st over sts in A.a, or start stockinette st a bit earlier. Continue A.1 and A.3 until finished measurements. Now insert 4 markers in the piece as follows: Work A.3 but insert 1st marker between 1st and 2nd st and 2nd marker between 7th and 8th st in A.3, work seed st as before, work A.1 but insert 3rd marker between 1st and 2nd st and 4th marker between 7th and 8th st in A.1, K the remaining sts (= 14 sts on top of foot, 15-15-17 sts under foot and 6 sts in each side of piece). Now dec for toe on next round as follows: Dec 1 st after 2nd marker and 1 st before 3rd marker under foot 0-0-1 time in total – READ DECREASE TIP above, work the remaining sts = 14 sts on top of foot and 15 sts under foot (= 41 sts in total). On next round, dec as follows: Dec 1 st before 1st and 3rd marker and 1 st after 2nd and 4th marker (= 4 dec in total). Repeat dec every round 6 times in total AT THE SAME TIME on last dec work cable sts in A.1 and A.3 as follows: K 2 twisted tog, K 2 tog. After all dec there are 13 sts on needle. Piece measures approx. 20-22-25 cm / 8''-8¾"-9¾". Cut the yarn and pull it through the remaining sts, tighten tog and fasten. ASSEMBLY: Fold cast-on edge double (= mid back), use yarn end from beg to sew neatly tog mid back. EDGE: Work edge in the round on double pointed needles around the opening on slipper. Pick up 50-50-54 sts on double pointed needles size 4 mm / US 6 with Nepal. P 1 round. Then K 1 round while AT THE SAME TIME inc 10 sts evenly = 60-60-64 sts. Work rib = K 2/P 2 until piece measures approx. 12-13-14 cm / 4¾''-5"-5½". Bind off sts with K over K and P over P. Fold the edge double. Knit another slipper. |
|||||||||||||||||||
Diagram explanations |
|||||||||||||||||||
|
|||||||||||||||||||
 |
|||||||||||||||||||
Have you finished this pattern?Tag your pictures with #dropspattern #celticdancerslippers or submit them to the #dropsfan gallery. Do you need help with this pattern?You'll find 21 tutorial videos, a Comments/Questions area and more by visiting the pattern on garnstudio.com. © 1982-2026 DROPS Design A/S. We reserve all rights. This document, including all its sub-sections, has copyrights. Read more about what you can do with our patterns at the bottom of each pattern on our site. |
|||||||||||||||||||


With over 40 years in knitting and crochet design, DROPS Design offers one of the most extensive collections of free patterns on the internet - translated to 17 languages. As of today we count 324 catalogs and 12284 patterns - 12274 of which are translated into English (US/in).
We work hard to bring you the best knitting and crochet have to offer, inspiration and advice as well as great quality yarns at incredible prices! Would you like to use our patterns for other than personal use? You can read what you are allowed to do in the Copyright text at the bottom of all our patterns. Happy crafting!
Post a comment to pattern DROPS 156-55
We would love to hear what you have to say about this pattern!
If you want to leave a question, please make sure you select the correct category in the form below, to speed up the answering process. Required fields are marked *.