
Popular categories
Looking for a yarn?


Comments / Questions (168)
![]() Sandra wrote:
Sandra wrote:
Eigentlich kann ich doch von Anfang an in Runden stricken oder? Ich sehe keinen Grund warum ich nicht gleich damit anfange
19.01.2019 - 09:18
![]() Emily Reardon wrote:
Emily Reardon wrote:
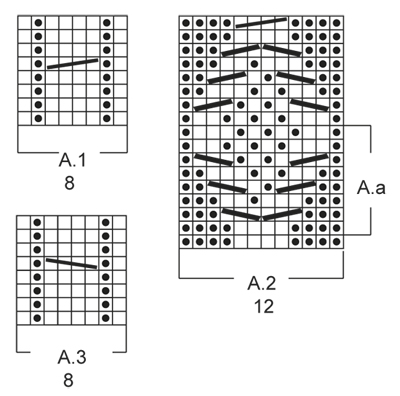
When I am ready to cable in A.2 (row 3) it says to P/K1 from cable needle. This depends on whether you are on a RS/WS? Should I be knitting only RS now that I am joined in the round? Therefore all cables with be knit? Thank you!
05.01.2019 - 22:05DROPS Design answered:
Dear Mrs Reardon, the sts in the middle of A.2 will be worked in seed stitch, so when working the cables in A.2 you will have to either K or P the st depending on how it should be worked on next row. Happy knitting!
07.01.2019 - 11:01
![]() Sacha Roest wrote:
Sacha Roest wrote:
You say that the cable row is row 5 in diagram A.1 and A.3 but it is actually the 4th row.. You see my confusion. But I understand what to do now, thanks
02.01.2019 - 19:42DROPS Design answered:
Dear Sacha, the cable row is row 5 in diagram A.1 and A. 3. Diagrams are to be read from the bottom corner, right to left. Happy crafting!
02.01.2019 - 20:41
![]() Sacha wrote:
Sacha wrote:
Hello, the first time to start with the charts A.3 & A.1 it says to start on RS. But then the cable row end up being a WS row.. am I missing something here? In the cable explanation it says to knit so that seems like a RS.
31.12.2018 - 13:52DROPS Design answered:
Dear Sacha, first row of all diagrams will be worked from RS so that the cable (= row 5 in A.1 and A.3) happens on a RS row. Happy knitting!
02.01.2019 - 11:06
![]() Neuleaddikti wrote:
Neuleaddikti wrote:
Aivan ihana ohje! Mutta miksi jalkapöydän kohdalla ruvetaan toistamaan A.a:ta A.2 sijasta? Tiukalla käsialallani sukkaan mahtuisi hyvin kaksi salmiakkikuviota, joten voinko korvata A.a toistamisen vain jatkamalla koko salmiakkikuviota (A.2)?
26.12.2018 - 22:17
![]() Neuleaddikti wrote:
Neuleaddikti wrote:
Aivan ihana ohje! Mutta miksi jalkapöydän kohdalla ruvetaan toistamaan A.a:ta A.2 sijasta? Tiukalla käsialallani sukkaan mahtuisi hyvin kaksi salmiakkikuviota, joten voinko korvata A.a toistamisen vain jatkamalla koko salmiakkikuviota (A.2)?
26.12.2018 - 22:16
![]() Lorraine wrote:
Lorraine wrote:
Hello, Thanks for posting this lovely pattern! I read the pattern before I started and want to make some notes. I just want to make sure that the first chart to use is A.3 and not A.1. Also, is the RS considered the row with the first line of knit stitches after the cast-on row? Thank you!
18.12.2018 - 20:06DROPS Design answered:
Hi Lorraine. Happy to hear you like the pattern. Yes, A.3 is worked before A.1. The only difference between them is the way the cable turns. On the photo featuring the back of the slippers, you can see A.3 is on the left side and A.1 is on the right side of the foot. Yes, the first row worked after cast on is the RS, that way the first row in the diagrams are also the RS. Happy knitting
19.12.2018 - 08:39
![]() Bleue wrote:
Bleue wrote:
Hi, my question is about A1 pattern. I don't understand exactly how to do "slip 1 st on cable needle behind piece, K 2, P/K 1 from cable needle". Yes, firstly I should knit twice, than what? purl firstly one time and than knit the one from cable needle. But when I do that, spiral look doesn't occur. I can get the desirable look from A3. What can be the reason?
11.12.2018 - 22:14DROPS Design answered:
Hi Bleue, You slip the stitch onto the cable needle and the needle lies at the back of the piece, knit the next 2 stitches (not the stitch on the cable needle) and then either purl or knit the stitch from the cable needle depending on which round you are on. I hope this helps and happy knitting!
12.12.2018 - 08:03
![]() Mathilde wrote:
Mathilde wrote:
Bonjour, Je ne comprends pas le passage du tricot en _ retour au tricot en rond, Comment tricoté t\'on les\'4 premières mailles? Auriez vous une vidéo qui explique ce point de\'l\'ouvrage, les explications trouvés dans les commentaires ne m\'aide pas vraiment. Je vous remercie Mathilde
04.11.2018 - 18:55DROPS Design answered:
Bonjour Mathilde, vous pouvez répartir les mailles sur les aiguilles doubles pointes juste à ce moment là: tricotez 4 m env, A.3, 13-13-15 m point de riz, A.1, 4 m env, monter 4 m, répartissez les mailles sur les aiguilles doubles pointes et tricoter les 4 premières m du tour, les tours commencent désormais ici. Bon tricot!
05.11.2018 - 10:41
![]() Hanne wrote:
Hanne wrote:
Tak for svar, men det giver fortsat ikke mening. A2 er ikke perlestriksdelen af opskriften og snoningerne i A2 er alle markeret i retfelter, idet der strikkes rundt. Hvorfor står der så, at man skal strikke ret/vrang? Burde der ikke rettelig stå strik ret?
29.10.2018 - 16:54DROPS Design answered:
Hej Hanne, jo maskerne imellem snoningerne i A.2 danner et perlestrikket mønster (skiftevis 1ret, 1vrang osv) det ser du også på billedet af tøflen. Vil du hellere strikke det midterste i glat, så gør du bare det. God fornøjelse!
30.10.2018 - 12:06
|
|||||||||||||||||||
Celtic Dancer#celticdancerslippers |
|||||||||||||||||||
 |
 |
||||||||||||||||||
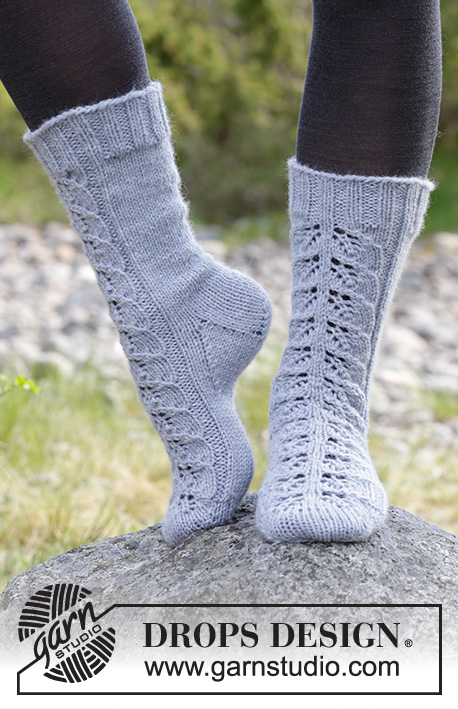
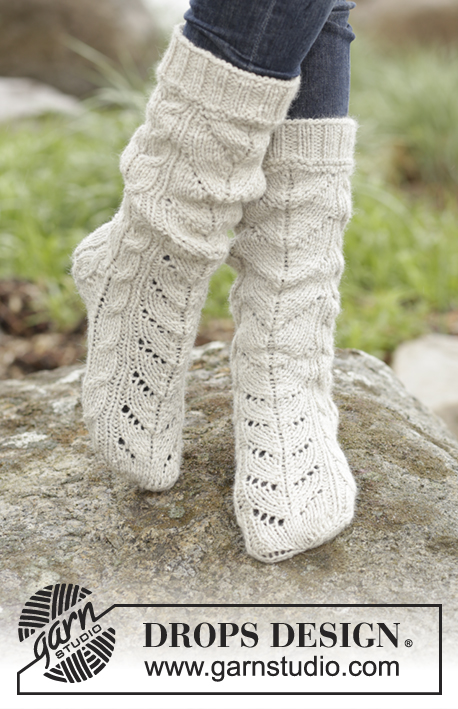
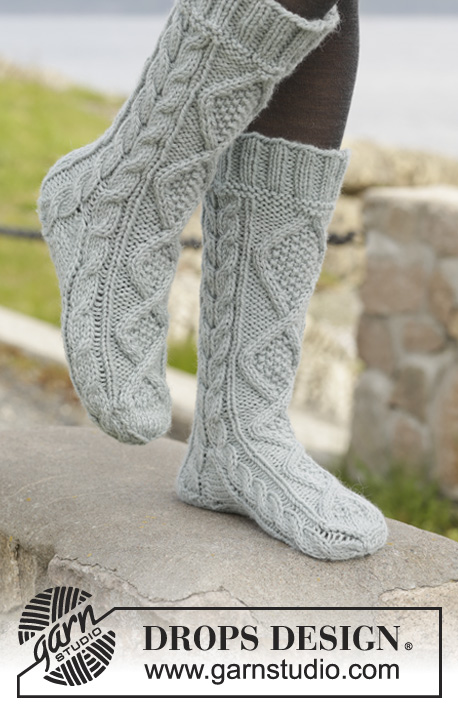
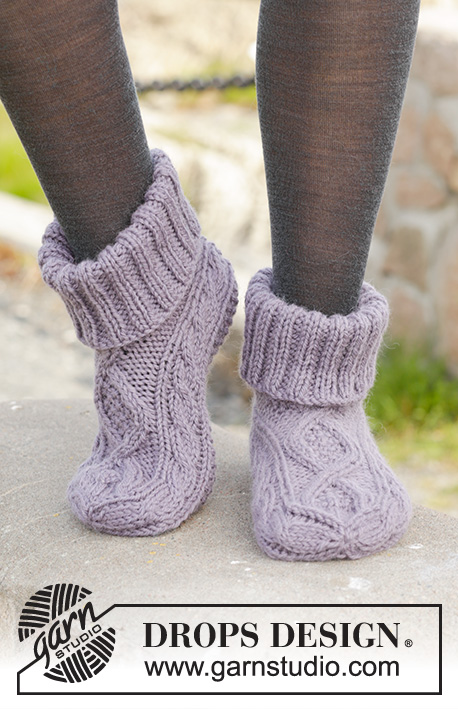
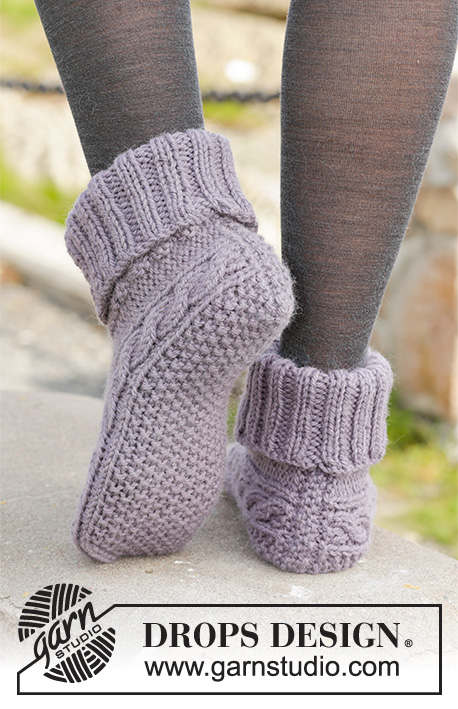
Knitted DROPS slippers with cables in "Nepal".
DROPS 156-55 |
|||||||||||||||||||
|
PATTERN: See diagrams A.1-A.3. The diagrams show the pattern seen from RS. DECREASE TIP: Dec 1 st before marker as follows: K 2 tog. Dec 1 st after marker as follows: K 2 twisted tog. GARTER ST (back and forth on needle): K all rows. 1 ridge = K2 rows. SEED ST: Row/round 1: * K 1, P 1 *, repeat from *-*. Row/round 2: K over P and P over K. Repeat 2nd row/round. MEASURING TIP: Measure in the middle of cable in A.1/A.3. ---------------------------------------------------------- SLIPPER: Worked back and forth from mid back. Cast on 33-33-35 sts on needle size 5 mm / US 8 with Nepal (let the yarn end be approx. 20 cm / 8"; used for assembly). Work 1 ridge in GARTER ST - see explanation above AT THE SAME TIME on last row inc 4 sts evenly = 37-37-39 sts. Then work as follows from RS: P 4, A.3 (= 8 sts), 13-13-15 sts SEED ST – see explanation above, A.1 (= 8 sts), finish with P 4. Continue the pattern like this, work P sts K from WS. Repeat A.1 and A.3 until finished measurements. REMEMBER THE GAUGE! When piece measures 10½-11½-13 cm / 4¼''-4½"-5" – see MEASURING TIP above, work as follows from RS: P 4, A.3, 13-13-15 sts seed st, A.1, P 4, cast on 4 new sts, work the first 4 sts, round beg here = 41-41-43 sts. Now work piece in the round on double pointed needles. Work pattern as before but now work A.2 (= 12 sts) over the 4 P sts in each side of piece and the 4 new sts. When A.2 has been worked 1 time vertically, work A.a until piece measures 17-19-22 cm / 6¾''-7½"-8¾". Now work in stockinette st over sts in A.a, or start stockinette st a bit earlier. Continue A.1 and A.3 until finished measurements. Now insert 4 markers in the piece as follows: Work A.3 but insert 1st marker between 1st and 2nd st and 2nd marker between 7th and 8th st in A.3, work seed st as before, work A.1 but insert 3rd marker between 1st and 2nd st and 4th marker between 7th and 8th st in A.1, K the remaining sts (= 14 sts on top of foot, 15-15-17 sts under foot and 6 sts in each side of piece). Now dec for toe on next round as follows: Dec 1 st after 2nd marker and 1 st before 3rd marker under foot 0-0-1 time in total – READ DECREASE TIP above, work the remaining sts = 14 sts on top of foot and 15 sts under foot (= 41 sts in total). On next round, dec as follows: Dec 1 st before 1st and 3rd marker and 1 st after 2nd and 4th marker (= 4 dec in total). Repeat dec every round 6 times in total AT THE SAME TIME on last dec work cable sts in A.1 and A.3 as follows: K 2 twisted tog, K 2 tog. After all dec there are 13 sts on needle. Piece measures approx. 20-22-25 cm / 8''-8¾"-9¾". Cut the yarn and pull it through the remaining sts, tighten tog and fasten. ASSEMBLY: Fold cast-on edge double (= mid back), use yarn end from beg to sew neatly tog mid back. EDGE: Work edge in the round on double pointed needles around the opening on slipper. Pick up 50-50-54 sts on double pointed needles size 4 mm / US 6 with Nepal. P 1 round. Then K 1 round while AT THE SAME TIME inc 10 sts evenly = 60-60-64 sts. Work rib = K 2/P 2 until piece measures approx. 12-13-14 cm / 4¾''-5"-5½". Bind off sts with K over K and P over P. Fold the edge double. Knit another slipper. |
|||||||||||||||||||
Diagram explanations |
|||||||||||||||||||
|
|||||||||||||||||||
 |
|||||||||||||||||||
Have you finished this pattern?Tag your pictures with #dropspattern #celticdancerslippers or submit them to the #dropsfan gallery. Do you need help with this pattern?You'll find 21 tutorial videos, a Comments/Questions area and more by visiting the pattern on garnstudio.com. © 1982-2026 DROPS Design A/S. We reserve all rights. This document, including all its sub-sections, has copyrights. Read more about what you can do with our patterns at the bottom of each pattern on our site. |
|||||||||||||||||||


With over 40 years in knitting and crochet design, DROPS Design offers one of the most extensive collections of free patterns on the internet - translated to 17 languages. As of today we count 324 catalogs and 12284 patterns - 12274 of which are translated into English (US/in).
We work hard to bring you the best knitting and crochet have to offer, inspiration and advice as well as great quality yarns at incredible prices! Would you like to use our patterns for other than personal use? You can read what you are allowed to do in the Copyright text at the bottom of all our patterns. Happy crafting!
Post a comment to pattern DROPS 156-55
We would love to hear what you have to say about this pattern!
If you want to leave a question, please make sure you select the correct category in the form below, to speed up the answering process. Required fields are marked *.