
Popular categories
Looking for a yarn?


Comments / Questions (37)
![]() Monica wrote:
Monica wrote:
Avendo aumentato il numero di cm. lavorati fra scalfo e spalla ho più maglie raccolte per il collo ovvero 162m. già dal primo ferro. Mi consigliate di aumentare comunque sul dietro del collo o bastano queste maglie fino alla fine? Grazie
05.11.2016 - 05:55DROPS Design answered:
Buongiorno Monica. Le consigliamo di aumentare comunque 1 m in ognuna delle 12 sezioni centrali, in modo che il colletto tiri meno intorno al collo una volta terminato e cucito nella parte inferiore. Buon lavoro!
05.11.2016 - 07:13
![]() Monica wrote:
Monica wrote:
Buonasera, per conformazione fisica del destinatario del maglione la spalla dopo lo scalfo risulta un po' stretta, mi consigliate di allungare un po' il lavoro, ma continuando a calare le 2 maglie x lato oppure lavorare calando un po' meno maglie (in modo che il lavoro sia un po' più largo) e proseguendo comunque in altezza fino alla lunghezza necessaria? Grazie
27.10.2016 - 18:53DROPS Design answered:
Buonasera Monica. Le consigliamo di calare un po' meno maglie e di proseguire fino alla lunghezza necessaria. Buon lavoro!
27.10.2016 - 19:29
![]() Toasterjess wrote:
Toasterjess wrote:
Hallo :) meine frage, zu beginn der Anleitung steht Krausrippe, also wird überall wo nicht explizit etwas anderes gesagt wird krausrippe gestrickt ? Also zum Beispiel auch nachdem man die 5 cm Bündchen gestrickt und die 33 (bei mir) maschen abgenommen hat ? Ich tue mir etwas schwer zweifarbig krausrippe zu stricken. lg Jessica
25.10.2016 - 20:39DROPS Design answered:
Liebe Toasterjess, nach den Bündchen stricken Sie 1 Runde re mit 33 Abnahme, dann stricken Sie Diagram M.1, alle Diagramme werden glatt gestrickt (= alle M. re. von der Vorderseite wenn Sie in der Runde stricken).
26.10.2016 - 09:02
![]() Ellen Mans wrote:
Ellen Mans wrote:
Ik heb deze trui gebreid. Paste heel goed. Na het wassen (wol 30°)lijkt het wel een jurk. Ook de mouwen zijn nu veel te lang. De breedte is wel goed. Jammer het was zo'n mooie trui.
30.01.2016 - 11:36DROPS Design answered:
Hoi Ellen. Inderdaad jammer, maar het kan aan de stekenverhouding liggen (te los gebreid) of verkeerd gewassen/laten drogen. Lees hier de tips en hulp voor het behandelen van wolgarens
01.02.2016 - 15:45
![]() Antje wrote:
Antje wrote:
Ich habe den Pullover für die Größe M gestrickt, Maschenprobe und Maße stimmen. Dennoch habe ich über 150g Wolle weniger gebraucht als angegeben: 2 Knäuel des beigen Garns und 1 des naturfarbenen Garns musste ich nicht einmal anbrechen. Das ist meiner Meinung nach ein bisschen zu großzügig kalkuliert worden.
18.10.2015 - 11:32
![]() Geke Matton wrote:
Geke Matton wrote:
Ik begrijp niet wat er bij het breien van de sjaalkraag wordt bedoeld met 'de middelste 12 recht-delen' en dan 'gezien aan de goede kant (=hals op het achterpand)' Hoe tel ik dat, waar moet ik meerderen? In één keer of om de 12 steken??? Alvast hartelijk dank voor het antwoord!!!
15.10.2015 - 12:23DROPS Design answered:
Beste Geke. Je breit de kraag met 1 r, 2 av. De 2 av = av-gedeelte. Tel hoeveel av-gedeelte je hebt en markeer de middelste 12 (zitten bij de hals). Je meerdert 1 st in elke van de 12 middelste av-gedeelten. Dwz, in deze twaalf heb je dan 3 av ipv 2. Ik hoop dat het zo duidelijker is.
15.10.2015 - 14:35Tania Berardi wrote:
Buonasera, sto lavorando al colletto a scialle. Non capisco cosa significa aumentare 1m in ognuna delle 12 sezioni centrali ? Così facendo nella parte dietro del collo il motivo 1d - 2rov viene modificato. Ho capito bene ? Grazie per la risposta Tania
08.09.2015 - 21:25DROPS Design answered:
Buongiorno Tania. Nei 12 gruppi centrali di m lavorate a coste (corrispondono al dietro del collo), deve aumentare 1 m. Solo in questi gruppi dove ha aumentato, lavora a coste 1 m dir, 3 m rov. Buon lavoro!
10.09.2015 - 13:09
![]() Bruce wrote:
Bruce wrote:
Euuuuh.... Où sont les diagrammes? Ils étaient là a peine hier!! :O
22.08.2015 - 21:59DROPS Design answered:
Bonjour Bruce, rafraîchissez votre page (F5), ils devraient être toujours là. Bon tricot!
24.08.2015 - 10:37
![]() Tania Berardi wrote:
Tania Berardi wrote:
Sto lavorando il corpo di questo modello per la taglia XXL. Le spiegazioni indicano di rimanere 99 maglie per il dietro. La domanda è come si continua a lavorare il diagramma M.2 in modo corretto dal momento che il motivo M.2 si sviluppa su 12 maglie e 99 non è divisibile per 12 e così anche alla fine degli intrecci per gli scalfi rimangono maglie 79 sempre non divisibili per 12 e nemmeno per 6 (motivo M.1) spero di essermi spiegata Grazie
20.08.2015 - 00:00DROPS Design answered:
Buongiorno Tania. Dopo aver intrecciato le maglie, proseguirà a lavorare i diagrammi facendo attenzione a mantenere il disegno allineato con quanto già lavorato. Buon lavoro!
23.08.2015 - 08:43Erika wrote:
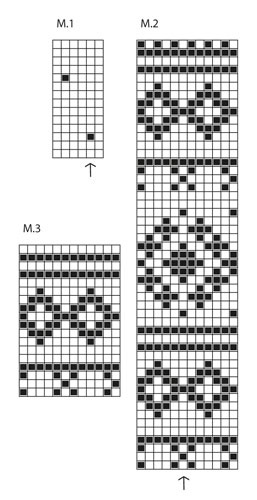
There is an error in pattern M2 - according pattern in the photo there should be one white st in the beginning of line 31 (counting from the bottom).
02.03.2014 - 20:26DROPS Design answered:
Dear Erika, you are correct, thank you. A new diagram has been uploaded. Happy knitting!
04.03.2014 - 10:28
|
|||||||
Seaman#seamansweater |
|||||||
 |
 |
||||||
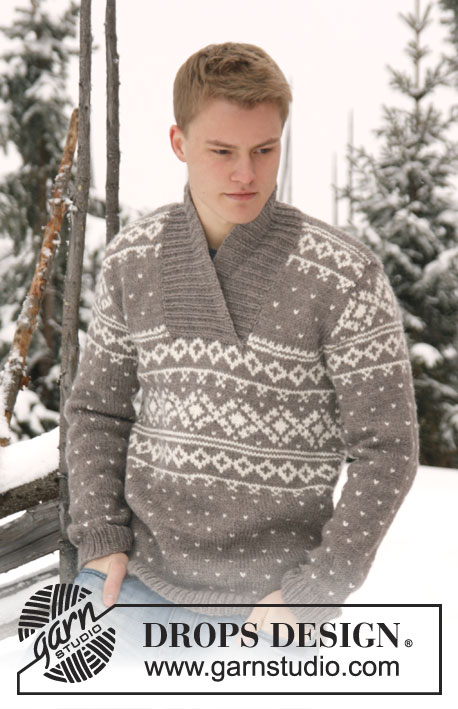
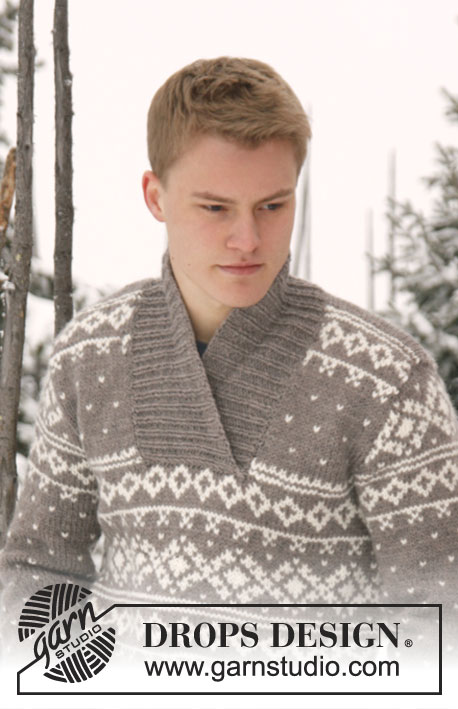
Knitted men's sweater in DROPS Alaska or DROPS Big Merino with pattern and shawl collar. Size: S - XXXL.
DROPS Extra 0-812 |
|||||||
|
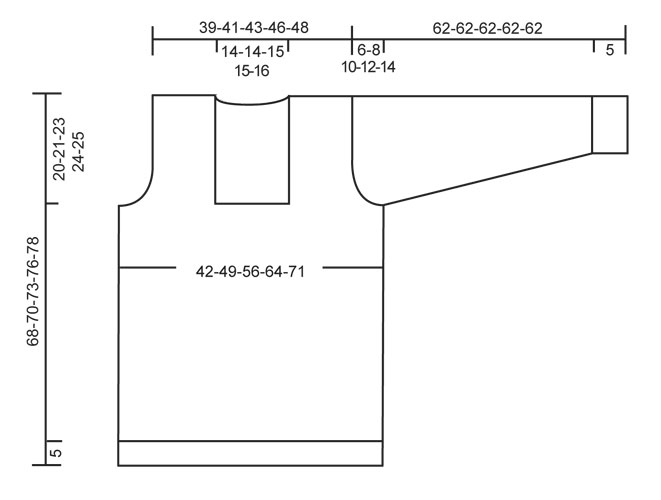
GARTER ST (back and forth on needle): K all rows. PATTERN: See diagrams M.1 to M.3 – diagrams are worked in stockinette st. -------------------------------------------------------- BODY: Worked in the round on circular needle. Cast on 171-201-231-258-288 sts on circular needle size 4 mm / US 6 with light brown Alaska. Work rib = K 1/P 2 for 5 cm / 2". Switch to circular needle size 5 mm / US 8 and K 1 round while AT THE SAME TIME dec 27-33-39-42-48 sts evenly = 144-168-192-216-240 sts. Then work diagram M.1. REMEMBER THE GAUGE! When piece measures approx. 25-27-30-33-35 cm / 9¾"-10½"-11¾"-13"-13¾" - adjust so that at least 2 rounds have been worked after 1 round with dots - work diagram M.2. After diagram M.2, work 3 rounds with light brown before working 23 rounds with diagram M.1. After diagram M.1, work diagram M.3, then work with light brown until finished measurements. AT THE SAME TIME when piece measures 48-49-50-52-53 cm / 19"-19¼"-19¾"-20½"-21", work next round as follows: bind off 3-4-4-5-5 sts for armhole, work 22-27-32-37-42 sts, bind off 23-23-25-25-27 sts for neck, work 22-27-32-37-42 sts, bind off 5-7-7-9-9 sts for armhole, work 67-77-89-99-111 sts (= back piece), bind off the last 2-3-3-4-4 sts for armhole. Finish each part separately. BACK PIECE: = 67-77-89-99-111 sts. Continue pattern as explained above. AT THE SAME TIME bind off for armholes at beg of every row in each side: 3 sts 0-0-1-1-2 times, 2 sts 0-1-1-2-3 times and 1 st 0-2-3-3-3 times = 67-69-73-79-81 sts remain on needle. When piece measures 66-68-71-74-76 cm / 26"-26¾"-28"-29⅛"-30", bind off the middle 21-21-23-23-25 sts for neck. Now finish each shoulder separately. Continue to bind off 1 st on next row from neck = 22-23-24-27-27 sts remain on the shoulder. Bind off when piece measures 68-70-73-76-78 cm / 26¾"-27½"-28¾"-30"-30¾". RIGHT FRONT PIECE: = 22-27-32-37-42 sts. Bind off for armhole in the side as on back piece = 22-23-24-27-27 sts. Bind off when piece measures approx. 68-70-73-76-78 cm / 26¾"-27½"-28¾"-30"-30¾" - NOTE: bind off on same row in pattern as on back piece. LEFT FRONT PIECE: Work as right front piece but reversed. SLEEVE: Worked in the round on double pointed needles, switch to circular needle when needed. READ ALL OF THE FOLLOWING SECTION BEFORE CONTINUING! Cast on 51-54-57-57-57 sts on circular needle size 4 mm / US 6 with light brown. Work rib = K 1/P 2 for 5 cm / 2". Switch to double pointed needles size 5 mm / US 8 and K 1 round while AT THE SAME TIME dec 10-11-12-12-12 sts evenly = 41-43-45-45-45 sts. Insert a marker at beg of round (= mid under sleeve) and a marker in the middle st on round (= mid on top of sleeve). Then work diagram M.1 – st marked with arrow in diagram should be st with marker mid on top of sleeve - count out towards the side. AT THE SAME TIME when piece measures 7-7-9-9-10 cm / 2¾"-2¾"-3½"-3½"-4", inc 1 st on each side of marker mid under sleeve. Repeat inc every 5-4½-3-2½-2 cm / 2"-1¾"-1⅛"-⅞"-¾" a total of 10-11-14-16-18 times = 61-65-73-77-81 sts – work the inc sts in pattern. AT THE SAME TIME when piece measures approx. 47 cm / 18½" in all sizes – adjust so that at least 2 rounds have been worked after 1 round with dots - work diagram M.2 until finished measurements (st marked with arrow in diagram should be st with marker mid on top of sleeve - count out towards the side). When piece measures 56-54-52-50-48 cm / 22"-21¼"-20½"-19¾"-19" (shorter measurements in the larger sizes because of longer sleeve cap and broader shoulder width), bind off 5-7-7-9-9 sts mid under sleeve (i.e. st with marker and 2-3-3-4-4 sts on each side of this st). Then continue back and forth on needle until finished measurements - AT THE SAME TIME bind off for sleeve cap at the beg of every row in each side: 2 sts 2-3-3-3-4 times and 1 st 1-2-3-4-5 times. Then bind off 2 sts in each side until piece measures 61 cm / 24", then bind off 3 sts 1 time in each side. Bind off the remaining sts, the piece measures approx. 62 cm / 24½" in all sizes. ASSEMBLY: Sew the shoulder seams. SHAWL COLLAR: Start mid front on the left side of sts bind off for neck. Pick up on circular needle size 4 mm / US 6 with light brown: 34 to 42 sts up to shoulder, then pick up 24 to 28 sts in back of neck and finally 34 to 42 sts down along left side of neck dec = 92 to 112 sts. (Do not pick up sts at the front of neck where sts were bind off.) K 1 row from WS while AT THE SAME TIME inc evenly to 123-129-138-144-150 sts. Then work rib as follows (from RS): 1 edge st which should be K on all rows, * K 1, P 2 *, repeat from *-* until 2 sts remain, finish with K 1 and 1 edge st which should be K on all rows. Continue rib like this until collar measures approx. 6 cm / 2⅜". Now inc 1 st in each of the middle 12 K-sections, seen from RS (= back of neck) = 135-141-150-156-162 sts. Continue to work until collar measures approx. 11-11-13-13-15 cm / 4½"-4½"-5"-5"-6", bind off with K over K and P over P. Place the collar double (right side over left side) at the bottom of neck opening and sew it to the neck line through both layers. Sew in sleeves. |
|||||||
Diagram explanations |
|||||||
|
|||||||
 |
|||||||
 |
|||||||
Have you finished this pattern?Tag your pictures with #dropspattern #seamansweater or submit them to the #dropsfan gallery. Do you need help with this pattern?You'll find 22 tutorial videos, a Comments/Questions area and more by visiting the pattern on garnstudio.com. © 1982-2026 DROPS Design A/S. We reserve all rights. This document, including all its sub-sections, has copyrights. Read more about what you can do with our patterns at the bottom of each pattern on our site. |
|||||||


With over 40 years in knitting and crochet design, DROPS Design offers one of the most extensive collections of free patterns on the internet - translated to 17 languages. As of today we count 324 catalogs and 12245 patterns - 12235 of which are translated into English (US/in).
We work hard to bring you the best knitting and crochet have to offer, inspiration and advice as well as great quality yarns at incredible prices! Would you like to use our patterns for other than personal use? You can read what you are allowed to do in the Copyright text at the bottom of all our patterns. Happy crafting!
Post a comment to pattern DROPS Extra 0-812
We would love to hear what you have to say about this pattern!
If you want to leave a question, please make sure you select the correct category in the form below, to speed up the answering process. Required fields are marked *.