
Popular categories
Looking for a yarn?


Comments / Questions (15)
![]() Zoe wrote:
Zoe wrote:
I am going the back piece, on the L hand side of the work as I have increased I have both pure and knit rows but in the othee side where I have increased they are all jusy knit stitched I have tried multiple times but is this right or am I doing something wrong?
16.11.2025 - 23:49
![]() Alegría wrote:
Alegría wrote:
Para la talla S, en los delanteros, si antes de comenzar con el cuello en v se tienen 33 puntos en cada lado y se aumentan 12 puntos en cada lado, el número de puntos después de completar los aumentos será 33+12=45, no? En el patrón indica que debería tener 49 pero eso implica incrementar más veces a la vez que los incrementos del cuerpo?
05.09.2025 - 00:08DROPS Design answered:
Hi, Alegría, make sure that you increase the number of stitches on your two front pieces and the back piece where the pieces meet the sleeves for the raglan. There should be increased 4 times (in size S). Happy knitting!
28.10.2025 - 11:08
![]() Elaine wrote:
Elaine wrote:
Pour les diminutions des manches il est écrit: tricoter 3 mailles ensemble à l’endroit /3 mailles ensemble à l’envers (on diminue 2 mailles) .Est-ce que l’on alterne ? Première diminution 3 mailles ensemble à l’endroit et 3 cm plus loin (L) diminuer 3 mailles ensemble à l’envers?
20.08.2025 - 14:29DROPS Design answered:
Bonjour Elaine, vous allez tricoter les mailles soit à l'envers soit à l'endroit pour tâcher de continuer les côtes dans la mesure du possible (la maille au milieu de ces 3 m est celle avec le marqueur, au milieu sous la manche). Bon tricot!
08.10.2025 - 09:06
![]() Elaine wrote:
Elaine wrote:
Il est écrit dans le « Petit aperçu de l’ouvrage » ceci : Tricoter ensuite l’empiècement en allers et retours, en augmentant pour les manches et l’encolure V. Augmenter ensuite pour les devants et le dos. Les augmentations du dos et devant commencent-elles lorsque les augmentations de l’encolure en V sont terminées? Ce n’est pas évident à comprendre. Merci de m’aider à comprendre!
05.08.2025 - 14:19DROPS Design answered:
Bonjour Elaine, comme vous pourrez le retrouvez dans le descriptif, vous allez d'abord 'augmenter pour le dos/les devants et les manches et, en même temps les augmentations pour les manches et celles de l'encolure V, puis, on va augmenter pour les manches, les devants et le dos mais aussi continuer les augmentations de l'encolure V si elles ne sont pas terminées, donc, oui vous devrez augmenter dans toutes les pièces indiquées dans les explications jusqu'à ce que les augmentations soient faites. Cf. ENCOLURE V pour savoir comment augmenter, combien de fois et à quel rythme pour votre taille. Bon tricot!
05.08.2025 - 15:58
![]() Annie wrote:
Annie wrote:
De meederingen voor het lijf beginnen die gelijk met het meerderen van de mouwen en de v-hals?
17.06.2025 - 19:05DROPS Design answered:
Dag Annie,
Ja, deze meerderingen beginnen inderdaad tegelijkertijd, zie deze paragraaf van 1 zin: "Brei NAALDEN 1 en 2 in totaal 18-20-24-24-20-20 keer (36-40-48-48-40-40 naalden gebreid) – denk ook om het meerderen voor de V-hals."
17.06.2025 - 21:08
![]() Cathy wrote:
Cathy wrote:
Bonjour, j'ai tricoté ce modèle en Belle, en taille S et j'adore le modèle et sa construction. Mon échantillon était bon mais il est un peu trop large pour moi, je regrette que vous ne proposiez pas de taille XS
11.05.2025 - 08:18
![]() Wanda wrote:
Wanda wrote:
Bonjour, il y a un problème avec les diminutions des manches. La mesure entre 2 diminutions doit être plus ou moins divisée par 2 si l'on veut pouvoir faire toutes les diminutions avant de terminer la manche ! Par exemple en taille L, 8 diminutions tous les 6 cm ne peuvent être faites dans une manche mesurant 33 cm depuis la division sous la manche.
30.04.2025 - 11:20DROPS Design answered:
Bonjour Wanda et merci pour votre retour, effectivement, les diminutions des manches ont été corrigées. Bon tricot!
06.05.2025 - 10:50
![]() Wanda wrote:
Wanda wrote:
Bonjour, la séparation pour le dos/devants et bras est en réalité beaucoup plus bas que les mesures données sur le dessin. Si je calcule en rangs depuis le haut du dos pour la taille L, il y a 37 rangs au départ( après le montage), 2 rangs, puis 48 rangs (augmentation pour les manches et le col V) et enfin 8 rangs (augmentation pour le dos et les devants), ce qui fait au total 95 rangs, qui correspondent à 33-34 cm (gauge) et non pas à 25 cm comme indiqués sur le modèle !
20.04.2025 - 09:47DROPS Design answered:
Bonjour Wanda, dans ce type de modèle avec épaules européennes, les rangs tricotés pour le dos ne sont pas pris en compte dans la hauteur d'emmanchures (cf onglets vidéos/leçons pour visualiser comment se tricote le dos); pour les devants, on tricote d'abord 10,5 cm en tailleL puis 20 cm après avoir relevé les mailles des manches - les 10,5 cm tricotés auparavant vont se répartir à la fois sur le devant et le dos (car les épaules tombent vers l'arrière, cf photos et vidéos/leçons), ainsi, vous aurez bien environ 25 cm de hauteur d'emmanchures. Bon tricot!
23.04.2025 - 08:44
![]() Hannah wrote:
Hannah wrote:
Hi, I'm having the same issue as Min: I cannot line up the stitches for the right shoulder with the pattern on the back piece. I'd have to start the setup row with purl 3, then start the ribbing for it to align. Or pick up one fewer, but that doesn't make any sense either. It would be the same on the left, the last 3 stitches before the neck are knit stitches.
12.04.2025 - 21:26DROPS Design answered:
Dear Hannah, the 2 stitches in stocking stitch are the edges and should stay the same as you work the whole back. You increase right before or right after the 2 stitches in stocking stitch, not in between them. So you should still have these 2 stitches in stocking stitch. That means that these stitches will be knitted on right side rows and purled on wrong side rows. The pattern shouldn't misalign due to these 2 stitches. Happy knitting!
14.04.2025 - 00:41
![]() Min wrote:
Min wrote:
Hi, I’m really sorry for bothering you again, but I really don’t think it’s possible to line up the shoulder and back in the size L in either the way you describe it or the pattern describes. Unless you shift the ribbing on the shoulder, but I’m afraid this will mess up the rest. The thing is, I don’t have 2 stocking stitches at the end of back piece, I have a purl and 3 knits. So if I wanted to match up the shoulder I would have to do 1edge stitch, k3,p1, etc.
04.04.2025 - 12:15DROPS Design answered:
Dear Min, the 2 stitches in stocking stitch are the edges and should stay the same as you work the whole back. You increase right before or right after the 2 stitches in stocking stitch, not in between them. So you should still have these 2 stitches in stocking stitch. Happy knitting!
06.04.2025 - 22:33
|
|
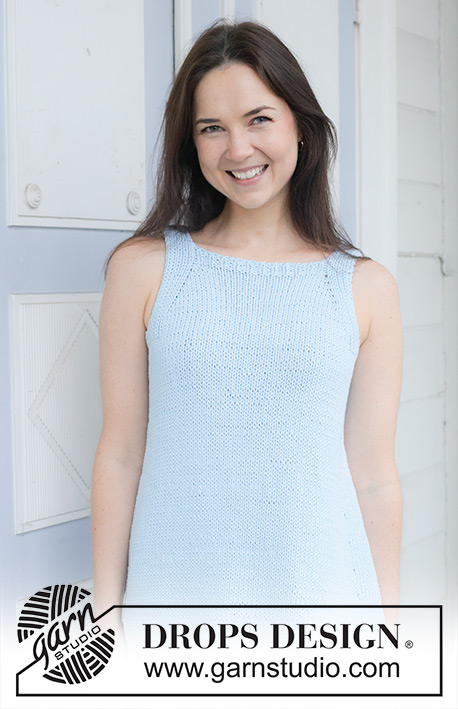
Summer's Whisper Wrap#summerswhisperwrap |
|
 |
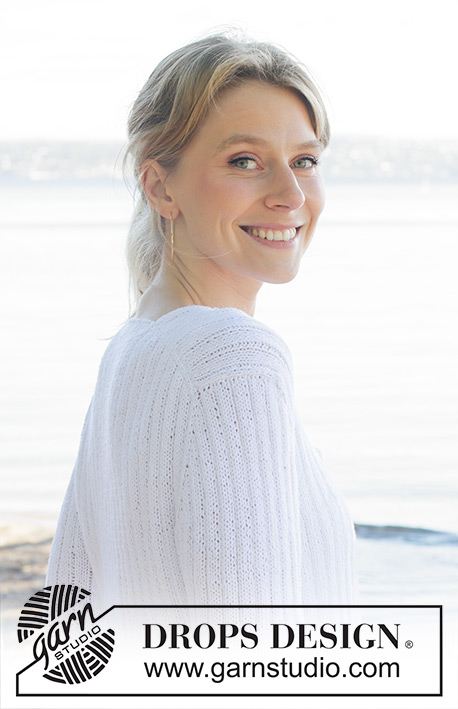 |
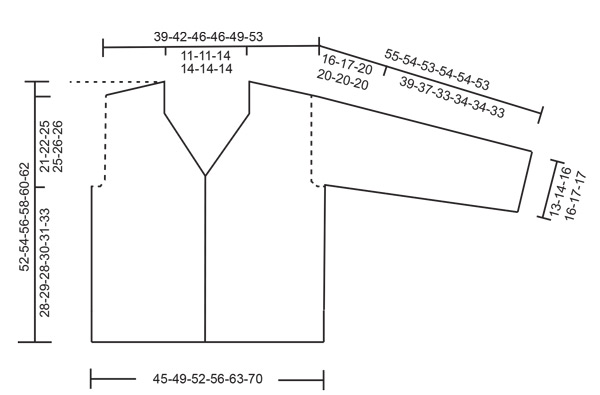
Knitted jacket in DROPS Belle. The piece is worked top down with rib, European yoke and rib. Sizes S - XXXL.
DROPS 257-21 |
|
|
------------------------------------------------------- START THE PIECE HERE: ------------------------------------------------------- JACKET – SHORT OVERVIEW OF THE PIECE: The pattern uses both long and short needles; start with the length which fits the number of stitches and change when necessary. The piece is started back and forth, casting on stitches at the back of the neck and working the back piece top down, while increasing stitches on each side for the shoulders, which become slightly diagonal. The front pieces are worked separately, knitting up stitches along 1 back shoulder and working downwards. This is repeated on the other shoulder. Now stitches for sleeves are knitted up along the sides of the front pieces and the stitches from the back piece are replaced on the needle. You continue back and forth across whole yoke, increasing for the sleeves and the V-neck. You later increase for the front and back pieces. When the yoke is finished it is divided for the body and sleeves. The body is finished back and forth while the sleeves wait. The sleeves are worked top down in the round. 1 tie is worked on each front piece to finish. BACK PIECE: The piece is worked back and forth with circular needle. Cast on 25-25-33-33-33-33 stitches with circular needle size 4 MM = US 6 and DROPS Belle. ROW 1 (wrong side): Purl 2, work rib (knit 1, purl 3) until there are 3 stitches left on the row, knit 1, purl 2. You now increase each side, inside 2 stockinette stitches, increasing the ribbed section (purl 1, knit 3 seen from the right side) as follows: ROW 2 (right side): Read INCREASE TIP-1. Knit 2, increase 1 stitch towards the left, knit over knit and purl over purl until there are 2 stitches left, increase 1 stitch towards the right, knit 2. ROW 3 (wrong side): Read INCREASE TIP-2. Purl 2, increase 1 stitch towards the right, knit over knit and purl over purl until there are 2 stitches left, increase 1 stitch towards the left, purl 2. ROW 4 (right side): Read INCREASE TIP-1. Knit 2, increase 1 stitch towards the left, knit over knit and purl over purl until there are 2 stitches left, increase 1 stitch towards the right, knit 2. ROW 5 (wrong side): Read INCREASE TIP-2 (this stitch will be purled from the right side). Purl 2, increase 1 stitch towards the right, knit over knit and purl over purl until there are 2 stitches left, increase 1 stitch towards the left, purl 2. Work ROWS 2 to 5 a total of 8-9-9-9-10-11 times (32-36-36-36-40-44 rows worked). After the last increase there are 89-97-105-105-113-121 stitches. Cut the strand and place the stitches on a stitch holder. RIGHT FRONT SHOULDER: Find the right back shoulder as follows: Lay the back piece flat, right side up, with the stitch holder towards you; right side of piece = right shoulder. Start from the right side by the shoulder and knit up 1 stitch outermost on the shoulder (this edge stitch is worked in GARTER STITCH – read description above, then later decreased and used to pick up stitches for the sleeve), knit up 1 stitch in each worked row, inside 1 stitch (= 32-36-36-36-40-44 stitches ), knit up 1 last stitch in the shoulder line towards neck = 34-38-38-38-42-46 stitches. All measurements on the front piece are taken from this knitted-up row. Work rib as follows from the wrong side: Purl 2, rib (knit 1, purl 3) until there are 4 stitches left, knit 1, purl 2 and work 1 edge stitch in garter stitch. From the right side work as follows: 1 edge stitch in garter stitch, knit 2, work rib (purl 1, knit 3) until there are 3 stitches left, purl 1 and knit 2. Work back and forth with knit over knit and purl over purl + 1 edge stitch in garter stitch. When the piece measures 10½-10½-10½-10½-12½-12½ cm = 4⅛"-4⅛"-4⅛"-4⅛"-5"-5" from the knitted-up row, work the last row from the wrong side and decrease the edge stitch by purling the last 2 stitches together = 33-37-37-37-41-45 stitches. Cut the strand and place the stitches on a stitch holder. Work the left front shoulder. LEFT FRONT SHOULDER: Find the left back shoulder as follows: Lay the back piece flat, right side up, with the stitch holder towards you; left side of piece = left shoulder. Working from the right side on the left back shoulder, knit up 1 stitch in the shoulder line towards neck then knit up 1 stitch inside 1 stitch in each row worked (= 32-36-36-36-40-44 stitches), then knit up 1 edge stitch outermost on the shoulder (this edge stitch is always worked in garter stitch, then decreased later and used to pick up stitches for the sleeve) = 34-38-38-38-42-46 stitches. All measurements on the front piece are taken from this knitted-up row. Work rib as follows from the wrong side: 1 edge stitch in garter stitch, purl 2, work rib (knit 1, purl 3) until there are 3 stitches left, knit 1 and purl 2. From the right side work as follows: Knit 2, work rib (purl 1, knit 3) until there are 4 stitches left, purl 1, knit 2 and work 1 edge stitch in garter stitch. Work back and forth with knit over knit and purl over purl + 1 edge stitch in garter stitch. When the piece measures 10½-10½-10½-10½-12½-12½ cm = 4⅛"-4⅛"-4⅛"-4⅛"-5"-5" from the knitted-up row, work the last row from the wrong side and decrease the edge stitch by purling the first 2 stitches twisted together = 33-37-37-37-41-45 stitches. The front and back pieces are now joined and stitches are knitted up for the sleeves. YOKE: Start on the left front piece and work from the right side as follows: Work as before across the left front piece (= 33-37-37-37-41-45 stitches), insert 1 marker, knit up 25-25-25-25-29-29 stitches along the side of the left front piece (= sleeve-stitches, knitted up inside the 1 garter stitch), insert 1 marker, work across the back piece as before from the right side (= 89-97-105-105-113-121 stitches), insert 1 marker, knit up 25-25-25-25-29-29 stitches along the side of the right front piece (= sleeve-stitches, knitted up inside the 1 garter stitch), insert 1 marker and work across the right front piece as before from the right side (= 33-37-37-37-41-45 stitches) = 205-221-229-229-253-269 stitches. Work as follows from the wrong side: Knit over knit and purl over purl as far as the first marker (= right front piece), move the marker to the right needle, work the next 24-24-24-24-28-28 stitches with rib (knit 1, purl 3), knit 1 (= 25-25-25-25-29-29 sleeve-stitches), move the marker to the right needle, work knit over knit and purl over purl across the back piece, move the marker to the right needle, work the next 24-24-24-24-28-28 stitches with rib (knit 1, purl 3), knit 1 (= 25-25-25-25-29-29 sleeve-stitches), move the marker to the right needle, work knit over knit and purl over purl across the right front piece. Continue back and forth across all stitches with knit over knit and purl over purl. The markers divide the sleeves from the front and back pieces – the ribbing on the sleeves is independent from the ribbing on the body. You now increase for the sleeves and on each side for the V-NECK – read description above. Increase 2 stitches on each sleeve, inside the markers, on each row from the right side (= 4 increased stitches). The ribbing (knit 3, purl 1 from the right side) increases – using INCREASE TIP-1 and increase 1 knitted stitch, use INCREASE TIP-2 and increase 1 purled stitch as follows: ROW 1 (right side): Work as before to marker-1 (= front piece), * move the marker onto the right needle, increase 1 stitch towards the left (sleeve-increase), work to the next marker, increase 1 stitch towards the right (sleeve-increase), move the marker onto the right needle *, work to the next marker (= back piece), work from *-* 1 more time and work as before to end of row (= front piece). ROW 2 (wrong side): Knit over knit and purl over purl, making sure the new stitches are worked into the ribbed pattern on the sleeves. Work ROWS 1 and 2 a total of 18-20-24-24-20-20 times (36-40-48-48-40-40 rows worked) – remember to also increase for the V-neck. Now begin increasing on the body as well (= 8 increased stitches), making sure the new stitches are worked into the ribbed pattern on the front and back pieces – i.e., you have 1 line of 2 stockinette stitches towards each sleeve, working as follows: ROW 1 (right side): Work as before until there are 2 stitches left before marker-1, increase 1 stitch towards the right, work 2 stockinette stitches, * move the marker onto the right needle, increase 1 stitch towards the left (= sleeve-increase), work as before to next marker, increase 1 stitch towards the right (= sleeve-increase), move the marker onto the right needle *, 2 stockinette stitches, increase 1 stitch towards the left, work until there are 2 stitches left before marker-3, increase 1 stitch towards the right, work 2 stockinette stitches , work from *-* 1 more time, work 2 stockinette stitches, increase 1 stitch towards the left, work as before to end of row (= front piece). ROW 2 (wrong side): Knit over knit and purl over purl, making sure the new stitches are worked into the ribbed pattern on the sleeves and on the front and back pieces. Work ROWS 1 and 2 a total of 4-4-4-4-8-8 times (8-8-8-8-16-16 rows worked). All increases are now finished. You have increased 12-12-16-16-16-16 times for the V-neck, 22-24-28-28-28-28 times for each sleeve and 4-4-4-4-8-8 times on the front and back pieces = 333-357-389-389-429-445 stitches. There are 69-73-81-81-85-85 stitches on each sleeve, 49-53-57-57-65-69 stitches on each front piece and 97-105-113-113-129-137 stitches on the back piece. The sleeves measure approx. 16-17-20-20-20-20 cm = 6¼"-6¾"-8"-8"-8"-8" measured from the knitted-up stitches, down the middle of the sleeve. When the jacket is folded double at the shoulder, the piece measures approx, 21-22-25-25-26-26 cm = 8¼"-8¾"-9¾"-9¾"-10¼"-10¼" measured along the armhole. Now divide for the body and sleeves. DIVIDE FOR BODY AND SLEEVES: Work the first 49-53-57-57-65-69 stitches as before, place the next 69-73-81-81-85-85 stitches on a thread for the sleeve, cast on 7-7-7-15-15-23 stitches (under the sleeve), work the next 97-105-113-113-129-137 stitches as before, place the next 69-73-81-81-85-85 stitches on a thread for the sleeve, cast on 7-7-7-15-15-23 stitches (under the sleeve), work the last 49-53-57-57-65-69 stitches as before. The body and sleeves are finished separately. BODY: = 209-225-241-257-289-321 stitches. Continue the ribbed pattern back and forth (purl 1, knit 3 from the right side and the same rib on the cast-on stitches under each sleeve) until the piece measures 28-29-28-30-31-33 cm = 11"-11⅜"-11"-11¾"-12¼"-13" from the join. Bind off with rib. The jacket measures approx. 52-54-56-58-60-62 cm = 20½"-21¼"-22"-22¾"-23⅝"-24⅜". SLEEVES: Place the 69-73-81-81-85-85 sleeve-stitches from one thread on circular needle size 4 MM = US 6 and knit up 1 stitch in each of the 7-7-7-15-15-23 stitches cast on under the sleeve = 76-80-88-96-100-108 stitches. Insert a marker-thread in the middle of the 7-7-7-15-15-23 stitches under the sleeve. Start at the marker-thread and continue the established ribbed pattern (purl 1, knit 3) in the round (including the knitted-up stitches under the sleeve). When the sleeve measures 3 cm = 1⅛", decrease 2 stitches under the sleeve – read DECREASE TIP. Decrease like this every 4-3½-3-2-2-1½ cm = 1½"-1¼"-1⅛"-¾"-¾"-½" a total of 8-8-8-12-12-16 times = 60-64-72-72-76-76 stitches (the pattern fits again when the decreases are finished). Continue working until the sleeve measures 55-54-53-54-54-53 cm = 21⅝"-21¼"-21"-21¼"-21¼"-21" from the knitted-up stitches on the shoulder and 39-37-33-34-34-33 cm = 15¼"-14½"-13"-13⅜"-13⅜"-13" from the division under the sleeve. Bind off with rib. TIES: Use double pointed needles size 4 MM = US 6. Knit up 2 stitches on one side of the V-neck (by the last increase for the neck). Knit both stitches. * Push both stitches back to the beginning of the needle, without turning, tighten the strand and knit the 2 stitches again *, work from *-* until the tie is 20 cm = 8" or to desired length. Cut and fasten the strand. Repeat on the other front piece. |
|
 |
|
Have you finished this pattern?Tag your pictures with #dropspattern #summerswhisperwrap or submit them to the #dropsfan gallery. Do you need help with this pattern?You'll find 30 tutorial videos, a Comments/Questions area and more by visiting the pattern on garnstudio.com. © 1982-2026 DROPS Design A/S. We reserve all rights. This document, including all its sub-sections, has copyrights. Read more about what you can do with our patterns at the bottom of each pattern on our site. |
|


With over 40 years in knitting and crochet design, DROPS Design offers one of the most extensive collections of free patterns on the internet - translated to 17 languages. As of today we count 325 catalogs and 12298 patterns - 12288 of which are translated into English (US/in).
We work hard to bring you the best knitting and crochet have to offer, inspiration and advice as well as great quality yarns at incredible prices! Would you like to use our patterns for other than personal use? You can read what you are allowed to do in the Copyright text at the bottom of all our patterns. Happy crafting!
Post a comment to pattern DROPS 257-21
We would love to hear what you have to say about this pattern!
If you want to leave a question, please make sure you select the correct category in the form below, to speed up the answering process. Required fields are marked *.