
Popular categories
Looking for a yarn?


Comments / Questions (155)
![]() Annie wrote:
Annie wrote:
Jag tycker det är svårt att veta vilken storlek jag ska göra. Vilken storlek har modellen på sig?
08.01.2026 - 14:16DROPS Design answered:
Hej Annie, lige under størrelserne finder du teksten: Vilken storlek ska jag välja?
29.01.2026 - 08:17
![]() Hilda wrote:
Hilda wrote:
Hej! Jag har lagt upp 12 maskor till högra framkanten, men om jag ska lyfta första maskan avig upplöses maskan och jag får två öglor på högra stickan… vad gör jag för fel? Tack på förhand!
28.12.2025 - 11:30
![]() Marianne Romer wrote:
Marianne Romer wrote:
Jeg bruger drops air. Og 5.5 men får kun omkring 7 cm.
22.12.2025 - 15:32DROPS Design answered:
Hi Marianne, needle size is only a guide. If you get too many stitches on 10 cm, change to a larger needle size. If you get too few stitches on 10 cm, change to a smaller needle size. Happy knitting!
27.12.2025 - 15:06
![]() Marianne wrote:
Marianne wrote:
Jeg kan slet ikke få det til at passe med garnet med antal af masker. Hvis jeg skal have 16 masker til at fylde 10 cm skal jeg bruge pind 10. Og så kommer den jo slet ikke til at ligne mønsteret. Kan jeg strikke flere masker? Og hvor mange
17.12.2025 - 10:15DROPS Design answered:
Hei Marianne. Hvilket garn bruker du og hvilken pinne str.? I denne oppskriften brukes det 1 tråd DROPS Air og det brukes pinne str. 5,5, da burde man få 16 masker i bredden og 20 pinner i høyden på 10 x10 cm. mvh DROPS Design
22.12.2025 - 12:58
![]() Toni wrote:
Toni wrote:
Hello, Can you please provide me with the gauge and needle size for this pattern? Thank you.
10.12.2025 - 14:39DROPS Design answered:
Hi Toni, The gauge and needle size are found under Knitting Tension at the top of the pattern : 16 stitches x 20 rows with needle size 5.5 mm = 10 x 10 cm. Regards, Drops Team.
11.12.2025 - 06:51
![]() Jane Romer wrote:
Jane Romer wrote:
Hej jeg kunne godt bruge hvor meget overvidde er på denne model for at få den rigtige størrelse.
10.12.2025 - 10:29DROPS Design answered:
Hej Jane, du finder alle mål i måleskitsen nederst i opskriften. Det er målene på cardiganen som står her og du får dem når du får samme strikkefasthed som vi skriver i opskriften :)
12.12.2025 - 08:37
![]() Berta wrote:
Berta wrote:
Buenos días, ¿para hacer la muestra que agujas utilizo, las de 4mm, 5mm o 5'5 mm? Muchas gracias.
01.12.2025 - 18:56DROPS Design answered:
Hola Berta, usas las agujas con las que vas a tejer en punto jersey, es decir, las agujas de 5.5mm.
15.12.2025 - 00:01
![]() Sandra Schmitz wrote:
Sandra Schmitz wrote:
Is there help knitting this cardigan if I have a question??
30.11.2025 - 05:39DROPS Design answered:
Hi Sandra, of course, write to us if you have any questions. Kind regards!
01.12.2025 - 09:04
![]() Anne wrote:
Anne wrote:
Hallo, Ich verstehe die Anleitung für die Blende leider ganz und gar nicht. Kann ich nicht einfach die Maschen aus dem Rand aufnehmen und hoch und runterstricken bis ich die gewünschte Breite habe? Ich weiß nicht wo und wofür ich 12 Maschen anschlagen soll? LG und danke
24.11.2025 - 13:57
![]() Amber wrote:
Amber wrote:
Is the yarn over supposed to leave a hole in this pattern? It doesn’t look like there are holes in the photos, so I’m a little confused. Thank you
09.11.2025 - 13:55DROPS Design answered:
Hi Amber, The yarn overs are worked as described under Raglan at the top of the pattern. This will avoid holes on the next row. Regards, Drops Team.
10.11.2025 - 06:55
|
|
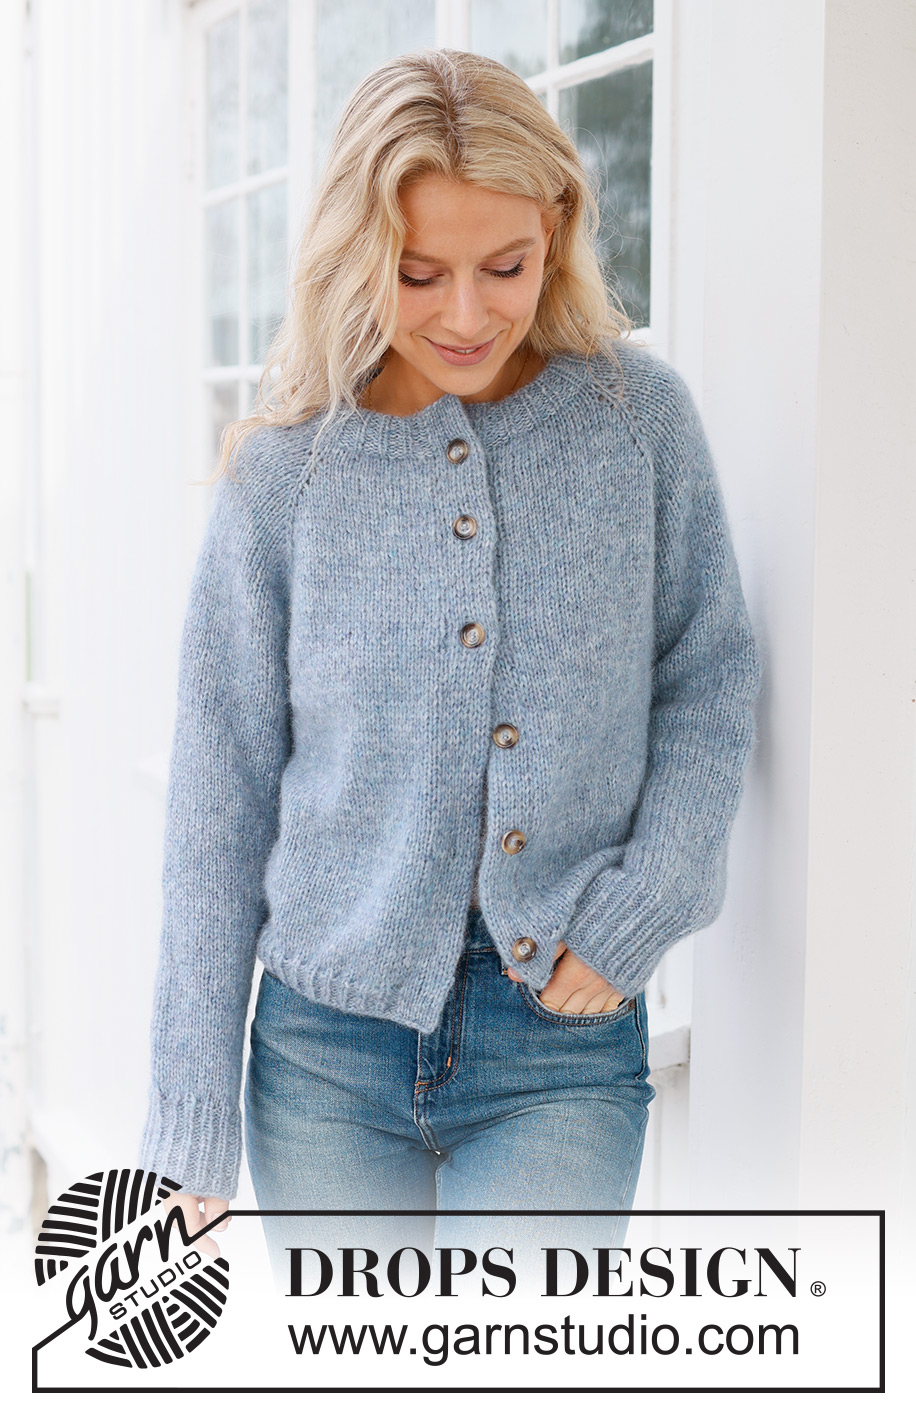
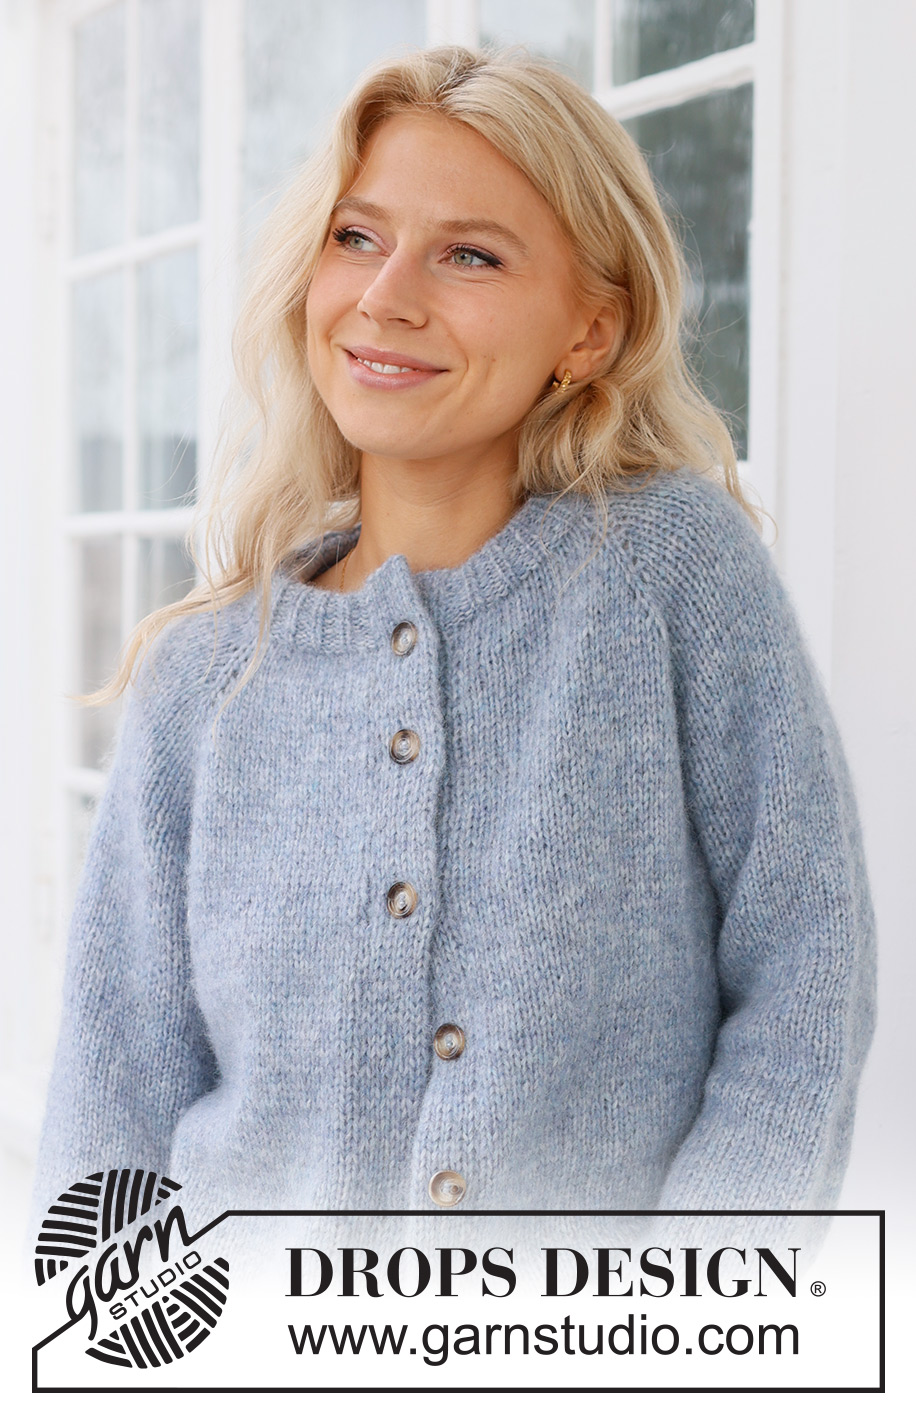
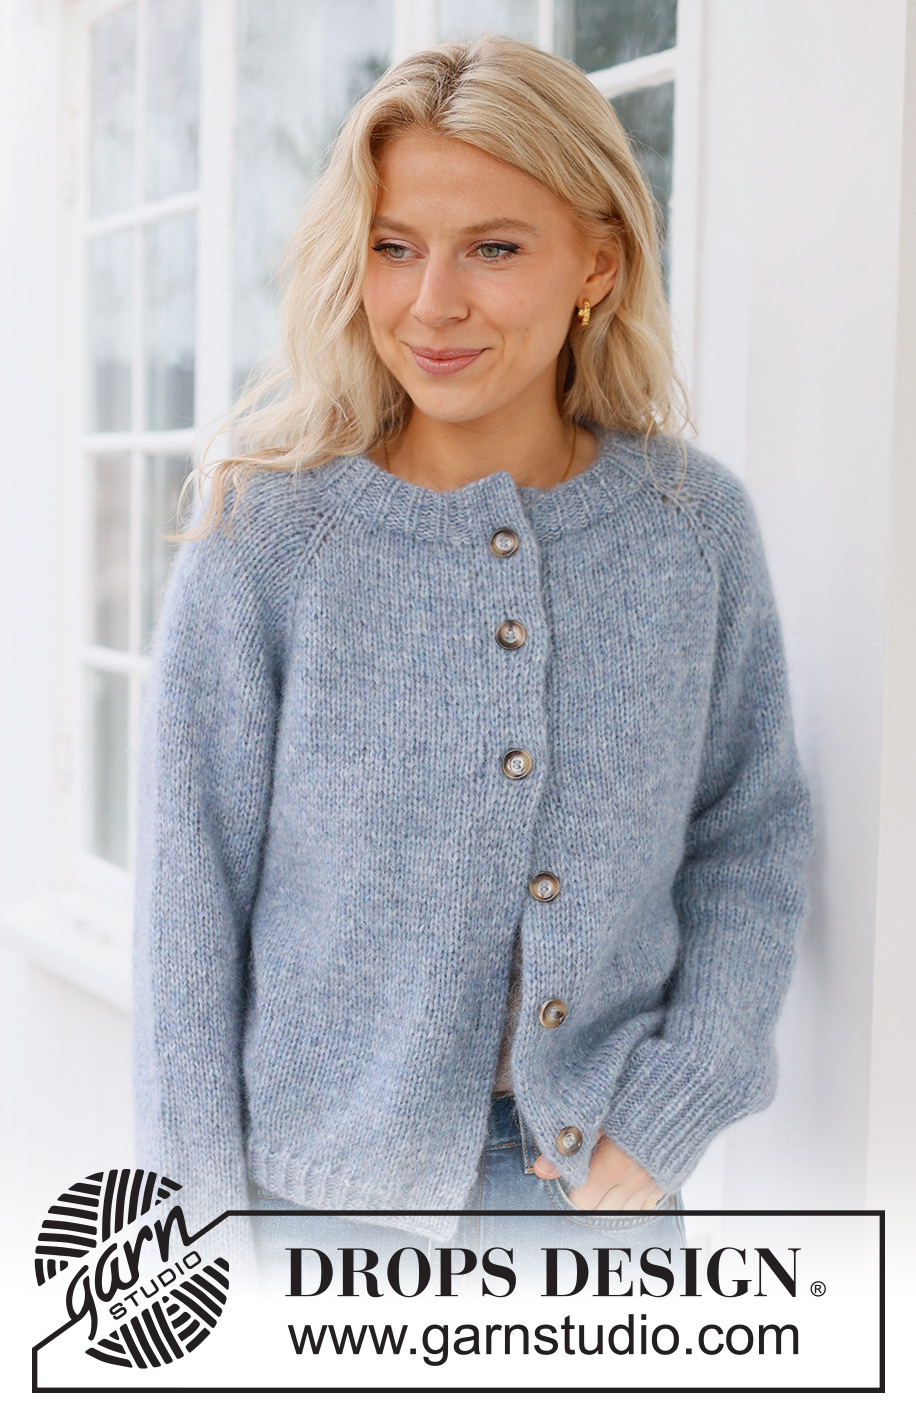
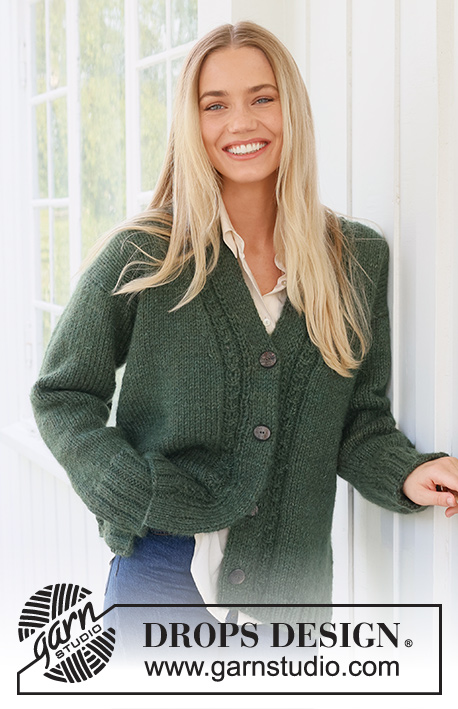
Foggy Autumn Cardigan#foggyautumncardigan |
|
 |
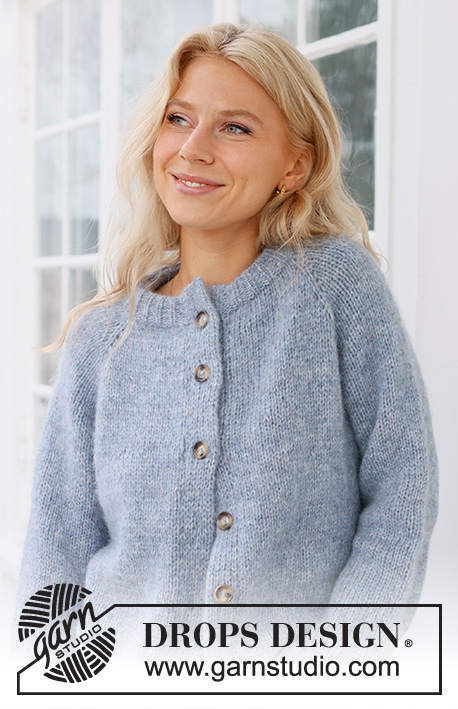 |
Knitted jacket in DROPS Air. The piece is worked top down, with raglan and double bands. Sizes S - XXXL.
DROPS 236-33 |
|
|
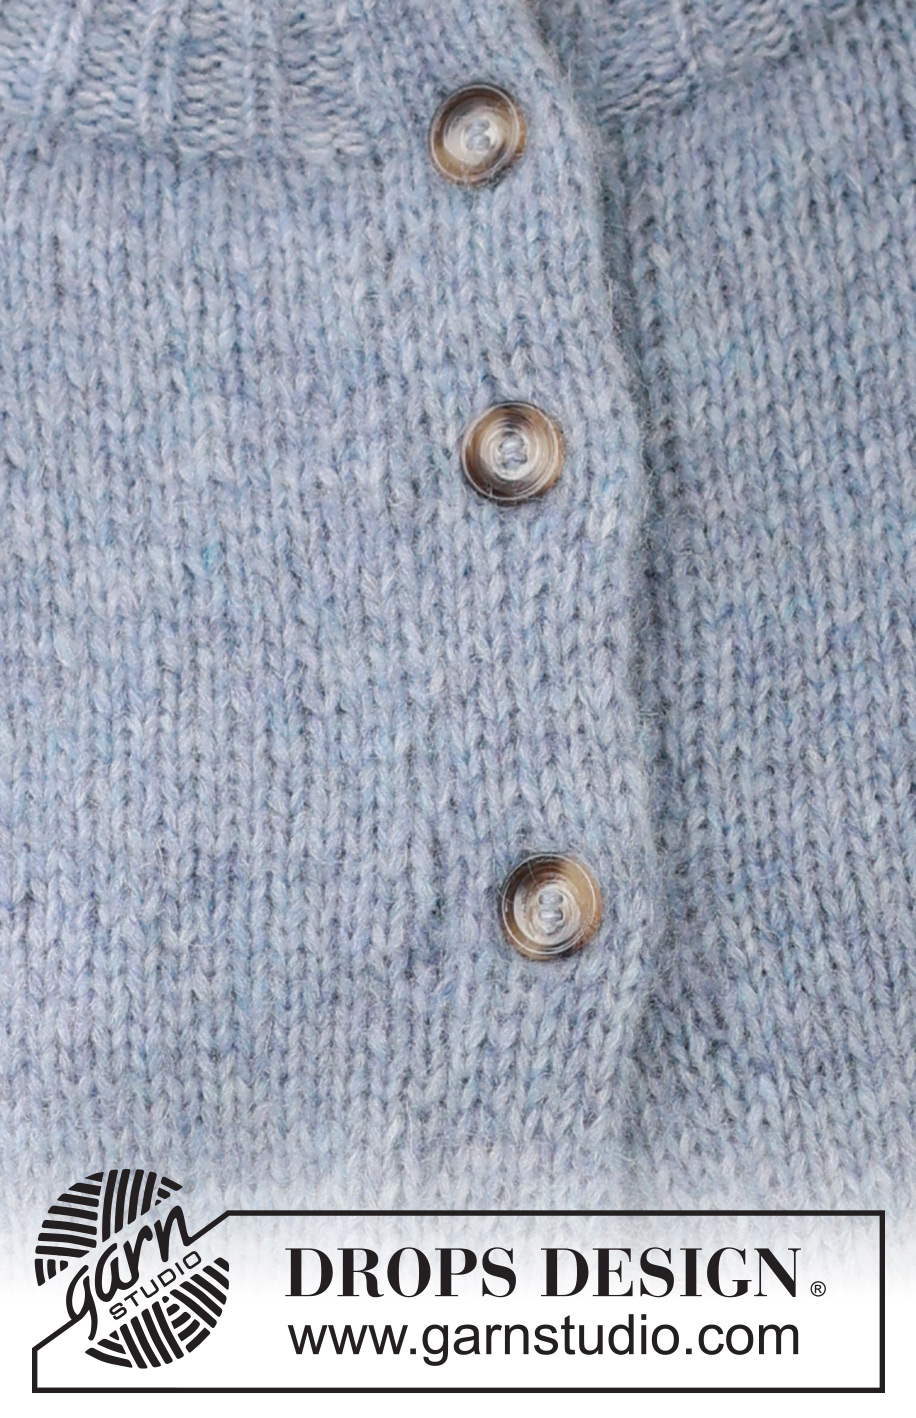
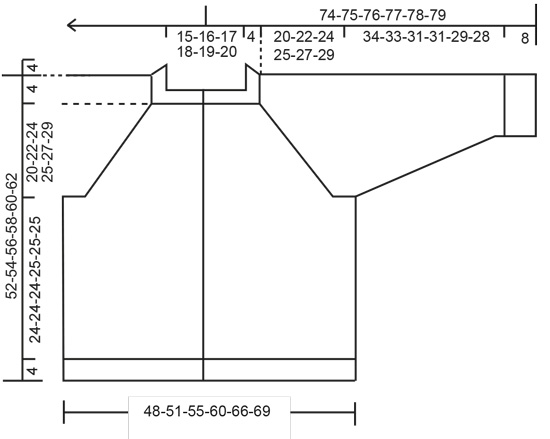
------------------------------------------------------- EXPLANATIONS FOR THE PATTERN: ------------------------------------------------------- RIDGE/GARTER STITCH (worked back and forth): Knit all rows. 1 ridge = knit 2 rows. RAGLAN: All increases are worked from the right side! Increase to raglan on each side of each marker-stitch as follows: Work to the marker-stitch, 1 yarn over, knit the marker-stitch, 1 yarn over (= 8 stitches increased). On the next row (wrong side) work the yarn overs as follows: BEFORE marker-stitch: Purl the yarn over twisted. AFTER marker-stitch: Slip the yarn over onto the right needle as if to knit, place it back onto the left needle the other way round (twisted), purl the yarn over. DECREASE TIP (sleeves): Decrease 1 stitch on either side of the marker as follows: Work until there are 3 stitches left before the marker, knit 2 together, knit 2 (marker sits between these 2 stitches), slip 1 stitch as if to knit, knit 1 and pass the slipped stitch over the knitted stitch (2 stitches decreased). BUTTONHOLES: The buttonholes are worked on the right band: Work the first 6 stitches, turn and work the same stitches back, turn and work these 6 stitches again. Cut the strand. Work 4 rows over the remaining 6 band stitches (first row from the right side) and knit together the last stitch from the right side and the stitch on the edge of the jacket. On the last row from the right side work all the band stitches as before. Work the buttonholes when the band measures: S: 4, 13, 22, 31, 40 and 48 cm = 1½", 5⅛", 8¾", 12¼", 15¾" and 19". M: 4, 14, 23, 33, 41 and 50 cm = 1½", 5½", 9", 13", 16⅛" and 19¾". L: 4, 14, 24, 34, 43 and 52 cm = 1½", 5½", 9½", 13⅜", 17" and 20½". XL: 6, 16, 26, 36, 45 and 54 cm = 2⅜", 6¼", 10¼", 14¼", 17¾" and 21¼". XXL: 4, 13, 22, 31, 40, 48 and 56 cm = 1½", 5⅛", 8¾", 12¼", 15¾", 19" and 22". XXXL: 5, 14, 23, 32, 41, 50 and 58 cm = 2", 5½", 9", 12½", 16⅛", 19¾" and 22¾". ------------------------------------------------------- START THE PIECE HERE: ------------------------------------------------------- JACKET – SHORT OVERVIEW OF THE PIECE. The neck and yoke are worked back and forth with circular needle, top down. The yoke is divided for body and sleeves and the body continued back and forth with circular needle. The sleeves are worked in the round with double pointed needles. DOUBLE NECK: Cast on 79-82-88-91-94-97 stitches with DROPS Air using 2 circular needles, sizes 4 and 5.5 MM = US 9, held together. Pull out the needle size 5.5 MM = US 9 and work with circular needle size 4 MM = US 6 (doing this gives you an elastic cast-on edge). Purl 1 row from the wrong side. Work rib from the right side as follows: 1 edge stitch in GARTER STITCH – read description above, * purl 2, knit 1 *, work from *-* until there are 3 stitches left, purl 2, 1 edge stitch in garter stitch. When the rib measures 9 cm = 3½", fold the neck double to the inside. On the next row, knit from right side, at the same time work every 2nd stitch together with every 2nd stitch from the cast-on edge. Change to circular needle size 5.5 MM = US 9. Insert 1 marker inside the 1 edge stitch; the yoke is measured from this marker! YOKE: Purl 1 row from the wrong side and increase 13-14-16-9-10-13 stitches evenly spaced = 92-96-104-100-104-110 stitches. Insert 4 markers (without working the stitches) as follows: Count 15-16-18-17-18-19 stitches (front piece), insert 1 marker in the next stitch, count 14 stitches (sleeve), insert 1 marker in the next stitch, count 30-32-36-34-36-40 stitches (back piece), insert 1 marker in the next stitch, count 14 stitches (sleeve), insert 1 marker in the next stitch, there are 15-16-18-17-18-19 stitches after the last marker-stitch (front piece). Continue with stockinette stitch and 1 edge stitch in garter stitch on each side. On the next row from the right side increase 1 stitch on each side of each marker-stitch – read RAGLAN above. Increase like this, each row from the right side, a total of 17-19-20-24-26-27 times = 228-248-264-292-312-326 stitches. REMEMBER THE KNITTING GAUGE! Continue with stockinette stitch and 1 edge stitch in garter stitch on each side until the yoke measures 20-22-24-25-27-29 cm = 8"-8¾"-9½"-9¾"-10⅝"-11⅜". Now divide for the body and sleeves as follows: Work 34-37-39-43-47-49 stitches, place the next 46-50-54-60-62-64 stitches on a thread for the sleeve, cast on 8-8-10-10-12-12 stitches under the sleeve, work 68-74-78-86-94-99 stitches, place the next 46-50-54-60-62-64 stitches on a thread for the sleeve, cast on 8-8-10-10-12-12 stitches under the sleeve, work the last 34-37-39-43-47-50 stitches. BODY: = 152-164-176-192-212-222 stitches. Continue with stockinette stitch and 1 edge stitch in garter stitch on each side for a further 24-24-24-25-25-25 cm = 9½"-9½"-9½"-9¾"-9¾"-9¾". Now increase 14-14-17-19-20-22 stitches evenly on the next row from the right side = 166-178-193-211-232-244 stitches. Change to circular needle size 4 MM = US 6. Work rib from the wrong side as follows: 1 edge stitch in garter stitch, * knit 2, purl 1 *, work from *-* until there are 3 stitches left, knit 2 and 1 edge stitch in garter stitch. Continue this rib for 4 cm = 1½". Bind off. The jacket measures approx. 52-54-56-58-60-62 cm = 20½"-21¼"-22"-22¾"-23⅝"-24⅜", from the shoulder down. SLEEVES: Place the 46-50-54-60-62-64 stitches from the thread on the one side of the piece on double pointed needles size 5.5 MM = US 9 and knit up 1 stitch in each of the 8-8-10-10-12-12 stitches cast on under the sleeve = 54-58-64-70-74-76 stitches. Insert a marker in the middle of the new stitches under the sleeve. Work stockinette stitch in the round for 2 cm = ¾". Now decrease 2 stitches under the sleeve – read DECREASE TIP. Decrease like this every 4½-4-3-2-2-1½ cm = 1⅝"-1½"-1⅛"-¾"-¾"-½" a total of 7-8-10-13-14-14 times = 40-42-44-44-46-48 stitches. When the sleeve measures 34-33-31-31-29-28 cm = 13⅜"-13"-12¼"-12¼"-11⅜"-11" from the division, increase 5-6-7-7-5-6 stitches evenly spaced = 45-48-51-51-51-54 stitches. Change to double pointed needles size 4 MM = US 6 and work rib (purl 2, knit 1) for 8 cm = 3⅛". Bind off. The sleeve measures approx. 42-41-39-39-37-36 cm = 16½"-16⅛"-15¼"-15¼"-14½"-14¼" from the division. Work the other sleeve in the same way. RIGHT BAND: The band is worked bottom up. Wind out a 90 to 120 cm = 35½" to 47¼" yarn-end and use it to knit up stitches along the front piece (this means you can continue working without cutting the strand afterwards): Start at the bottom and knit up 1 stitch in each row, inside the 1 edge stitch, with circular needle size 5 MM = US 8 and DROPS Air. Work from the end of the needle, where the wool-ball is = bottom of the front piece. Cast on 12 stitches from the wrong side, extending the band outwards. Work back and forth over these 12 stitches and work the band together with the front piece as follows: ROW 1 (right side): Slip the first stitch onto the right needle as if to purl, keeping the strand at the front, * knit 1, slip 1 stitch onto the right needle as if to purl, keeping the strand in front *, work from *-* until there is 1 stitch left on the band, slip the last stitch onto the right needle as if to knit, keeping the strand at the back, knit the next stitch and pass the slipped stitch over the knitted stitch, turn. ROW 2 (wrong side): * Slip the first/next stitch onto the right needle as if to purl, keeping the strand in front, knit 1 *, work from *-* over all 12 band-stitches, turn. Repeat rows 1 and 2. NB! If the band becomes too long for the front piece, the band stitches can be worked together with 1 extra stitch from the front piece. Then work every 10th row as follows from the right side: Work until 1 stitch remains of the 12 band stitches, slip the last stitch onto the right needle as if to knit, with the yarn behind the work, knit the next 2 stitches together, pass the slipped stitch over the stitches knitted together, turn. Remember the BUTTONHOLES – read description above. When all the stitches on the front piece are worked together with the band, knit all stitches together 2 and 2, then bind off. LEFT BAND: The band is worked bottom up. Start at the top and knit up 1 stitch down the front piece in each row, working inside the 1 edge stitch, with circular needle size 5 MM = US 8 and DROPS Air. Cast on 12 stitches at the bottom, extending the band outwards. Work back and forth over these 12 stitches and work the band together with the front piece as follows: ROW 1 (wrong side): Knit 1, * slip 1 stitch onto the right needle as if to purl, keeping the strand in front, knit 1 *, work from *-* until there is 1 stitch left on the band, slip the next 2 stitches onto the right needle as if to purl together, keeping the strand in front, turn. ROW 2 (right side): Knit 2 together, * slip 1 stitch onto the right needle as if to purl, keeping the strand in front, knit 1 *, work from *-* until there is 1 stitch left, slip the last stitch onto the right needle as if to purl, keeping the strand in front, turn. Repeat rows 1 and 2. NB! If the band becomes too long for the front piece, the band stitches can be worked together with 1 extra stitch from the front piece on every 9th and 10th row as follows: slip 3 stitches onto the right needle at the end of the row from the wrong side and knit 3 together from the right side. When all the stitches on the front piece are worked together with the band, work together as follows from the right side: Slip 1 stitch onto the right needle as if to knit, knit 1, pass the slipped stitch over, bind off. ASSEMBLY: Sew the buttons onto the left band. |
|
 |
|
Have you finished this pattern?Tag your pictures with #dropspattern #foggyautumncardigan or submit them to the #dropsfan gallery. Do you need help with this pattern?You'll find 35 tutorial videos, a Comments/Questions area and more by visiting the pattern on garnstudio.com. © 1982-2026 DROPS Design A/S. We reserve all rights. This document, including all its sub-sections, has copyrights. Read more about what you can do with our patterns at the bottom of each pattern on our site. |
|


With over 40 years in knitting and crochet design, DROPS Design offers one of the most extensive collections of free patterns on the internet - translated to 17 languages. As of today we count 324 catalogs and 12290 patterns - 12280 of which are translated into English (US/in).
We work hard to bring you the best knitting and crochet have to offer, inspiration and advice as well as great quality yarns at incredible prices! Would you like to use our patterns for other than personal use? You can read what you are allowed to do in the Copyright text at the bottom of all our patterns. Happy crafting!
Post a comment to pattern DROPS 236-33
We would love to hear what you have to say about this pattern!
If you want to leave a question, please make sure you select the correct category in the form below, to speed up the answering process. Required fields are marked *.