
Popular categories
Looking for a yarn?


Comments / Questions (28)
![]() Mary wrote:
Mary wrote:
I am sorry, I have tried many times to work this without success. Can you please just tell me what I should do between the 1st and the 2nd marker in the second raglan? Maybe in this way, I can understand the logic. But if you do not specify the bit between these 2 markers, I am lost. Many thanks in advance!
11.02.2023 - 10:45DROPS Design answered:
Dear Mary, Work as follows: marker 1, k1 (=raglan line), 1YO, k7 (= sleeve), 1 YO, k1, 2nd marker, k1 (=raglan line), 1 YO, A.1, A.2, A.3 (for the front), 1 YO, k1, 3rd marker, k1 (= raglan line), e.t.c. Happy knitting!
13.02.2023 - 00:02
![]() Mary wrote:
Mary wrote:
Can you please specify which are the stitches included within the first 2 stitch markers? My understanding was that "knit 1, 1 yarn over, knit 7, 1 yarn over, knit 1, insert 1 marker here (transition between right sleeve and front piece), knit 1, 1 yarn over" is within the first 2 stitch markers but if I do what you told me above for the second raglan, I go over the second stitch marker and I think it's wrong, I think I should stay within the 2 stitch markers.
07.02.2023 - 13:28DROPS Design answered:
Dear Mary, the round starts between the first 2 raglan stitches, reason why you start with K1 (and end with K1) - then you are right, the next marker is between the 2 knitted stitches at the end of sleeve before front piece. You should have K2 on each raglan lines (K1, marker, K1) and you will increase on either side of these K2. Happy knitting!
07.02.2023 - 16:58
![]() Mary wrote:
Mary wrote:
Sorry, I am still not clear. In the first Raglan, I have this bit "knit 1, 1 yarn over, knit 7, 1 yarn over, knit 1, insert 1 marker here". Now, for the second raglan, which is the bit that correspond to this one?
07.02.2023 - 12:15DROPS Design answered:
Dear Mary, on the 2nd raglan increase, work; K1 (raglan stitch), YO (new raglan increase for sleeve), K9 (the K7 from 1st round + the 2 raglan increases), YO (new raglan increase for sleeve), K2 (raglan stitches), YO (new raglan increase for body), diagrams etc.. On 3rd raglan increase you will start with K1, YO, K11 (the K9 + the 2 sts increased the 2nd time), YO, K2, etc..Can this help?
07.02.2023 - 13:20
![]() Mary wrote:
Mary wrote:
Hi, always following to the last answer I got. So "this means for the 2nd increase, you will work: K1 (raglan st), YO (new increase for raglan), K9 (= K7 + 2 previous inc), YO..." does this mean that the difference between the first raglan and any additional one is that I have to add 2 more K per each increase?
07.02.2023 - 10:59DROPS Design answered:
Dear Mary, yes, you need to knit the increases in the next round. So you will have 2 more knitted stitches per increases in each round. Happy knitting!
07.02.2023 - 11:45
![]() Mary wrote:
Mary wrote:
Hi, once I have finished the first raglan, the instructions say: "Continue this pattern and increase to raglan every 2nd round.." but does this mean I have to shift to the diagram? I think this passage is not clear at all. If I redo this: "knit 1, 1 yarn over, knit 7, 1 yarn over, knit 1, insert 1 marker here (transition between right sleeve and front piece), knit 1, 1 yarn over, A.1 over the next 5-5-5-6-6-6 stitches, A.." it doe snot work as I have more stitches now. What am I missing?
07.02.2023 - 00:34DROPS Design answered:
Dear Mary, the increases for the raglan are worked as explained under RAGLAN at the beginning of the written pattern, this means for the 2nd increase, you will work: K1 (raglan st), YO (new increase for raglan), K9 (= K7 + 2 previous inc), YO (new inc for raglan), K2 (raglan sts), YO (inc for raglan), work row 3 diagrams A.1, A.2,A.3 as before, etc..; Happy knitting!
07.02.2023 - 10:25
![]() Lotekky wrote:
Lotekky wrote:
How am I supposed to work two yarn overs right next to each other? Is it supposed to make two holes side by side? If not, won’t the stitch count be off?
05.09.2022 - 20:44DROPS Design answered:
Dear Lotekky, there will always be at least 1 knit stitch between 2 yarn overs. Happy knitting!
06.09.2022 - 09:37
![]() Alyssa wrote:
Alyssa wrote:
I’m knitting size M. I don’t understand the part that says that (on the yoke) once 16 increases have finished the piece will measure 23 cm. Continue without further increases until the piece measures 23 cm. Am I misunderstanding something?
13.06.2022 - 05:50DROPS Design answered:
Dear Alyssa, when you have done all raglan increases, continue working the lace pattern as before but do not increase anymore - just make sure you will have enough room to work every decrease compensated by a yarn over in the lace pattern to keep correct number of stitches; if there are not enough stitches for the lace pattern, knit these stitches . Happy knitting!
13.06.2022 - 11:35
![]() Sara wrote:
Sara wrote:
Buonasera, vorrei sapere se possibile a quanti millimetri corrisponde lo spessore del filo del filato snow qui usato. Grazie.
31.08.2021 - 17:00DROPS Design answered:
Buonasera Sara, per un'assistenza così personalizzata può rivolgersi al suo rivenditore DROPS di fiducia. Buon lavoro!
02.09.2021 - 19:04
![]() Berit Terjesen wrote:
Berit Terjesen wrote:
Hei og takk for hjelpen hittil. Fremdeles lurer jeg på om disse 13 maskene under armene skal strikkes rett helt ned til vrangbord? slik at det dannes en "stripe "under hver arm og som deler front og bakside?
18.05.2021 - 15:36DROPS Design answered:
Hei Berit. Ja, det stemmer. Blir en bred "stripe" med glattstrikk under ermene. mvh DROPS design
19.05.2021 - 10:17
![]() Margaret wrote:
Margaret wrote:
Hi, this pattern looks lovely. Is it possible to knit this on two needles? Thank you.
12.05.2021 - 17:00DROPS Design answered:
Dear Margaret, please see THIS lesson about adapting our patterns for straight needles. Happy Knitting!
12.05.2021 - 17:09
|
|||||||||||||||||||
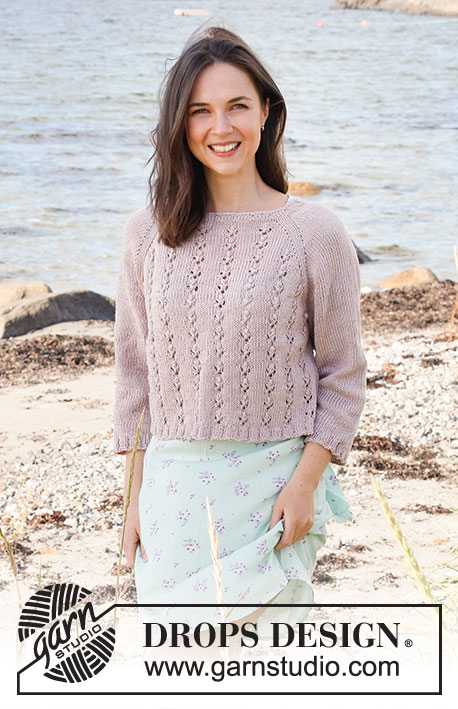
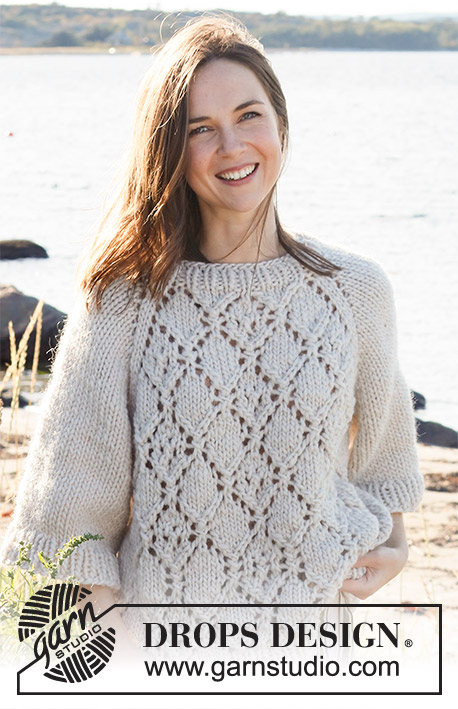
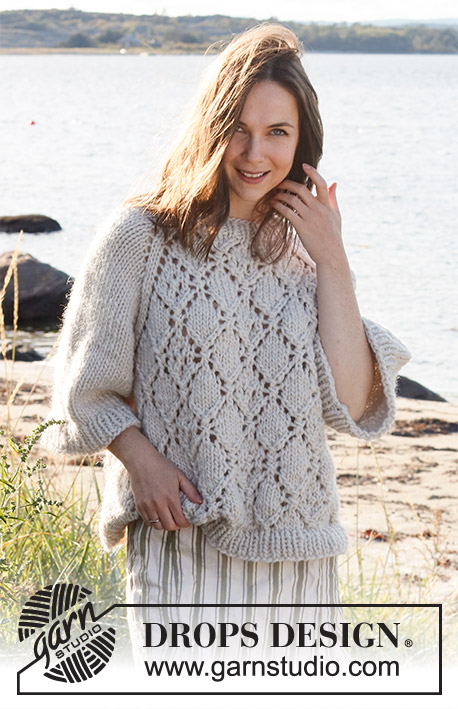
Diamonds in the Sky#diamondsintheskysweater |
|||||||||||||||||||
 |
 |
||||||||||||||||||
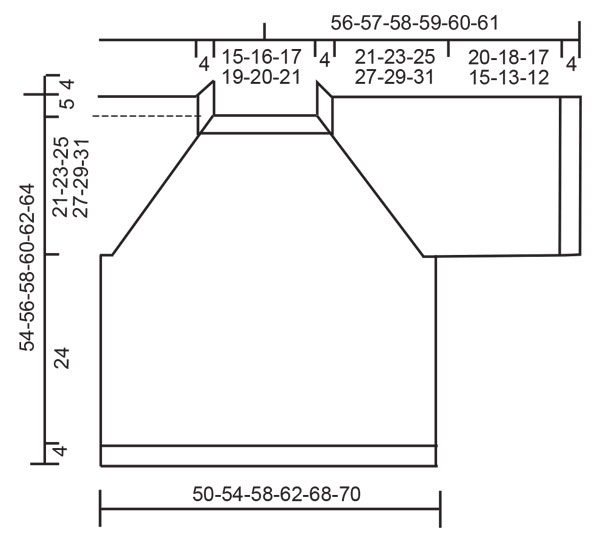
Knitted sweater in DROPS Snow or DROPS Wish. The piece is worked top down with raglan, lace pattern and ¾-length, wide sleeves. Sizes S - XXXL.
DROPS 221-29 |
|||||||||||||||||||
|
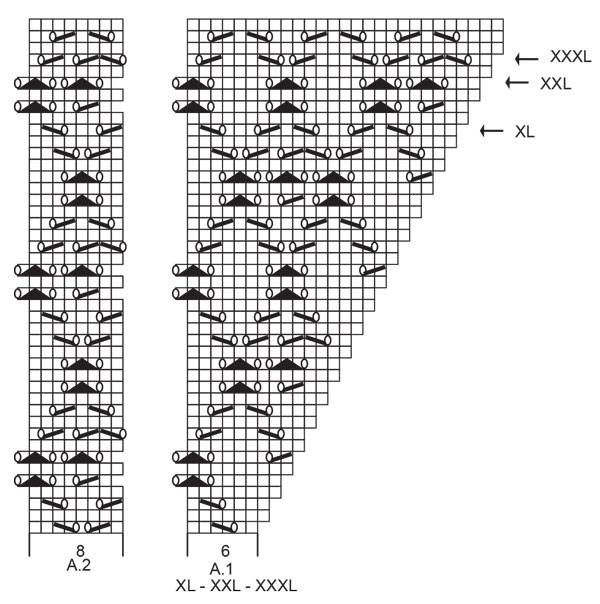
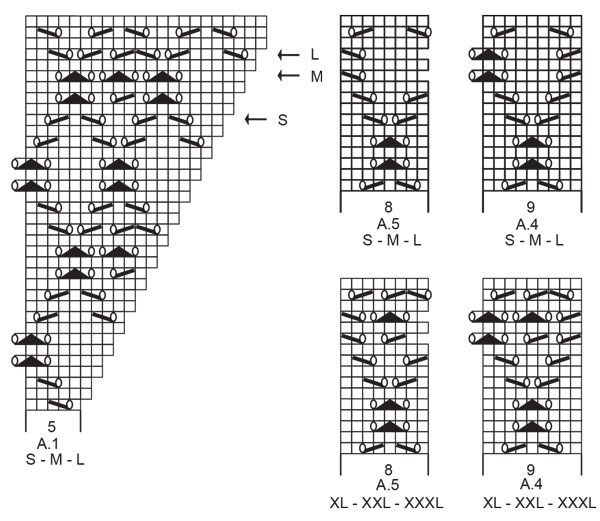
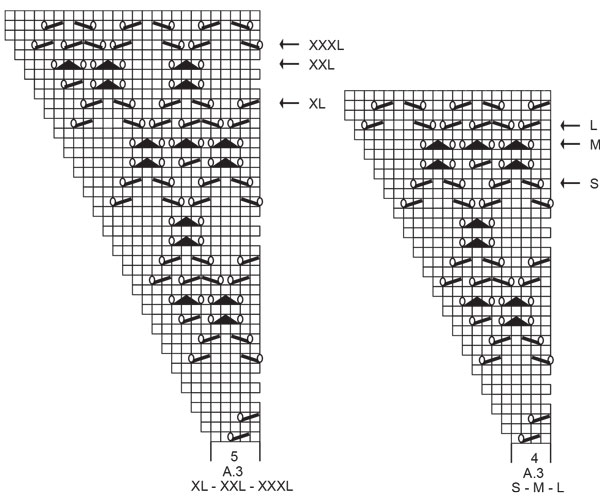
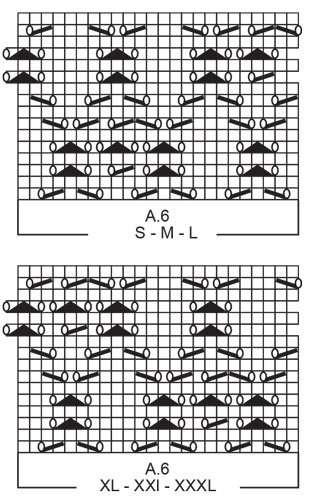
------------------------------------------------------- EXPLANATIONS FOR THE PATTERN: ------------------------------------------------------- PATTERN: See diagrams A.1 to A.6. Choose the diagrams for your size. INCREASE TIP (evenly spaced): To work out how to increase evenly, count the total number of stitches on the needle (e.g. 46 stitches) and divide by the number of increases to be made (e.g. 10) = 4.6. In this example, increase by making 1 yarn over after alternately each 4th and 5th stitch. On the next round work the yarn overs twisted to avoid holes. RAGLAN: Increase to raglan by making 1 yarn over on each side of 2 stitches (marker sits in the middle of these 2 stitches), in the transitions between body and sleeves, as follows (a total of 8 stitches increased). Increase 1 stitch by making 1 yarn over. On the next round knit the yarn overs; leaves holes. Then work the new stitches in pattern on the front and back pieces and in stockinette stitch on the sleeves. BINDING-OFF TIP: To avoid the bind-off edge being tight you can bind off with a larger size needle. If the edge is still tight, make 1 yarn over after approx. each 4th stitch at the same time as binding off; the yarn overs are bind off as normal stitches. ------------------------------------------------------- START THE PIECE HERE: ------------------------------------------------------- SWEATER – SHORT OVERVIEW OF THE PIECE: The neck and yoke are worked in the round with circular needle, top down. The yoke is divided and the body and sleeves are then continued separately in the round, with circular needle, top down. NECK: Cast on 46-48-50-54-56-58 stitches with short circular needle size 8 MM = US 11 and Snow or Wish. Knit 1 round. Then work rib (knit 1, purl 1) in the round for 4 cm = 1½". Knit 1 round where you increase 10-8-6-6-4-2 stitches evenly spaced – read INCREASE TIP = 56-56-56-60-60-60 stitches. Knit 1 round. Change to circular needle size 9 MM = US 13. Insert 1 marker after 20-20-20-21-21-21 stitches (= approx. mid-front), the yoke is measured from this marker! YOKE: Now work pattern and insert 4 markers as follows: Insert 1 marker at the beginning of the round (= transition between back piece and right sleeve), knit 1, 1 yarn over, knit 7, 1 yarn over, knit 1, insert 1 marker here (transition between right sleeve and front piece), knit 1, 1 yarn over, A.1 over the next 5-5-5-6-6-6 stitches, A.2 over the next 8 stitches, A.3 over the next 4-4-4-5-5-5 stitches, 1 yarn over, knit 1, insert 1 marker here ( transition between front piece and left sleeve), knit 1, 1 yarn over, knit 7, 1 yarn over, knit 1, insert 1 marker here (transition between left sleeve and back piece), knit 1, 1 yarn over, A.1 over the next 5-5-5-6-6-6 stitches, A.2 over the next 8 stitches, A.3 over the next 4-4-4-5-5-5 stitches, 1 yarn over, knit 1. REMEMBER THE KNITTING GAUGE! The first increase to RAGLAN – read description above, is now finished. Continue this pattern and increase to raglan every 2nd round a total of 14-16-17-18-20-21 times = 168-184-192-204-220-228 stitches. After the last increase, the piece measures approx. 20-23-24-26-29-30 cm = 8"-9"-9½"-10¼"-11⅜"-11¾" from the marker on the neck. Continue working without further increases until the piece measures 21-23-25-27-29-31 cm = 8¼"-9"-9¾"-10⅝"-11⅜"-12¼" from the marker, (work as many stitches in the pattern as there is room for towards the raglan, making sure the yarn overs and decreases equal each other so the number of stitches remains the same – the other stitches are worked in stockinette stitch). On the next round (a knitted round) – adjust so the round now starts 1 stitch earlier, work as follows: Place the first 39-43-45-47-51-53 stitches on a thread for the sleeve, cast on 5-5-7-7-9-9 new stitches on the needle (= in side under the sleeve), work the next 45-49-51-55-59-61 stitches as before (= front piece), place the next 39-43-45-47-51-53 stitches on a thread for the sleeve, cast on 5-5-7-7-9-9 new stitches on the needle (= in side under the sleeve), work the last 45-49-51-55-59-61 stitches as before (= back piece). Body and sleeves are finished separately. THE PIECE IS NOW MEASURED FROM HERE. BODY: = 100-108-116-124-136-140 stitches. Knit as far as the middle stitch cast on under the sleeve. The round now starts here. Continue the pattern from yoke on body – making sure to continue with the correct row in the diagram after the yoke. Work pattern and stockinette stitch in the sides as follows: * Knit 1-3-5-3-6-7 stitches, A.4 over the next 9 stitches (choose diagram for your size), work A.6 over the next 24 stitches (choose diagram for your size), work the first 8-8-8-16-16-16 stitches in A.6, work A.5 over the next 8 stitches (choose diagram for your size) knit 0-2-4-2-5-6 *, work from *-* 1 more time on the round. When the piece measures 24 cm = 9½", knit 1 round where you increase 10-10-12-12-14-14 stitches evenly spaced = 110-118-128-136-150-154 stitches. Change to circular needle size 8 MM = US 11 and work rib (knit 1, purl 1) for 4 cm = 1½". Bind off with knit over knit and purl over purl. The sweater measures approx. 54-56-58-60-52-64 cm = 21¼"-22"-22¾"-23⅝"-20½"-25¼" from the shoulder down. SLEEVES: Place the 39-43-45-47-51-53 stitches from the thread on the one side of the piece on short circular needle size 9 MM = US 13 and knit up 1 stitch in each of the 5-5-7-7-9-9 stitches cast on under the sleeve = 44-48-52-54-60-62 stitches. Work stockinette stitch in the round. When the sleeve measures 20-18-17-15-13-12 cm = 8"-7"-6¾"-6"-5⅛"-4¾", increase 4-4-4-4-6-6 stitches evenly spaced = 48-52-56-58-70-68 stitches. Change to circular needle size 8 MM = US 11. Work rib (knit 1, purl 1) for 4 cm = 1½". Bind off with knit over knit and purl over purl. The sleeve measures approx. 24-22-21-19-17-16 cm = 9½"-8¾"-8¼"-7½"-6¾"-6¼" from the division. Work the other sleeve in the same way. |
|||||||||||||||||||
Diagram explanations |
|||||||||||||||||||
|
|||||||||||||||||||
 |
|||||||||||||||||||
 |
|||||||||||||||||||
 |
|||||||||||||||||||
 |
|||||||||||||||||||
 |
|||||||||||||||||||
Have you finished this pattern?Tag your pictures with #dropspattern #diamondsintheskysweater or submit them to the #dropsfan gallery. Do you need help with this pattern?You'll find 24 tutorial videos, a Comments/Questions area and more by visiting the pattern on garnstudio.com. © 1982-2026 DROPS Design A/S. We reserve all rights. This document, including all its sub-sections, has copyrights. Read more about what you can do with our patterns at the bottom of each pattern on our site. |
|||||||||||||||||||


With over 40 years in knitting and crochet design, DROPS Design offers one of the most extensive collections of free patterns on the internet - translated to 17 languages. As of today we count 325 catalogs and 12298 patterns - 12288 of which are translated into English (US/in).
We work hard to bring you the best knitting and crochet have to offer, inspiration and advice as well as great quality yarns at incredible prices! Would you like to use our patterns for other than personal use? You can read what you are allowed to do in the Copyright text at the bottom of all our patterns. Happy crafting!
Post a comment to pattern DROPS 221-29
We would love to hear what you have to say about this pattern!
If you want to leave a question, please make sure you select the correct category in the form below, to speed up the answering process. Required fields are marked *.