
Populära kategorier
Letar du efter ett garn?


|
|||||||||||||||||||
Diamonds in the Sky |
|||||||||||||||||||
 |
 |
||||||||||||||||||
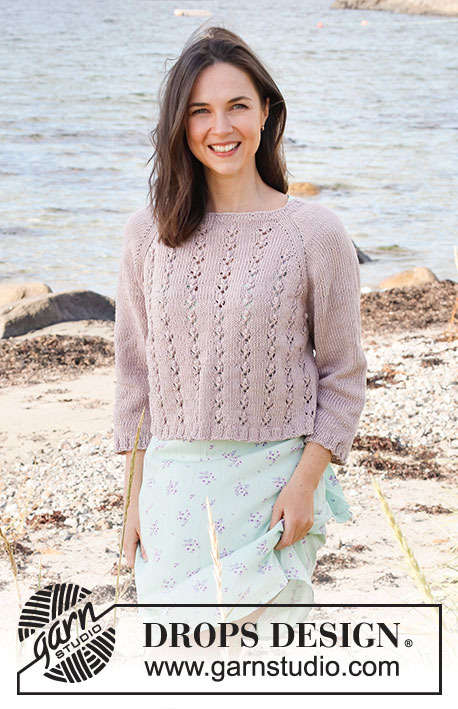
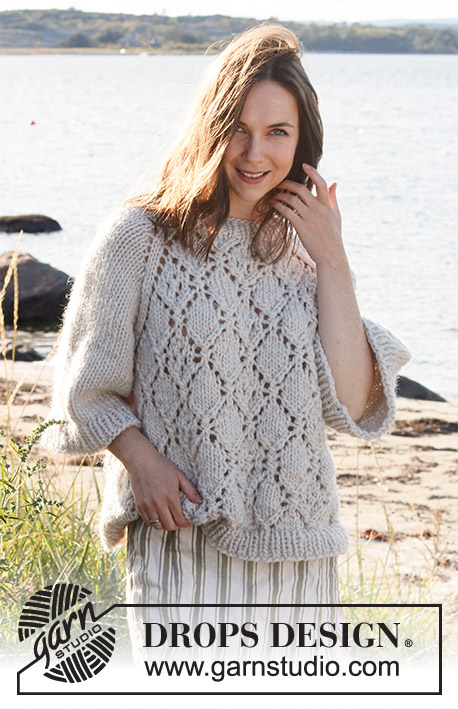
Stickad tröja i DROPS Snow eller DROPS Wish. Arbetet stickas uppifrån och ner med raglan, hålmönster och ¾-långa, vida ärmar. Storlek S - XXXL.
DROPS 221-29 |
|||||||||||||||||||
|
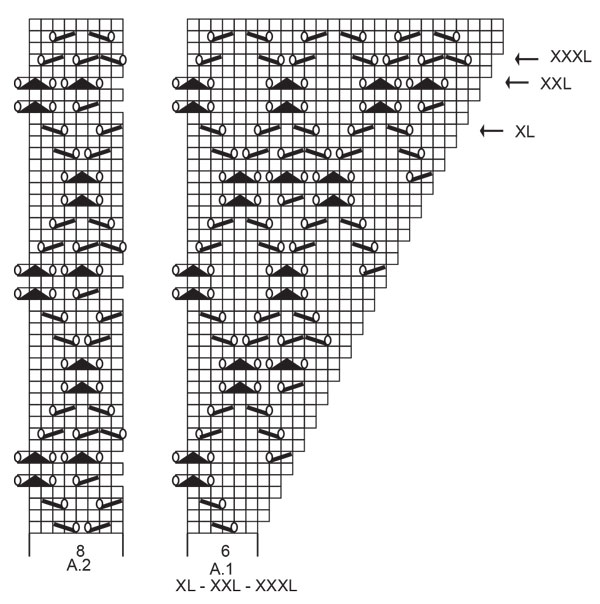
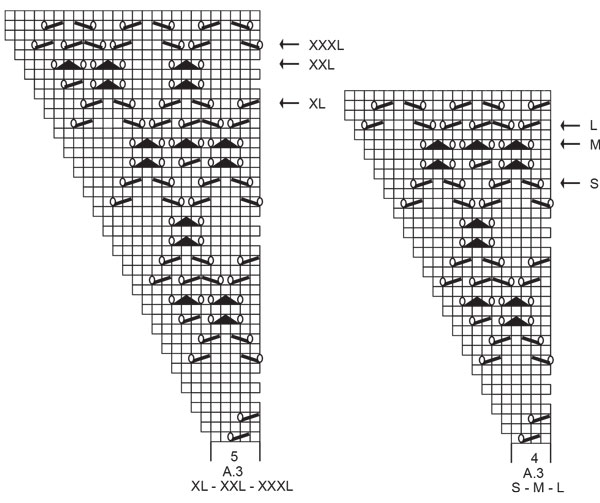
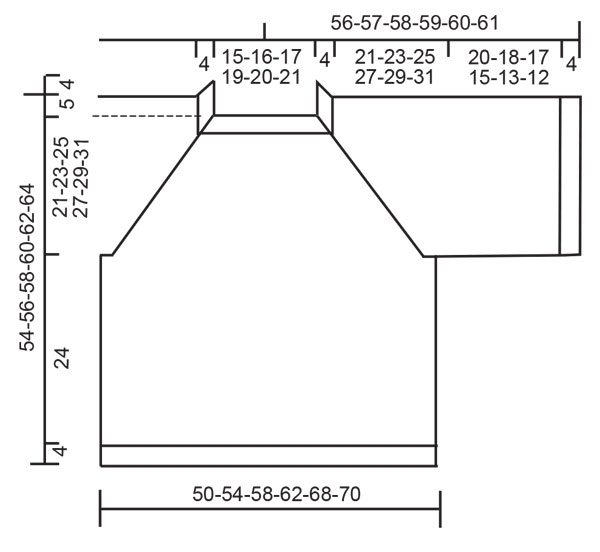
------------------------------------------------------- FÖRKLARING TILL BESKRIVNINGEN: ------------------------------------------------------- MÖNSTER: Se diagram A.1 till A.6. Välj diagram för din storlek. ÖKNINGSTIPS (jämn fördelning): För att beräkna hur det ska ökas jämnt, räknar man det totala maskantalet på varvet (t.ex 46 maskor), och delar maskorna med det antal ökningar som ska göras (t.ex 10) = 4,6. I detta exempel ökas det genom att göra 1 omslag om stickan efter växelvis ca var 4:e och var 5:e maska. På nästa varv stickas omslagen vridna, så att det inte blir hål. RAGLAN: Öka 1 maska på varje sida av 2 maskor (markören sitter mitt emellan dessa 2 maskorna) i varje övergång mellan fram- och bakstycke och ärmar (= 8 maskor ökade på varvet). Öka 1 maska genom att göra 1 omslag om stickan. På nästa varv stickas omslagen räta, så att det blir hål. Sedan stickas de nya maskorna in i mönstret på framstycket och bakstycket, och i slätstickning på ärmarna. AVMASKNINGSTIPS: För att avmaskningskanten inte ska strama när det maskas av, kan det maskas av med en tjockare sticka. Om detta också blir stramt, kan det göras 1 omslag om stickan efter ca var 4:e maska samtidigt som det maskas av (omslagen maskas av som vanliga maskor). ------------------------------------------------------- BÖRJA ARBETET HÄR: ------------------------------------------------------- TRÖJA – KORT ÖVERSIKT ÖVER ARBETET: Halskanten och oket stickas runt på rundsticka, uppifrån och ner. Oket delas till fram- och bakstycke och ärmar. Varje del stickas runt på rundsticka var för sig, uppifrån och ner. HALSKANT: Lägg upp 46-48-50-54-56-58 maskor på kort rundsticka 8 med Snow eller Wish. Sticka 1 varv rätt. Sedan stickas det resår (= 1 rätmaska, 1 avigmaska) runt i 4 cm. Sticka 1 varv rätt där det ökas 10-8-6-6-4-2 maskor jämnt fördelat – läs ÖKNINGSTIPS = 56-56-56-60-60-60 maskor. Sticka 1 varv rätt. Byt till rundsticka 9. Sätt 1 markör efter 20-20-20-21-21-21 maskor (= ca mitt fram), oket ska mätas från denna markören! OK: Nu stickas det mönster och det sätts 4 markörer i arbetet så här: Sätt en markör i början av varvet (= i övergången mellan bakstycket och höger ärm), 1 rätmaska, gör 1 omslag om stickan, rätmaska över de nästa 7 maskorna, gör 1 omslag om stickan, 1 rätmaska, sätt en markör här (= i övergången mellan höger ärm och framstycke), 1 rätmaska, gör 1 omslag om stickan, A.1 över de första 5-5-5-6-6-6 maskorna, A.2 över de nästa 8 maskorna, A.3 över de nästa 4-4-4-5-5-5 maskorna, gör 1 omslag om stickan, 1 rätmaska, sätt en markör här ( i övergången mellan framstycket och vänster ärm), 1 rätmaska, gör 1 omslag om stickan, 7 rätmaskor, gör 1 omslag om stickan, 1 rätmaska, sätt en markör här (= i övergången mellan vänster ärm och bakstycket), 1 rätmaska, gör 1 omslag om stickan, A.1 över de första 5-5-5-6-6-6 maskorna, A.2 över de nästa 8 maskorna, A.3 över de nästa 4-4-4-5-5-5 maskorna, gör 1 omslag om stickan, 1 rätmaska. KONTROLLERA STICKFASTHETEN! Första ökningen till RAGLAN – läs förklaring ovan, är nu färdig. Fortsätt runt med mönster så och öka till raglan på vartannat varv totalt 14-16-17-18-20-21 gånger = 168-184-192-204-220-228 maskor. Efter sista ökningen mäter arbetet ca 20-23-24-26-29-30 cm från markören efter resåren. Sticka vidare tills arbetet mäter 21-23-25-27-29-31 cm från markören efter resåren i halsen utan att det ökas fler maskor (sticka så många maskor av mönstret som det finns plats för mot raglan, men se till att det görs lika många omslag som det minskas maskor i mönstret så att maskantalet hålls konstant – de resterande maskorna stickas i slätstickning). På nästa varv (dvs ett varv med rätmaskor) – anpassa så att varvet nu börjar 1 maska före början av varvet, stickas det så här: Sätt de första 39-43-45-47-51-53 maskorna på en tråd till ärm, lägg upp 5-5-7-7-9-9 nya maskor på stickan (= i sidan under ärmen), sticka de nästa 45-49-51-55-59-61 maskorna som förut (= framstycke), sätt de följande 39-43-45-47-51-53 maskorna på en tråd till ärm, lägg upp 5-5-7-7-9-9 nya maskor på stickan (= i sidan under ärmen), sticka de nästa 45-49-51-55-59-61 maskorna som förut (= bakstycke). Sedan stickas fram- och bakstycke och ärmar sedan var för sig. HÄRIFRÅN MÄTS ARBETET SEDAN. FRAM- OCH BAKSTYCKE: = 100-108-116-124-136-140 maskor. Sticka rätmaskor fram till den mittersta maskan som lades upp under ärmen. Nu börjar varvet före denna maskan. Sedan ska mönstret från oket fortsätta på fram- och bakstycket. Det är därför viktigt att det anpassas vilket varv i diagrammen det börjas på när det stickas mönster. Sticka mönster och slätstickning i sidorna så här: * Sticka 1-3-5-3-6-7 rätmaskor, A.4 över de nästa 9 maskorna (välj diagram för din storlek), sticka A.6 över de nästa 24 maskorna (välj diagram för din storlek), sticka de första 8-8-8-16-16-16 maskorna i A.6, sticka A.5 över de nästa 8 maskorna (välj diagram för din storlek), 0-2-4-2-5-6 rätmaskor *, sticka *-* 1 gång till på varvet. När arbetet mäter 24 cm, stickas det 1 varv rätt där det ökas 10-10-12-12-14-14 maskor jämnt fördelat = 110-118-128-136-150-154 maskor. Byt till rundsticka 8. Sticka resår (= 1 rätmaska, 1 avigmaska) runt i 4 cm. Maska av med rätmaskor över rätmaskor och avigmaskor över avigmaskor. Tröjan mäter ca 54-56-58-60-52-64 cm från axeln och ner. ÄRMAR: Sätt tillbaka de 39-43-45-47-51-53 maskorna från tråden i den ena sidan av arbetet på kort rundsticka 9, och sticka dessutom upp 1 maska i var och en av de 5-5-7-7-9-9 nya maskorna som lades upp i sidan under ärmen = 44-48-52-54-60-62 maskor. Sticka slätstickning runt. När ärmen mäter 20-18-17-15-13-12 cm, ökas det 4-4-4-4-6-6 maskor jämnt fördelat = 48-52-56-58-70-68 maskor. Byt till rundsticka 8. Sticka resår (= 1 rätmaska, 1 avigmaska) runt i 4 cm. Maska av med rätmaskor över rätmaskor och avigmaskor över avigmaskor. Ärmen mäter ca 24-22-21-19-17-16 cm från delningen. Sticka den andra ärmen på samma sätt. |
|||||||||||||||||||
Diagram förklaring |
|||||||||||||||||||
|
|||||||||||||||||||
|
|||||||||||||||||||

|
|||||||||||||||||||
|
|||||||||||||||||||

|
|||||||||||||||||||
|
|||||||||||||||||||
|
Har du stickat/virkat detta mönster, eller några av våra andra designs? Dela dina bilder i sociala medier och använd taggen #dropsdesign så vi också kan se dem! Behöver du hjälp med mönstret?Du hittar instruktionsvideoer, kommentarer/frågor och mer i mönstret på www.garnstudio.com © 1982-2024 DROPS Design A/S. Alla rättigheter är reserverade. Detta dokument med tillhörande underdokument har copyright. Läs mer om vad du kan göra med våra mönster längst ner på vår hemsida. |
|||||||||||||||||||


Med över 40 år i stick- och virkbranschen erbjuder DROPS Design en av de mest omfattande samlingarna av gratis mönster på internet - översatt till 17 språk. Per idag har vi 304 kataloger och 11422 mönster på och alla är översatta till Svenska.
Vi arbetar hårt för att kunna erbjuda det bästa inom stickning och virkning, inspiration och goda råd, men också kvalitetsgarn till fantastiska priser! Vill du använda våra mönster till annat än personligt användande? Du kan läsa om vilka regler som gäller i texten Copyright längst ner på sidan på alla våra mönster. Lycka till!
Kommentarer / Frågor (27)
But that’s precisely the problem! If I start the third line A4 from the underarm (the first stitch of the new round is basically the third stitch from the underarm) I get the mismatch because the triangle will be stitched earlier: I can’t understand where I am going wrong
09.04.2023 - 14:12DROPS Design answered:
Dear Mary, you need to adjust the stitches before starting the triangle. In this case, you need to simply knit stitches (not just the amount indicated in the pattern) so that the triangle won't be mismatched. The pattern under the arm may get slightly mismatched initially but that isn't important, since it will later on match correctly. Happy knitting!
10.04.2023 - 13:34Yes, I can see that the pattern is the same. But if I follow the instructions from A4 third line, I should start the "triangle" after 3 stitches of the body, while according to the stitches I have after the line with the arrow, A1, I should start the triangle after 5 stitches but this means that it will be "anticipated" hence the mismatch. Does it mean that I have not divided the garment accordingly? Many thanks and Happy Easter!
09.04.2023 - 11:09DROPS Design answered:
Dear Mary, take into account that you should have adjusted the start of the round in the body; you adjust so that the beginning of the round is in the middle stitch cast on under the sleeve. This should help adjust the pattern so that the triangle in A.4 won't get mismatched with the pattern in the yoke in A.1. Happy knitting!
09.04.2023 - 13:30Thanks! But I am still confused: the instructions say that the yoke is finished when I have 168 stitches (S size). If I had not knit the last row (the one with the arrow), I would not have got 168 stitches. In any case, once I have knit the row with the arrow, if I then start A4 from the third line I still get a mismatch in the pattern and I do not know where I get it wrong. Well, I know that I do something wrong while shifting from the yoke to the body but I can't figure out what.
07.04.2023 - 10:25DROPS Design answered:
Dear Mary, after having worked the row with the arrow, you should have knitted round, where you separated the stitches for each part of the garment. Then, you should start the body with the third row of A.4. There shouldn't be a mismatch there. You can check that the third row of A.4 is exactly like the third row in A.1 after the row with the arrow, so they should be matching. Hope this helps!
08.04.2023 - 20:58Thanks! But I am still confused: the instructions say that the yoke is finished when I have 168 stitches (S size). If I had not knit the last row (the one with the arrow), I would not have got 168 stitches. In any case, once I have knit the row with the arrow, if I then start A4 from the third line I still get a mismatch in the pattern and I do not know where I get it wrong. Well, I know that I do something wrong while shifting from the yoke to the body but I can't figure out what.
07.04.2023 - 10:20DROPS Design answered:
Dear Mary, after having worked the row with the arrow, you should have knitted round, where you separated the stitches for each part of the garment. Then, you should start the body with the third row of A.4. There shouldn't be a mismatch there. You can check that the third row of A.4 is exactly like the third row in A.1 after the row with the arrow, so they should be matching. Hope this helps!
08.04.2023 - 20:59Sorry, I am still unclear: I have finished the yoke knitting the A1-A3-A5 line with the arrow. Then I divided the work and I went for a knitted round. Now which line should I knit first and from which diagram?
05.04.2023 - 09:04DROPS Design answered:
Dear Mary, the arrows in the chart mean that, if the gauge is correct, you should finish the raglan/yoke when you reach the arrow for your size (before working it). If you have worked this row, then you will need to start the new part by working the third row of the new chart (A.4). Happy knitting!
06.04.2023 - 23:29Hi! "Continue the pattern from yoke on body – making sure to continue with the correct row in the diagram after the yoke. " Does this mean that if I finish A1 (S size) with the line with the arrow, the next line for the body in A4 is in fact the thirs one of the diagram?
04.04.2023 - 08:59DROPS Design answered:
Hi Mary, Yes, if you finished the diagram before separating for the body and sleeves, you continue with the first row in the diagram. Happy Easter!
05.04.2023 - 07:01"Knit as far as the middle stitch cast on under the sleeve. The round now starts here." Does it mean that the round starts after the second or after the third stitch under the sleeve? Many thanks!
08.03.2023 - 16:03DROPS Design answered:
Dear Mary, yes correct: work the first 2 of the 5 stitches cast on under 1st sleeve, the rounds will now start here, before the middle of the new stitches. Happy knitting!
08.03.2023 - 16:08Following from your last answer: "...you will start the next round 1 stitch eariler. So, you need to not work the last stitch of the previous round". I interpret this as moving the stitch marker one stitch behind and working that stitch as the first one of the next round rather than the last one of the previous round. Is this correct? So it is basically just a matter of moving the stitch marker?
07.03.2023 - 12:16DROPS Design answered:
Dear Mary, you will now work the dividing round, this means you don't need the markers anymore, you start working the dividing round when the last stitch on previous round remain on left needle, slip the next 39 sts (starting with the last stitch previous round + the first 38 sts next round). Happy knitting!
07.03.2023 - 14:37Hi, I have just finished all the increases on the raglan and I have 168 stitches (S size). I'll go now go for a knitted round but what does it mean " adjust so the round now starts 1 stitch earlier"? Plus, the 39 stitches I habe to put aside, correspond to the stiches that are within the first and the second marker?
04.03.2023 - 10:25DROPS Design answered:
Dear Mary, after finishing the increases and reaching the indicated length (21cm from the marker), you will start the next round 1 stitch eariler. So, you need to not work the last stitch of the previous round. On the other hand, the first marker was inserted in the transition between the back and the sleeve and the second marker between the sleeve and the front. Since you have to put aside the stitches which correspond to the sleeve, these stitches are all in between the first and 2nd marker. Happy knitting!
05.03.2023 - 20:45I am sorry, I have tried many times to work this without success. Can you please just tell me what I should do between the 1st and the 2nd marker in the second raglan? Maybe in this way, I can understand the logic. But if you do not specify the bit between these 2 markers, I am lost. Many thanks in advance!
11.02.2023 - 10:45DROPS Design answered:
Dear Mary, Work as follows: marker 1, k1 (=raglan line), 1YO, k7 (= sleeve), 1 YO, k1, 2nd marker, k1 (=raglan line), 1 YO, A.1, A.2, A.3 (for the front), 1 YO, k1, 3rd marker, k1 (= raglan line), e.t.c. Happy knitting!
13.02.2023 - 00:02