Neville by DROPS Design

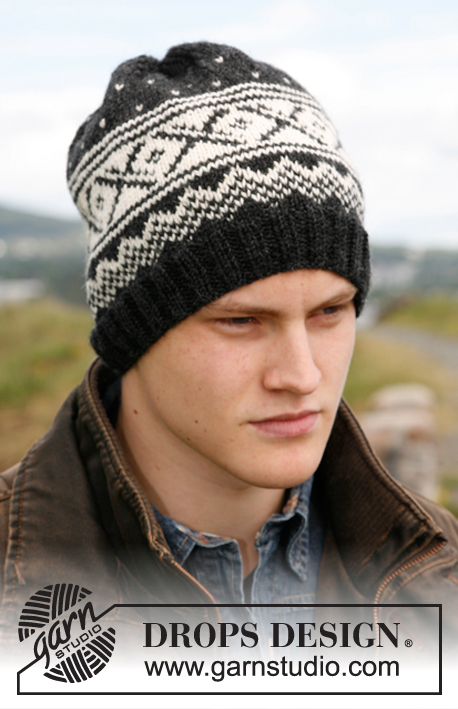
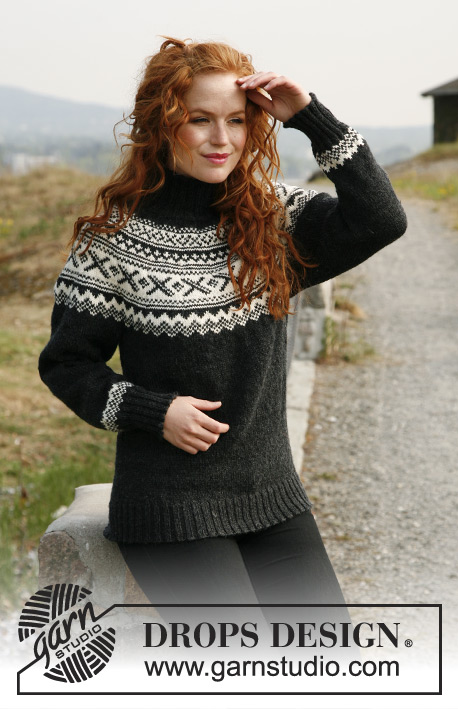
Kötött DROPS pulóver férfiaknak, kerek vállrésszel és Norvégmintával "Karisma" fonalból Méret: S - XXXL

DROPS 135-4
DROPS 135-4
DROPS design: u-640 jelű minta
B fonalcsoport
-----------------------------------------------------------
Méret: S - M - L - XL - XXL - XXXL
Alapanyagok: DROPS KARISMA a Garnstudio-tól
53-as antracit szürke : 600-650-700-750-850-900 g
01, törtfehér: 150-150-150-200-200-200 g

DROPS KÉTHEGYŰ KÖTŐTŰ KÉSZLET ÉS KÖRKÖTŐTŰ (80 cm hosszú) 4 mm-es - vagy olyan vastagságú, amellyel 21 szem X 28 sor = 10 X 10 cm harisnyakötéses (színén sima, fonákoldalán fordított) próbadarabot tudunk készíteni.
Fontos, hogy a kötéspróbánk megfeleljen a megadottnak, nemcsak a szemek számának, hanem a sorok számának tekintetében is, hogy a kerekített vállrészünk megfelelő formájú legyen.
DROPS KÉTHEGYŰ KÖTŐTŰ KÉSZLET és KÖRKÖTŐTŰ (40 és 80 cm) 3 mm-es a bordás mintához.

-------------------------------------------------------

Kötéspróba – Nézze meg hogyan és miért kell megmárni ITT
Választható más fonalak – Nézze meg hogyan helyettesítheti be a fonalat ITT.
A_F fonalcsoportok – Használja ugyanazt a mintát és helyettesítse be a fonalat ITT.
Fonalhasználat más, behelyettesített fonalnál – Hazsnálja a fonalátváltónkat.

-------------------------------------------------------


100% gyapjú
minimum 1020.00 Ft /50g
DROPS Karisma uni colour DROPS Karisma uni colour 1020.00 Ft /50g
Nordfonal.hu
Rendelés
DROPS Karisma mix DROPS Karisma mix 1020.00 Ft /50g
Nordfonal.hu
Rendelés
needles Kötőtűk & Horgolótűk Rendelés
Ehhez a darabhoz, megvásárolhatja a fonalat már 16320Ft. Olvasson tovább.

Mintaleírás

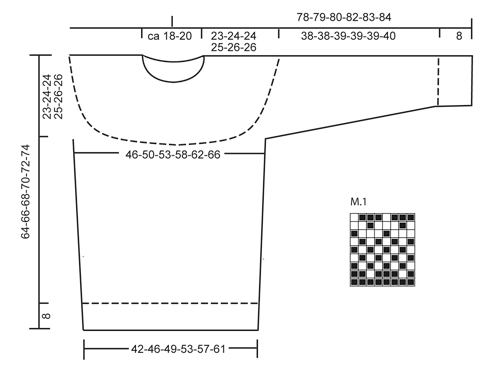
MINTA:
Lásd az M.1-es é M.2-es diagramokat. A diagramokat harisnyakötéssel kötjük, és a minta 1 ism-t ábrázolják.
--------------------------------------------------------

TESTRÉSZ:
Körben kötjük a körkötőtűn:
A kezdéshez szedjünk fel 200-220-236-256-276-292 szemet a 3 mm-es körkötőtűre, az antracit szürke fonalból.
Bordás mintával folytatjuk = 2 S / 2 F 8 cm-t. Váltsunk a 4 mm-es körkötőtűre, és kössünk 1 kört sima szemekkel, miközben UGYANAKKOR egyenletesen elosztva fogyasztunk 24-28-32-32-36-36 s szemet = 176-192-204-224-240-256 szem.
Tegyünk 1 jelölőt a kör kezdetéhez, és 1 másikat 88-96-102-112-120-128 szem után (= a darab két oldala).
Folytassuk harisnyakötéssel. NE FELEDKEZZÜNK MEG A MEGFELELŐ KÖTÉSPRÓBA BETARTÁSÁRÓL.
Amikor a darabunk 15 cm-es mindkét jelölő mindkét oldalán szaporítsunk egy-egy szemet (= 4 szemet szaporítottunk).
Ismételjük meg a szaporítást 5 cm-ként, összesen 4-4-5-5-5-5 alkalommal = 192-208-224-244-260-276 szem.
UGYANAKKOR, amikor a darabunk 41-42-44-45-46-48 cm-es, láncoljunk le mindkét oldalon 8 szemet a karöltőhöz (vagyis mindkét jelölő mindkét oldalán 4 szemet).
Tegyük félre a darabot és kössük meg a két ujját.
UJJA:
Körben kötjük a kéthegyű kötőtű-készleten.
A kezdéshez szedjünk fel 56-56-60-60-64-64 szemet az 3.5 mm-es kéthegyű kötőtű készletre, az antracit szürke fonalból.
Kössünk a bordásmintával, 2 S / 2 F, 8 cm-t. Váltsunk a 4 mm-es körkötőtűvel. A köv körben így haladjunk:
Tegyünk jelölőt az ujja alsó középvonalához.
Folyt az M.1-es diagrammal, majd a teljes méretig az antracit szürke fonallal dolgozunk tovább.
UGYANAKKOR, Amikor a darabunk 13 cm-es a jelölő mindkét oldalán szaporítsunk egy-egy szemet.
Ism a szap minden 6.-6.-6.-6.-6.-5. sorban összesen 14-16-14-16-16-17 alkalommal= 84-88-88-92-96-98 szem.
Kössünk, amíg a darabunk 46-47-47-47-47-48 cm-es, láncoljunk le 8 szemet, az ujja alsó részének közepénél = 76-80-80-84-88-90 szem marad a kötőtűn.
Tegyük félre a darabot és kössük meg a másik ujját.
VÁLLRÉSZ:
Csúsztassuk az ujjak szemeit ugyanarra a kötőtűre, amin a testrész szemei vannak, ahol a szemeket leláncoltuk a karöltőhöz = 328-352-368-396-420-440 szem.
Tegyünk 1 jelölőt a háta közepéhez. A kör most itt kezdődik.
Kössünk 1 kört sima szemekkel , UGYANAKKOR, egyenletesen elosztva fogyasszunk 4-10-8-18-6-8 szemet= 324-342-360-378-414-432 szem marad a kötőtűn.
Folytassuk 0-2-2-5-7-7 S szemekkel kötött körrel az antracitszürke színű fonallal, majd fojt az M.2-es diagram mintájával (= 10-11-11-12-13-14 ismétlés a körben).
Amikor az M.2-es diagram mintáját megkötöttük, 126-133-140-147-161-168 szemünk van a kötőtűn, és a darabunk kb 62-64-66-68-70-72 cm cm-es a vállig.
Kössünk az antracitszürke fonallal, és harisnyakötéssel a teljes méretig.
Ezután 1 kört sima szemekkel kötünk, miközben UGYANAKKOR, egyenletesen elosztva fogyasztunk 34-37-40-43-53-56 szemet= 92-96-100-104-108-112 szem.
Ezután elkészítjük a nadrág hátuljának megemelését a következő módon:
Kössünk a jelölő után 8 szemig, fordítsuk meg a munkát és húzzuk meg a fonalat. Kössünk sima szemekkel 24 szemet, fordítsuk meg a munkát. Folytassuk minden fordulásnál 8 szemmel többet kötve, amíg összesen 080 szemet kötöttünk az utolsó fordulás után. Fordítsuk meg a munkát, kössünk 1 kört sima szemekkel minden szemen, a háta közepéig.
NYAKKIVÁGÁS:
Váltsunk a 3 mm-es körkötőtűre és kössünk 1 sort sima szemekkel a színe oldal felől, UGYANAKKOR, egyenletesen elosztva a körben 20-20-16-16-12-12 szemet szaporítunk =112-116-116-120-120-124 szem.
Folyt bordáskötéssel = 2 sima/ 2 fordított 10 cm-ig, majd lazán láncoljuk le a szemeket: a sima szemeket simán, a fordítottakat fordítottan.
ÖSSZEÁLLÍTÁS:
Varrjuk össze a nyílásokat az ujjak alatt.

Ezt a mintát javítottuk. .

Online frissítve: 24.09.2012
Új M.2 jelű diagram.

Diagram

symbols = törtfehér
symbols = antracit
symbols = 2 szemet S összekötünk
diagram
diagram

Segítségre van szüksége a mintával kapcsolatban?

Köszönjük, hogy a DROPS Design mintáját választotta! Sokat dolgozunk azért, hogy mintáink könnyen érthetőek és hibamentesek legyenek. Minden mintát Norvégból fordítunk, és a méreteket, számításokat mindig ellenőrizheti az eredeti mintán (DROPS 135-4) .

Gondja van a minta követésével? Az alábbiakban talál egy listát, olyan helyekről, amik segíthetenek abban, hogy a projektet hamr befjezze, vagy akár - miért ne?- tanuljon valami újat.

signature-image signature

Gondja van a minta követésével? Az alábbiakban talál egy listát, olyan helyekről, amik segíthetenek abban, hogy a projektet hamr befjezze, vagy akár - miért ne?- tanuljon valami újat.

Minden mintánkhoz tartoznak oktató-videók, amik segítenek.

Vannak olyan útmutatóink is, amelyek lépésről lépésre mutatják meg a különféle technikákat, ezeket itt találhatják meg.

1) Why is the knitting/crochet tension so important?

Knitting tension is what determines the final measurements of your work, and is usually measured per 10 x 10 cm. It is provided like so: number of stitches in width x number of rows in height - eg: 19 stitches x 26 rows = 10 x 10 cm.

The knitting tension is very individual; some people knit/crochet loosely while others work tightly. You adjust the knitting tension with the needle size, which is why the suggested needle size only serve as a guide! You need to adjust this (up or down) to ensure that YOUR knitting tension matches the knitting tension provided in the pattern. If you work with a different knitting tension than provided you will have a different yarn consumption, and your work will have different measurements than what the pattern suggests.

The knitting tension also determines which yarns can replace each other. As long as you achieve the same knitting tension you can replace one yarn with another.

See DROPS lesson: How to measure your tension/gauge

See DROPS video: How to make a gauge tension swatch

fel

2) Fonalcsoportok - Mik ezek, és hogyan használjuk őket?

A fonalakat vastagságuk, és a velük elérhető kötéspróba szerint csoportokba rendeztük, így könnyebben találhat mintát a kedvenc fonalához. Vagy könnyebben találhat egy mintához fonal-alternatívákat. Az ugyanabban a fonalcsoportban levő fonalak hasonló kötéspróbát adnak, így egymással behelyettesíthetőek. Azonban, ettől függetlenül a minőségük, a struktúrájuk eltérő, így az elkészült darab különleges és egyedi lesz. Az egyes fonalcsoportok áttekintéséhez kattintson ide!.

A fonalcsoport = a csoporton belül minden fonallal 26 -23 szemet tudunk 10 cm-en kötni.

B fonalcsoport = a csoporton belül minden fonallal 22 -20 szemet tudunk 10 cm-en kötni.

C fonalcsoport = a csoporton belül minden fonallal 19 -16 szemet tudunk 10 cm-en kötni.

D fonalcsoport = a csoporton belül minden fonallal 15 -12 szemet tudunk 10 cm-en kötni.

E fonalcsoport = a csoporton belül minden fonallal 11 -9 szemet tudunk 10 cm-en kötni.

E fonalcsoport = a csoporton belül minden fonallal 8 -5,5 szemet tudunk 10 cm-en kötni.

Amennyiben több szál fonalat összefogva szeretne dolgozni, ehhez a következőket érdemes tudni: A C fonalcsoport 1 szálával hasonló kötéspróbát tudunk készíteni, mint az A. fonalcsoport 2 szálát összefogva, Az A fonalcsoportból tehát bármely fonalból 2 szálat, vagy bármely 2 fonalból 1-1 szálat összefogva megfelel a C fonal 1-1 szálának, ezt a mintákban így jeleztük: A + A = C.

Az alábbiakban áttekintjük, hogyan működnek a fonalaink, ha 1 szálnál többel dolgozunk:

2 szál az A fonalcsoportból megfelel a C fonalcsoport 1 szálának. Ezt a mintában így jeleztük: A + A = C

3 szál az A fonalcsoportból megfelel a D fonalcsoport 1 szálának. Ezt a mintában így jeleztük: A+A+A = D

4 szál az A fonalcsoportból megfelel az E fonalcsoport 1 szálának. Ezt a mintában így jeleztük: A + A+A+A = D

8 szál az A fonalcsoportból megfelel az F fonalcsoport 1 szálának. Ezt a mintában így jeleztük: A+A+A+A +A+A+A+A = F

2 szál az B fonalcsoportból megfelel a D fonalcsoport 1 szálának. Ezt a mintában így jeleztük: B+B =D

2 szál a C fonalcsoportból megfelel az E fonalcsoport 1 szálának. Ezt a mintában így jeleztük: C+C = E

4 szál a C fonalcsoportból megfelel az F fonalcsoport 1 szálának. Ezt a mintában így jeleztük: C+C+C+C = F

2 szál az E fonalcsoportból megfelel az F fonalcsoport 1 szálának. Ezt a mintában így jeleztük: E+E= F

A fonalak ilyen cseréjével új minőségeket, új struktúrákat érhetünk el, a választott kombinációktól függően. Kifejlesztettünk egy fonal-kalkulátort, amivel kiszámolhatja, mennyi fonalra van szüksége, ha 1 szál fonal helyett 2 vagy több szál kombinációját választja. A kalkulátorhoz a linket minden minta oldalán megtalálja. Ne feledje, hogy a megadott kötéspróba határozza meg, melyik fonalakat használhatjuk. Feltétlenül készítsünk próbadarabot a választott fonalkombinációval, és ellenőrizzük, hogy be tudjuk-e tartani a megfelelő kötéspróbát.

fel

3) Can I use a different yarn than what the pattern suggests?

The important thing when changing from one yarn to another is that the knitting/crochet tension remains the same. This is so that the measurements of the finished piece will be the same as on the sketch provided. It is easier to achieve the same knitting tension using yarns from the same yarn group. It is also possible to work with multiple strands of a thinner yarn to achieve the knitting tension of a thicker one. Please try our yarn converter. We recommend you to always work a test swatch.

Please NOTE: when changing yarn the garment might have a different look and feel to the garment in the photo, due to individual properties and qualities of each yarn.

See DROPS lesson: Can I use a different yarn than the one mentioned in the pattern?

fel

4) How do I use the yarn converter?

At the top of all our patterns you’ll find a link to our yarn converter, which is a helpful tool should you wish to use a different yarn than suggested. By filling in the yarn quality you wish to replace, the amount (in your size) and number of strands, the converter will present good alternative yarns with the same knitting tension. Additionally it will tell you how much you’ll require in the new qualities and whether you’ll need to work with multiple strands. Most skeins are 50g (some are 25g or 100g).

If the pattern is worked with multiple colours, every colour will have to be converted separately. Similarly, if the pattern is worked with several strands of different yarns (for example 1 strand Alpaca and 1 strand Kid-Silk) you will have to find alternatives for each, individually.

Click here to see our yarn converter

fel

5) Why do I get the wrong knitting tension with the suggested needle size?

The needle size provided in the pattern serves only as a guide, the important thing is to follow the knitting tension. And since knitting tension is very individual, you will have to adjust the needle size to ensure that YOUR tension is the same as in the pattern – maybe you’ll have to adjust 1, or even 2 needle sizes, up or down to achieve the correct tension. For this, we recommend that you work test swatches.

Should you work with a different knitting tension than the one provided, the measurements of the finished garment might deviate from the measurement sketch.

See DROPS lesson: How to measure your tension/gauge

See DROPS video: How to make a gauge tension swatch

fel

6) Why is the pattern worked top-down?

Working a garment top-down provides more flexibility and room for personal adjustment. For example it is easier to try the garment on while working, as well as making adjustments to length of yoke and shoulder caps.

The instructions are carefully explaining every step, in the correct order. Diagrams are adjusted to the knitting direction and are worked as usual.

fel

7) Why are the sleeves shorter in larger sizes?

The total width of the garment (from wrist-to-wrist) will be larger in the larger sizes, despite the actual sleeves being shorter. The larger sizes have longer sleeve caps and wider shoulders, so there will be a good fit in all sizes.

fel

8) What is a repeat?

Diagrams are often repeated on the round or in height. 1 repeat is the diagram the way it appears in the pattern. If it says to work 5 repeats of A.1 in the round, then you work A.1 a total of 5 times after/next to each other in the round. If it says to work 2 repeats of A.1 vertically/in height you work the entire diagram once, then begin again at the start and work the entire diagram one more time.

fel

9) How do I work according to a knitting diagram?

The diagram depicts all rows/rounds, and every stitch seen from the right side. It is read from bottom to top, from right to left. 1 square = 1 stitch.

When working back and forth, every other row is worked from the right side and every other row is worked from the wrong side. When working from the wrong side, the diagram will have to be worked reversed: from left to right, knit stitches are purled, purl stitches are knit etc.

When working in the round every round is worked from the right side and the diagram are worked from right to left on all rounds.

See DROPS lesson: How to read knitting diagrams

fel

10) How do I work according to a crochet diagram?

The diagram depicts all rows/rounds, and every stitch seen from the right side. It is worked from bottom to top, from right to left.

When working back and forth every other row is worked from the right side: from right to left and every other row is worked from the wrong side: from left to right.

When working in the round, every row in the diagram are worked from the right side, from right to left.

When working a circular diagram you start in the middle and work your way outwards, counter clockwise, row by row.

The rows usually start with a given number of chain stitches (equivalent to the height of the following stitch), this will either be depicted in the diagram or explained in the pattern.

See DROPS lesson: How to read crochet diagrams

fel

11) How do I work several diagrams simultaneously on the same row/round?

Instructions for working several diagrams after each other on the same row/round, will often be written like so: “work A.1, A.2, A.3 a total of 0-0-2-3-4 times". This means you work A.1 once, then A.2 is worked once, and A.3 is repeated (in width) the number of times provided for your size – in this case like so: S = 0 times, M = 0 times, L=2 times, XL= 3 times and XXL = 4 times.

The diagrams are worked as usual: begin with the first row in A.1, then work the first row in A.2 etc.

See DROPS lesson: How to read knitting diagrams

See DROPS lesson: How to read crochet diagrams

fel

12) Why does the piece start with more chain stitches than it’s worked with?

Chain stitches are slightly narrower than other stitches and to avoid working the cast-on edge too tight, we simply chain more stitches to begin with. The stitch count will be adjusted on the following row to fit the pattern and measurement sketch.

fel

13) Why increase before the rib edge when the piece is worked top-down?

The rib edge is more elastic and will contract slightly compared to, for example, stocking stitch. By increasing before the rib edge, you avoid a visible difference in width between the rib edge and the rest of the body.

fel

14) Why increase in the cast-off edge?

It’s very easy to cast off too tightly, and by making yarn overs while casting off (and simultaneously casting these off) you avoid a too tight cast off edge.

See DROPS video: How to bind off with yarn overs (yo)

fel

15) How do I increase/decrease on every 3rd and 4th row/round alternately?

To achieve an even increase (or decrease) you can increase on, for example: every 3rd and 4th row alternately, like so: work 2 rows and increase on the 3rd row, work 3 rows and increase on the 4th. Repeat this until the increase is complete.

See DROPS lesson: Increase or decrease 1 st on every 3rd and 4th row alternately

fel

16) Why is the pattern slightly different than what I see in the photo?

Pattern repeats can vary slightly in the different sizes, in order to get the correct proportions. If you’re not working the exact same size as the garment in the photo, yours might deviate slightly. This has been carefully developed and adjusted so that the complete impression of the garment is the same in all sizes.

Make sure to follow instructions and diagrams for your size!

fel

17) How can I work a jacket in the round instead of back and forth?

Should you prefer to work in the round instead of back and forth, you may of course adjust the pattern. You’ll need to add steeks mid-front (usually 5 stitches), and follow the instructions. When you would normally turn and work from the wrong side, simply work across the steek and continue in the round. At the end you’ll cut the piece open, pick up stitches to work bands, and cover the cut edges.

See DROPS video: How to knit steeks and cut open

fel

18) Can I work a jumper back and forth instead of in the round?

Should you prefer to work back and forth instead of in the round, you may of course adjust the pattern so you work the pieces separately and then assemble them at the end. Divide the stitches for the body in 2, add 1 edge stitch in each side (for sewing) and work the front and back pieces separately.

See DROPS lesson: Can I adapt a pattern for circular needles into straight needles?

fel

19) Why do you show discontinued yarns in the patterns?

Since different yarns have different qualities and textures we have chosen to keep the original yarn in our patterns. However, you can easily find options among our available qualities by using our yarn converter, or simply pick a yarn from the same yarn group.

It is possible that some retailers still have discontinued yarns in stock, or that someone has a few skeins at home that they would like to find patterns for.

The yarn converter will provide both alternative yarn as well as required amount in the new quality.

fel

20) How do I make a women’s size garment into a men’s size one?

If you have found a pattern you like which is available in women’s size it’s not very difficult to convert it to men’s size. The biggest difference will be the length of sleeves and body. Start working on the women size that you think would fit across the chest. The additional length will be worked right before you cast off for the armhole/sleeve cap. If the pattern is worked top-down you can add the length right after the armhole or before the first decrease on sleeve.

Regarding additional yarn amount, this will depend on how much length you add, but it is better with a skein too many than too few.

fel

21) How do I prevent a hairy garment from shedding?

All yarns will have excess fibres (from production) that might come off as lint or shedding. Brushed yarns (ie hairier yarns) have more of these loose, excess fibres, causing more shedding.

Shedding also depends on what is worn under or over the garment, and whether this pulls at the yarn fibres. It’s therefore not possible to guarantee that there will be no shedding

Below are some tips on how to get the best result when working with hairier yarns:

1. When the garment is finished (before you wash it) shake it vigorously so the looser hairs come off. NOTE: do NOT use a lint roller, brush or any method that pulls at the yarn.

2. Place the garment in a plastic bag and put it in your freezer - the temperature will cause the fibres to become less attached to each other, and excess fibres will come off easier.

3. Leave in the freezer for a few hours before taking it out and shaking it again.

4. Wash the garment according to the instructions on the yarn label.

fel

22) Where on the garment is the length measured?

The measurement sketch/schematic drawing provides information regarding the full length of the garment. If it’s a jumper or a jacket the length is measured from the highest point on the shoulder closest to the neckline, and straight down to the bottom of the garment. It is NOT measured from the tip of shoulder. Similarly, the length of yoke is measured from the highest point on the shoulder and down to where yoke is split into body and sleeves.

On a jacket measures are never taken along bands, unless specifically stated. Always measure inside band stitches when measuring the length.

See DROPS lesson: How to read a schematic drawing

fel

23) How do I know how many balls of yarn I need?

The required amount of yarn is provided in grams, eg: 450 g. To calculate how many balls you’ll need you first need to know how many grams are in 1 ball (25g, 50g or 100g). This information is available if you click on the individual yarn quality on our pages. Divide the amount required with the amount of each ball. For example, if each ball is 50g (the most common amount), the calculation will be as follows: 450 / 50 = 9 balls.

fel

DROPS fonalat vásárolt a minta elkészítéséhez? akkor, abban a boltban, ahol a fonalat vásárolta, joga van segítséget kérni és kapni. A DROPS üzletek listáját ITT találja!
Még mindig nem találta meg a választ, amire szüksége van? Görgessen lejjebb, és tegye fel kérdését, és szakembereink megpróbálnak segíteni. Ez általában 5-10 munkanapon beül megtörténik.. Addig is elolvashatja a korábban, mások által feltett kérdéseket és a válaszokat, vagy csatlakozhat a Facebook-on a DROPS Workshophoz, hogy kézimunkázó társaitól kaphasson segítséget.

Megjegyzések / Kérdések (68)

country flag Stine wrote:

Hej :-) Jeg har strikket ribkanten og skal nu strikke 15cm før udt. Er det inklusiv ribkanten eller er det 15 cm glatstrik? Hav en god dag!

08.04.2023 - 23:35

DROPS Design answered:

Hej Stine, du måler fra starten af arbejdet :)

13.04.2023 kl. 14:53

country flag Françoise TEYCHENEY wrote:

Bonjour, je suis en trains de réaliser ce pull en taille M, mais je trouve que le rendu avec le rehausse-dos n'est pas joli. Est-il possible de le réaliser sans rehausse-dos et dans ce cas, combien de centimètre dois-je tricoter avant le cotes d'encolure ? Merci pour votre réponse et félicitations pour vos très beaux modèles que je fais régulièrement.

16.02.2023 - 16:01

DROPS Design answered:

Bonjour Mme Teycheney et merci. Vous pouvez tout à fait "sauter" ces rangs raccourcis de la réhausse et passer directement au col. Ainsi, l'encolure devant et dos seront identiques. Bon tricot!

16.02.2023 kl. 16:50

country flag Xenia wrote:

Hej, jeg har problemer med at få den rette strikkefasthed. Strikkefastheden passer i bredden, men i højden har jeg ca. 10 flere masker end der burde være på 10 cm. Jeg har prøvet at skifte til et større pindenummer, men så kommer der for få masker i bredden. Hvad kan jeg gøre for at få strikkefastheden til at passe?

09.01.2023 - 15:30

DROPS Design answered:

Hej Xenia, Strikkefastheden stemmer hvis du strikker i DROPS Karisma. Du kan følge strikkefastheden i bredden og så følge målene som står i opskriften. Men du vil bruge mere garn når du har flere pinde på 10 cm :)

10.01.2023 kl. 11:43

country flag Dorthe wrote:

Was bedeutet es, wenn im Bild M2 zwei weiße Kästchen mit einem Strich durchgestrichen sind?

05.12.2022 - 15:33

DROPS Design answered:

Liebe Dorthe, diese 2 Maschen stricken Sie rechts zusammen mit der Farbe der Runde. Viel Spaß beim stricken!

06.12.2022 kl. 10:35

country flag Britta wrote:

Liebes Team, was bedeutet es im Rapport M2 (Pullover Neville), wenn zwei Kästchen (weiß) nach recht durch gestrichen sind? LG Britta

05.12.2022 - 15:32

country flag Rosita wrote:

Buonasera io sto eseguendo tg. L stò facendo il disegno m2, non viene spiegato come da 360 maglie, facendo le 11 diminuzioni che si vedono su tutto il disegno m2 possa ritrovarmi a 140 maglie ! Potreste specificare meglio quante diminuzioni fare, per ottenere il risultato da: 360 a 140? Su m2 si vede solo una diminuzione all'inizio giro e basta! Spero di essermi spiegata bene, Grazie

25.10.2022 - 22:54

DROPS Design answered:

Buonasera Rosita, M.2 si ripete per tutto il giro e ci sono 20 ripetizioni del motivo sul giro: ci sono 11 diminuzioni in 1 ripetizione verticale di M.2 per cui in totale vengono diminuite 220 maglie, passando così da 360 a 140 maglie. Buon lavoro!

26.10.2022 kl. 19:24

country flag Beatrice Morrison wrote:

I’m at the Yoke, I have all ready done the 7rows in MC, but how to I go from 414 Staten down to 161 star, when there is no mention of any dec rows or how many sts to dec. Thank you in advance for you answer

04.09.2022 - 20:00

DROPS Design answered:

Dear Beatrice, as you can read in the pattern: "Then K 0-2-2-5-7-7 rounds with anthracite, then continue with diagram M.2 (= 18-19-20-21-23-24 repetitions on the round). When M.2 has been worked, there are 126-133-140-147-161-168 sts on needle". All decreases are included in the diagram M.2, found under the pattern. If you need more help with diagram M.2, you can check here how to read knitting diagrams: https://www.garnstudio.com/lesson.php?id=68&cid=17. Happy knitting!

04.09.2022 kl. 23:18

country flag Lone wrote:

Hej Jeg har strikket rib kanten og er i gang med glatstrikning ryg/forstyk Der står jeg når arbejdet måler 15 cm skal jeg starte med udtagning. Når jeg måler de 15 cm. Er det incl. rib kanten eller er det kun glatstrikning ? Vh. Lone

31.05.2022 - 15:49

DROPS Design answered:

Hej Lone, Du måler de 15 cm fra starten af blusen. God fornøjelse!

02.06.2022 kl. 10:41

country flag Marie-Claude Roy wrote:

Je fais le modèle en taille L. Pour les manches, on monte 60 mailles, par contre le diagramme M1 comporte 8 mailles et 60 ne se divise pas par 8… On aboutit donc avec une moitié de M1 sous la manche? C’est normal? Merci

02.01.2022 - 00:33

DROPS Design answered:

Bonjour Mme Roy, le diagramme M.1 est représenté sur8 mailles mais se répète sur 4 mailles, autrement dit, tricotez 7 fois au total les 8 mailles de M.1 et terminez par les 4 premières mailles. Bon tricot!

03.01.2022 kl. 12:07

country flag Connie Lykke øbro wrote:

Hej ☺ opskriften Drops 135-4 vil min mand gerne have men kun i sort og med det lille motiv på ærme er det muligt og bliver den pæn alligevel uden at strikke motiv og hvor meget skal jeg bruge af den sorte og en fin grå til det lille mønster den strikkes i xxl vh connie lykke

16.12.2021 - 12:55

DROPS Design answered:

Hej Connie, Ja det bliver helt sikkert superflot :) Du skal nok bruge samme antal nøgler i din størrelse som det står i opskriften, men 1 af nøglerne bytter du ud med den grå du vil bruge :)

21.12.2021 kl. 08:47

Post a comment to pattern DROPS 135-4

Szívesen vesszük, ha megosztja velünk gondolatait erről a mintáról.

Ha kérdést szeretne feltenni, ügyeljen arra, hogy a megfelelő kategóriát válassza ki, így fegyorsíthatja a válaszadás folyamatát. Það verður að merkja við svæði merktri með *.

#dropsfan gallery

Neville

Angelika, Germany

135-4 Neville

Stirlingknitter, United Kingdom