
Looking for a yarn?


Megjegyzések / Kérdések (25)
![]() Anni írta:
Anni írta:
Danke für die Antwort! Noch eine Frage habe ich: Warum soll mal vor dem Bündchen unten am Rumpf und am Schluss der Ärmel Maschen zunehmen? Damit die Bündchen nicht zu eng werden? Danke, lg.
05.02.2025 - 20:01A DROPS Design válasza:
Liebe Anni, ja genau deshalb. Viel Spaß beim Stricken!
06.02.2025 - 09:13
![]() Anni írta:
Anni írta:
Danke für die Antwort! Noch eine Frage habe ich: Warum soll mal vor dem Bündchen unten am Rumpf und am Schluss der Ärmel Maschen zunehmen? Damit die Bündchen nicht zu eng werden? Danke, lg.
04.02.2025 - 17:03A DROPS Design válasza:
Liebe Anni, ja genau, für den gleichen Umfang braucht man mehr Maschen für Bündchen mit kleineren Nadeln als für Glattrechts mit grösseren Nadeln, deshalb wird man vor Bündchen zunehmen. Viel Spaß beim Stricken!
05.02.2025 - 07:43
![]() Anni írta:
Anni írta:
Hallo! Bei mir ist es ähnlich wie bei Yvonne. Nach A2 bin ich schon bei 29cm. Man soll ja in der Passe etwas lockerer stricken, damit es nicht spannt. Dadurch weicht es natürlich auch etwas von der Maschenprobe ab. Aber rein rechnerisch sind es 2- cm mehr und nicht 5-6 cm ? Durch das lockerere Stricken in der Passe wellt sich diese auch bei mir. Gibt es dafür/ dagegen Empfehlungen oder Tipps? Danke. LG Anni
04.02.2025 - 11:45A DROPS Design válasza:
Liebe Anni, sollten Sie die fertige Länge (nach der Halsblende) schon vor Ende A.2 erreichen, dann teilen Sie die Arbeit bei der angegebenen Länge, und A.2 stricken Sie separat beim Rumpf/Ärmel fertig. Sollte das Muster an den Seiten/unter die Ärmel nicht passen, dann beachten Sie nur, daß das Muster in der Höhe stimmt/weiter von der Passe forsetzt. Viel Spaß beim Stricken!
04.02.2025 - 15:18
![]() Yvonne írta:
Yvonne írta:
Ich bin am Ende von A2 angekommen. Dort steht nun ich soll in der Hauptfarbe weiter stricken bis ich 25cm messe. Ich bin aber am Ende von A2 schon bei 28cm. Ist das ein Tippfehler, oder habe ich deutlich zu groß gestrickt? Von wo genau muss ich das messen?
27.01.2025 - 18:43A DROPS Design válasza:
Liebe Yvonne, diese 25 cm messen Sie nach Bündchen/Halsblende, dh ab 1. Reihe der Passe - beachten Sie, daß Ihre Maschenprobe auch in der Höhe (20 Reihen = 10 cm) stimmt. Viel Spaß beim Stricken!
28.01.2025 - 09:07
![]() Anke Keil írta:
Anke Keil írta:
Hallo nettes Team, der Pullover ist wunderbar geworden. Meine Mutter trägt ihn so gerne, ist richtig verliebt. Danke, danke ! L. G....Anke Keil
23.01.2025 - 18:42
![]() Angela Botham írta:
Angela Botham írta:
Can you please verify jumper sizes? What is large in cms or inches and medium and large please
11.12.2024 - 18:01
![]() Anke Keil írta:
Anke Keil írta:
Hallo, ich bin beim Ärmel, Gr. S. Wenn man alle 14 cm, 3 x in der Höhe abnimmt, ist man am Ende doch schon bei 42 cm. Man soll aber doch nur bis 33 cm stricken. Wie funktioniert das? L. G...Anke
27.11.2024 - 12:34A DROPS Design válasza:
Liebe Frau Keil, die 1. Abnahmen stricken Sie wenn der Ärmel 3 cm ab Verteilung misst, die 2. Abnahmen 14 cm danach = nach insgesamt 17 cm (3+14), und die 3. Abnahmen nach 14 weitere cm = wenn der Ärmel 31 cm misst (17+14), dann stricken Sie noch 2 cm = bis 33 cm vor dem Bündchen. Viel Spaß beim Stricken!
27.11.2024 - 13:47
![]() Anke Keil írta:
Anke Keil írta:
Hallo, ich bin bei der Passe. Habt ihr ein Video ab dieser Stelle : 48-56-60-64-64-66 Maschen für den Ärmel stilllegen, 6-6-8-8-10-12 neue Maschen anschlagen (an der Seite unter dem Arm), 76-84-88-100-108-114 Maschen wie zuvor stricken (Vorderteil)." Auf welcher Nadel liegen die neu aufgenommenen Maschen? Durch die stillgelegten Maschen bekomme ich die Rundnadeln nicht mehr zusammen zum Weiterstricken. L. G...Anke
22.11.2024 - 00:03A DROPS Design válasza:
Liebe Anke, sicher, in diesem Video sehen Sie die Verteilung ab ca 07:00 time code; und in diese Lektion zeigen wird die Verteilung ab Foto 9. Diese neu angeschlagenen Maschen sind dann unter jede Ärmel = an die Seiten vom Pullover. Viel Spaß beim Stricken!
22.11.2024 - 09:54
![]() Anke Keil írta:
Anke Keil írta:
Hallo, in welcher Farbe strickt man die Umschläge? 11. Reihe habe ich gar keine Idee. Gleich die 1. Masche ein Unschlag?
26.10.2024 - 00:01A DROPS Design válasza:
Liebe Frau Keil, stricken Sie die Umschläge mit der Hauptfarbe der Reihe, dh mit graugrüne bei der 11. Reihe. Viel Spaß beim Stricken!
28.10.2024 - 08:02
![]() Anke Keil írta:
Anke Keil írta:
10x10 cm stimmt nur mit 7,0 . Außerdem wird laut Anleitung die Halsblende nicht mit 5,5 , sondern mit 4,5 weitergestrickt: "Maschen mit der Farbe kamel DROPS Nepal auf der kurzen Rundnadel Nr. 4,5 und der kurzen Rundnadel Nr. 5,5, die zusammengelegt werden. Rundnadel Nr. 5 herausziehen und die Maschen auf Rundnadel Nr. 4,5 belassen." Nun weiß ich nicht, mit welchen Nadelstärken ich die Maschen aufnehmen und mit welcher Stärke ich stricken soll.
03.10.2024 - 20:38A DROPS Design válasza:
Liebe Frau Keil, hier wird die Halskante mit Nadeln Nr 4,5 gestrickt, die Maschen werden aber mit 2 Nadeln angeschlagen damit die Anschlagskante elastisch wird; so können Sie die Nadeln für Ihre Maschenprobe + die Nadeln für das Bündchen (vielleicht Nr 6 oder 5,5?) zusammennehmen, um die Maschen anzuschlagen. Viel Spaß beim Stricken!
04.10.2024 - 07:39
|
||||||||||||||||||||||
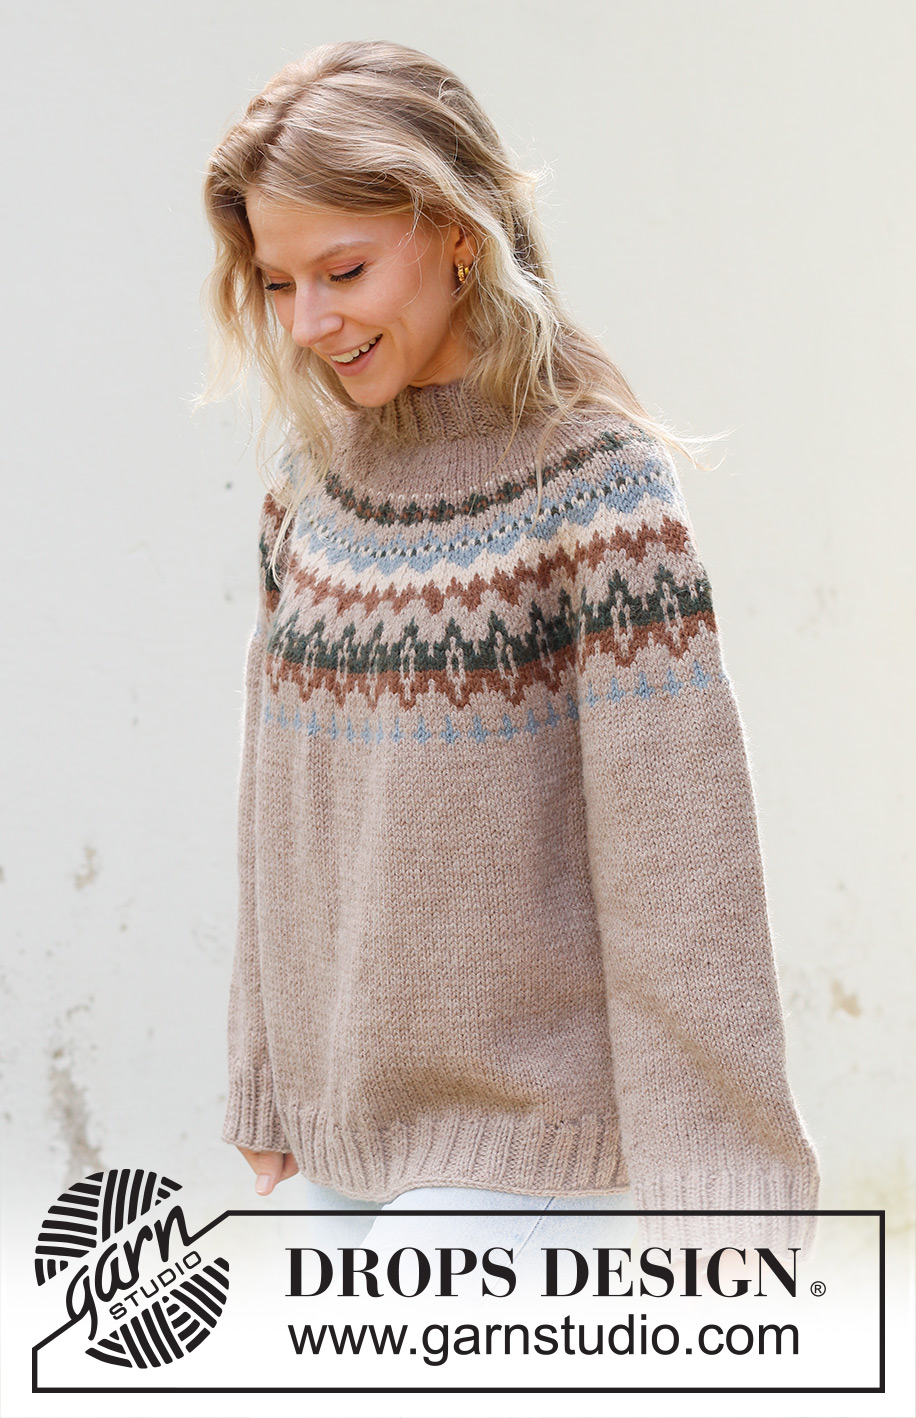
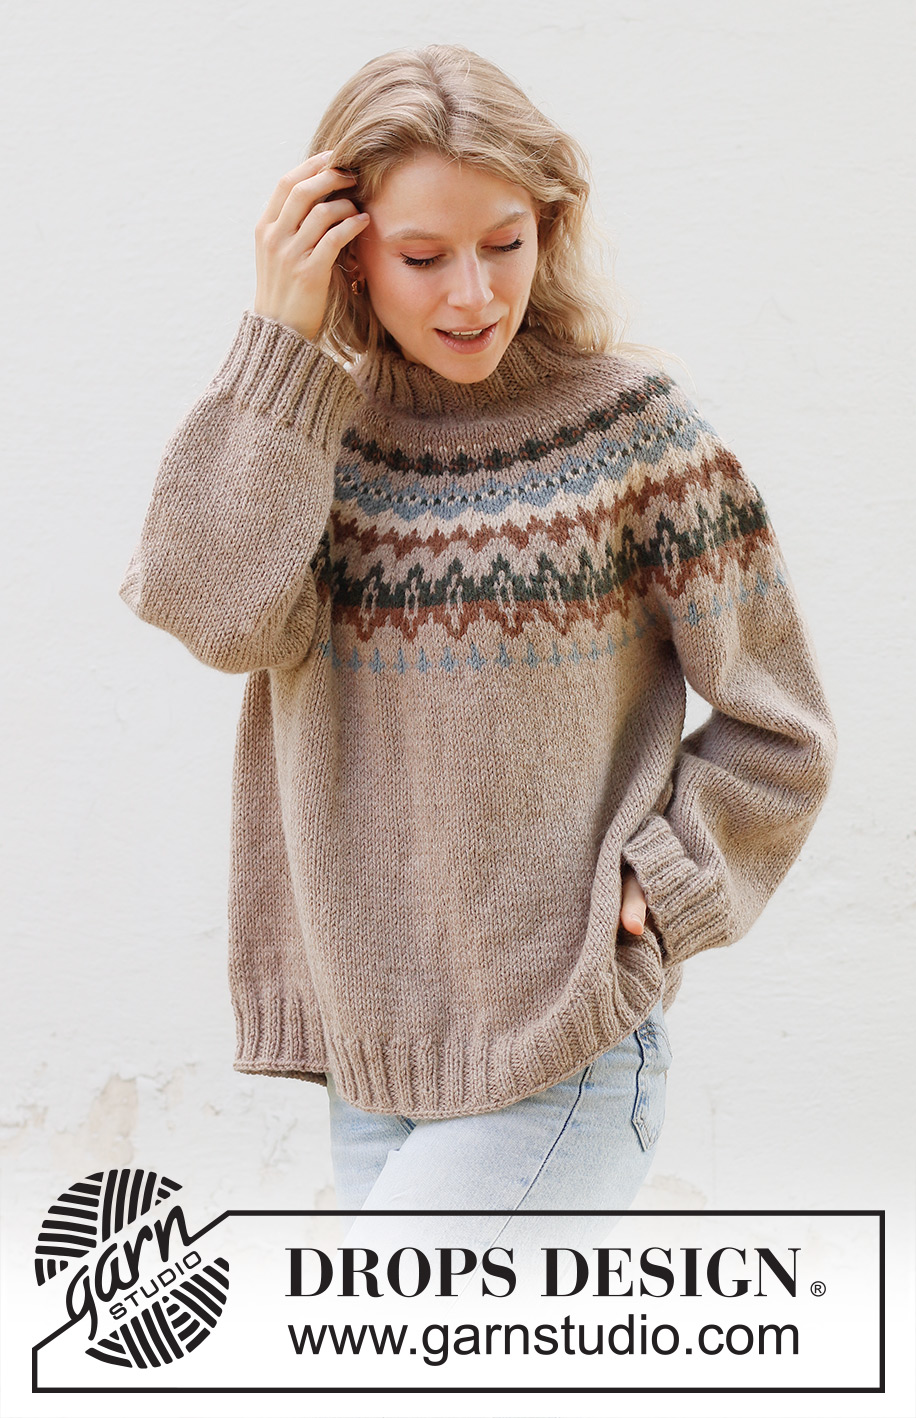
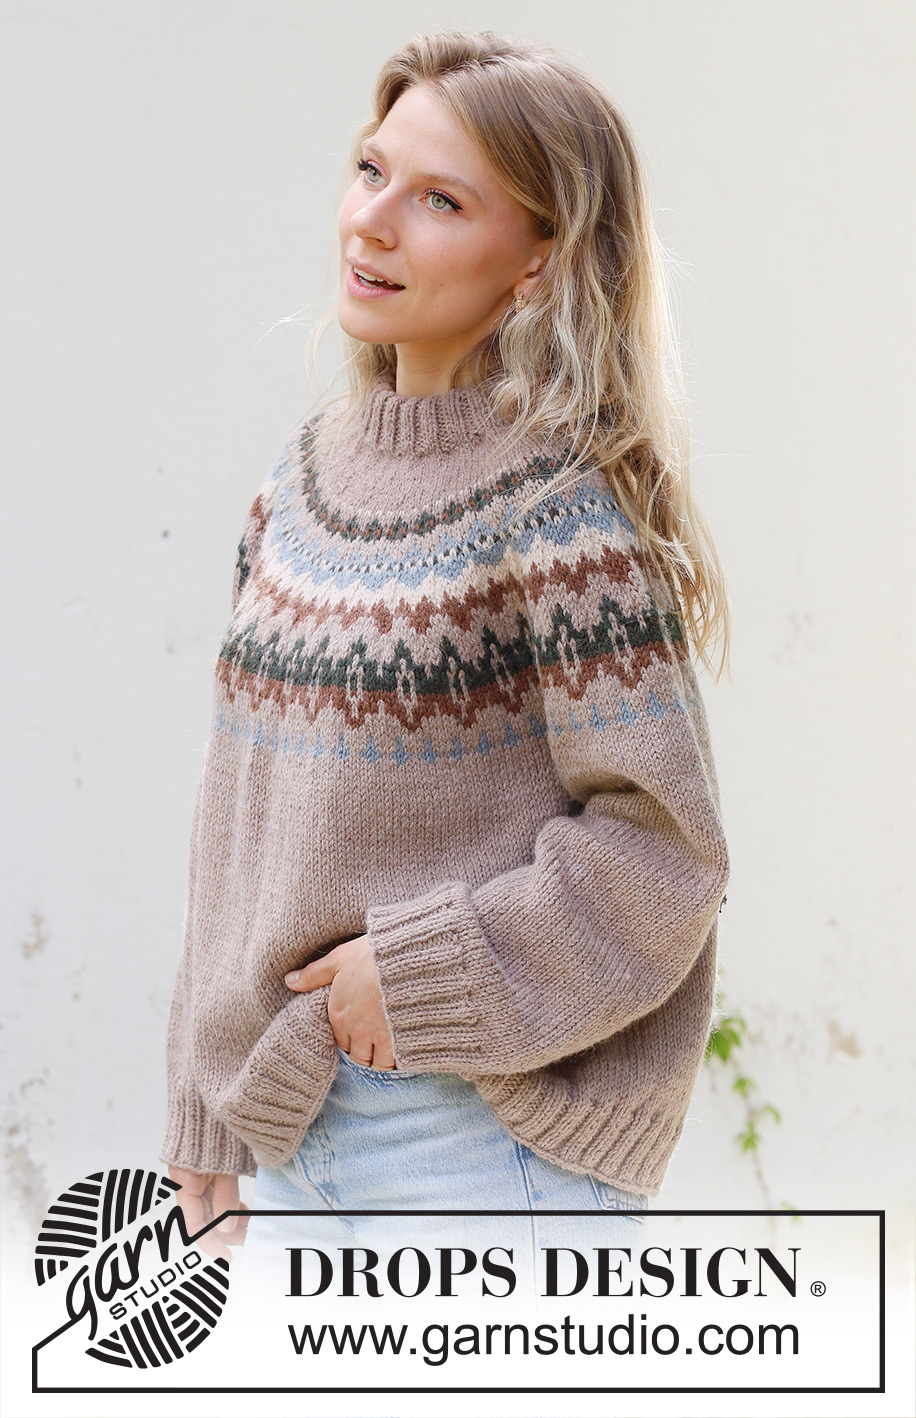
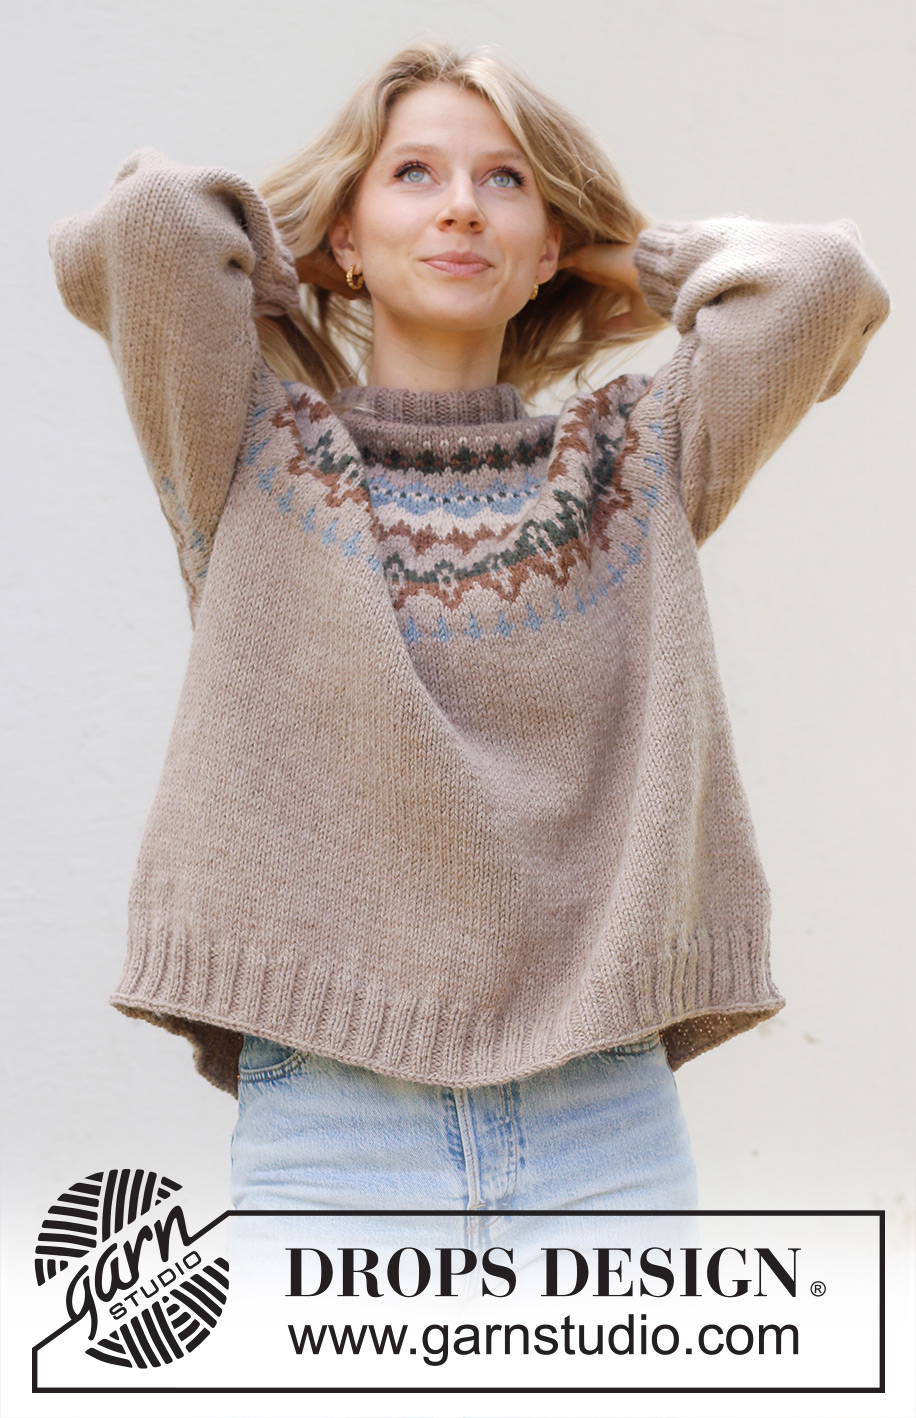
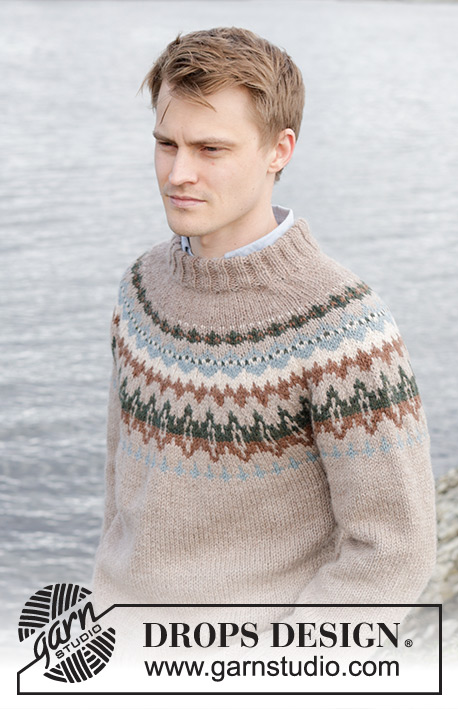
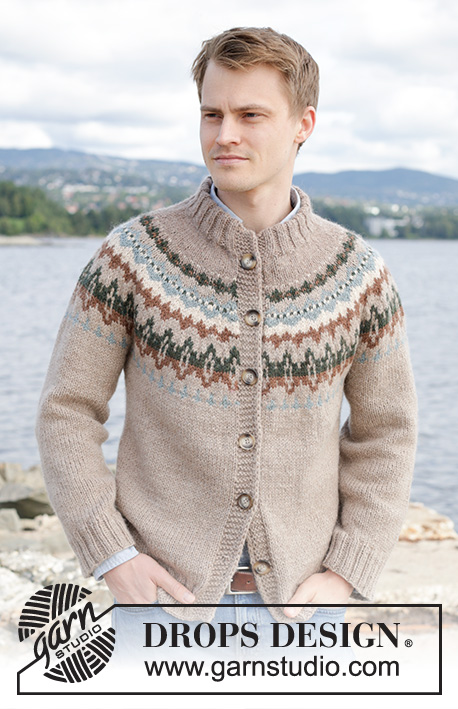
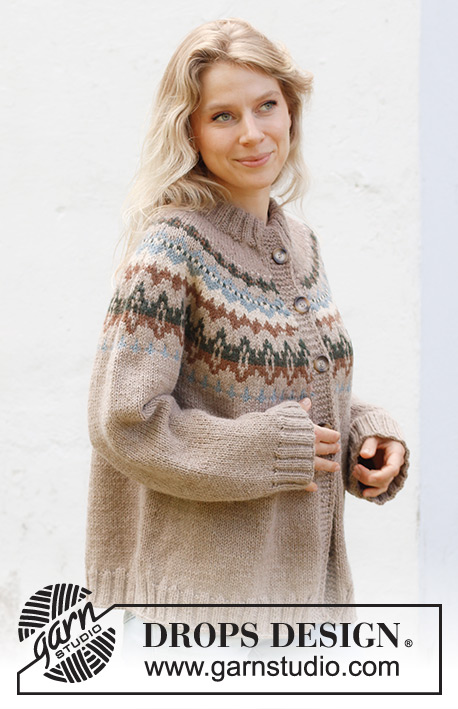
Autumn Reflections Sweater#autumnreflectionssweater |
||||||||||||||||||||||
 |
 |
|||||||||||||||||||||
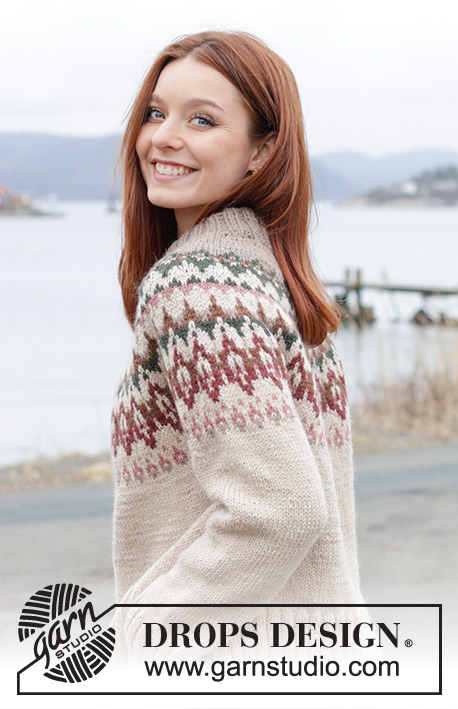
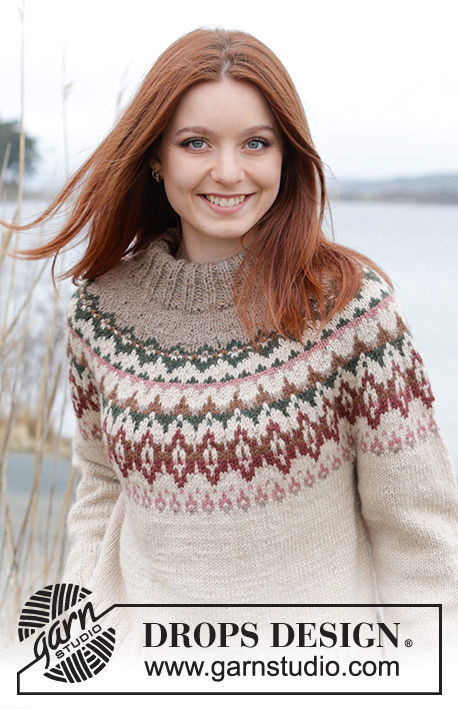
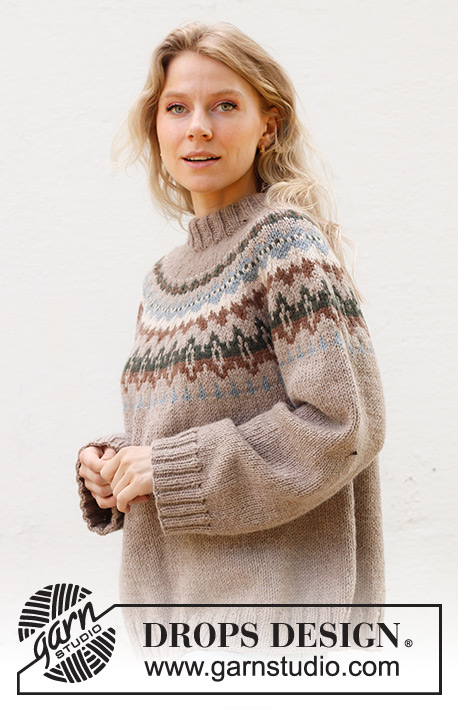
Kötött Drops pulóver DROPS Nepal fonalból. A darabot fentről lefelé irányban készítjük, kerek vállrésszel, színes mintával és dupla nyakkal. S - XXXL méretekben.
DROPS 244-24 |
||||||||||||||||||||||
|
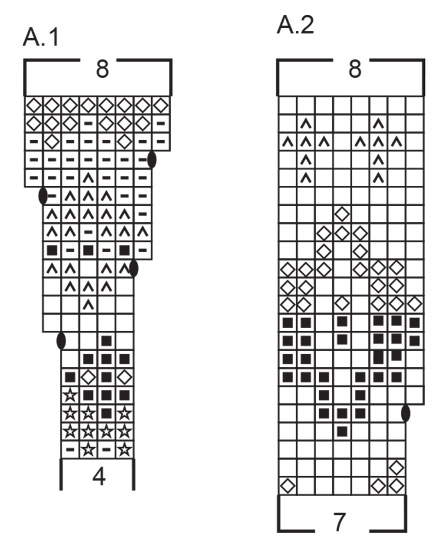
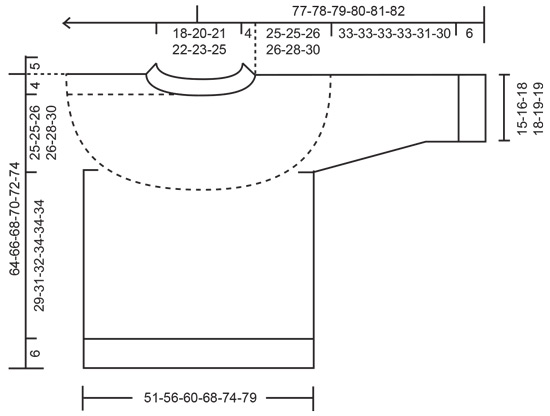
---------------------------------------------------------- TANÁCSOK A MINTA ELKÉSZÍTÉSÉHEZ: ---------------------------------------------------------- MINTA: Lásd az A.1 és A.2 jelű ábrát A teljes mintát harisnyakötéssel kötjük. 1. TANÁCS A SZAPORÍTÁSHOZ (egyenletesen elosztva elhelyezett szaporításokhoz): Úgy számoljuk ki, az egyenletesen elosztott szaporításokhoz hol kell a sorban a szaporítást elkészítenünk, hogy vesszük a kötőtűn lévő szemek számát (vagyis ebben a példában 84 szemet), és a szemek számát elosztjuk azzal a számmal, ahány szemet kell szaporítanunk (ebben a példában , 12) = 7. Ebben a példában tehát, 1 rh-t készítve szaporítunk, kb minden 7. szem után. A következő sorban/körben a ráhajtásokat csavartan kötjük, így a helyükön nem keletkezik lyuk. TANÁCS A KÖTÉSHEZ: Ügyeljünk arra, hogy a kötés ne húzódjon össze, amikor a mintát kötjük, ezért figyeljünk arra, hogy a szálakat a szokásosnál lazábbra hagyjuk, és ne húzzuk meg a darab mögött. Ha a mintával kötött sorokban így is összehúzódik a darab, használjunk vastagabb kötőtűt. TANÁCS A FOGYASZTÁSHOZ (az ujjánál): Minden jelölő mindkét oldalán a következő módon fogyasztunk 1 szemet: Kössünk, amíg 3 szem marad a jelölő előtt, 2 szemet simán összekötünk, 2 sima szemet kötünk (a jelölő a 2 szem között van), 1 szemet simán leemelünk, 1 sima, majd a leemelt szemet a lekötött szemen átemeljük. ---------------------------------------------------------- A MINTALEÍRÁS ITT KEZDŐDIK: ---------------------------------------------------------- PULÓVER: RÖVID ÖSSZEFOGLALÓ A nyakkivágás szegélyét és a vállrészt körben kötjük, a háta közepénél kezdve, a körkötőtűn fentről lefelé haladva. A vállrészt elkészítettük, és darabot körben haladva készítjük tovább. A két ujját körben kötjük, a rövidebb körkötőtűvel, és/vagy kéthegyű kötőtűkkel. DUPLANYAK: A kezdéshez szedjünk fel 84-88-92-96-100-104 szemet egy 4,5 és egy 5,5 mm vastag, összefogott, rövidebb körkötőtűre a teve színű DROPS Nepal fonalból. Vegyük ki a 5,5 mm vastag kötőtűn és a szemeket tartsuk a 4,5 mm vastag kötőtűn (így a kezdőszélünk rugalmas marad). Kössünk 1 kört S szemekkel majd kössünk a bord mintával (2 S / 2 F) 10 cm-ig. Ezután kössünk 1 kört sima szemekkel, UGYANAKKOR, egyenletesen elosztva szaporítsunk 12-16-18-22-24-26 szemet a körben. OLVASSUK EL A FENTI TANÁCSOT A SZAPORÍTÁSHOZ! = 96-104-110-118-124-130 szem. VÁLLRÉSZ: Váltsunk a rövid, 5,5 mm vastag körkötőtűkre. Folytassuk a harisnyakötéssel és a teve színű fonallal 4 cm-ig. A köv körben, egyenletesen elosztva szaporítsunk 12-16-18-22-24-26 szemet = 108-120-128-140-148-156 szem. Kössünk 1 kört S szemekkel. OLVASSUK EL A FENTI TANÁCSOT A KÖTÉSHEZ! Ezután az A.1-es mintát készítjük minden szemen. NE FELEDKEZZÜNK MEG A MEGFELELŐ KÖTÉSPRÓBA BETARTÁSÁRÓL! Az A.1 jelű minta utolsó körében, egyenletesen elosztva szaporítsunk 1-5-3-7-5-3 szemet = 217-245-259-287-301-315 szem. Ezután az A.2 jelű mintát készítjük minden szemen. Miután az A.2 jelű mintát elkészítettük, 248-280-296-328-344-360 szemünk lesz a kötőtűn a körben. Folytassuk harisnyakötéssel és a bézs színű fonallal a korábbiak szerint, amíg a darabunk 25-25-26-26-28-30 cm-es lesz a nyakkivágástól mérve) A következő sorban osszuk el a szemeket, és a testrész és a két ujját külön-külön fejezzük be. A köv körben haladjunk a köv módon: Kössük le az első 38-42-44-50-54-57 szemet sima szemekkel (= fél háta). A következő 48-56-60-64-64-66 szemet tegyük szemtartóra / maradék fonalra (= a jobb ujja), szedjünk fel 6-6-8-8-10-12 új szemet (= az oldalán az ujja alatt) folytassuk a következő 76-84-88-100-108-114 szemmel (= eleje), csúsztassuk a következő 48-56-60-64-64-66 szemet szemtartóra / maradék fonalra (= a bal ujja), szedjünk fel 6-6-8-8-10-12 új szemet az oldalán, az ujja alatt. Kössük le a maradék 38-42-44-50-54-57 szemet (= fél háta). A testrész és az ujjak szemeit külön-külön kötjük tovább. A DARABOT EZENTÚL ETTŐL A PONTTÓL MÉRJÜK! TESTRÉSZ: = 164-180-192-216-236-252 szem. Folytassuk a kötést, harisnyakötéssel, és a bézs színnel körben haladva további 29-31-32-34-34-34 cm-ig. Kössünk 1 kört S szemekkel minden szemen, és egyenletesen elosztva szaporítsunk 24-24-24-28-32-32 szemet a körben = 188-204-216-244-268-284 szem. Váltsunk a 4,5 mm vastag körkötőtűre / kéthegyű kötőtű készletre, és kössük a bordás mintát (2 sima /2 fordított). kezdés. 6 cm-t. Lazán láncoljuk le a szemeket. A pulóver kb 64-66-68-70-72-74 cm-es a vállrésztől lefelé mérve. Ujjak: Csúsztassuk vissza az egyik ujjához szemtartóra félretett 48-56-60-64-64-66 szemet a 5 mm- vastag kéthegyű kötőtűkészletre / rövidebb körkötőtűre. Szedjünk fel 1-1 új szemet az ujjak alatt felszedett 6-8-8-8-10-12 szem mindegyikébe a = 54-62-68-72-74-78 szem van a kötőtűnkön. Tegyünk jelölőt az ujja alatt az új szemek közepére. A kört a jelölőnél kezdjük, és folytassuk harisnyakötéssel, körben kötve, a bézs színnel. Amikor a darabunk 3 cm-es (minden méretben) az ujja alsó középvonalánál, fogyasszunk 2 szemet - OLVASSUK EL A FENTI TANÁCSOT A FOGYASZTÁSHOZ! Ismételjük meg a fogyasztást a fentiek szerint 14-6½-5-3½-3½-2½ cm-ként összesen 3-5-6-8-7-9 alkalommal = 48-52-56-56-60-60 szem marad. Folytassuk a munkát a fentiek szerint, amíg az ujja kb 33-33-33-33-31-30 cm-es a jelölőtől vagy a kívánt hosszúságú). Kb 6 cm marad a darabból). Kössünk 1 kört S szemekkel minden szemen, és egyenletesen elosztva szaporítsunk 8-8-8-8-8-8-8 szemet a körben = 56-60-64-64-68-68 szem. Váltsunk a 4,5 mm vastag körkötőtűre / kéthegyű kötőtű készletre, és kössük a bordás mintát (2 sima /2 fordított) 6 cm-t. Lazán láncoljuk le a szemeket. Az ujja kb 39-39-39-39-37-36 cm. hosszú. Készítsük el a másik ujját ugyanilyen módon. ÖSSZEÁLLÍTÁS: Hajtsuk be a nyakkivágás szegélyét a FO felé, és apró öltésekkel varrjuk le. Ügyeljünk arra, hogy a varrás ne legyen túl szoros, és a szegély ne forduljon ki vagyis, a pulóver nyakkivágása elég rugalmas legyen. |
||||||||||||||||||||||
Diagram magyarázatok |
||||||||||||||||||||||
|
||||||||||||||||||||||
|
||||||||||||||||||||||
|
||||||||||||||||||||||
Elkészítette ezt a mintát?Akkor adja a képeihez a #dropspattern #autumnreflectionssweater tageket, vagy küldje be a képet a #dropsfan galériába. Segítségre van szüksége a modell elkészítéséhez? 23 tutorial videót találhat, és egy kérdés/felelek részt, és még többet, ha a mintát megkeresi a garnstudio.com oldalán. © 1982-2025 DROPS Design A/S. Minden jog fenntartca. Ez a documentim, az összes részével védelem alatt áll. A weboldalunkon többet olvashat arról, hogy mit tehet és mit nem a mintáinkkal. |
||||||||||||||||||||||


Több mint 40 év tapasztalattal a kötés és horgolásminták tervezésében a DROPS Design az ingyenes minták egyik legszélesebb körű gyűjtemnyét kínálja az Interneten, 17 nyelvre fordítva. A mai nappal 314 katalógust 11822 mintát tudunk számon tartani a mintákból 11804 -t fordítottunk le magyarra (európai mértékegységekkel).
keményen dolgozunk azon, hogy a kötés és a horgolás világából a legjobbat hozzuk el, remek fonalakkal, hihetetlen árakon. Ha mintáinkat nemcsak személyes használatra szeretné használni, minden minta alján a Copyright szövegben olvashat arról, mit tehet s mit nem. Sikeres kézimunkázást!
Post a comment to pattern DROPS 244-24
Szívesen vesszük, ha megosztja velünk gondolatait erről a mintáról.
Ha kérdést szeretne feltenni, ügyeljen arra, hogy a megfelelő kategóriát válassza ki, így fegyorsíthatja a válaszadás folyamatát. Það verður að merkja við svæði merktri með *.