
Popular categories
Looking for a yarn?


Megjegyzések / Kérdések (18)
![]() Michaela Lindahl írta:
Michaela Lindahl írta:
Hej! Jag förstår inte hur jag ska maska av när jag är färdig med öglan. Dvs jag förstår inte ” Nu stickas m från fram- och baksidan räta tills 2 och 2 SAMTIDIGT som de maskas av.” Och jag hittar tyvärr inte någon video som förklarar. Tack för att ni alltid hjälper till!
12.01.2025 - 21:20A DROPS Design válasza:
Hej Michaela, du stikker højre pind ind i første maske på den ene pind og ind i første maske på den anden pind, strikker maskerne sammen og lukker af efterhånden :)
14.01.2025 - 14:35
![]() Etta Otten írta:
Etta Otten írta:
Bovenstaand tel patroon hoort niet bij bovenstaande foto, maar bij Mandoline 1987’s Kitted Potholder #1. De foto staat hieronder.
04.04.2023 - 16:12
![]() Etta Otten írta:
Etta Otten írta:
Graag wil ik de pannenlappen DROPS 159-25 DROPS design: Model nr. r-683 breien, maar als ik naar de foto kijk, mis ik een paar telpatronen in de werkbeschrijving. Alleen A.1 is te zien. Moet ik de rest op een andere plek zoeken? Graag hoor ik van u. Vriendelijke groet.
03.04.2023 - 22:08A DROPS Design válasza:
Dag Etta,
Er is ook maar 1 patroon, alleen A.1. Alle kabels e.d. zijn hierin verwerkt.
05.04.2023 - 07:45
![]() Antje Konopka írta:
Antje Konopka írta:
Ich verstehe leider das Diagramm nicht. Wie stricke ich denn A1 in der Mitte? Also in den ersten 4 Reihen?
18.04.2022 - 23:55A DROPS Design válasza:
Liebe Frau Konopka, die Zöpfe und das Lochmuster werden nicht genauso in der Höhe wiederholt, dh das Lochmuster in der Mitte wiederholen Sie wenn die ersten 8 Reihen fertig sind, aber die Zöpfe beidseitig stricken Sie wie zuvor (= in jede 6. Runde). Viel Spaß beim stricken!
19.04.2022 - 11:53
![]() Claudia Mackenzie írta:
Claudia Mackenzie írta:
Well I have started the Pattern A1 but noticed that where the marker was at the first start of round 1 by the time I did the 56 stitchs it did not reach the marker(where we increased 9 on the knit 1-49ers) so I thought just do the 56 sts so I went to the next round and noticed that the same thing happened. I guess what confusing me is are the 56st in pattern A1 suppose to reach the marker each time? Or do we just knit the pattern A1 and when the stitches end we knit to the marker then due P
15.01.2022 - 03:36A DROPS Design válasza:
Dear Mrs Mackenzie, after you have increased between 1st and 2nd marker the 2nd marker is now in the 58th stitch (not in the 49th anymore because of the increases), and you work: K1, A.1 (= 56 sts), K1, P2, K43, P2 - there are more sts on front piece because of the cable but width will be the same on front and back. Hope it will help. Happy knitting!
19.01.2022 - 10:18
![]() Claudia Mackenzie írta:
Claudia Mackenzie írta:
Thank you for your response.it is helpful and I looked at the lesson .I know each square is a stitch so when you have the lines going through 2 of the square does that mean when do it twice or just one time. Example 1st round in A1: purl ,purl (slip1st as if to knit,K1,Psso) do we do it twice?Then you do a 1Yo,K2 tog ,purl,purl.This is how I’m reading the pattern. Now 2nd round in pattern A1: purl,purl,knit,knit,purl,knit 6,purl,knit2,purl2,knit9,purl,purl,knit,knit,
13.01.2022 - 00:42A DROPS Design válasza:
Hi Claudia, If you mean the 2 squares side by side with a diagonal line through, then this means the explanation covers 2 stitches (you do not do it twice). !st row in A.1 is : P2, psso, 1 yarn over, P1, K6, P1, 1 yarn over, K2 together, P2 and so on. You are correct in your reading of row 2. Happy knitting!
13.01.2022 - 07:54
![]() Claudia Mackenzie írta:
Claudia Mackenzie írta:
In the pattern for this pot holder in the 56 stitch. you in the first row purl twice then you slip one as if to knit then do your 6 cables then purl then knit2 together.then the next row purl2,Knit 2,Purl1 then do you do a cable or knit?after that you Purl 1 then K2 or do you knit 2together.In other words do you only do the cables or slip 1 or knit togeather where the vertical lines are? I see that in the middle of the 56 stitches you have some vertical lines and can see that it is in di
12.01.2022 - 09:43A DROPS Design válasza:
Dear Mrs Mackenzie, in diagram A.1 you will have decreases and yarn over (see 4th and 5th symbol for decreases) and at the same time you will work cables (as shown in next to last + last symbol). When the lace pattern in the middle of A.1 is done, repeat from first row, while continuing the cables on each side, ie the middle panel is worked over 8 round but the cables are worked over every 6th round (and the small lace pattern on each side on every other round). This lesson might help you understanding how to read diagrams. Happy knitting!
12.01.2022 - 15:55
![]() Claudia Mackenzie írta:
Claudia Mackenzie írta:
So when do you start the pattern in A1?Do you do the purl 1 round then knit 1 round first then when you get to the 5th round is that when you start the increases of 9 sts. Or do you start the increases at each knit 1 round?
08.01.2022 - 04:18A DROPS Design válasza:
Dear Mrs Mackenzie, cast on the stitches, then purl 1 round, knit 1 round, purl 1 round, knit 1 round and purl 1 round. Insert the 2 markers without working the stitches, on next round, knit all stitches increasing between 1st and 2nd marker. On next round, start working A.1 between first 2 markers. Happy knitting!
10.01.2022 - 07:43
![]() MJ írta:
MJ írta:
Hei! Så nydelige grytekluter! Men jeg trenger litt hjelp med diagrammet. Hvorfor er det tegnet flere omganger på sidene?? Hva gjør man da med maskene i midten?
26.07.2019 - 00:50A DROPS Design válasza:
Hej, ja vist er de fine :) du fortsætter bare de midterste masker fra starten igen. Det er fordi de yderste snoninger i hver side skal strikkes på hver 6.pind. God fornøjelse!
02.08.2019 - 09:37
![]() Maria írta:
Maria írta:
Hei! Blir disse tykke og trygge grytekluter som beskytter hendene, eller vil hullmønsteret gjøre at de først og fremst er dekorative? Jeg står mellom å strikke disse eller strikke "sun-baked" en gang til.
10.04.2018 - 21:02A DROPS Design válasza:
Hei Maria. Disse gryteklutene strikkes rundt så de blir dobble. Du kan derfor helt fint bruke dem. God fornøyelse
12.04.2018 - 15:50
|
||||||||||||||||||||||
Helping Hand#helpinghandpotholder |
||||||||||||||||||||||
|
|
||||||||||||||||||||||
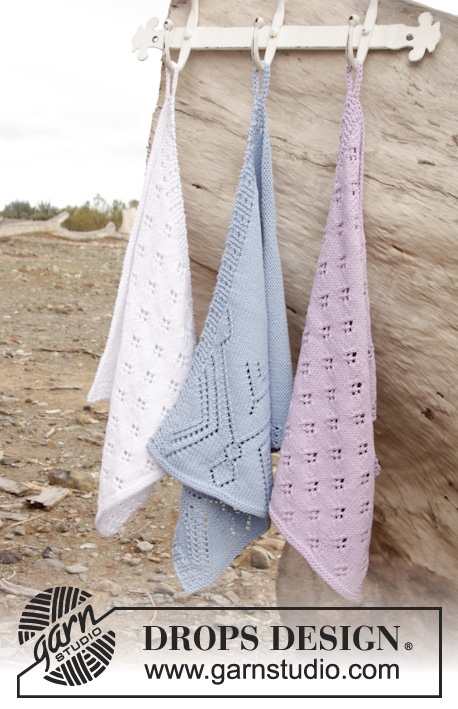
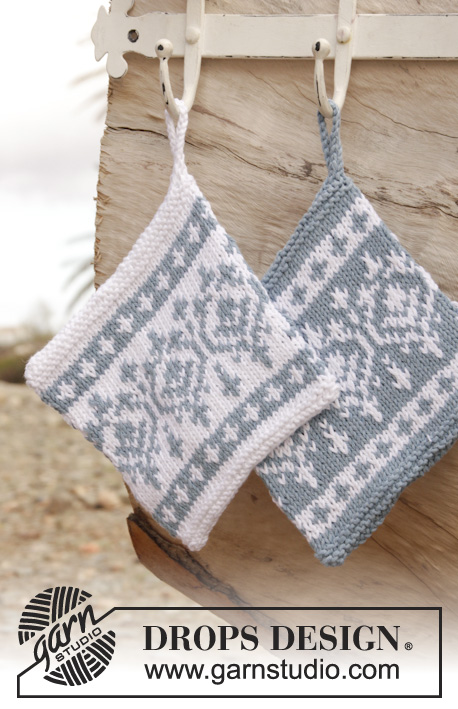
Kötött DROPS edényfogó csipke mintával MUSKAT fonalból.
DROPS 159-25 |
||||||||||||||||||||||
|
MINTA: Lásd az A.1-es diagramot. ---------------------------------------------------------- EDÉNYFOGÓ: Körben kötjük a körkötőtűn: A kezdéshez szedjünk fel 96 szemet az 3 mm-es körkötőtűre, a Muskat fonallal. 1 kör F,1 kör S,1 kör F, 1 kör S 1, 1 kör F. Tegyünk 1 jelölőt az első szembe a körkezdeténél, és 1 jelölőt a 49. szembe (= oldalak). Kössünk 1 kört S szemekkel, UGYANAKKOR, az 1. és a 2. jelölő között egyenletesen elosztva szap 9 szemet (a szemek száma azért nagyobb az edényfogó elején, mert a csipkeminta összehúzódik) = 105 szem a kötőtűn. Az első körben így haladjunk: 1 S (= szem a jelölővel), a minta az A.1-es diagram szerint (= 56 szem), 1 S, (a jelölt szem), 2 F, 43 szem harisnyakötéssel, és 2 F. Folytassuk a mintát a fentiek szerint, amíg a darabunk kb 19 cm-es lesz, és az A.1-es minta középső szakaszának 41 teljes ism befejeztük. 1 kör S, UGYANAKKOR, az 1. és 2. jelölő között egyenletesen elosztva fogy 9 szemet, így az edényfogó első és hátsó oldalán a szemek száma ugyanannyi lesz. 1 kör fordított, 1 kör sima, 1 kör fordított. Ezután kössünk 1 kört S, UGYANAKKOR, a kör végén szedjünk fel 20 új szemet az akasztóhoz.. Fordítsuk meg a darabot, láncoljuk le a 20 szemet, majd hajtsuk félbe az edényfogót úgy, hogy a jelölt szemek essenek a szélére. Most az eleje és a háta szemeit kettesével összekötjük, UGYANAKKOR le is láncoljuk őket. Varrjuk össze az edényfogó alját apró öltésekkel a kezdősor mellett. A 20 új szem hurkot alkot az edényfogó sarkánál varrjuk a végét az edényfogó sarkához. Kössünk még egy edényfogót ugyanígy. |
||||||||||||||||||||||
Diagram magyarázatok |
||||||||||||||||||||||
|
||||||||||||||||||||||
 |
||||||||||||||||||||||
Elkészítette ezt a mintát?Akkor adja a képeihez a #dropspattern #helpinghandpotholder tageket, vagy küldje be a képet a #dropsfan galériába. Segítségre van szüksége a modell elkészítéséhez? 14 tutorial videót találhat, és egy kérdés/felelek részt, és még többet, ha a mintát megkeresi a garnstudio.com oldalán. © 1982-2026 DROPS Design A/S. Minden jog fenntartca. Ez a documentim, az összes részével védelem alatt áll. A weboldalunkon többet olvashat arról, hogy mit tehet és mit nem a mintáinkkal. |
||||||||||||||||||||||


Több mint 40 év tapasztalattal a kötés és horgolásminták tervezésében a DROPS Design az ingyenes minták egyik legszélesebb körű gyűjtemnyét kínálja az Interneten, 17 nyelvre fordítva. A mai nappal 324 katalógust 12290 mintát tudunk számon tartani a mintákból 12268 -t fordítottunk le magyarra (európai mértékegységekkel).
keményen dolgozunk azon, hogy a kötés és a horgolás világából a legjobbat hozzuk el, remek fonalakkal, hihetetlen árakon. Ha mintáinkat nemcsak személyes használatra szeretné használni, minden minta alján a Copyright szövegben olvashat arról, mit tehet s mit nem. Sikeres kézimunkázást!
Post a comment to pattern DROPS 159-25
Szívesen vesszük, ha megosztja velünk gondolatait erről a mintáról.
Ha kérdést szeretne feltenni, ügyeljen arra, hogy a megfelelő kategóriát válassza ki, így fegyorsíthatja a válaszadás folyamatát. Það verður að merkja við svæði merktri með *.