
Popular categories
Looking for a yarn?


Megjegyzések / Kérdések (12)
![]() Clare írta:
Clare írta:
Hi, can you please let me know if this pattern can be updated to include larger sizes ? Like up to XXXL
21.01.2024 - 19:26
![]() Lynne Randall Caloggero írta:
Lynne Randall Caloggero írta:
I haven't begun to knit the project yet, but as I read through the instructions I'm wondering why it's necessary to shift M.1 half a pattern repeat to the right on every other row?
01.07.2020 - 15:30A DROPS Design válasza:
Dear Mrs Randall Caloggero, you will displace the diagrams so that the flowers are note the one over each other but one flower will come over 2 from previous diagram. Happy knitting!
01.07.2020 - 15:43
![]() Debra írta:
Debra írta:
Hi, I have another question about the directions. I am working on the sleeve and am almost finished. I have cast off 10 sts mid underarm, ready to work back and forth on the needles. It says to decrease 6 sts 3 times on every other row. Where do I place these decreases- at the beginning, middle, end of row or equally spaced out across the row? Please clarify for me. Thanks for all your help so far.
20.06.2020 - 01:38A DROPS Design válasza:
Dear Debra, after you have cast off 10 sts on mid under arm, you continue back and forth casting off (you don't decrease, pattern will be updated) 6 sts at the begining of every row on each side a total of 3 times (= 6 sts at the beg of next 6 rows). Happy knitting!
22.06.2020 - 07:37
![]() Debra írta:
Debra írta:
I am working on the sleeve and am questioning the instructions. Do I work M1 just once and then change to M2 as soon as it's completed or do I continue with M1 repeated several times until I have 122 sts and then switch to M2 once all 122 sts are made?
17.06.2020 - 19:41A DROPS Design válasza:
Dear Debra, diagram M.1 is worked only one time in height (but around all stitches in the round - make sure to center a diagram mid on top of sleeve), then you work M.2 (both in width and height) to the end of sleeve. Happy knitting!
18.06.2020 - 09:37
![]() Debra írta:
Debra írta:
Thanks for your answer but I am still unsure about the meaning of decreasing 2 sts 2 times and 1 st 2 times. Is that all in one row and consecutively cast off. Why doesn't it just say cast off 6 stitches? Maybe I'm not understanding and making it more complicated than it is. Please help clear this up for me.
05.06.2020 - 18:08A DROPS Design válasza:
Dear Debra, you don't cast off 6 sts 1 time to make the neck line somewhat rounded. You have to cast off the sts for neckline at the beg of row from neck towards armhole, then work row to the end, turn and work next row and repeat this 2 rows until all sts are cast off (you repeat these 2 rows 2 times casting off 2 sts at the beg of row then repeat 2 times castinf off 1 st at the beg of row). Happy knitting!
08.06.2020 - 07:35
![]() Debra írta:
Debra írta:
Can you give me more explicit details on how to shape the front neckline? I don't know what you mean by decrease 2 sts 2 times , 1 st 2 times. Are these all in the same row?How many stitches will I be decreasing in total? I assume I will be using the knit 2 together technique to do these decreases.
05.06.2020 - 02:08A DROPS Design válasza:
Dear Debra, you first cast off the middle 41 sts for neck and finish each shoulder separately, at the beginning of every row from neck towards armhole (from RS on one shoulder, from WS on the other shoulder), you will cast off (will looks nicer than decrease): 2 sts 2 times and 1 stitch 2 times = you have cast off a total of 6 sts towards neck. Happy knitting!
05.06.2020 - 07:41
![]() Debra írta:
Debra írta:
Ughhh, I have already knitted one complete diagram as before the edits. Do you know if I can continue on pearling as the original pattern and just turn the garment inside out when finished so the knit side shows? Or is there a way to retread the stitches on the needle ? Or do I have to rip it all out and begin again? Please tell me what you think.
25.05.2020 - 23:14A DROPS Design válasza:
Dear Debra, you could turn your work inside outside so that the knit side will be now towards outside (= from RS) and the purl side inside (from WS) - just do this at at the beg of the round - you might also continue working with purled sts outside and then just turn inside outside when dividing piece for armholes; Happy knitting!
26.05.2020 - 08:47
![]() Debra írta:
Debra írta:
Hi, Can you please give me some details as to how to shift the diagram half a pattern repeat to the right. Would I begin the rows on stitch 13 ? Thanks for your help.
24.05.2020 - 16:07A DROPS Design válasza:
Dear Debra, when working the 2nd M.1 in height, you can start the round with the 13rd stitch and then repeat M.1 and finish round with the 12th stitch. On 3rd repeat, start again as before and continue like this. Happy knitting!
25.05.2020 - 09:53
![]() Debra írta:
Debra írta:
This pattern diagram is starting with a pearl row and the rose is done in knit stitch. Will this mean the right side of the sweater has the pearl side facing out? in the sweater photo, it looks like the main body is stocking stitch with the knitted side showing and the rose in pearls. Can you please help? Did I do something wrong to have the right side out showing pearl stitch?
23.05.2020 - 19:36A DROPS Design válasza:
Dear Debra, diagram text has been reversed - it has been edited now, thanks for your feedback - a white square should be a K stitch and a small black square a P - Happy knitting!
25.05.2020 - 09:06
![]() Debra Briere írta:
Debra Briere írta:
I am confused with the instructions for the moss stitch pattern. It says to repeat second row but I am thinking it should say repeat these 2 rows of K1P1 over P1K1. Can you please clarify this for me?
22.05.2020 - 05:35A DROPS Design válasza:
Hi Debra, Row 2 says to knit over purl and purl over knit, which is then repeated in the following rows - so all rows consist of knit over the previous row's purl and purl over the previous row's knit. I hope this helps and happy knitting!
22.05.2020 - 07:49
|
||||||||||
DROPS 29-22 |
||||||||||
|
|
||||||||||
DROPS / 29/ 22 Méret: M
DROPS 29-22 |
||||||||||
|
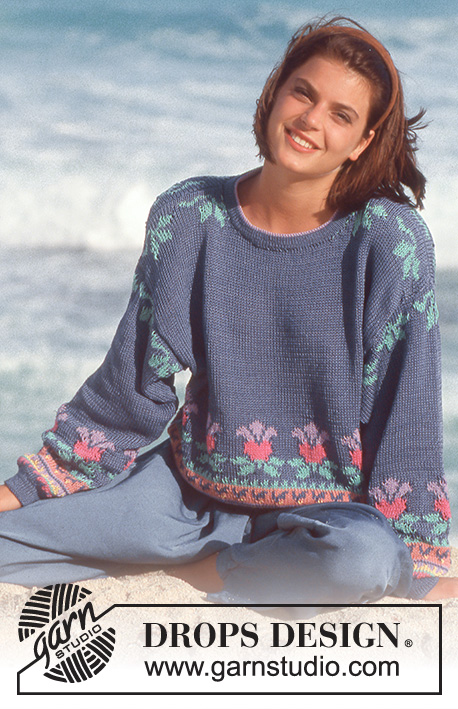
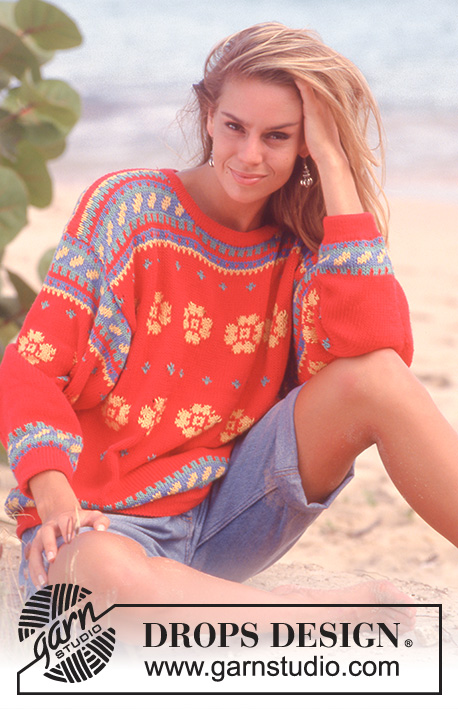
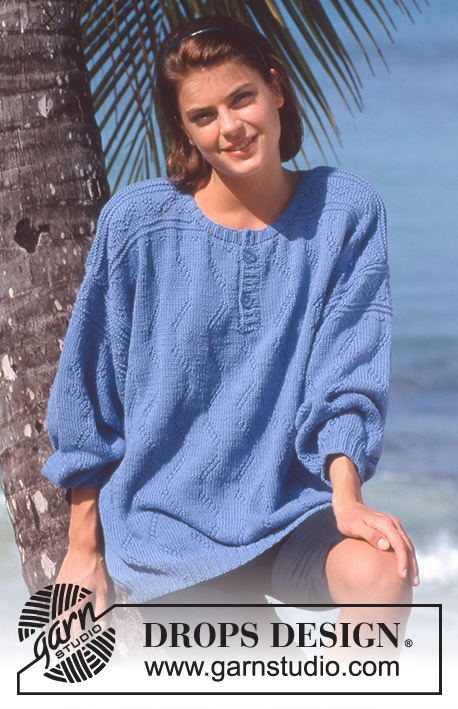
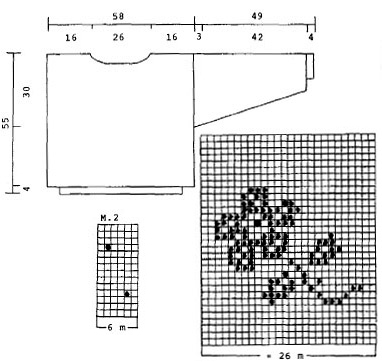
Mintaleírás: MINTA: Lásd az M.1- M.4-es diagramot A diagramok a mintákat a színe oldal felől mutatja. Rizsminta: 1. sor: 1 S, 1 F. 2. sor: A sima szemeket fordítottan, a fordított szemeket simán kötjük. Hosszú változat A hosszú változathoz 100 grammal több fonalra lesz szükség. A hosszanti méreteket növeljük meg 14 cm-rel. A darab teljes mérete körülbelül 69 cm-es. Eleje és háta: Körben kötjük a körkötőtűn: A kezdéshez szedjünk fel 188 szemet a 2,5 mm vastag körkötőtűre és kössünk 4 cm-t a rizsmintával. Váltsunk a 4 mm-es kötőtűre, kössünk tovább, UGYANAKKOR, az 1. sorban, egyenletesen elosztva szap 46 szemet = 234 szem. Kössük az M.1 jelű mintát, de minden 2. körben, mozdítsuk el a mintát fél ismétlésnyit jobbra. NE FELEDKEZZÜNK MEG A MEGFELELŐ KÖTÉSPRÓBA BETARTÁSÁRÓL! Amikor a darabunk 25 cm-es, osszuk szét a szemeket kétfelé és az eleje és háta darabokat külön-külön fejezzük be. ELEJE: = 117 szem. Amikor a darabunk 50 cm hosszú láncoljuk le a középső 41 szemet a nyakkivágás kialakításához, majd a minden második sorban további szemeket fogyasztunk a nyakkivágás mellett a következő módon: 2 szemet 2 alkalommal, 1 szemet 2 alkalommal. Amikor a darabunk 55 cm-es láncoljuk le a szemeket HÁTA = 117 szem. UGYANAKKOR, amikor a darabunk 53 cm-es láncoljuk le a középső 49 szemet a nyakkivágás kialakításához, majd a köv sorban további 2 szemet fogyasztunk a nyakkivágás mellett a következő sorban. Az elejénél leírtak szerint láncoljuk l a szemeket. Ujja: Körben kötjük a kéthegyű kötőtű-készleten. A kezdéshez szedjünk fel 46 szemet a 2,5 mm vastag körkötőtűre / kéthegyű kötőtűkre, és kössünk 4 cm-t a rizsmintával. Váltsunk a 4 mm-es kötőtűre, kössünk tovább, UGYANAKKOR, az 1. sorban, egyenletesen elosztva szap 14 szemet = 60 szem. Kössük az M.1 jelű mintát (ügyeljünk arra, hogy a minta szimmetrikusan illeszkedjen az ujja felső középvonalára). UGYANAKKOR, szap 2 szemet az ujja alsó középvonalának két oldalán, minden 3. körben, összesen 31 alkalommal = 122 szem. A szaporított szemeket a mintába illesztve kössük tovább. Az M.1-es minta után folytassuk az M.2-es mintával. Amikor a darabunk 46 cm-es láncoljunk le 10 szemet az ujja alsó középső vonala mellett (mindkét oldalon 3-3 szemet), majd a darabot a kötőtűn oda-vissza haladva (síkban kötve) fejezzük be Ezután láncoljunk le szemeket minden második sorban az ujja felső ívének kialakításához, minden 2. sorban a köv módon: 6 szemet 3 alkalommal. Amikor a darabunk körülbelül 49 cm-es láncoljuk le a szemeket. ÖSSZEÁLLÍTÁS: Varrjuk össze a vállvarrásokat. Szedjünk fel kb 02 szemet a nyakkivágás körül a 2,5 mm vastag körkötőtűre / kéthegyű kötőtű készletre, és kössünk 4 kört lustakötéssel. Láncoljuk le a szemeket. A nyakkivágás széle köré horgoljunk szegélyt a 3 mm-es horgolótűvel a köv módon: 1 rp *3 lsz, 1 erp az első lsz-be, kb 2 cm-t kihagyunk, 1 rp*. Ismételjük meg a *-* közötti részt. A széleket egymás mellé illesztve, a szélszemek külső hurkába öltve a varrásszélünk nem lesz vaskos. |
||||||||||
Diagram magyarázatok |
||||||||||
|
||||||||||
 |
||||||||||
Elkészítette ezt a mintát?Akkor adja a képeihez a #dropspattern tageket, vagy küldje be a képet a #dropsfan galériába. Segítségre van szüksége a modell elkészítéséhez? 25 tutorial videót találhat, és egy kérdés/felelek részt, és még többet, ha a mintát megkeresi a garnstudio.com oldalán. © 1982-2026 DROPS Design A/S. Minden jog fenntartca. Ez a documentim, az összes részével védelem alatt áll. A weboldalunkon többet olvashat arról, hogy mit tehet és mit nem a mintáinkkal. |
||||||||||


Több mint 40 év tapasztalattal a kötés és horgolásminták tervezésében a DROPS Design az ingyenes minták egyik legszélesebb körű gyűjtemnyét kínálja az Interneten, 17 nyelvre fordítva. A mai nappal 324 katalógust 12290 mintát tudunk számon tartani a mintákból 12268 -t fordítottunk le magyarra (európai mértékegységekkel).
keményen dolgozunk azon, hogy a kötés és a horgolás világából a legjobbat hozzuk el, remek fonalakkal, hihetetlen árakon. Ha mintáinkat nemcsak személyes használatra szeretné használni, minden minta alján a Copyright szövegben olvashat arról, mit tehet s mit nem. Sikeres kézimunkázást!
Post a comment to pattern DROPS 29-22
Szívesen vesszük, ha megosztja velünk gondolatait erről a mintáról.
Ha kérdést szeretne feltenni, ügyeljen arra, hogy a megfelelő kategóriát válassza ki, így fegyorsíthatja a válaszadás folyamatát. Það verður að merkja við svæði merktri með *.