Comments / Questions (18)
![]() Jorunn Rusten wrote:
Jorunn Rusten wrote:
Hei,er der en feil i A1,omgang nr.27? Får ikke mønsteret til å stemme.
18.08.2021 - 21:21
![]() Jacqueline wrote:
Jacqueline wrote:
Waar staat A.3 voor maat M ?
11.02.2021 - 16:28DROPS Design answered:
Dag Jacqueline,
In maat M heb je A.3 niet nodig, je begint dan gelijk met A.4.
16.02.2021 - 15:41
![]() Meryem Bilan wrote:
Meryem Bilan wrote:
1.Welche Länge muss das Seil von der Rundnadel bei den Ärmeln von Modell "love Links" haben? 2.Von wo ab wird der Ärmel begonnen? 3.Was bedeutet der Pfeil bei "A4"und wie beginnt man das Muster bei den Ärmeln zu stricken?
25.01.2021 - 04:37DROPS Design answered:
Liebe Frau Bilan, die Ärmel können Sie zuerst mit Rundnadel 40 cm dann Nadelset stricken - "Ärmel"-Teil in der Anleitung beginnt, nach der Verteilung der Passe. Bei dem Pfeil in A.4 wird es unter Rumpfteil siehe ALLE GRÖSSEN gleichmäßig verteilt zugenommen. Viel Spaß beim stricken!
25.01.2021 - 11:48
![]() Colinda wrote:
Colinda wrote:
Bij de stekenverhouding staat “21 steken in de breedte en 28 naalden in de hoogte in tricotsteek en Scandinavisch patroon = 10 x 10 cm”. Nu heb ik in een boek over noors/fair isle breien gelezen dat de steken in zo’n patroon niet langwerpig zijn maar vierkant. Dat klopt bij mij ook. Maar dan is er toch een verschil in de stekenverhouding van de tricotsteek en het Scandinavisch patroon? Waar moet ik dan op af gaan?
28.11.2020 - 12:05DROPS Design answered:
Dag Colinda,
Je kan de stekenverhouding aanhouden zoal in het patroon, dus 21 steken in de breedte = 10 cm en 28 naalden in de hoogte is 10 cm. Als je deze stekenverhouding hebt, dan kom je goed uit met de maten en kun je het patroon gewoon volgen.
30.11.2020 - 20:14
![]() Ives DLR wrote:
Ives DLR wrote:
Bestaat er een manier van breien of techniek die ervoor zorgt dat het "verspringen" van het patroon midden op de rug aan het begin van elke toer minder opvalt?
02.11.2020 - 22:06DROPS Design answered:
Dag Ives DLR,
Er is wel een trucje voor wat vaak bij strepen rondbreien gebruikt wordt en dat is dat je bij de overgang de lus van de vorige toer op de linker naald zet en die samen breit met de volgende steek. Ik denk dat je dit even per toer moet bekijken of je dit wilt doen en wat voor effect het heeft. In deze video wordt dat uitgelegd.
03.11.2020 - 13:15
![]() Bernie wrote:
Bernie wrote:
Where is diagrams A1 and A4?
30.09.2020 - 22:25DROPS Design answered:
Dear Bernie, diagram A.1 and A.4 are at the bottom of the page. Happy knitting!
30.09.2020 - 22:59
![]() Lisali66 wrote:
Lisali66 wrote:
Sehr schön, aber wo ist a1?
27.09.2020 - 17:32
![]() Mimi M Routh wrote:
Mimi M Routh wrote:
So much fun to knit! I would use more blending colors.
04.06.2020 - 18:56
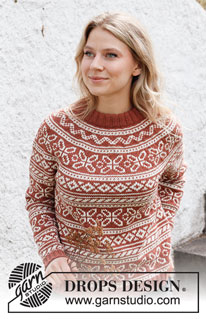
Love Links#lovelinkssweater |
|||||||||||||
 |
 |
||||||||||||
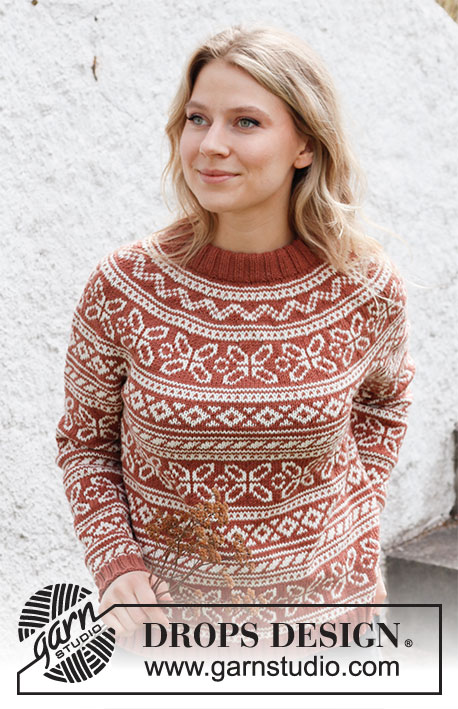
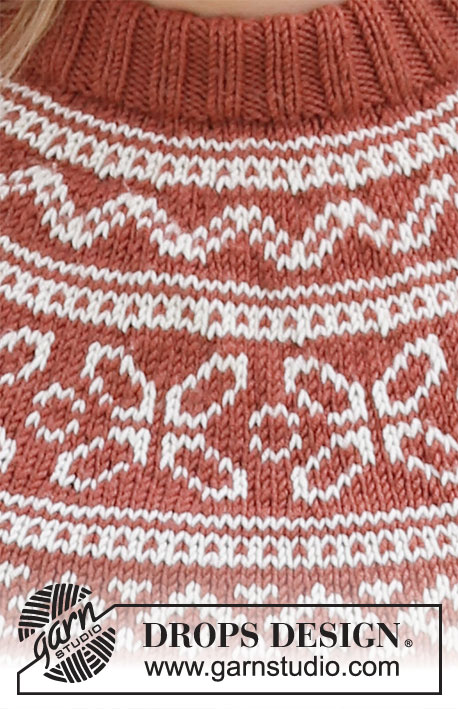
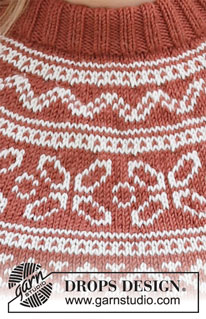
Knitted sweater in DROPS Merino Extra Fine. Piece is knitted top down with double neck edge, round yoke and Nordic pattern. Size XS–XXL.
DROPS 217-17 |
|||||||||||||
|
------------------------------------------------------- EXPLANATION FOR THE PATTERN: ------------------------------------------------------- KNITTING TIP: To avoid the knitting gauge to tighten when working pattern, it is important not to tighten the strands on back side of piece. Switch to a higher needle number when working pattern if the pattern is somewhat tight. If the knitting gauge is too tight vertically, the garment will be too short and the armhole will be too small - this can be adjusted by working 1 row more evenly in the sections with one color. If the knitting gauge is too loose vertically, the garment will be too long and the armhole too big, this can be adjusted by working 1 row less in the sections with one color. INCREASE TIP: To calculate how to increase evenly, use the total number of stitches on row (e.g. 104 stitches) and divide stitches by number of increases to be done (e.g. 24) = 4.3. In this example increase by making 1 yarn over after approx. every 4th stitch. On next round knit yarns over twisted to avoid holes. PATTERN: See diagrams A.1 to A.4. Choose diagram for your size (applies to A.2, A.3 and A.4). Work the entire pattern in stockinette stitch. DECREASE TIP (applies to mid under sleeves): Begin 2 stitches before stitch with marker, knit 2 together, knit 1 (stitch with marker), knit 2 twisted together (= 2 stitches decreased). BIND-OFF TIP: To avoid a tight bind-off edge you may use a larger needle size. If this also is too tight, work a 1 yarn over after approx. every 8th stitch while binding off (bind off yarn overs as regular stitches). ------------------------------------------------------- START THE PIECE HERE: ------------------------------------------------------- SWEATER - SHORT OVERVIEW OF THE PIECE: Double neck edge and yoke in the round on circular needle from mid back, top down. Now divide yoke for body and sleeves. Body is worked in the round on circular needle, top down. Work sleeves in the round on double pointed needles/short circular needle, top down. DOUBLE NECK EDGE: Cast on 104-108-112-120-124-132 stitches on a short circular needle size 3 mm = US 2,5 with cedar. Knit 1 round. Then work rib in the round (= knit 2/purl 2) for 9 cm = 3½". When rib is done, knit 1 round while increasing 24-28-32-32-36-44 stitches evenly - read INCREASE TIP = 128-136-144-152-160-176 stitches. Knit 1 round with cedar (knit yarn overs twisted). Insert 1 marker in the middle of round (= mid front). Work yoke as explained below, measure yoke from this marker. YOKE: Switch to circular needle size 4 mm = US 6. Read all of the following section on yoke before working and read KNITTING TIP! Work A.1 in the round (= 32-34-36-38-40-44 repetitions of 4 stitches). Continue pattern like this. When A.1 has been worked vertically, work A.2 the same way. REMEMBER THE KNITTING GAUGE! AT THE SAME TIME on every round marked with arrow in A.1 and A.2 increase stitches evenly as explained below - remember INCREASE TIP: Arrow-1: Increase 32-32-32-32-40-40 stitches evenly = 160-168-176-184-200-216 stitches (there is now room for 20-21-22-23-25-27 repetitions A.1 of 8 stitches). Arrow-2: Increase 32-40-40-40-40-48 stitches evenly = 192-208-216-224-240-264 stitches (there is now room for 24-26-27-28-30-33 repetitions A.1 of 8 stitches). Arrow-3: Increase 32-32-40-48-48-40 stitches evenly = 224-240-256-272-288-304 stitches (there is now room for 14-15-16-17-18-19 repetitions A.1 of 16 stitches). Arrow-4: Increase 32-32-32-32-40-48 stitches evenly = 256-272-288-304-328-352 stitches (there is now room for 32-34-36-38-41-44 repetitions A.2 of 8 stitches). Arrow-5: Increase 32-32-32-24-32-32 stitches evenly = 288-304-320-328-360-384 stitches (there is now room for 36-38-40-41-45-48 repetitions A.2 of 8 stitches). Increases in size XS, S and M are now done. Arrow-6: Increase 24-24-32 stitches evenly (only applies to sizes L, XL and XXL) = 288-304-320-352-384-416 stitches (there is now room for 22-24-26 repetitions A.1 of 16 stitches in the 3 largest sizes). The increases in size L, XL and XXL are done. Then work until last round in A.2 remains in your size. Piece measures approx. 19-21-23-25-27-29 cm = 7½"-8¼"-9"-9¾"-10⅝"-11⅜" from marker mid front. Now divide yoke for body and sleeves, i.e. work last round as follows: Work 40-44-46-50-56-64 stitches in stockinette stitch as last round in A.2 shows (= ½ back piece), slip the next 64-64-68-76-80-80 stitches on 1 stitch holder for sleeve, cast on 8-8-12-12-16-16 new stitches on needle (= in the side under sleeve), work 80-88-92-100-112-128 stitches in stockinette stitch as last round in A.2 shows (= front piece), slip the next 64-64-68-76-80-80 stitches on 1 stitch holder for sleeve, cast on 8-8-12-12-16-16 new stitches on needle (= in the side under sleeve) and work the remaining 40-44-46-50-56-64 stitches in stockinette stitch as last round in A.2 shows (= ½ back piece). Finish body and sleeves separately. NOW MEASURE PIECE FROM HERE! BODY: = 176-192-208-224-256-288 stitches. Begin round in one side of body, in the middle of the 8-8-12-12-16-16 stitches cast on under sleeve, and work as follows: XS, S, L and XL: Work A.3 in the round to finish pattern border from yoke (= 22-24-14-16 repetitions of 8-8-16-16 stitches). When A.3 has been worked vertically, work A.4 in the round (= 11-12-14-16 repetitions of 16 stitches). Then work as explained below ALL SIZES. M and XXL: Work A.4 in the round (= 13-18 repetitions of 16 stitches). Then work as explained below ALL SIZES. ALL SIZES: Continue A.4 in the round. Repeat A.4 vertically as far as you can before rib begins at the bottom of body. AT THE SAME TIME on round marked with arrow in A.4 , increase 16 stitches evenly in all sizes = 192-208-224-240-272-304 stitches (this increase is only done first time A.4 is worked vertically, and there is now room for 12-13-14-15-17-19 repetitions of 16 stitches). Work until piece measures approx. 31 cm.= 12¼" from division in all sizes – finish pattern nicely after a whole pattern border. Approx. 4 cm = 1½" remain until finished measurements, try the sweater on and work until desired length. Knit 1 round with cedar while increasing 56-64-68-72-80-92 stitches evenly = 248-272-292-312-352-396 stitches. NOTE! Increase stitches to avoid the rib from contracting when working the piece together. Switch to circular needle size 3 mm = US 2,5. Work rib in the round = knit 2/purl 2 for 4 cm = 1½". Bind off with knit over knit and purl over purl - read BIND-OFF TIP. Sweater measures approx. 58-60-62-64-66-68 cm = 22¾"-23⅝"-24⅜"-25¼"-26"-26¾" from shoulder and down. SLEEVE: Slip the 64-64-68-76-80-80 stitches from stitch holder in one side of piece on double pointed needles or a short circular needle size 4 mm = US 6 and pick in addition up 1 stitch in each of the 8-8-12-12-16-16 new stitches cast on under sleeve = 72-72-80-88-96-96 stitches. Insert 1 marker in the middle of the 8-8-12-12-16-16 stitches cast on under sleeve, i.e. insert marker in first stitch after the middle, count 35-35-39-43-47-47 stitches, insert 1 marker in next stitch (= middle stitch). 35-35-39-43-47-47 stitches remain on round after last marker. Move markers upwards when working. Marker mid under sleeve is used later when decreasing stitches under sleeve and marker mid on top of sleeve should be used to count where to begin pattern. Work last round in A.2 to finish A.2 the same way as on body - make sure that pattern fits over stitches from yoke. Read the rest of sleeve before continuing! XS, S, L and XL: Work A.3 in the round to finish repetition from yoke vertically but adjust to continue pattern nicely over stitches from yoke. When A.3 has been worked, work A.4 in the round the same way - count outwards from the middle so that middle stitch in A.4 fit with stitch with marker mid on top of sleeve. Repeat A.4 vertically. Then work as explained below ALL SIZES. M and XXL: When last round in A.2 has been worked, work A.4 in the round - count outwards from the middle so that middle stitch in A.4 fit with stitch with marker mid on top of sleeve. Repeat A.4 vertically. Then work as explained below ALL SIZES. ALL SIZES: AT THE SAME TIME when sleeve measures 3 cm = 1⅛" from division in all sizes, decrease 2 stitches mid under sleeve - read DECREASE TIP. Decrease like this every 2½-3-2-1½-1½-1½ cm = 1"-1⅛"-¾"-½"-½"-½" 14-12-16-18-20-20 times in total = 44-48-48-52-56-56 stitches. Work until sleeve measures approx. 41-40-38-36-35-33 cm = 16⅛"-15¾"-15"-14¼"-13¾"-13" from division – finish pattern nicely after a whole pattern border. Approx. 4 cm = 1½" remains until finished measurements. Try the sweater and work to desired length. NOTE! Shorter measurements in the larger sizes because of wider neck and longer yoke. Knit 1 round with cedar while increasing 4 stitches evenly in all sizes = 48-52-52-56-60-60 stitches. Switch to double pointed needles size 3 mm = US 2,5. Work rib in the round = knit 2/purl 2 for 4 cm = 1½". Bind off with knit over knit and purl over purl - remember BIND-OFF TIP. Sleeve measures approx. 45-44-42-40-39-37 cm = 17¾"-17¼"-16½"-15¾"-15¼"-14½" from division. Work the other sleeve the same way. ASSEMBLY: Fold rib at the top of neck double in towards wrong side of garment. Fasten rib but to avoid a tight neck edge and avoiding the edge to tip outwards, it is important to make the seam elastic. |
|||||||||||||
Diagram explanations |
|||||||||||||
|
|||||||||||||
 |
|||||||||||||
 |
|||||||||||||
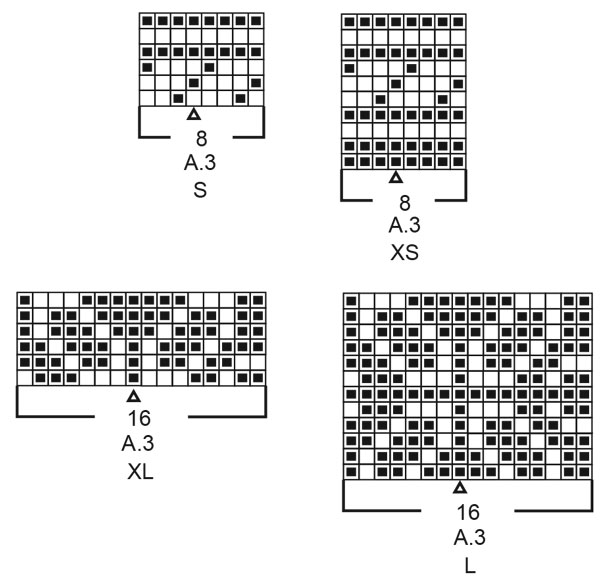 |
|||||||||||||
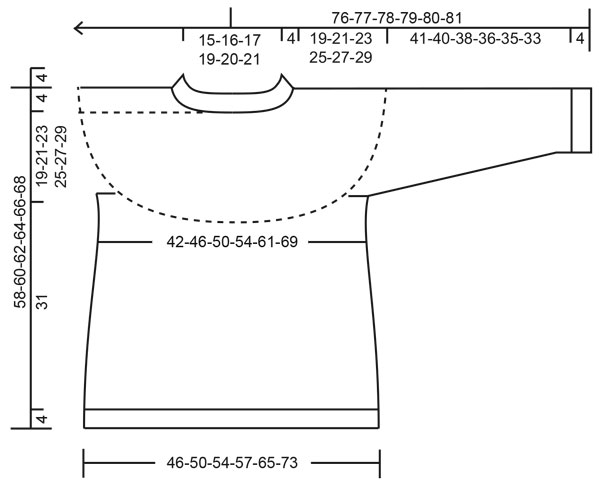 |
|||||||||||||
Have you finished this pattern?Tag your pictures with #dropspattern #lovelinkssweater or submit them to the #dropsfan gallery. Do you need help with this pattern?You'll find 26 tutorial videos, a Comments/Questions area and more by visiting the pattern on garnstudio.com. © 1982-2026 DROPS Design A/S. We reserve all rights. This document, including all its sub-sections, has copyrights. Read more about what you can do with our patterns at the bottom of each pattern on our site. |
|||||||||||||






Post a comment to pattern DROPS 217-17
We would love to hear what you have to say about this pattern!
If you want to leave a question, please make sure you select the correct category in the form below, to speed up the answering process. Required fields are marked *.