
Popular categories
Looking for a yarn?


Comments / Questions (50)
![]() Maja wrote:
Maja wrote:
I’ve really enjoyed knitting this sweater, but I don’t really like that the sleeves end up really wide at the bottom. Could you suggest an interval for further decreases to make the sleeves a bit more tapered, please? Any help would be greatly appreciated. Thank you
21.02.2023 - 22:21DROPS Design answered:
Dear Maja, we are unfortunately not able to adjust every pattern to every single request, maybe you can calculate your own decreases following your own measurements. Feel free to contact your DROPS store for any individual assistance. Thanks for your comprehension. Happy knitting!
22.02.2023 - 08:40
![]() Ragnhild Brudevik wrote:
Ragnhild Brudevik wrote:
Strikker str M Antall under «Bærestykke» er feil. Ved setting av merker har vi 20+12+40+12+20=104(ikke 112) Etter økning +4x20=80 har vi da 104+80=184(ikke 192) Hva er riktig??
04.11.2022 - 13:17
![]() Inge Andersen wrote:
Inge Andersen wrote:
Det ser ud til at diagrammet er faldet ud af opskriften, jeg kan ikke finde det. Er der ikke en tekstforklaring til mønsteret?
17.10.2022 - 22:16DROPS Design answered:
Hei Inge. Diagram A.1 finner du ved siden av målskissen (under ermet, lite diagram). mbh DROPS Design
24.10.2022 - 14:31
![]() Christy wrote:
Christy wrote:
It might be helpful if the questions and answers were translated into English (and those in English translated into German or French). That would make them accessible to more of your fans. Thank you for your consideration.
07.03.2022 - 06:44
![]() Cath wrote:
Cath wrote:
Il semble manquer le diagramme du point fantaisie est-il possible de l’obtenir ?
14.01.2022 - 09:28DROPS Design answered:
Bonjour Cath, vous trouverez le diagramme du point fantaisie (A.1) à droite du schéma des mesures (sous la manche). Bon tricot!
14.01.2022 - 16:32
![]() Kirsten wrote:
Kirsten wrote:
Hej Drops-team. Når man tager ud til for-og bagstykke, så tager man 2 masker ud (1 efter og 1 før mærket). Når jeg kommer rundt til samme sted på næste pind, så har jeg øget maskeantallet med 2, men mønsteret strækker sig over 4 masker. Hvordan skal de sidste to masker strikkes? Hvis jeg starter med mønsteret straks efter den nye udtagning, så "mangler" jeg to masker til sidst (f.eks. der, hvor man skal strikke første maske vrang og derefter to masker ret sammen).
03.12.2021 - 11:52DROPS Design answered:
Hej Kirsten, du strikker de nye masker ind i mønsteret, men først når du har 2 m glatstrik efter hinanden, kan de strikkes sammen ifølge diagrammet. God fornøjelse!
03.12.2021 - 15:42
![]() Stefania wrote:
Stefania wrote:
Non riesco a capire gli aumenti manica: Il lavoro misura circa 19-16-19-18-20-22 cm dal segnapunti. Continuare a maglia rasata e con il motivo come prima senza ulteriori aumenti fino a quando il lavoro misura 19-17-19-19-20-22 cm. Io sto lavorando la taglia L . Quanto deve misurare la parte senza aumenti (B) ? Io ho capito che deve essere 19 cm dalla fine degli aumenti!
25.10.2021 - 21:53DROPS Design answered:
Buonasera Stefania, per la taglia L non deve lavorare ulteriormente, ha già la lunghezza corretta. Buon lavoro!
26.10.2021 - 19:49
![]() Simon Erzsébet wrote:
Simon Erzsébet wrote:
Tisztelt Ügyfélszolgálat, sajnos nem találom a minta leírást (pl. A.1 minta), kéek segítséget. Köszönöm, Erzsébet
28.09.2021 - 21:16DROPS Design answered:
Kedves Erzsébet, a hiba javításra került, most már láthatónak kell lennie a diagramoknak, és a hozzájuk tartozó magyarázatoknak. Sikeres Kézimunkázást!
01.10.2021 - 17:10
![]() Anett Kaufmann wrote:
Anett Kaufmann wrote:
Ich kann mit dem Diagramm A.1 nichts anfangen, was bedeutet die liegende 0 auf der Schräge?
29.08.2021 - 18:14DROPS Design answered:
Liebe Kaufmann, es ist ein Umschlag (= 5. Symbol), dh bei der 1. Reihe stricken Sie 1 M links, 2 Maschen rechts zusammenstricken, 1 Umschlag, 1 M links und bei der 3. Reihe: 1 M links, 1 Umschlag, 1 Masche wie zum Rechtsstricken abheben, 1 Masche rechts, die abgehobene Masche überziehen, 1 M links. Viel Spaß beim stricken!
30.08.2021 - 08:02
![]() Hanne Hartung Jensen wrote:
Hanne Hartung Jensen wrote:
Hej i model 215-21 står der at glat strik er 20 masker i glat strik på pind 4,5 hvad med rib den stikkes på pind 3,5 skal det også give 10 cm på 20 masker ? Og hvad med mønstret ?
11.07.2021 - 07:50DROPS Design answered:
Hej Hanne, hvis du har 20 masker på 10 cm i glatstrik, så vil alt det andet også stemme med din strikkefasthed :)
13.07.2021 - 14:59
|
||||||||||||||||||||||||||||
Follow the Fjord#followthefjordsweater |
||||||||||||||||||||||||||||
 |
 |
|||||||||||||||||||||||||||
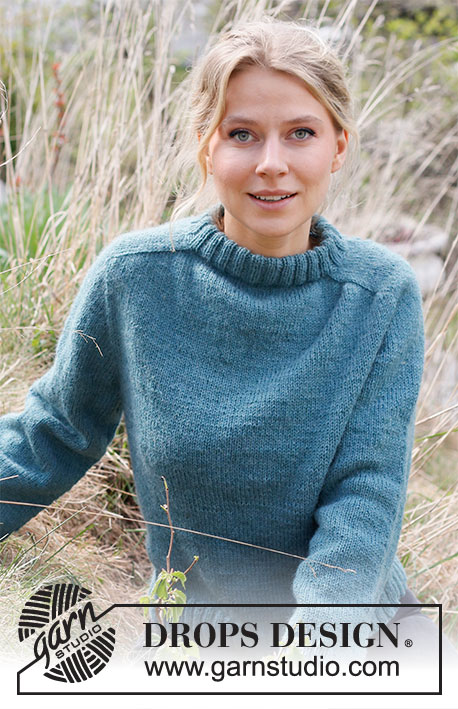
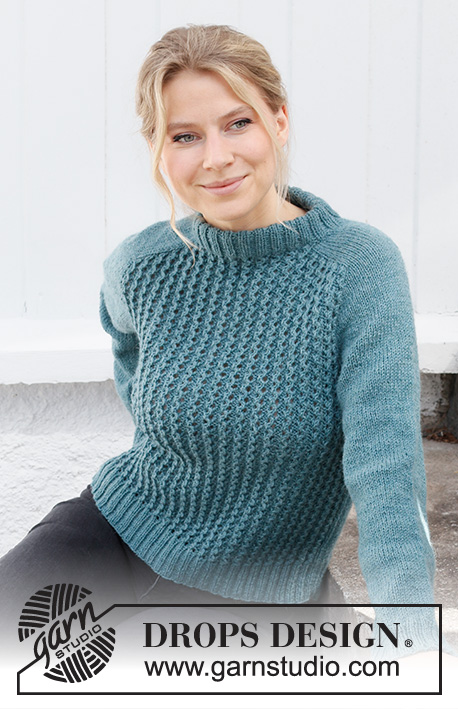
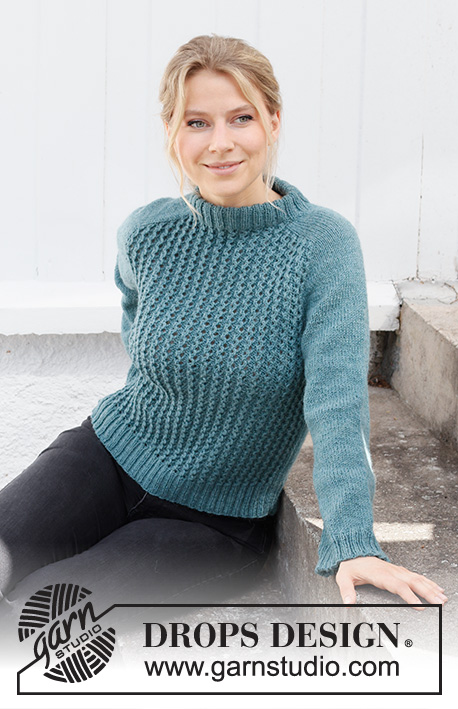
Knitted sweater in DROPS Karisma. The piece is worked top down with saddle shoulders and lace pattern. Sizes S - XXXL.
DROPS 215-21 |
||||||||||||||||||||||||||||
|
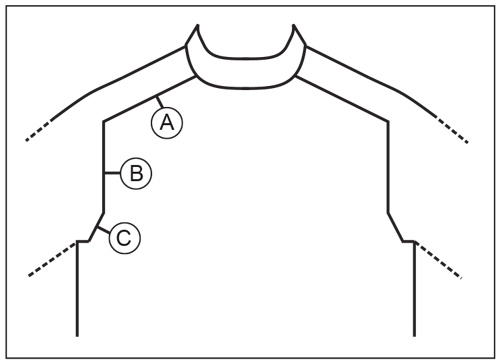
------------------------------------------------------- EXPLANATIONS FOR THE PATTERN: ------------------------------------------------------- PATTERN: See diagram A.1. INCREASE TIP-1 (evenly spaced): To work out how to increase evenly, count the total number of stitches on the needle (e.g. 12 stitches) and divide by the number of increases to be made (e.g. 4) = 3. In this example, increase by making 1 yarn over after each 3rd stitch. On the next round work the yarn overs twisted to avoid holes. INCREASE TIP-2: BEFORE MARKER: The new stitch will be twisted, leaning towards the right. Use left needle to pick up strand between 2 stitches from the round below, pick up strand from behind and knit stitch in front loop. AFTER MARKER: The new stitch will be twisted, leaning towards the left. Use left needle to pick up strand between 2 stitches from the round below, pick up strand from the front and knit stitch in back loop. DECREASE TIP (for sleeves): Decrease 1 stitch on either side of the marker as follows: Work until there are 3 stitches left before the marker, knit 2 together, knit 2 (marker thread sits between these 2 stitches), slip 1 stitch as if to knit, knit 1 and pass the slipped stitch over the knitted stitch. BINDING-OFF TIP: To avoid the bind-off edge being tight you can bind off with a larger size needle. If the edge is still tight, make 1 yarn over after approx. each 4th stitch at the same time as binding off; the yarn overs are bind off as normal stitches ------------------------------------------------------- START THE PIECE HERE: ------------------------------------------------------- SWEATER – SHORT OVERVIEW OF THE PIECE: The piece is worked in the round, top down. Stiches are increased on the yoke for the shoulders front and back, then stitches are increased for the sleeves. The yoke is divided for the body and sleeves; the body is continued in the round. The sleeves are worked in the round with double pointed needles, top down. NECK: Cast on 96-104-104-112-120-128 stitches with circular needle size 3.5 mm = US 4 and Karisma. Knit 1 round. Then work rib as follows: Purl 1, * knit 2, purl 2 *, work from *-* until there are 3 stitches left, knit 2 and purl 1. Continue this rib for 8½ cm = 3¼". Change to circular needle size 4.5 mm = US 7. Insert a marker at the beginning of the round (mid-back). Leave the marker there; THE PIECE IS MEASURED FROM THE MARKER! YOKE: On the next round you increase stitches, work pattern and insert 4 markers (between stitches) as follows: Work A.1 (= 4 stitches) over 16-20-20-20-20-24 stitches (= 4-5-5-5-5-6 times in width = half back piece), insert marker 1, knit 12-12-12-12-16-16 and increase 4-4-8-8-8-8 stitches evenly over these stitches – read INCREASE TIP-1, insert marker 2 (= shoulder), A.1 over the next 36-40-40-44-44-48 stitches (= 9-10-10-11-11-12 times in width = front piece), insert marker 3, knit 12-12-12-12-16-16 and increase 4-4-8-8-8-8 stitches evenly over these stitches, insert marker 4 (= shoulder) and A.1 over the last 20-20-20-24-24-24 stitches (= 5-5-5-6-6-6 times in width = half back piece) = 104-112-120-128-136-144 stitches. SADDLE SHOULDER INCREASE: Work stockinette stitch over the shoulder stitches and pattern A.1 over the front and back pieces. On the next round increase for saddle shoulders as follows: Increase 1 stitch BEFORE markers 1 and 3 and 1 stitch AFTER markers 2 and 4 - read INCREASE TIP-2 (= 4 stitches increased). I.e. there are increases on back piece and front piece, and number of shoulder stitches remain the same. The increased stitches are worked into A.1 as you go. Pattern A.1 is repeated in height. Increase like this every round a total of 20-20-24-24-28-28 times = 184-192-216-224-248-256 stitches. The piece measures approx. 8-8-9-9-11-11 cm = 3⅛"-3⅛"-3½"-3½"-4⅜"-4⅜" from the marker on the neck. REMEMBER THE KNITTING GAUGE! SLEEVE INCREASE: Now increase for the sleeves as follows: Increase 1 stitch AFTER markers 1 and 3 and 1 stitch BEFORE markers 2 and 4 (= 4 stitches increased). I.e. increase in shoulder stitches, number of stitches in front piece and back piece remains the same. Increase like this every 2nd round a total of 14-11-13-12-12-14 times = 240-236-268-272-296-312 stitches. The piece measures approx. 19-16-19-18-20-22 cm = 7½"-6¼"-7½"-7"-8"-8¾" from the marker. Continue with stockinette stitch and pattern as before without further increases until the piece measures 19-17-19-19-20-22 cm = 7½"-6¾"-7½"-7½"-8"-8¾". YOKE INCREASE: Now increase 1 stitch on each side of the marker as follows: Work until 1 stitch remain before markers 1 and 3, increase 1 stitch BEFORE marker, work 1 stitch, move the marker to the right needle and increase 1 stitch AFTER marker. Work until markers 2 and 4, increase 1 stitch BEFORE marker, move the marker to the right needle, work one stitch and increase 1 stitch AFTER marker (= 8 stitches increased). The increased stitches on the front and back pieces are worked into pattern A.1 and the increased stitches on the sleeves are worked in stockinette stitch (stitches between markers 1 and 2 and markers 3 and 4). Increase like this every 2nd round a total of 8-12-12-16-16-16 times = 304-332-364-400-424-440 stitches. When all the increases are finished, the piece measures 25-26-28-30-32-34 cm = 9¾"-10¼"-11"-11¾"-12½"-13⅜" from the marker on the neck. Now divide the piece for body and sleeves on the next round as follows: Work the first 44-52-56-60-64-68 stitches (= half back piece), place the next 60-62-70-76-80-84 stitches on a thread for the sleeve, cast on 8-8-8-8-8-12 stitches under the sleeve, work 92-104-112-124-132-136 stitches (= front piece), place the next 60-62-70-76-80-84 stitches on a thread for the sleeve, cast on 8-8-8-8-8-12 stitches under the sleeve and work the last 48-52-56-64-68-68 stitches (= half back piece). Body and sleeves are finished separately. BODY: = 200-224-240-264-280-296 stitches. Continue with pattern A.1 as before with stockinette stitch over the 8-8-8-8-8-12 stitches cast on under each sleeve. A.1 is repeated 23-26-28-31-33-34 times in width on both the front and the back piece. When the body measures 22-23-23-23-23-23 cm = 8¾"-9"-9"-9"-9"-9", change to circular needle size 3.5 mm = US 4 and work rib as follows: Purl over purl and knit over the lace pattern and over the 8-8-8-8-8-12 stockinette stitches under the sleeves work as follows: Purl 1, * knit 2, purl 2 *, work from *-* 1-1-1-1-1-2 times, knit 2 and purl 1. You now have a rib with knit 2, purl 2 over all stitches. When the rib measures 7 cm = 2¾", bind off with knit over knit and purl over purl – read BINDING-OFF TIP! SLEEVE: Place the 60-62-70-76-80-84 stitches from the thread on the one side of the piece on double pointed needles size 4.5 mm = US 7 and knit up 1 stitch in each of the 8-8-8-8-8-12 stitches cast on under the sleeve = 68-70-78-84-88-96 stitches. Insert a marker in the middle of the new stitches under the sleeve. This will be used when decreasing under the sleeve. Work stockinette stitch in the round. When the piece measures 3 cm = 1⅛" from the division, decrease 1 stitch on each side of the marker – read DECREASE TIP. Repeat this decrease every 6-5-3-2-2-1½ cm = 2⅜"-2"-1⅛"-¾"-¾"-½" a total of 5-5-8-10-11-14 times = 58-60-62-64-66-68 stitches. Continue with stockinette stitch until the body measures 33-32-31-30-30-28 cm = 13"-12½"-12¼"-11¾"-11¾"-11" from the division. Knit 1 round where you increase 18-16-18-16-18-16 stitches evenly spaced = 76-76-80-80-84-84 stitches. Change to circular needle size 3.5 mm = US 4. Work rib (= knit 2, purl 2) for 5 cm = 2". Bind off with knit over knit and purl over purl – remember BINDING-OFF TIP. Work the other sleeve in the same way. ASSEMBLY: Fold the neck double to the inside and sew down. To avoid the neck being tight and rolling outwards, it is important that the seam is elastic. |
||||||||||||||||||||||||||||
Diagram explanations |
||||||||||||||||||||||||||||
|
||||||||||||||||||||||||||||
 |
||||||||||||||||||||||||||||
 |
||||||||||||||||||||||||||||
Have you finished this pattern?Tag your pictures with #dropspattern #followthefjordsweater or submit them to the #dropsfan gallery. Do you need help with this pattern?You'll find 27 tutorial videos, a Comments/Questions area and more by visiting the pattern on garnstudio.com. © 1982-2026 DROPS Design A/S. We reserve all rights. This document, including all its sub-sections, has copyrights. Read more about what you can do with our patterns at the bottom of each pattern on our site. |
||||||||||||||||||||||||||||


With over 40 years in knitting and crochet design, DROPS Design offers one of the most extensive collections of free patterns on the internet - translated to 17 languages. As of today we count 325 catalogs and 12298 patterns - 12288 of which are translated into English (US/in).
We work hard to bring you the best knitting and crochet have to offer, inspiration and advice as well as great quality yarns at incredible prices! Would you like to use our patterns for other than personal use? You can read what you are allowed to do in the Copyright text at the bottom of all our patterns. Happy crafting!
Post a comment to pattern DROPS 215-21
We would love to hear what you have to say about this pattern!
If you want to leave a question, please make sure you select the correct category in the form below, to speed up the answering process. Required fields are marked *.