
Popular categories
Looking for a yarn?


Comments / Questions (48)
![]() Mani wrote:
Mani wrote:
Où puis-je trouver le diagramme A1 svp?
26.02.2025 - 22:53DROPS Design answered:
Bonjour Mani, vous trouverez le diagramme A.1 à droite du schéma des mesures, sous la manche. Bon tricot!
27.02.2025 - 11:11
![]() Katharina wrote:
Katharina wrote:
Liebes Drops-Team, wird A1 in jeder Runde von rechts nach links gestrickt bis die erforderliche Höhe erreicht ist? Wird A2 dann ebenso immer von rechts gestrickt? Liebe Grüße, Katharina
17.01.2025 - 13:02DROPS Design answered:
Liebe Katharina, A.1 wird bei der Halsblende gestrickt bis die Arbeit 5 cm misst. A.2 wird nur einmal in der Höhe gestrickt. Diagramme liest man in jeder Runde rechts nach links (alle Reihen sind im Diagram gezeichnet). Viel Spaß beim Stricken!
17.01.2025 - 13:29
![]() Emilie Toure wrote:
Emilie Toure wrote:
Hoe kan ik de draden het beste afhechten? Ze zijn dik met Drops Snow.
06.12.2024 - 09:08DROPS Design answered:
Dag Emilie,
Je zou ze af kunnen hechten zoals je normaliter gewend bent, maar je kunt de draden ook in tweeën splitsen en elk een verschillende kant uit wegwerken, zodat het wat minder dik is.
11.12.2024 - 09:49
![]() Cecilia wrote:
Cecilia wrote:
Hi! Is there any video that can help me understand better how to split the body from the sleeves and the cast on of additional stitches to the sleeves? Thank you!
04.11.2024 - 08:40DROPS Design answered:
Sure Cecilia, you get this video and even this lesson where we show how to work a jumper top down, in both links you will see raglan jumpers but when dividing technique will be the same for a round yoke as here. Happy knitting!
04.11.2024 - 14:34
![]() Cecilia wrote:
Cecilia wrote:
Hi! When deciding on the size to knit, if the wearer has a much bigger waist/tummy than breast, the measurement should take from the waist, to have a more comfortable fit?
01.11.2024 - 04:54DROPS Design answered:
Dear Cecilia, to find your size, measure a similar garment you have and like the shape and compare these measurements to the ones in the chart at the bottom of the pattern; this is the most appropriate way to find out your size. Read more here. Happy knitting!
01.11.2024 - 09:58
![]() Cecilia wrote:
Cecilia wrote:
Hi! Just wondering if we want to increase without creating holes, wouldn't knit/purl front & back be better? I notice that even with a twisted knit/purl for the yarn over stitch, there will still be a small hole created, unless that is the design intent.
01.11.2024 - 04:39DROPS Design answered:
Dear Cecilia, there are different techniques to increase avoiding holes, our design team often use the technique with yarn overs worked twisted on next round, feel free to use any technique you like. Happy knitting!
01.11.2024 - 09:57
![]() Cathrine wrote:
Cathrine wrote:
Det verkar vara ett fel i mönstret. När man börjar med det senare mönstret som ser ut som ett ax, så behöver flätorna börja tvärtemot: först 2 maskor på hjälpsticka framför arbetet, efter avigmaskan så blir det 2 maskor på hjälpsticka bakom arbetet. Annars trevligt mönster att sticka.
29.04.2024 - 15:12
![]() Monique wrote:
Monique wrote:
Easy pattern top down, simple construction, easy to understand, turned out amazing, highly recommend that for a beginner, TV knitting project,
01.02.2024 - 18:25
![]() Elina wrote:
Elina wrote:
Hei ohjeesta puuttuu a1 kuvallinen osio. Mistä sen saisi?
07.02.2022 - 19:26DROPS Design answered:
Hei, piirros A.1 löytyy mittapiirroksen oikealta puolelta.
14.02.2022 - 17:55
![]() Annika wrote:
Annika wrote:
Hej, det står att man ska sticka enligt diagram A1, men det finns inte i mönstret, endast diagram A2 finns.
22.10.2021 - 18:57DROPS Design answered:
Hei Annika. Om du ser under ermet på målskissen finner du diagram A.1. mvh DROPS Design
25.10.2021 - 08:23
|
|||||||||||||||||||||||||
Harvest Queen#harvestqueensweater |
|||||||||||||||||||||||||
 |
 |
||||||||||||||||||||||||
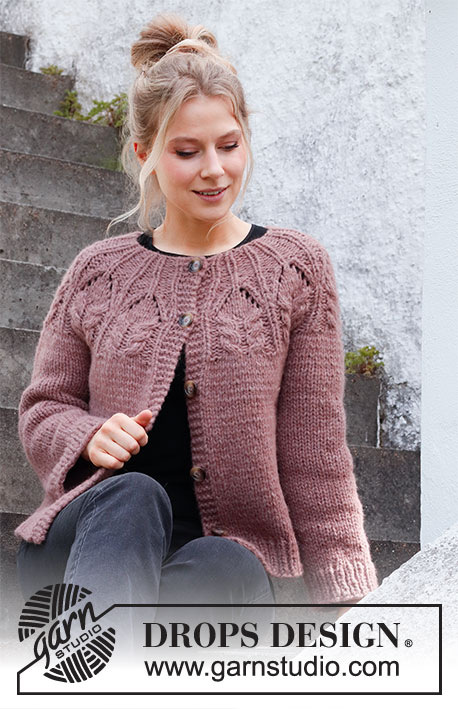
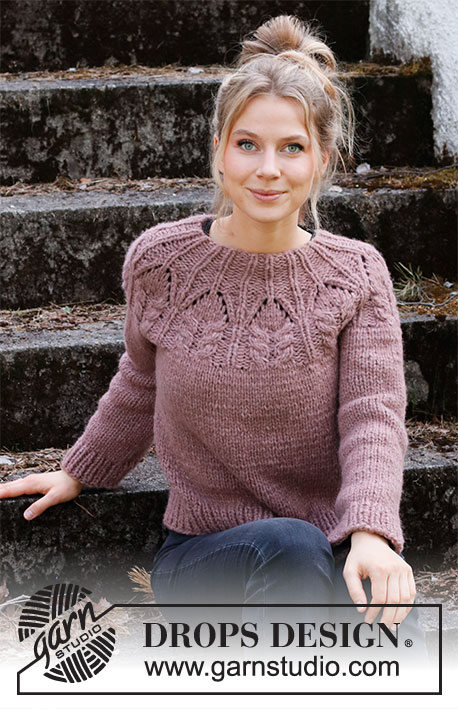
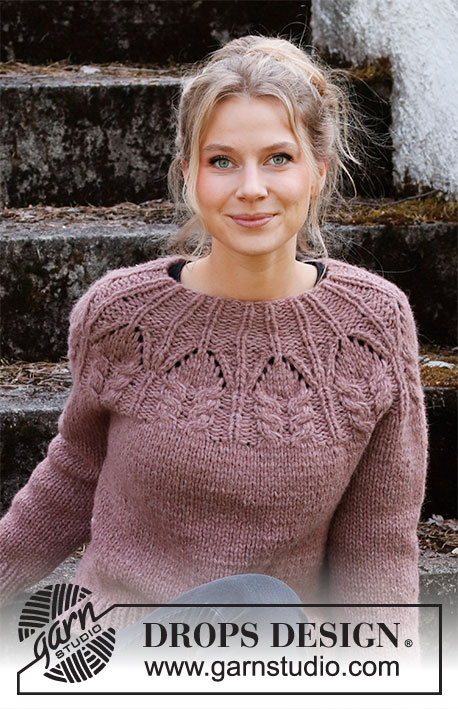
Knitted sweater in 2 strands DROPS Air or 1 strand Snow. The piece is worked top down with round yoke, lace pattern and cables. Sizes XS - XXL.
DROPS 218-1 |
|||||||||||||||||||||||||
|
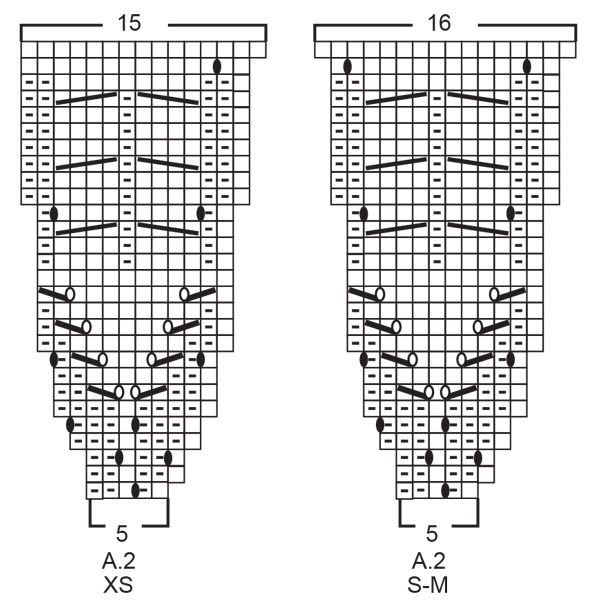
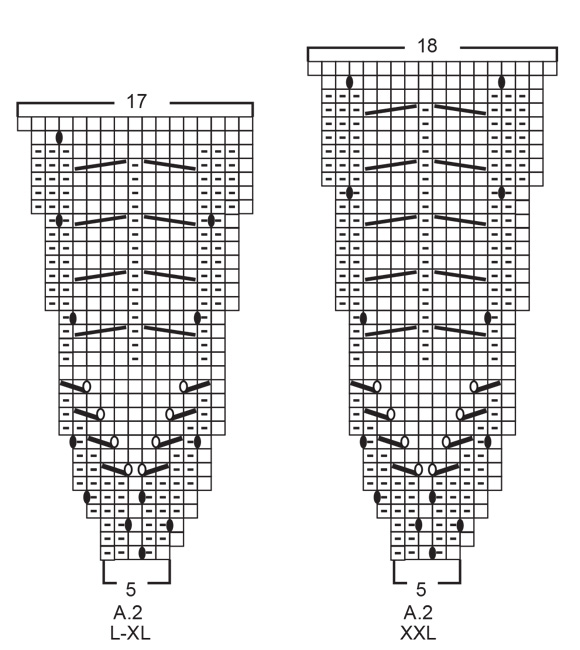
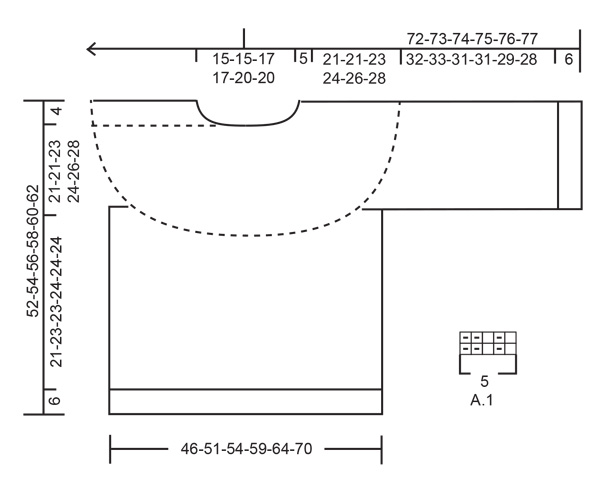
------------------------------------------------------- EXPLANATIONS FOR THE PATTERN: ------------------------------------------------------- PATTERN: See diagrams A.1 and A.2. Choose diagram for your size (applies to A.2). INCREASE TIP (evenly spaced): To work out how to increase evenly, count the total number of stitches on the needle (e.g. 144 stitches) and divide by the number of increases to be made (e.g. 5) = 28.8. In this example, increase by making 1 yarn over after approx. each 29th stitch. On the next round work the yarn overs twisted to avoid holes. DECREASE TIP (for sleeves in sizes L-XL-XXL): Decrease 1 stitch on either side of the marker thread as follows: Work until there are 3 stitches left before the marker thread, knit 2 together, knit 2 (marker thread sits between these 2 stitches), slip 1 stitch as if to knit, knit 1 and pass the slipped stitch over the knitted stitch (2 stitches decreased). BINDING-OFF TIP: To avoid the bind-off edge being tight you can bind off with a larger size needle. If the edge is still tight, make 1 yarn over after approx. each 4th stitch at the same time as binding off; the yarn overs are bind off as normal stitches. ------------------------------------------------------- START THE PIECE HERE: ------------------------------------------------------- SWEATER – SHORT OVERVIEW OF THE PIECE: The neck and yoke are worked in the round with circular needle, from mid back and top down. The yoke is divided for body and sleeves and the body is continued in the round with circular needle. The sleeves are worked with short circular needle, top down. NECK: Cast on 45-45-50-50-55-55 stitches with circular needle size 8 mm = US 11 and 2 strands Air or 1 strand Snow. Knit 1 round. Then work A.1 (= 5 stitches) over all stitches (= 9-9-10-10-11-11 times in width). Continue like this for 5 cm = 2". Insert 1 marker at the beginning of the round; the yoke is measured from this marker! YOKE: Change to circular needle size 9 mm = US 12. Work A.2 (= 9-9-10-10-11-11 repeats of 5 stitches). Continue the pattern as shown in A.2. REMEMBER THE KNITTING GAUGE! When A.2 has been completed in height there are 135-144-160-170-187-198 stitches on the needle. The piece measures approx. 20-20-20-23-23-26 cm = 8"-8"-8"-9"-9"-10¼" from the marker on the neck. Knit 1 round where you increase 0-5-0-0-0-5 stitches evenly spaced – read INCREASE TIP = 135-149-160-170-187-203 stitches. Work stockinette stitch until the piece measures 21-21-23-24-26-28 cm = 8¼"-8¼"-9"-9½"-10¼"-11" from the marker on the neck. Now divide the yoke for the body and sleeves on the next round as follows: Work as before over the first 20-23-25-27-29-32 stitches (= half back piece), place the next 26-28-30-32-36-38 stitches on 1 thread for the sleeve, cast on 4-4-4-6-6-6 new stitches on the needle (= in side under the sleeve), work the next 43-47-50-52-57-63 stitches (= front piece), place the next 26-28-30-32-36-38 stitches on 1 thread for the sleeve, cast on 4-4-4-6-6-6 new stitches on the needle (= in side under the sleeve) and work the remaining 20-23-25-27-29-32 stitches (= half back piece). Body and sleeves are finished separately. BODY: = 91-101-108-118-127-139 stitches. Work stockinette stitch. When the piece measures 21-23-23-24-24-24 cm = 8¼"-9"-9"-9½"-9½"-9½" from the division (there is approx. 6 cm = 2⅜" to finished length; try the sweater on and work to desired length), knit 1 round where you increase 11-11-12-12-11-11 stitches evenly spaced - remember INCREASE TIP = 102-112-120-130-138-150 stitches. Change to circular needle size 8 mm = US 11. Work rib (= purl 1, knit 1) for 6 cm = 2⅜". Bind off with knit over knit and purl over purl - read BINDING-OFF TIP! The sweater measures approx. 52-54-56-58-60-62 cm = 20½"-21¼"-22"-22¾"-23⅝"-24⅜" from the shoulder down. SLEEVE: Place the 26-28-30-32-36-38 stitches from the thread on the one side of the piece on short circular needle size 9 mm = US 13 and knit up 1 stitch in each of the 4-4-4-6-6-6 stitches cast on under the sleeve = 30-32-34-38-42-44 stitches. In the 3 largest sizes, insert a marker thread in the middle of the 6 stitches under the sleeve. It will be used when decreasing under the sleeve. Work stockinette stitch in the round. When the sleeve measures 5 cm = 2" from the division, decrease 0-0-0-1-1-1 stitch on each side of the marker – read DECREASE TIP. Decrease like this every 7 cm = 2⅜" a total of 0-0-0-2-3-3 times = 30-32-34-34-36-38 When the sleeve measures 32-33-31-31-29-28 cm = 12½"-13"-12¼"-12¼"-11⅜"-11" from the division, knit 1 round where you increase 6 stitches evenly spaced = 36-38-40-40-42-44 stitches. Change to short circular needle size 8 mm = US 11 and work rib (= knit 1, purl 1) for 6 cm = 2⅜". Bind off with knit over knit and purl over purl. The sleeve measures approx. 38-39-37-37-35-34 cm = 15"-15¼"-14½"-14½"-13¾"-13⅜" from the division. Work the other sleeve in the same way. |
|||||||||||||||||||||||||
Diagram explanations |
|||||||||||||||||||||||||
|
|||||||||||||||||||||||||
 |
|||||||||||||||||||||||||
 |
|||||||||||||||||||||||||
 |
|||||||||||||||||||||||||
Have you finished this pattern?Tag your pictures with #dropspattern #harvestqueensweater or submit them to the #dropsfan gallery. Do you need help with this pattern?You'll find 26 tutorial videos, a Comments/Questions area and more by visiting the pattern on garnstudio.com. © 1982-2026 DROPS Design A/S. We reserve all rights. This document, including all its sub-sections, has copyrights. Read more about what you can do with our patterns at the bottom of each pattern on our site. |
|||||||||||||||||||||||||


With over 40 years in knitting and crochet design, DROPS Design offers one of the most extensive collections of free patterns on the internet - translated to 17 languages. As of today we count 324 catalogs and 12291 patterns - 12281 of which are translated into English (US/in).
We work hard to bring you the best knitting and crochet have to offer, inspiration and advice as well as great quality yarns at incredible prices! Would you like to use our patterns for other than personal use? You can read what you are allowed to do in the Copyright text at the bottom of all our patterns. Happy crafting!
Post a comment to pattern DROPS 218-1
We would love to hear what you have to say about this pattern!
If you want to leave a question, please make sure you select the correct category in the form below, to speed up the answering process. Required fields are marked *.