
Popular categories
Looking for a yarn?


Comments / Questions (36)
![]() Marie wrote:
Marie wrote:
How many stitches do you start with when you are at row 9 of the A1 chart if you are in size medium for men/women?
07.03.2024 - 01:14DROPS Design answered:
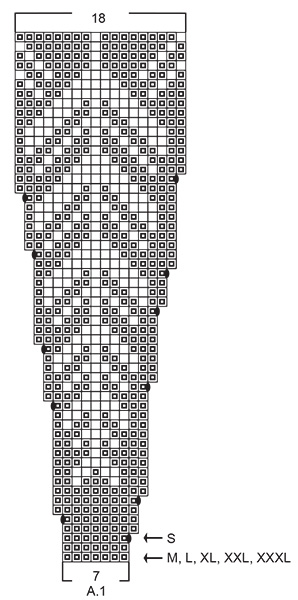
Hi Marie, On row 9 in A.1 you should have 97 + 51 = 148 stitches on the round: 17 repeats of A.1 in width x 3 increased stitches in each repeat during the 9 rounds = 51 increased stitches. Happy knitting!
07.03.2024 - 07:05
![]() Maija Kunnari wrote:
Maija Kunnari wrote:
Hei, ko. ohjeessa pääntien resorin jälkeen pitää kaventaa 19s, neuloa yksi kerros oikein ja lisätä 22s... Mikä idea on ensin kaventaa ja sitten lisätä...vai onko tässä virhe?
14.02.2024 - 14:24DROPS Design answered:
Hei, tällä tavoin pääntien reunuksen ja kaarrokkeen rajakohdasta tulee siisti.
03.04.2024 - 17:52
![]() Albrecht wrote:
Albrecht wrote:
The measurements in this pattern dont work at all. I made it once in XL and it turned out much to big. I ripped it and worked again in L and it turned out far too small... I wasted over 2 years and now i have a pile of worn out yarn that is not useable anymore. Thanks for nothing.
17.01.2024 - 23:26
![]() Andrea wrote:
Andrea wrote:
Good morning, Is the kinitting tension 21X28=10X10cm intended after blocking (washed and dried)? Thank you
14.09.2023 - 10:00DROPS Design answered:
Dear Andrea, we don't block anything, but should you have a difference between/after, then just block it - so that you will get the finished measurements in the chart. Happy knitting!
14.09.2023 - 17:10
![]() Diana Hellström wrote:
Diana Hellström wrote:
Hej, har kommit till ärmhålen. Lagt upp 10m på var sida. Markör i mitten. Har stickat runt i 2 cm. Ska jag nu fortsätta sticka runt eller ska man sticka framstycket för sig och bakstycket för sig , alltså dela fram och bakstyckena? och öka 2 m på vardera sida av markören i ärmen? Mvh Diana
15.03.2023 - 18:27DROPS Design answered:
Hej Diana. Du ska fortsätta att sticka fram- och bakstycket runt (alltså inte dela på de). När fram- och bakstycket är färdigt så stickar du ärmarna. Mvh DROPS Design
16.03.2023 - 10:50
![]() Kari Pauline wrote:
Kari Pauline wrote:
Prøver å strikke Inner Circle genser i størrelse M.Må omtrent gjette meg til det meste med økinger og fellinger. Nesten ikke et tall som er oppgitt som stemmer. Det begynner med at det skal felles til 97 masker. 2 rette og 2 vrange kan jo ikke gå opp i 97.Det siste er at jeg skal øke 40 masker før jeg strikker vrangborden nede på genseren. Har aldri hørt at man øker før man strikker vrangborden på en vanlig genser. Syntes dere bør gå igjennom oppskriften før dere legger den ut.
04.04.2022 - 14:48
![]() Gerda Van Den Bergh-Huibers wrote:
Gerda Van Den Bergh-Huibers wrote:
Goedemiddag, ik ben met deze trui nog bezig en moet nog de mouwen. Maar als mijn man hem aan heeft, trekt het onder de armen. Hoe kan ik dit oplossen. Kan ik extra steken opnemen wanneer ik ze onder de arm moet opnemen om weer verder te gaan? Of hoe krijg ik misschien op een andere manier meer ruimte? Ik hoor heel graag een reactie. Vriendelijke groet, Gerda vd Bergh
01.02.2022 - 13:28DROPS Design answered:
Dag Gerda,
Begrijp ik dat het te strak zit om de arm ter hoogte van de oksel? Ja, dan zou ik inderdaad proberen meer steken onder de arm op te nemen, maar ook vlak daarnaast, zodat de extra steken wat verdeeld zijn.
02.02.2022 - 09:12
![]() Marianne Sandberg wrote:
Marianne Sandberg wrote:
Jag stickar fram och bakstycke. Jag ska nu sticka slätstickning. När jag kommer till de 8 "nya" maskorna, ska jag sticka dem också eller gör man på ngt annat sätt? MVH: Marianne Sandberg
16.12.2021 - 17:42DROPS Design answered:
Hej Marianne. Ja de stickar du i slätstickning som resten av oket. Mvh DROPS Design
17.12.2021 - 08:01
![]() Marianne Sandberg wrote:
Marianne Sandberg wrote:
Tack för att du svarade så fort! Jag är fortfarande osäker på mönstret 208-11. När jag börjar sticka med 2 färger gör jag ett omslag och därefter 7 maskor varvet ut. Stämmer det? Jag kallar det för första varvet. Nästa varv stickas som vanligt, utan ngn ökning, stämmer det? Tredje varvet stickas 8 maskor och sedan omslag, hela varvet ut. Är det så? MVH: Marianne Sandberg
24.11.2021 - 10:10DROPS Design answered:
Hej Marianne. Ja det stämmer. Det du kallar första varvet är alltså där det är en pil och står S (du börjar med 2 färger först senare i diagrammet). Mvh DROPS Design
25.11.2021 - 08:25
![]() Marianne Sandberg wrote:
Marianne Sandberg wrote:
Hej! Jag stickar herrtröja 208-11 i stl. S. Jag har stickat halskant och ska börja med oket. När jag kommit så långt att jag ska sticka mönstret, får jag 20 rapporter, det ska vara 16 st. Har jag för många maskor? Ska jag bara öka 1 gång på första varvet när mönstret börjar? Jag har ökat var sjunde maska!! MVH: Marianne Sandberg
22.11.2021 - 14:59DROPS Design answered:
Hej Marianne. Det stämmer att du ska öka i början av varje rapport (dvs omslag, 7 m, omslag.. osv). När första varvet är stickat har du ökat 16 m och har då 128 m på varvet. Nästa varv består en rapport av 8 maskor. 128 m / 8 m = 16 rapporter. Du ska alltså fortfarande ha 16 rapporter på varvet. Mvh DROPS Design
23.11.2021 - 08:43
|
|||||||||||||
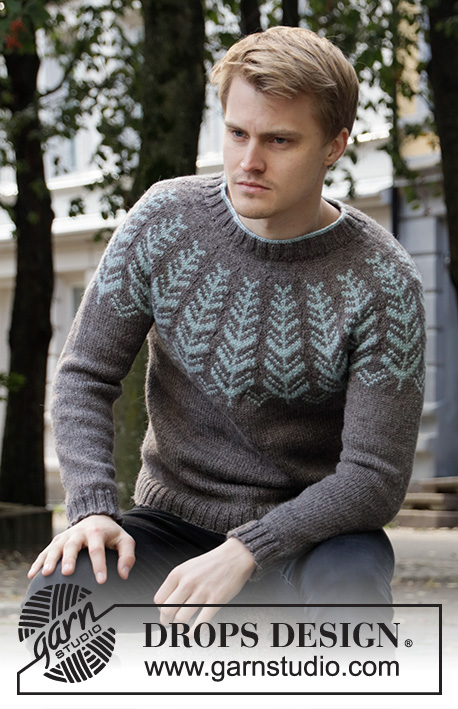
Inner Circle#innercirclesweater |
|||||||||||||
 |
 |
||||||||||||
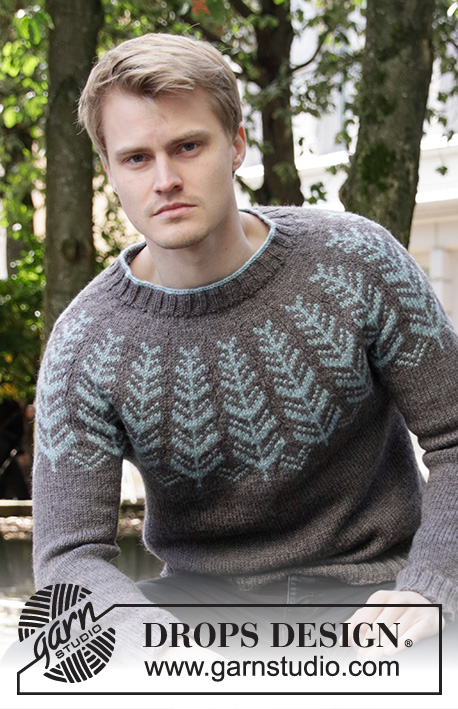
Knitted sweater for men with round yoke in DROPS Karisma. The piece is worked top down with Nordic pattern. Sizes S - XXXL.
DROPS 208-11 |
|||||||||||||
|
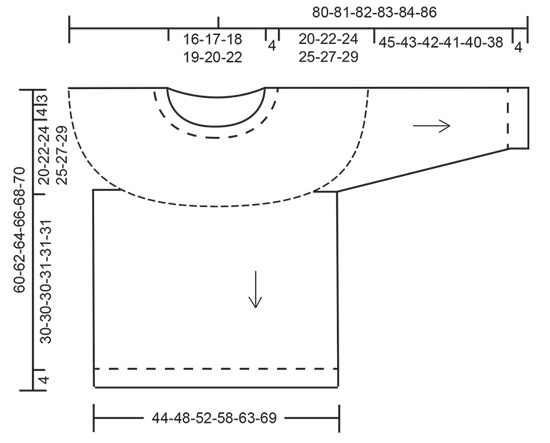
------------------------------------------------------- EXPLANATIONS FOR THE PATTERN: ------------------------------------------------------- PATTERN: See diagram A.1. All stitches are worked in stockinette stitch. KNITTING TIP (for two-colored pattern): To avoid the knitting gauge becoming tight when working patter, it is important the strands at the back are not tight. ELEVATION: Insert a marker thread in the first stitch on the round (= mid back). Start from the right side and knit 11-11-12-13-13-14 stitches, turn, tighten the strand and purl 22-22-24-26-26-28 stitches back. Turn, tighten the strand and knit 33-33-36-39-39-42, turn, tighten the strand and purl 44-44-48-52-52-56. Turn, tighten the strand and knit 55-55-60-65-65-70, turn, tighten the strand and purl 66-66-72-78-78-84, turn, tighten the strand and knit back to the beginning of the round. DECREASE/INCREASE TIP (evenly spaced): To work out how to decrease/increase evenly, count the total number of stitches on needle (e.g. 108 stitches), and divide by number of decreases/increases to be made (e.g. 16) = 6.8. In this example, decrease by working together approx. each 6th and 7th stitch. When increasing, make 1 yarn over after approx. each 7th stitch. On the next round work the yarn overs twisted to avoid holes. INCREASE TIP-1 (for sides of body): Work until there are 2 stitches left before the marker thread, make 1 yarn over, knit 4 (marker thread sits between these 4 stitches) make 1 yarn over (= 2 stitches increased). On the next round knit the yarn overs twisted to avoid holes. DECREASE TIP (for sleeves): Decrease 1 stitch on each side of the marker thread as follows: Work until there are 3 stitches left before the marker thread, knit 2 together, knit 2 (marker thread sits between these 2 stitches), slip 1 stitch as if to knit, knit 1 and pass the slipped stitch over the knitted stitch. ------------------------------------------------------- START THE PIECE HERE: ------------------------------------------------------- SWEATER – SHORT OVERVIEW OF THE PIECE: The piece is worked in the round with circular needle, from mid back and top down. The sleeves are worked in the round with double pointed needle/ short circular needle, top down. NECK: Cast on 108-116-120-124-128-132 stitches with circular needle size 3 mm = US 2,5 and light grey green. Knit 1 round. Change to beige brown and work rib (knit 2, purl 2) for 4 cm = 1½". Knit 1 round where you decrease 16-19-19-20-20-20 stitches evenly spaced – read DECREASE/INCREASE TIP = 92-97-101-104-108-112 stitches. Knit 1 round where you increase 20-22-32-36-39-42 stitches evenly spaced = 112-119-133-140-147-154 stitches. Change to circular needle size 4 mm = US 6. For a better fit you can work an elevation so the neck is slightly higher at the back. The elevation can be left out; the neck will then be the same front and back – read ELEVATION. YOKE: Now work pattern A.1 (= 7 stitches) 16-17-19-20-21-22 repeats on the round (start with your size in the diagram) - read KNITTING TIP and REMEMBER THE KNITTING GAUGE! Continue this pattern in the round. When A.1 has been completed in height there are 288-306-342-360-378-396 stitches on the needle and the piece measures approx. 23-24-24-24-24-24 cm = 9"-9½"-9½"-9½"-9½"-9½". Size S: The yoke is finished – continue with ALL SIZES below. Sizes M, L and XL: Continue working stockinette stitch with beige brown until the piece measures 25-27-28 cm = 9¾"-10⅝"-11" from the cast-on edge, AT THE SAME TIME when the piece measures 24-24-24 cm = 9½"-9½"-9½" increase 14-6-20 stitches evenly spaced = 320-348-380 stitches. Continue with ALL SIZES below. Sizes XXL and XXXL: Continue working stockinette stitch with beige brown until the piece measures 30-32 cm = 11¾"-12½" from the cast-on edge, AT THE SAME TIME when the piece measures 24-24 cm = 9½"-9½" increase 11-14 stitches evenly spaced and when the piece measures 27-29 cm = 10⅝"-11⅜" increase 11-14 stitches evenly spaced = 400-424 stitches. ALL SIZES: The next round is worked as follows: Work 42-46-50-56-60-65 stitches as before (= half back piece), place the next 60-68-74-78-80-82 stitches on 1 thread for the sleeve, cast on 8-8-10-10-12-14 new stitches on the needle (= in side under the sleeve), work 84-92-100-112-120-130 stitches (= front piece), place the next 60-68-74-78-80-82 stitches on 1 thread for the sleeve, cast on 8-8-10-10-12-14 new stitches on the needle (= in side under the sleeve) and work the remaining 42-46-50-56-60-65 stitches as before (= half back piece). Body and sleeves are finished separately. THE PIECE IS NOW MEASURED FROM HERE! BODY: = 184-200-220-244-264-288 stitches. Insert a marker thread in the middle of the 8-8-10-10-12-14 new stitches cast on under each sleeve (= 92-100-110-122-132-144 stitches between the threads on both the front and back pieces. Work stockinette stitch in the round with beige brown. When the piece measures 30-30-30-31-31-31 cm = 11¾"-11¾"-11¾"-12¼"-12¼"-12¼" from the division, knit 1 round where you increase 40 stitches evenly spaced = 224-240-260-284-304-328 stitches. Change to circular needle size 3 mm = US 2,5 and work rib (knit 2, purl 2) for 4 cm = 1½". Bind off with knit over knit and purl over purl. The sweater measures approx. 60-62-64-66-68-70 cm = 23⅝"-24⅜"-25¼"-26"-26¾"-27½" from the shoulder down. SLEEVE: Place the 60-68-74-78-80-82 stitches from the thread on the one side of the piece on short circular needle size 4 mm = US 6 and knit up 1 stitch in each of the 8-8-10-10-12-14 stitches cast on under the sleeve = 68-76-84-88-92-96 stitches. Insert a marker thread in the middle of the 8-8-10-10-12-14 stitches under the sleeve. Work stockinette stitch in the round with beige brown. When the piece measures 5-3-4-5-5-3 cm = 2"-1⅛"-1½"-2"-2"-1⅛" from the division decrease 2 stitches mid under the sleeve – read DECREASE TIP. Decrease like this every 5-4-3-3-2.5-2.5 cm = 2"-1½"-1⅛"-1⅛"-⅞"-⅞" a total of 8-10-12-12-14-14 times = 52-56-60-64-64-68 stitches. When the sleeve measures 45-43-42-41-40-38 cm = 17¾"-17"-16½"-16⅛"-15¾"-15" from the division (shorter measurements in the larger sizes due to longer yoke), change to double pointed needles size 3 mm = US 2,5 and work rib (= knit 2, purl 2) for 4 cm = 1½". Bind off with knit over knit and purl over purl but to avoid the bind-off edge being tight, make 1 yarn over after each 4th stitch (yarn overs bind off as normal stitches). The sleeve measures approx. 49-47-46-45-44-42 cm = 19¼"-18½"-18"-17¾"-17¼"-16½" from the division. Work the other sleeve in the same way. |
|||||||||||||
Diagram explanations |
|||||||||||||
|
|||||||||||||
 |
|||||||||||||
 |
|||||||||||||
Have you finished this pattern?Tag your pictures with #dropspattern #innercirclesweater or submit them to the #dropsfan gallery. Do you need help with this pattern?You'll find 27 tutorial videos, a Comments/Questions area and more by visiting the pattern on garnstudio.com. © 1982-2026 DROPS Design A/S. We reserve all rights. This document, including all its sub-sections, has copyrights. Read more about what you can do with our patterns at the bottom of each pattern on our site. |
|||||||||||||


With over 40 years in knitting and crochet design, DROPS Design offers one of the most extensive collections of free patterns on the internet - translated to 17 languages. As of today we count 324 catalogs and 12290 patterns - 12280 of which are translated into English (US/in).
We work hard to bring you the best knitting and crochet have to offer, inspiration and advice as well as great quality yarns at incredible prices! Would you like to use our patterns for other than personal use? You can read what you are allowed to do in the Copyright text at the bottom of all our patterns. Happy crafting!
Post a comment to pattern DROPS 208-11
We would love to hear what you have to say about this pattern!
If you want to leave a question, please make sure you select the correct category in the form below, to speed up the answering process. Required fields are marked *.