Inner Circle by DROPS Design

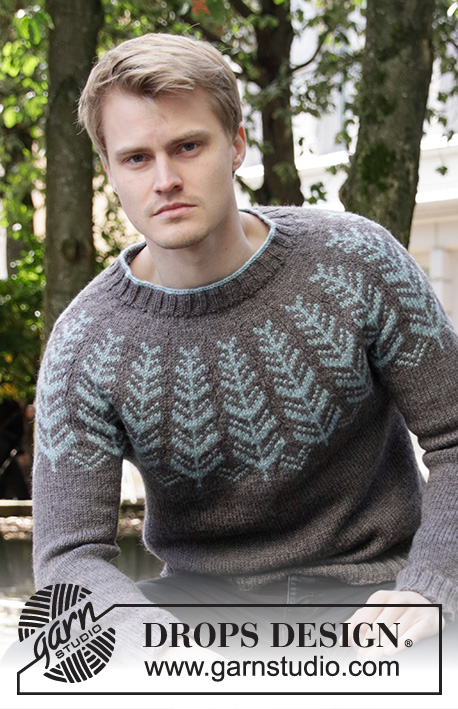
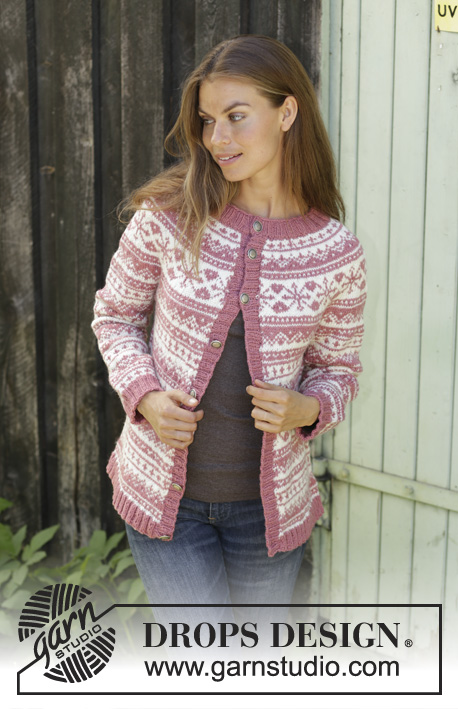
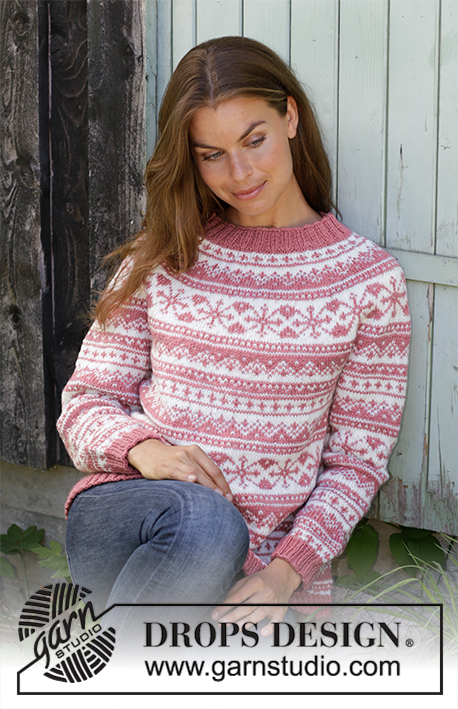
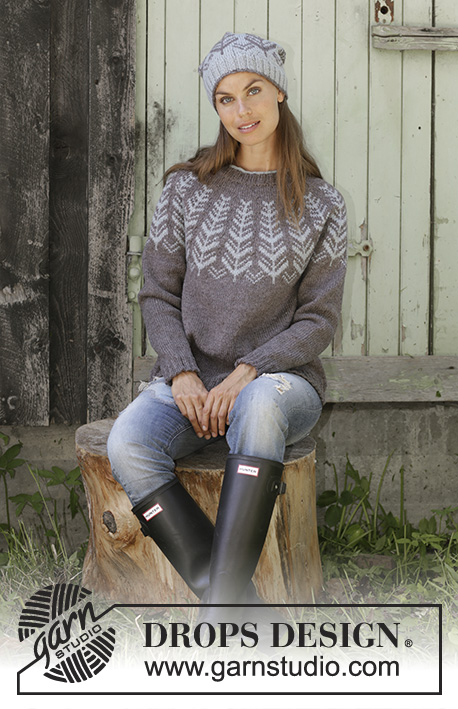
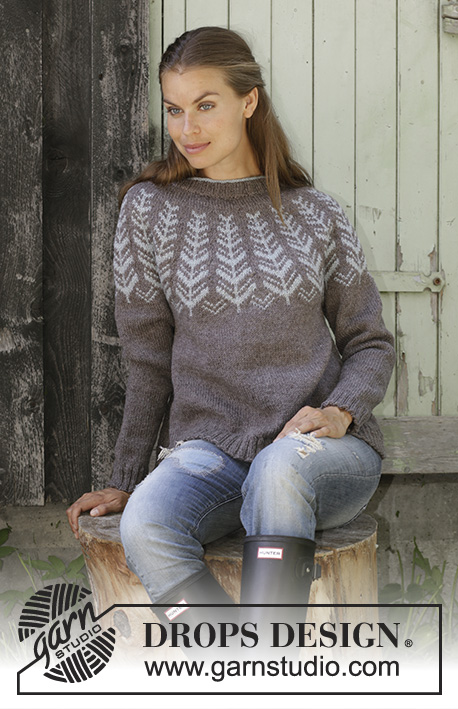
Knitted sweater with round yoke in DROPS Karisma or DROPS Merino Extra Fine. Piece is knitted top down with Nordic pattern. Size: S - XXXL Knitted hat in DROPS Karisma or DROPS Merino Extra Fine. Piece is knitted in the round with Nordic pattern.

DROPS 196-23
DROPS design: Pattern u-869
Yarn group B
----------------------------------------------------------

YARN FOR THE ENTIRE SET:
Size: S - M - L - XL - XXL – XXXL
Head circumference: 56/58 cm = 22"/22 1/4"
Materials:
DROPS KARISMA from Garnstudio (belongs to yarn group B)
500-550-600-650-750-800 g color no 54, beige brown
150-200-200-200-250-250 g color 69, light gray green
Or use:
DROPS MERINO EXTRA FINE from Garnstudio (belongs to yarn group B)
500-550-600-650-700-750 g color 07, light brown
150-200-200-200-200-250 g color 15, light gray green

YARN FOR SWEATER:
Size: S - M - L - XL - XXL - XXXL
Materials:
DROPS KARISMA from Garnstudio (belongs to yarn group B)
500-550-600-650-700-750 g color no 54, beige brown
100-150-150-150-150-200 g color 69, light gray green
Or use:
DROPS MERINO EXTRA FINE from Garnstudio (belongs to yarn group B)
450-500-550-600-650-750 g color 07, light brown
100-100-150-150-150-150 g color 15, light gray green

YARN FOR HAT:
Size: One-size
Head circumference: approx. 56/58 cm = 22"/22 3/4"
Materials:
DROPS KARISMA from Garnstudio (belongs to yarn group B)
50 g color 54, beige brown
100 g color 69, light gray green
Or use:
DROPS MERINO EXTRA FINE from Garnstudio (belongs to yarn group B)
50 g color 07, light brown
100 g color 15, light gray green

----------------------------------------------------------
ACCESSORIES FOR THE PIECE:

SWEATER:

KNITTING GAUGE:
21 stitches in width and 28 rows vertically in stockinette stitch = 4'' x 4'' (10 x 10 cm).

NEEDLES:
DROPS DOUBLE POINTED NEEDLES size 4 mm / US 6 for stockinette stitch
DROPS CIRCULAR Needle size 4 mm / US 6, length 40 and 80 cm / 16'' and 32'' for stockinette stitch.
DROPS DOUBLE POINTED NEEDLES size 3 mm / US 2.5: for rib
DROPS CIRCULAR Needle size 3 mm / US 2.5, length 80 cm / 32" for rib.
Needle size is only a suggestion! If you have too many stitches on 10 cm / 4'' switch to larger needles. If you have too few stitches on 10 cm / 4'' switch to smaller needles.

HAT:

KNITTING GAUGE:
21 stitches in width and 28 rows vertically in stockinette stitch = 4'' x 4'' (10 x 10 cm).

NEEDLES:
DROPS DOUBLE POINTED NEEDLES size 4 mm / US 6 for stockinette stitch
DROPS CIRCULAR Needle size 4 mm / US 6, length 40 cm for stockinette stitch.
DROPS CIRCULAR Needle size 3 mm / US 2.5, length 40 cm for rib.
Needle size is only a suggestion! If you have too many stitches on 10 cm / 4'' switch to larger needles. If you have too few stitches on 10 cm / 4'' switch to smaller needles.

-------------------------------------------------------
Color combinations shown are:
A) DROPS Karisma 21, 16
B) DROPS Merino Extra Fine 5, 13
C) DROPS Karisma 56, 11
D) DROPS Merino Extra Fine 6, 7
-------------------------------------------------------

-------------------------------------------------------

Knitting tension – See how to measure it and why here
Alternative Yarn – See how to change yarns here
Yarn Groups A to F – Use the same pattern and change the yarn here
Yarn usage using an alternative yarn – Use our yarn converter here

-------------------------------------------------------


100% Wool
from 3.00 $ /50g
DROPS Karisma uni colour DROPS Karisma uni colour 3.00 $ /50g
Wool Warehouse Direct Ltd
Order
DROPS Karisma mix DROPS Karisma mix 3.00 $ /50g
Wool Warehouse Direct Ltd
Order
needles DROPS Needles & Hooks
You can get the yarn to make this pattern from 39.00$. Read more.

Pattern instructions

NOTE: This pattern is written in American English. All measurements in charts are in cm. For conversion from inches to cm - click here. There are different terms for crocheting in American and British English. If this pattern includes crochet, click for "crochet terms" here. For this pattern in British English, please click here.
----------------------------------------------------------

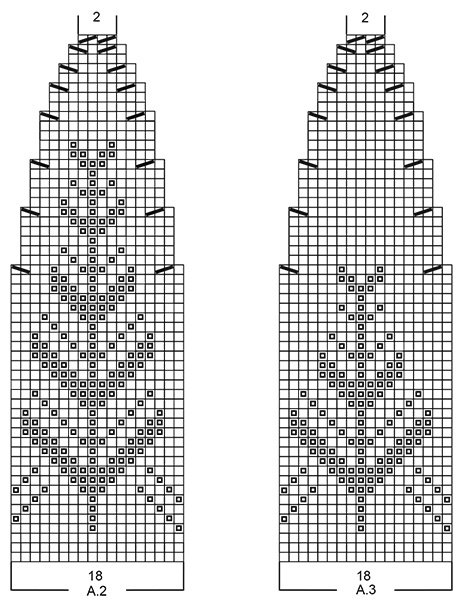
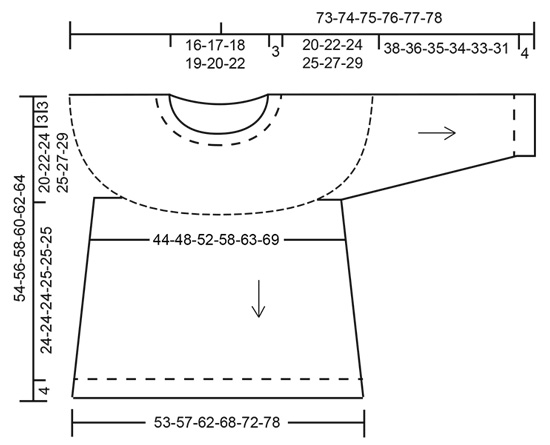
EXPLANATION FOR THE PATTERN:

----------------------------------------------------------

PATTERN: 
Sweater: See diagram A.1.
Hat: See diagrams A.2 and A.3. Choose diagram for desired pattern.
Work all stitches in stockinette stitch.

KNITTING TIP (applies to multi-colored pattern):
To avoid the knitting gauge to tighten when working pattern, it is important not to tighten the strands on back side of piece. Switch to a higher needle number when working pattern if the pattern is somewhat tight.

ELEVATION:
Insert a marker thread in first stitch on round (= mid back). Begin from right side and knit 11-11-12-13-13-14 stitches past marker thread, turn, tighten yarn and purl 22-22-24-26-26-28 stitches. Turn, tighten yarn and knit 33-33-36-39-39-42, turn, tighten yarn and purl 44-44-48-52-52-56. Turn, tighten yarn and knit 55-55-60-65-65-70, turn, tighten yarn and purl 66-66-72-78-78-84, turn and knit until beginning of round.

DECREASE/INCREASE TIP (evenly):
To calculate how to decrease/increase evenly, use the total number of stitches on row (e.g. 108 stitches) and divide stitches by number of decreased/increases to be done (e.g. 16) = 6.8. In this example work approx. every 6th and 7th stitch together.
When increasing make 1 yarn over after every approx. 7th stitch. On next round work yarn overs twisted to avoid holes.

INCREASE TIP (applies to sides of body):
Work until 2 stitches remain before marker thread, make 1 yarn over, knit 4 (marker thread is in the middle of these 4 stitches), make 1 yarn over (= 2 stitches increased). On next round knit yarn overs twisted to avoid holes.

DECREASE TIP (applies to sleeves): 
Decrease 1 stitch on each side of marker thread as follows: Work until 3 stitches remain before marker thread and knit 2 together, knit 2 (marker thread is between these stitches), slip 1 stitch knitwise, knit 1, pass slipped stitch over stitch worked.

----------------------------------------------------------

START THE PIECE HERE:

----------------------------------------------------------

SWEATER - SHORT OVERVIEW OF THE PIECE:
Worked in the round on circular needle from mid back, work top down. Work sleeves in the round on double pointed needles/a short circular needle.

NECK EDGE:
Cast on 108-116-120-124-128-132 stitches on circular needle size 3 mm / US 2.5 with light gray green. Knit 1 round. Switch to beige brown. Now work rib = knit 2/purl 2 until piece measures 3 cm / 1''. Knit 1 round while decreasing 16-19-19-20-20-20 stitches evenly - read DECREASE/INCREASE TIP = 92-97-101-104-108-112 stitches. Knit 1 round while increasing 20-22-32-36-39-42 stitches evenly = 112-119-133-140-147-154 stitches. Switch to circular needle size 4 mm / US 6. For better fit work an elevation at the back of neck so that yoke is somewhat higher on back piece. This elevation can be skipped, to make the neck the same at the front and back - read ELEVATION. 

YOKE:
Now work pattern A.1 (= 7 stitches) 16-17-19-20-21-22 repetitions on round (begin at your size in diagram) - read KNITTING TIP and REMEMBER THE GAUGE! Continue pattern in the round like this. When entire A.1 has been worked vertically there is 288-306-342-360-378-396 stitches on round. Piece should now measure 23-24-24-24-24-24 cm / 9"-9 3/8"-9 3/8"-9 3/8"-9 3/8"-9 3/8".
Size S is now done, continue with next section below.
Continue as follows in size M, L, XL, XXL and XXXL:
Size M, L and XL:
Work in stockinette stitch with beige brown until piece measures 25-27-28 cm / 9 ¾"-10 5/8"-11" from cast-on edge, AT THE SAME TIME when piece measures 24-24-24 cm / 9 3/8"-9 3/8"-9 3/8" increase 14-6-20 stitches evenly = 320-348-380 stitches. Continue with next section below.
Size XXL and XXXL:
Work in stockinette stitch with beige brown until piece measures 30-32 cm / 11 ¾"-12 ½" from cast-on edge, AT THE SAME TIME when piece measures 24-24 cm / 9 3/8"-9 3/8" increase 11-14 stitches evenly and when piece measures 27-29 cm / 10 5/8"-11 3/8" increase 11-14 stitches evenly = 400-424 stitches. Continue with next section.

ALL SIZES:
Work next row as follows: Work 42-46-50-56-60-65 stitches as before (= half back piece), slip the next 60-68-74-78-80-82 stitches on a stitch holder for sleeve, cast on 8-8-10-10-12-14 new stitches on row (= in the side under sleeve), work 84-92-100-112-120-130 stitches (= front piece), slip the next 60-68-74-78-80-82 stitches on a stitch holder for sleeve, cast on 8-8-10-10-12-14 new stitches on row (= in the side under sleeve) and work the 42-46-50-56-60-65 stitches as before (= left front piece). Finish body and sleeves separately. NOW MEASURE PIECE FROM HERE!

BODY:
= 184-200-220-244-264-288 stitches. Insert a marker thread in each side, in the middle of the 8-8-10-10-12-14 new stitches cast on under sleeve in each side = 92-100-110-122-132-144 stitches between marker threads on both front and back piece.
Work stockinette stitch in the round with beige brown. When piece measures 2 cm / 3/4'' from division, increase 1 stitch on each side of both marker threads - read INCREASE TIP (= 4 stitches increased). Increase like this every 6th row (approx. 2 cm / 3/4'') 10 times in total in each side = 224-240-260-284-304-328 stitches. When piece measures 24-24-24-25-25-25 cm / 9 3/8"-9 3/8"-9 3/8"-9 ¾"-9 ¾"-9 ¾" from division, knit 1 round while increasing 60-64-68-72-76-84 stitches evenly = 284-304-328-356-380-412 stitches. Switch to circular needle size 3 mm / US 2.5 and work rib = knit 2/purl 2 for 4 cm / 1½''. Bind off with knit over knit and purl over purl but to avoid at tight bind-off edge make 1 yarn over after every 4th stitch (bind off yarn overs as stitches). Sweater measures approx. 54-56-58-60-62-64 cm / 21¼''-22''-22¾''-23 5/8''-24 3/8''-25¼'' from shoulder and down.

SLEEVE:
Slip the 60-68-74-78-80-82 stitches from stitch holder in one side of piece on a short circular needle size 4 mm / US 6/double pointed needles and pick in addition up 1 stitch in each of the 8-8-10-10-12-14 new stitches cast on under sleeve = 68-76-84-88-92-96 stitches on needle. Insert 1 marker thread in the middle of the 8-8-10-10-12-14 stitches (= mid under sleeve). Work stockinette stitch in the round with beige brown. When piece measures 2 cm / 3/4'' from division, decrease 2 stitches mid under sleeve - read DECREASE TIP. Decrease like this every approx. 8th-6th-5th-4th-4th-4th round 12-15-18-19-20-21 times in total = 44-46-48-50-52-54 stitches. When sleeve measures 38-36-35-34-33-31 cm / 14 7/8"-14 1/8"-13 ¾"-13 3/8"-13"-12 1/8" from division (shorter measurements in the larger sizes because of longer yoke), knit 1 round while increasing 12-14-16-18-20-22 stitches evenly = 54-60-64-68-72-76 stitches. Switch to double pointed needles size 3 mm / US 2.5. Work rib in the round = knit 2/purl 2 for 4 cm / 1½''. Bind off with knit over knit and purl over purl but to avoid at tight bind-off edge make 1 yarn over after every 4th stitch (bind off yarn overs as stitches). Sleeve measures approx. 42-40-39-38-37-35 cm / 16 ½"-15 ¾"-15 ¼"-14 7/8"-14 ½"-13 ¾" from division and down. Work the other sleeve the same way.

----------------------------------------------------------

HAT - SHORT OVERVIEW OF THE GARMENT:
Worked in the round on circular needle. Switch to double pointed needles when needed.
There are 2 different diagrams for hat. If you want pattern with a big tree work according to diagram A.2 and if you want the pattern with a small tree work according to diagram A.3.

Cast on 124 stitches on circular needle size 3 mm / US 2.5 with beige brown. Knit 1 round. Switch to light gray green. Work rib = knit 2/purl 2 for 4 cm / 1½''. Switch to circular needle size 4 mm / US 6, knit 1 round while decreasing 16 stitches evenly - read INCREASE/DECREASE TIP (evenly) = 108 stitches. Now work pattern A.2 or A.3 – choose diagram for large or small tree (= 18 stitches) 6 times in total on round. REMEMBER THE GAUGE! When entire A.2/A.3 have been worked vertically, there are 12 stitches on row. Cut the yarn and pull it through the remaining stitches on needle, tighten tog and fasten. Hat measures approx. 24 cm/9½".

This pattern has been corrected. .

Updated online: 11.09.2018
Correction: INCREASE TIP (for sides of body):..Work until there are 2 stitches left before the marker thread
Updated online: 14.09.2018
ALL SIZES: Work next row as follows

Diagram

All measurements in charts are in cm.

symbols = beige brown
symbols = light grey green
symbols = between 2 stitches make 1 yarn over. On next round knit yarn overs twisted to avoid holes.
symbols = knitting direction
symbols = slip 1 stitch as if to knit, knit 1 stitch and pass slipped stitch over
symbols = knit 2 together
diagram
diagram
diagram

Do you need help with this pattern?

Thank you for choosing a DROPS Design pattern. We take pride in providing patterns that are correct and easy to understand. All patterns are translated from Norwegian and you can always check the original pattern (DROPS 196-23) for measurements and calculations.

Are you having trouble following the pattern? See below for a list of resources to help you finish your project in no time - or why not, learn something new.

signature-image signature

Are you having trouble following the pattern? See below for a list of resources to help you finish your project in no time - or why not, learn something new.

Each of our patterns has specific tutorial videos to help you.

We have also step-by-step guides for different techniques which you'll find here.

1) Why is the knitting/crochet tension so important?

Knitting tension is what determines the final measurements of your work, and is usually measured per 10 x 10 cm. It is provided like so: number of stitches in width x number of rows in height - eg: 19 stitches x 26 rows = 10 x 10 cm.

The knitting tension is very individual; some people knit/crochet loosely while others work tightly. You adjust the knitting tension with the needle size, which is why the suggested needle size only serve as a guide! You need to adjust this (up or down) to ensure that YOUR knitting tension matches the knitting tension provided in the pattern. If you work with a different knitting tension than provided you will have a different yarn consumption, and your work will have different measurements than what the pattern suggests.

The knitting tension also determines which yarns can replace each other. As long as you achieve the same knitting tension you can replace one yarn with another.

See DROPS lesson: How to measure your tension/gauge

See DROPS video: How to make a gauge tension swatch

to top

2) What are the yarn groups?

All our yarns are categorised into yarn groups (from A to F) according to thickness and knitting tension – group A contains the thinnest yarns and group F the thickest. This makes it easier for you to find alternative yarns to our patterns, should you wish to switch yarn. All yarns within the same group have a similar knitting tension and can easily replace each other. However, different yarn qualities have different structures and properties which will give the finished work a unique look and feel.

Click here for an overview of the yarns in each yarn group

to top

3) Can I use a different yarn than what the pattern suggests?

The important thing when changing from one yarn to another is that the knitting/crochet tension remains the same. This is so that the measurements of the finished piece will be the same as on the sketch provided. It is easier to achieve the same knitting tension using yarns from the same yarn group. It is also possible to work with multiple strands of a thinner yarn to achieve the knitting tension of a thicker one. Please try our yarn converter. We recommend you to always work a test swatch.

Please NOTE: when changing yarn the garment might have a different look and feel to the garment in the photo, due to individual properties and qualities of each yarn.

See DROPS lesson: Can I use a different yarn than the one mentioned in the pattern?

to top

4) How do I use the yarn converter?

At the top of all our patterns you’ll find a link to our yarn converter, which is a helpful tool should you wish to use a different yarn than suggested. By filling in the yarn quality you wish to replace, the amount (in your size) and number of strands, the converter will present good alternative yarns with the same knitting tension. Additionally it will tell you how much you’ll require in the new qualities and whether you’ll need to work with multiple strands. Most skeins are 50g (some are 25g or 100g).

If the pattern is worked with multiple colours, every colour will have to be converted separately. Similarly, if the pattern is worked with several strands of different yarns (for example 1 strand Alpaca and 1 strand Kid-Silk) you will have to find alternatives for each, individually.

Click here to see our yarn converter

to top

5) Why do I get the wrong knitting tension with the suggested needle size?

The needle size provided in the pattern serves only as a guide, the important thing is to follow the knitting tension. And since knitting tension is very individual, you will have to adjust the needle size to ensure that YOUR tension is the same as in the pattern – maybe you’ll have to adjust 1, or even 2 needle sizes, up or down to achieve the correct tension. For this, we recommend that you work test swatches.

Should you work with a different knitting tension than the one provided, the measurements of the finished garment might deviate from the measurement sketch.

See DROPS lesson: How to measure your tension/gauge

See DROPS video: How to make a gauge tension swatch

to top

6) Why is the pattern worked top-down?

Working a garment top-down provides more flexibility and room for personal adjustment. For example it is easier to try the garment on while working, as well as making adjustments to length of yoke and shoulder caps.

The instructions are carefully explaining every step, in the correct order. Diagrams are adjusted to the knitting direction and are worked as usual.

to top

7) Why are the sleeves shorter in larger sizes?

The total width of the garment (from wrist-to-wrist) will be larger in the larger sizes, despite the actual sleeves being shorter. The larger sizes have longer sleeve caps and wider shoulders, so there will be a good fit in all sizes.

to top

8) What is a repeat?

Diagrams are often repeated on the round or in height. 1 repeat is the diagram the way it appears in the pattern. If it says to work 5 repeats of A.1 in the round, then you work A.1 a total of 5 times after/next to each other in the round. If it says to work 2 repeats of A.1 vertically/in height you work the entire diagram once, then begin again at the start and work the entire diagram one more time.

to top

9) How do I work according to a knitting diagram?

The diagram depicts all rows/rounds, and every stitch seen from the right side. It is read from bottom to top, from right to left. 1 square = 1 stitch.

When working back and forth, every other row is worked from the right side and every other row is worked from the wrong side. When working from the wrong side, the diagram will have to be worked reversed: from left to right, knit stitches are purled, purl stitches are knit etc.

When working in the round every round is worked from the right side and the diagram are worked from right to left on all rounds.

See DROPS lesson: How to read knitting diagrams

to top

10) How do I work according to a crochet diagram?

The diagram depicts all rows/rounds, and every stitch seen from the right side. It is worked from bottom to top, from right to left.

When working back and forth every other row is worked from the right side: from right to left and every other row is worked from the wrong side: from left to right.

When working in the round, every row in the diagram are worked from the right side, from right to left.

When working a circular diagram you start in the middle and work your way outwards, counter clockwise, row by row.

The rows usually start with a given number of chain stitches (equivalent to the height of the following stitch), this will either be depicted in the diagram or explained in the pattern.

See DROPS lesson: How to read crochet diagrams

to top

11) How do I work several diagrams simultaneously on the same row/round?

Instructions for working several diagrams after each other on the same row/round, will often be written like so: “work A.1, A.2, A.3 a total of 0-0-2-3-4 times". This means you work A.1 once, then A.2 is worked once, and A.3 is repeated (in width) the number of times provided for your size – in this case like so: S = 0 times, M = 0 times, L=2 times, XL= 3 times and XXL = 4 times.

The diagrams are worked as usual: begin with the first row in A.1, then work the first row in A.2 etc.

See DROPS lesson: How to read knitting diagrams

See DROPS lesson: How to read crochet diagrams

to top

12) Why does the piece start with more chain stitches than it’s worked with?

Chain stitches are slightly narrower than other stitches and to avoid working the cast-on edge too tight, we simply chain more stitches to begin with. The stitch count will be adjusted on the following row to fit the pattern and measurement sketch.

to top

13) Why increase before the rib edge when the piece is worked top-down?

The rib edge is more elastic and will contract slightly compared to, for example, stocking stitch. By increasing before the rib edge, you avoid a visible difference in width between the rib edge and the rest of the body.

to top

14) Why increase in the cast-off edge?

It’s very easy to cast off too tightly, and by making yarn overs while casting off (and simultaneously casting these off) you avoid a too tight cast off edge.

See DROPS video: How to bind off with yarn overs (yo)

to top

15) How do I increase/decrease on every 3rd and 4th row/round alternately?

To achieve an even increase (or decrease) you can increase on, for example: every 3rd and 4th row alternately, like so: work 2 rows and increase on the 3rd row, work 3 rows and increase on the 4th. Repeat this until the increase is complete.

See DROPS lesson: Increase or decrease 1 st on every 3rd and 4th row alternately

to top

16) Why is the pattern slightly different than what I see in the photo?

Pattern repeats can vary slightly in the different sizes, in order to get the correct proportions. If you’re not working the exact same size as the garment in the photo, yours might deviate slightly. This has been carefully developed and adjusted so that the complete impression of the garment is the same in all sizes.

Make sure to follow instructions and diagrams for your size!

to top

17) How can I work a jacket in the round instead of back and forth?

Should you prefer to work in the round instead of back and forth, you may of course adjust the pattern. You’ll need to add steeks mid-front (usually 5 stitches), and follow the instructions. When you would normally turn and work from the wrong side, simply work across the steek and continue in the round. At the end you’ll cut the piece open, pick up stitches to work bands, and cover the cut edges.

See DROPS video: How to knit steeks and cut open

to top

18) Can I work a jumper back and forth instead of in the round?

Should you prefer to work back and forth instead of in the round, you may of course adjust the pattern so you work the pieces separately and then assemble them at the end. Divide the stitches for the body in 2, add 1 edge stitch in each side (for sewing) and work the front and back pieces separately.

See DROPS lesson: Can I adapt a pattern for circular needles into straight needles?

to top

19) Why do you show discontinued yarns in the patterns?

Since different yarns have different qualities and textures we have chosen to keep the original yarn in our patterns. However, you can easily find options among our available qualities by using our yarn converter, or simply pick a yarn from the same yarn group.

It is possible that some retailers still have discontinued yarns in stock, or that someone has a few skeins at home that they would like to find patterns for.

The yarn converter will provide both alternative yarn as well as required amount in the new quality.

to top

20) How do I make a women’s size garment into a men’s size one?

If you have found a pattern you like which is available in women’s size it’s not very difficult to convert it to men’s size. The biggest difference will be the length of sleeves and body. Start working on the women size that you think would fit across the chest. The additional length will be worked right before you cast off for the armhole/sleeve cap. If the pattern is worked top-down you can add the length right after the armhole or before the first decrease on sleeve.

Regarding additional yarn amount, this will depend on how much length you add, but it is better with a skein too many than too few.

to top

21) How do I prevent a hairy garment from shedding?

All yarns will have excess fibres (from production) that might come off as lint or shedding. Brushed yarns (ie hairier yarns) have more of these loose, excess fibres, causing more shedding.

Shedding also depends on what is worn under or over the garment, and whether this pulls at the yarn fibres. It’s therefore not possible to guarantee that there will be no shedding

Below are some tips on how to get the best result when working with hairier yarns:

1. When the garment is finished (before you wash it) shake it vigorously so the looser hairs come off. NOTE: do NOT use a lint roller, brush or any method that pulls at the yarn.

2. Place the garment in a plastic bag and put it in your freezer - the temperature will cause the fibres to become less attached to each other, and excess fibres will come off easier.

3. Leave in the freezer for a few hours before taking it out and shaking it again.

4. Wash the garment according to the instructions on the yarn label.

to top

22) Where on the garment is the length measured?

The measurement sketch/schematic drawing provides information regarding the full length of the garment. If it’s a jumper or a jacket the length is measured from the highest point on the shoulder (usually closest to the neckline), and straight down to the bottom of the garment. It is NOT measured from the tip of shoulder. Similarly, the length of yoke is measured from the highest point on the shoulder and down to where yoke is split into body and sleeves.

See DROPS lesson: How to read a schematic drawing

to top

23) How do I know how many balls of yarn I need?

The required amount of yarn is provided in grams, eg: 450 g. To calculate how many balls you’ll need you first need to know how many grams are in 1 ball (25g, 50g or 100g). This information is available if you click on the individual yarn quality on our pages. Divide the amount required with the amount of each ball. For example, if each ball is 50g (the most common amount), the calculation will be as follows: 450 / 50 = 9 balls.

to top

Have you purchased DROPS yarn to make this pattern? Then you are entitled to receive help from the store where you bought the yarn. Find a list of DROPS stores here!
Still can't find the answer you need? Then scroll down and leave your question so one of our experts can try to help you. This will be done normally within 5 to 10 working days. In the meantime, you can read the questions and answers that others have left to this pattern or join the DROPS Workshop on Facebook to get help from fellow knitters/crocheters!

Comments / Questions (58)

country flag Kerstin Andersson wrote:

Hur byter jag färg när det är mönster utan att det blir trassel mellan garnnystanen

31.08.2023 - 17:01

DROPS Design answered:

Hej Kerstin, det löser du efter ett par varv :)

08.09.2023 kl. 15:23

country flag Stina Mikkelsen wrote:

Hvilken sværdhedsgrad har denne bluse ? Jeg har strikke et års tid - ialt 2 veste og to sweatere. Men endnu ikke med mønster....

27.07.2023 - 14:48

DROPS Design answered:

Hei Stina. Da kan du fint prøve deg på denne :) Det vil du greie. Et tips: Bruk maskemarkører/ merketråd mellom hver rapport av diagrammet, så får du en bedre oversikt etter hver omgang og kan kontrollsjekke maskeantallet med de økningene du gjør i diagrammet. mvh DROPS Design

27.07.2023 kl. 14:52

country flag Nadia wrote:

Bonjour, je voudrais savoir si je peu détricoter mon col pour refaire sans la rehausse , car mon tricot est de travers . Merci

28.04.2023 - 20:14

DROPS Design answered:

Bonjour Nadia, si vous préférez ne pas tricoter la rehausse, détricotez jusqu'au tour d'augmentations et passez à l'empiècement directement. Bon tricot!

02.05.2023 kl. 07:51

country flag Manon wrote:

196-23 COL (XL) - monter 124m \r\nBonjour - Quel est le but de diminuer 20 m ( = 104) , tricoter 1 tour pour ensuite immediatement aug de 36m au rang suivant (=140). ?\r\nEtape semble superflue sur 2 rangs consecutifs , pourquoi ne pas simplement passer de 124 a 140?\r\nMerci de clarifier svp.

19.03.2023 - 02:25

DROPS Design answered:

Bonjour Manon, c'est un choix de la styliste pour que le col rende mieux. Bon tricot!

20.03.2023 kl. 09:38

country flag Bjørg-Ida Alexandersen wrote:

Strikker «Inner circle»i str. M. I oppskriften er det lagt inn en økning først på 40m på bolen fra ermhull og før vrangbord ytterligere 64m. Dette ble altfor mange masker, og genseren skrådde bare utover i en merkelig fasong. Resulterte i at alt måtte rekkes opp. Strikket på nytt uten økning. Nederst på ermet før vrangbord er det også lagt inn ei økning på 14 masker noe som gjør denne altfor vid! Har strikket flere av deres gensere, men ikke opplevd en så «rar» oppskrift.

18.03.2023 - 08:55

country flag Päivi wrote:

Ohjeen puserossa lisätään runsaasti silmukoita kainaloiden ja helman väliin, miksi? Onko puseron mallin tarkoitus olla vartalonmyötäinen? Suurimman koon mittakuvassa on 9 cm ero puolessa paidassa eli ympärysmitassa 18 cm ero.

16.03.2023 - 10:01

DROPS Design answered:

Hei, silmukoita lisätään, jotta puserosta tulisi A-muotoinen. Eli puseron alaosa on yläosaa leveämpi.

20.03.2023 kl. 17:05

country flag Monika Carlsson wrote:

Ska börja sticka nu. Läser igenom mönstret o undrar. Efter resåren vid halsen ska man minska 19 maskor, efter 1 varv skan man öka 20 maskor. Varför?

10.02.2023 - 15:55

DROPS Design answered:

Hei Monika. Om du minsker masker etter vrangborden for deretter å øke maskeantallet vil du få bedre hold i halsen. Halsen/ vrangborden vil ikke sige så mye utover. mbh DROPS Design

13.02.2023 kl. 10:41

country flag Luna wrote:

Under ærmer står der at man skal have 44 masker efter indtagningerne i størrelse S, derefter strikkes en omgang ret hvor der tages 12 masker ud jævnt fordelt, der må være en fejl i størrelse S for jeg er nu ret sikker på at 44+12 ikke giver 54 som står i opskriften, men 56 :))

11.01.2023 - 12:45

country flag Ewa Wiesława wrote:

Adding those 60.extras (for size S) seems to be a mistake. My jumber ended wider than a skirt. 284 stitches does not give 53cm but over 70. ... ?

08.01.2023 - 18:08

DROPS Design answered:

Witaj Ewo, tą część ze zwiększoną liczbą oczek przerabiasz ściągaczem, więc nie możemy do niej stosować próbki podanej we wzorze. Oczka dodane przed ściągaczem mają sprawić, że szerokość swetra na całej długości jest taka sama. Jeżeli ten efekt Ci nie odpowiada możesz dodać mniej oczek. Jak nie dodasz oczek w ogóle, to sweter będzie miał kształt bombki. Pozdrawiamy!

09.01.2023 kl. 09:39

country flag Agneta wrote:

Hej! Hjälp! Jag har köpt garn och har börjat försöka sticka Inner Circle DROPS 196-23 DROPS Design: Modell u-869 Garngrupp B och nu skall jag börja sticka rapport/mönster A1. Jag förstår då inte hur många maskor det skall vara emellan varje rapport/mönster A1 på första varvet? Hur skall man komma på det, skall man räkna baklänges eller vad har jag missat. Snälla, hjälp! Med bästa hälsningar Agneta

25.12.2022 - 16:52

DROPS Design answered:

Hei Agneta. Det skal ikke være noen masker mellom hver rapport av A.1. Les i oppskriften hvor mange rapporter av diagrammet du skal strikke i den str. du strikker etter. I f.eks str. S skal du strikke A.1 16 ganger etter hverandre (16 rapporter av A.1 som har 7 masker) = 112 masker. I str. S øker du også 1 maske i hver rapport på første omgang = 112 masker + 16 økte masker = 128 masker. Når du har strikket A.1 1 gang i høyden har du også økt på 11 pinner 16 ganger = 288 masker. mvh DROPS Design

02.01.2023 kl. 11:05

Post a comment to pattern DROPS 196-23

We would love to hear what you have to say about this pattern!

If you want to leave a question, please make sure you select the correct category in the form below, to speed up the answering process. Required fields are marked *.

From the #dropsfan gallery

Inner Circle

Gillian Johnstone, Cyprus

Inner Circle

nugova, Germany

Inner Circle

Marion Dambeck, Germany

See more