
Popular categories
Looking for a yarn?


Comments / Questions (42)
![]() Mari Carmen Rodríguez Moreno wrote:
Mari Carmen Rodríguez Moreno wrote:
El patrón me gusta, pero las explicaciones no son muy buenas no están claras
04.01.2025 - 17:33
![]() Francesca wrote:
Francesca wrote:
Ciao! Nel pattern italiano manca un gettato nelle istruzioni per lo sprone: all’inizio della prima riga, tra gli ultimi due punti di A1 e i 12 punti di A2a. L’ho notato perché non riuscivo a proseguire e mi si sfasava la lavorazione, quindi ho cambiato lingua. Spero possa essere utile! 🤗
16.11.2024 - 18:49DROPS Design answered:
Buonasera Francesca, grazie per la segnalazione: abbiamo corretto il modello. Buon lavoro!
17.11.2024 - 19:37
![]() Chaima Balil wrote:
Chaima Balil wrote:
When I finish the 24 rounds with 12 raglan increases I only find myself with 104 stitches on the needle , and it's include the 40 cast on stitches lol , HELP ME OUT PLEASE
30.09.2024 - 01:00DROPS Design answered:
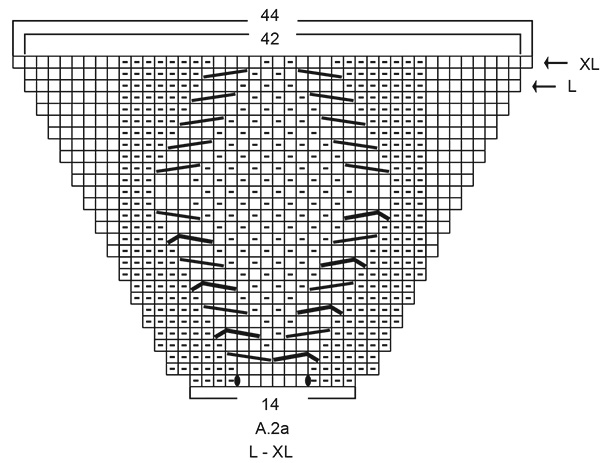
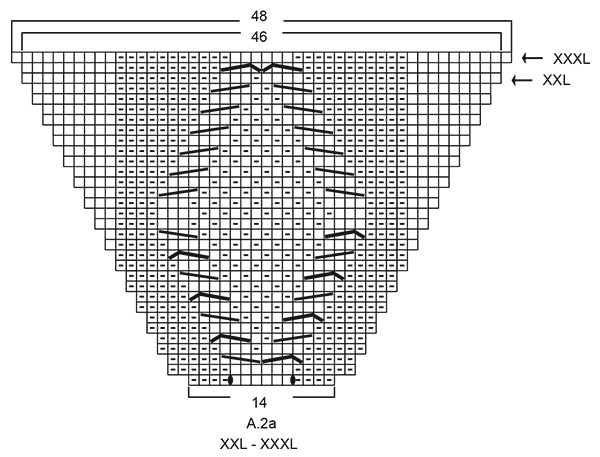
Hi Chaima, If we take size S as an example, at the end of the ribbing for the neck you should have 44 stitches on the round (decrease 4 stitches on 1 round, purl 1 round then increase 4 stitches on the next round). In addition to increasing for raglan on the yoke, you also increase in A.2a, which will give you a total of 136 stitches after all the increases are finished. Hope this helps and happy knitting!
30.09.2024 - 06:37
![]() Chaima Balil wrote:
Chaima Balil wrote:
I started knitting the sweater Medium then after I finished the neck, something didn't end up with the math , so first we have 44 stitches if we do 8 increases for 12 times it give us 140 stitches not 144 stitches , the total of stitches increased are 96 stitches including the first round. can you please clarify ? and also when I decoded the pattern , there is 28 stitches for A1+A3 it stays the same number even if we have 8 yarn over increases in each 2round , the only number that change is A2A
29.09.2024 - 18:52DROPS Design answered:
Dear Chaima, there are 4 extra yarn overs; 2 yarn overs for each of the repeats of A.2a in the round. These are in the first round, represented as black ovals. So you increase to 144 stitches in total, the 4 yarn overs and 96 raglan yarn overs. Happy knitting!
29.09.2024 - 23:33
![]() Alvia Bhat wrote:
Alvia Bhat wrote:
Hi lovely pattern. im intermediate knitter and I can read pattern I normally use King cole pattern so this one is really baffling me. my size is xxl so using A.2a diagram ive done neck and on yoke can you simplify it for me. thank you.
04.01.2024 - 16:11DROPS Design answered:
Dear Mrs Bhat, we only have diagrams to this pattern but this lesson should help you to understand how to read diagrams. Happy knitting!
05.01.2024 - 07:57
![]() Margherita wrote:
Margherita wrote:
Buongiorno! Nella versione italiana non viene spiegato come eseguire il bordo inferiore a coste.
16.12.2022 - 20:56DROPS Design answered:
Buonasera Margherita, grazie per la segnalazione: abbiamo aggiunto la parte mancante. Buon lavoro!
17.12.2022 - 21:30
![]() Eciepecie wrote:
Eciepecie wrote:
Witam, mam problem z reglanem rozmiar M: Zaczynam z 44 oczkami. Pierwszy rządek dodaje 12 oczek. Mam więc 56 oczek. Kiedy jednak robię kolejny to zawsze zostają mi 4 nieprzerobione oczka. Gdzie popełniam błąd? Drugi rządek robię następująco: Prawe o, lewe o, 16.(a2),4o(a1), 2o (a3), 4o (a1), 16o(a2), 4o (a1), 2o (a3), lewe o. Prawe o. Lacznie 52o….
13.12.2022 - 14:44DROPS Design answered:
Witaj, w każdym okrążeniu z dodawaniem oczek, dodajesz 8 oczek na reglan. Wyjątkiem jest pierwsze okrążenie z dodawaniem oczek, w którym dodajesz 12 oczek (8+4 dodane oczka w schematach A.2 a). 1-sze okrążenie z dodawaniem oczek: 44+12=56 oczek. Kolejne okrążenia z dodawaniem oczek 11x 8=88 > 56 + 88 = 144 oczka w rozmiarze M. Zobacz jeszcze fragment REGLAN. Pozdrawiamy!
13.12.2022 - 17:16
![]() Eugenia wrote:
Eugenia wrote:
Nie zgadza mi się liczba oczek. Na koniec wykończenia dekoltu mam 44 oczka (rozmiar S). Robiąc karczek dodaję 8 oczek (narzutów) na reglan w jednym okrążeniu. Dodawanie tych oczek powtarzam 11 razy. 8 x 11 = 88 dodanych oczek, było 44, więc 88+44 = 132 oczka. W opisie jest 136. Gdzie są te brakujące 4 oczka?
19.09.2022 - 16:54DROPS Design answered:
Witaj Eugenio, w 2 schematach A.2a (na tyle i przodzie) w pierwszym rzędzie są dodane 2 oczka (patrz czarne owalne symbole w schemacie) poza oczkami dodanymi na reglan. Tutaj są nasze brakujące oczka. Miłej pracy!
20.09.2022 - 08:24
![]() Monika wrote:
Monika wrote:
Dzień dobry, a można zrobić rękawy na przerabiając na okrągło?
13.12.2021 - 07:29DROPS Design answered:
Witaj Moniko, oczywiście że można. Pozdrawiamy!
13.12.2021 - 08:23
![]() Emma wrote:
Emma wrote:
Hei! Kastene på bærestykket skal strikkes vridd, men vil ikke disse da bli rett? Eller er det mulig å strikke kast vrang? På bildet ser det ut som om alle kastene er vrangmasker siden de skal blandes inn i ytterkantene av A2a, eller ser jeg feil?
23.12.2020 - 00:11DROPS Design answered:
Hej Emma. I denna video ser du hur du stickar en maske vridd vrang. Mvh DROPS Design
05.01.2021 - 11:52
|
||||||||||||||||||||||||||||
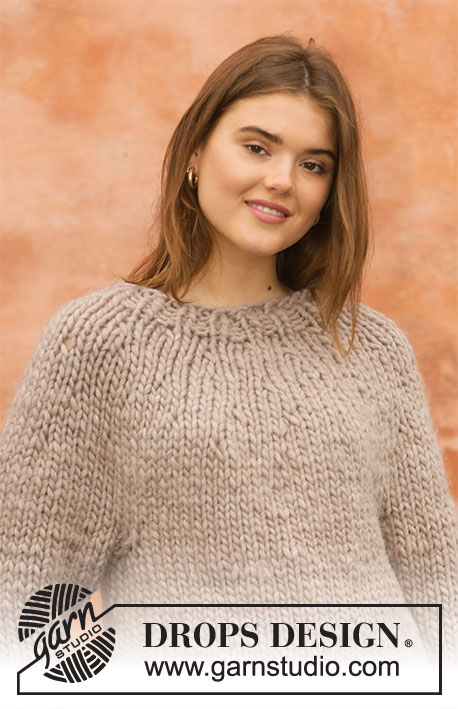
Frosted Cathedral#frostedcathedralsweater |
||||||||||||||||||||||||||||
 |
 |
|||||||||||||||||||||||||||
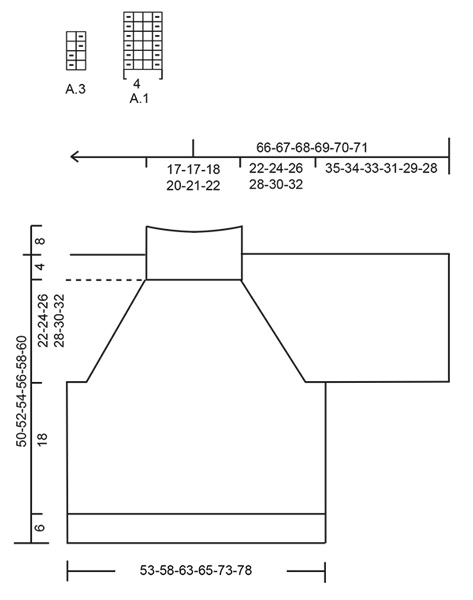
Knitted sweater with raglan in DROPS Polaris. The piece is worked top down with cables and moss stitch. Sizes S - XXXL.
DROPS 206-23 |
||||||||||||||||||||||||||||
|
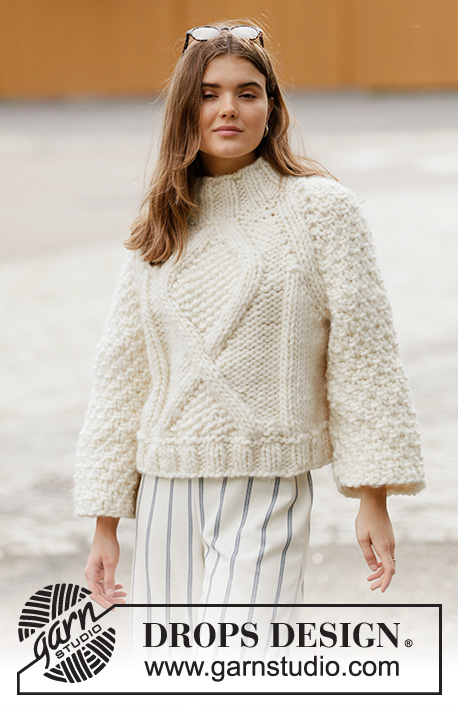
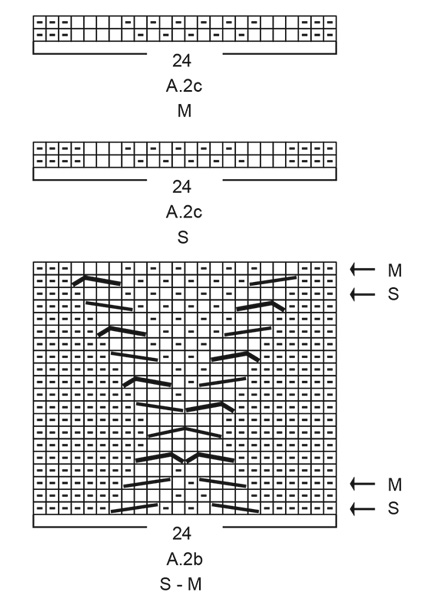
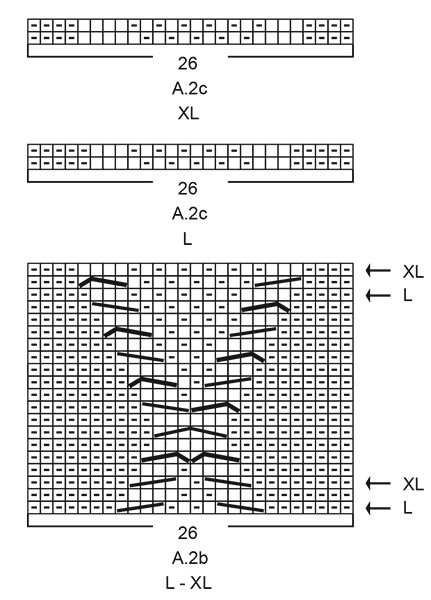
------------------------------------------------------- EXPLANATIONS FOR THE PATTERN: ------------------------------------------------------- CHANGING STRAND TIP (when working with Polaris): When changing balls of Polaris, divide the old strand in half lengthwise for the last 15 cm = 6" – cut away one half and do the same on the new strand. Lay the last and first 15 cm = 6" over each other (so you have the normal thickness of yarn) and continue working – in this way the joins will be invisible. PATTERN: See diagrams A.1 to A.3. Choose diagram for your size. The diagrams show all rows in the pattern seen from the right side. RAGLAN: Increase1 stitch on each side of every repeat of A.1 (= 8 stitches increased on the round). Increase 1 stitch by making 1 yarn over. On the next round work the yarn overs twisted to avoid holes. Then work the new stitches into pattern A.3 on the sleeves and into pattern A.2a on the front and back pieces. NOTE: The first increase is described in the text below. ------------------------------------------------------- START THE PIECE HERE: ------------------------------------------------------- SWEATER – SHORT OVERVIEW OF THE PIECE: The neck and yoke are worked in the round, with double pointed needles/circular needle, top down. The yoke is divided for body and sleeves and the body continued in the round with circular needle. The sleeves are worked back and forth with circular needle, top down. Read CHANGING STRAND TIP. NECK: Cast on 44-44-48-48-52-52 stitches with double pointed needles size 10 mm = US 15 and Polaris. Knit 1 round, then work rib (= knit 2/ purl 2) for 8 cm = 3⅛". Knit 1 round where you decrease 4 stitches evenly spaced = 40-40-44-44-48-48 stitches. Purl 1 round. Knit 1 round where you increase 4-4-4-4-8-8 stitches evenly spaced = 44-44-48-48-56-56 stitches. Insert 1 marker thread here – THE PIECE IS NOW MEASURED FROM HERE! YOKE: Change to circular needle size 12 mm = US 17. Work pattern and increase to RAGLAN – read description above, as follows: Work the last 2 stitches in A.1 (= knit 1/ purl 1), 1 yarn over, work A.2a over the next 12-12-14-14-14-14 stitches (= back piece), 1 yarn over, work A.1 (= 4 stitches), 1 yarn over, work A.3 over the next 2-2-2-2-6-6 stitches (= sleeve), 1 yarn over, work A.1 (= 4 stitches), 1 yarn over, A.2a over the next 12-12-14-14-14-14 stitches (= front piece), 1 yarn over, work A.1 (= 4 stitches), 1 yarn over, A.3 over the next 2-2-2-2-6-6 stitches (= sleeve), 1 yarn over and work the first 2 stitches in A.1 (= purl 1/ knit 1). Continue this pattern in the round and increase to raglan every 2nd round a total of 11-12-13-14-15-16 times (including the first round described here). When all the increases are finished there are 136-144-156-164-180-188 stitches on the needle and the piece measures approx. 22-24-26-28-30-32 cm = 8¾"-9½"-10¼"-11"-11¾"-12½" from the marker thread in the neck. On the next round (i.e. the last round for your size; marked with an arrow in A.2), divide the piece for body and sleeves as follows: Work the first 38-42-46-48-52-55 stitches (= back piece), place the next 30-30-32-34-36-36 stitches on 1 thread for sleeve, cast on 6 new stitches on the needle (= in side under sleeve), work the next 38-42-46-48-54-58 stitches (= front piece), place the next 30-30-32-34-36-36 stitches on 1 thread for sleeve, cast on 6 new stitches on the needle (= in side under sleeve) and work the remaining 0-0-0-0-2-3 stitches (= back piece). Body and sleeves are finished separately. THE PIECE IS NOW MEASURED FROM HERE! BODY: = 88-96-104-108-120-128 stitches. Now work pattern A.2b over the middle 24-24-26-26-28-28 stitches in A.2a – start on the first round as marked with an arrow for your size; the remaining stitches are worked in stockinette stitch. When A.2b has been completed in height the body measures approx. 18 cm = 7" from the division in all sizes. If the piece measures less than this work A.2c over A.2b to the correct length. Change to circular needle size 10 mm = US 15. Knit 1 round, purl 1 round and knit 1 round. Then work rib (= knit 2 / purl 2) for 6 cm = 2⅜". Bind off with knit over knit and purl over purl. Make sure the bind-off edge is not tight. The sweater measures approx. 50-52-54-56-58-60 cm = 19¾"-20½"-21¼"-22"-22¾"-23⅝" from the shoulder down. SLEEVE: The sleeve is worked back and forth with circular needle and is sewn together to finish. Place the 30-30-32-34-36-36 stitches from the thread on the one side of the piece on circular needle size 12 mm = US 17 and cast on 3 new stitches on each side in all sizes = 36-36-38-40-42-42 stitches. Continue back and forth according to pattern A.3. Work until the sleeve measures approx. 35-34-33-31-29-28 cm = 13¾"-13⅜"-13"-12¼"-11⅜"-11" from the division, (you can try the sweater on and work to desired length) – adjust so you finish after a row from the wrong side. NOTE: Shorter measurements in larger sizes due to wider neck and longer yoke. Bind off with knit over knit and purl over purl. Work the other sleeve in the same way. ASSEMBLY: Sew the sleeve seam in the outermost loop of the outermost stitch so the seam is flat. |
||||||||||||||||||||||||||||
Diagram explanations |
||||||||||||||||||||||||||||
|
||||||||||||||||||||||||||||
 |
||||||||||||||||||||||||||||
 |
||||||||||||||||||||||||||||
 |
||||||||||||||||||||||||||||
 |
||||||||||||||||||||||||||||
 |
||||||||||||||||||||||||||||
 |
||||||||||||||||||||||||||||
 |
||||||||||||||||||||||||||||
Have you finished this pattern?Tag your pictures with #dropspattern #frostedcathedralsweater or submit them to the #dropsfan gallery. Do you need help with this pattern?You'll find 25 tutorial videos, a Comments/Questions area and more by visiting the pattern on garnstudio.com. © 1982-2026 DROPS Design A/S. We reserve all rights. This document, including all its sub-sections, has copyrights. Read more about what you can do with our patterns at the bottom of each pattern on our site. |
||||||||||||||||||||||||||||


With over 40 years in knitting and crochet design, DROPS Design offers one of the most extensive collections of free patterns on the internet - translated to 17 languages. As of today we count 324 catalogs and 12290 patterns - 12280 of which are translated into English (US/in).
We work hard to bring you the best knitting and crochet have to offer, inspiration and advice as well as great quality yarns at incredible prices! Would you like to use our patterns for other than personal use? You can read what you are allowed to do in the Copyright text at the bottom of all our patterns. Happy crafting!
Post a comment to pattern DROPS 206-23
We would love to hear what you have to say about this pattern!
If you want to leave a question, please make sure you select the correct category in the form below, to speed up the answering process. Required fields are marked *.