
Popular categories
Looking for a yarn?


Comments / Questions (24)
![]() Montserrat Fellay wrote:
Montserrat Fellay wrote:
Comment peut ton augmenter à 57 mailles quand on en a déjà 63 maille la je comprend pas comment vous faite sa Merci j espère que je suis assez claire
31.05.2021 - 02:00DROPS Design answered:
Si vous aviez 63 mailles (= XL) au début du devant droit, vous devrez diminuer 6 mailles à intervalles réguliers dans les mailles de A.1 (cette leçon explique comment faire) autrement dit 63-6= 57 mailles. Bon tricot!
31.05.2021 - 08:09
![]() Montserrat Fellay wrote:
Montserrat Fellay wrote:
Voici la fin pouvez vous m aide à comprendre ses 3 mail que je vous est envoyez Modèle n ai 228 A.1 jusqu'à ce qu'il reste 1 maille et 1 maille lisière au point mousse (la tricoter à l'envers sur ce rang). Au dernier rang de A.1, ajuster le nombre de mailles à 47-56-56-57-66-67 mailles (ne pas diminuer/augmenter au-dessus de la bordure devant). Tricoter maintenant en fonction de la taille ainsi:
31.05.2021 - 01:22DROPS Design answered:
Les réponses précédentes ont-elles pu vous aider?
31.05.2021 - 08:07
![]() Montserrat Fellay wrote:
Montserrat Fellay wrote:
Suite dés explication que je ne comprend pas Couper le fil et continuer sur l'endroit (2 rangs sur l'endroit l'un après l'autre) ainsi: 6 mailles de bordure devant au point mousse (c'est-à-dire tricoter ces 6 mailles à l'envers sur ce rang),
31.05.2021 - 01:18DROPS Design answered:
... Coupez votre fil à la fin de ce rang 1,3,5 ou 7 de A.3, et tricotez le rang suivant de nouveau sur l'endroit = vous tricotez ainsi 2 rangs sur l'endroit l'un après l'autre. Pour que le point mousse continue correctement, tricotez les 6 mailles à l'envers au 2ème rang sur l'endroit et tricotez ainsi: 6 m env (=bordure devant), tricotez A.1 et terminez par 1 m lis au point mousse (= à tricoter à l'envers). ..
31.05.2021 - 08:06
![]() Montserrat Fellay wrote:
Montserrat Fellay wrote:
Je vous pause une question en plusieurs fois car tout ne rentre pas Je ne comprend pas A.1. Continuer jusqu'à ce que l'ouvrage mesure 32-34-36-34-36-34 cm – ajuster pour arrêter après un rang sur l'endroit (c'est-à-dire après un rang 1,3,5 ou 7 du diagramme).
31.05.2021 - 01:15DROPS Design answered:
Bonjour Mme Montserrat Fellay, vous tricotez d'abord A.1, puis 2 x A.2 en hauteur, A.1 et A.3; quand votre ouvrage mesure 32 à 34 cm (cf taille), mais ajustez cette longueur de sorte que vous ayez tricoté un rang 1, 3, 5 ou 7 du diagramme A.3, autrement dit après un rang sur l'endroit...
31.05.2021 - 08:04
![]() Brigitte wrote:
Brigitte wrote:
Hallo, auf dem Bild ist zu sehen, dass am Ärmel auch Muster A4 gestrickt wird. In der Anleitung ist davon aber nichts zu lesen ??
18.04.2021 - 16:15DROPS Design answered:
Liebe Brigitte, der Teil A.4, der an den Ärmeln zu sehen ist, wird bei den Vorderteilen/beim Rückenteil gestrickt. Durch die Oversized-Größe hängen die Schultern recht weit über und der eigentliche Ärmel setzt erst etwas tiefer an. Viel Spaß beim Stricken!
18.04.2021 - 22:04
![]() Pauline wrote:
Pauline wrote:
Was ist der Grund, warum die letzte Reihe (Rückreihe) von A.3 nicht gestrickt wird und dadurch 2 Hinreihen aufeinander folgen? Könnte man nicht stattdessen nach der letzten Hinreihe von A.3 eine Rückreihe linke Maschen stricken und dadurch das Abschneiden des Fadens vermeiden?
14.10.2020 - 12:59DROPS Design answered:
Liebe Pauline, das gehört zur Designerin Wahl. Viel Spaß beim stricken!
14.10.2020 - 16:25
![]() Jenny De Jong wrote:
Jenny De Jong wrote:
Waarom laat u magere modellen poseren in Plus-size kleding? Het is geen gezicht! Zonde van het mooie vest; het lijkt wel een vuilniszak zo.
02.07.2020 - 14:25
![]() Siri wrote:
Siri wrote:
Hei! Hvilken størrelse bruker modellen på bildene i denne oppskriften?
17.03.2020 - 21:02DROPS Design answered:
Hej Siri, Det går ikke at sige. Vælg de mål i måleskitsen (nederst på siden) i den størrelse som passer dig. God fornøjelse!
18.03.2020 - 16:01
![]() Caromok wrote:
Caromok wrote:
Bonjour, je ne comprends pas après A3 dans le dos. « Couper le fils et continuer sur l’endroit (2 rangs sur l’endroit l’un après l’autre) »pourriez-vous me l’expliquer merci.
27.10.2019 - 23:17DROPS Design answered:
Bonjour Mme Caromok, le dernier rang de A.3 se tricote sur l'endroit, quand vous l'avez tricoté, coupez le fil, ne tournez pas l'ouvrage, et tricotez le rang suivant comme indiqué sur l'endroit de nouveau = on va avoir 2 rangs sur l'endroit tricotés l'un après l'autre. Bon tricot!
04.11.2019 - 12:38
![]() Gisa wrote:
Gisa wrote:
Finde die Jacke sehr schön. Laut Anleitung soll ein Schalkragen gestrickt werden, dieser ist bei der Abbildung nicht zu sehen, dort ist die Jacke mit V -Ausschnitt abgebildet. Gibt es noch eine andere Anleitung ?
25.10.2019 - 11:47DROPS Design answered:
Liebe Gisa, die Anleitung ist korrekt, der Kragen wird hier als Schalkragen bezeichnet, da einige Maschen der Vorderteile ab den Schultern als Kragen weitergestrickt werden und später hinten an den Halsausschnitt genäht werden. An den Vorderteilen entspricht der Kragen aber in der Tat einem V-Ausschnitt. Viel Spaß beim Stricken!
29.10.2019 - 22:44
|
|||||||
Inner City Jacket#innercityjacket |
|||||||
 |
 |
||||||
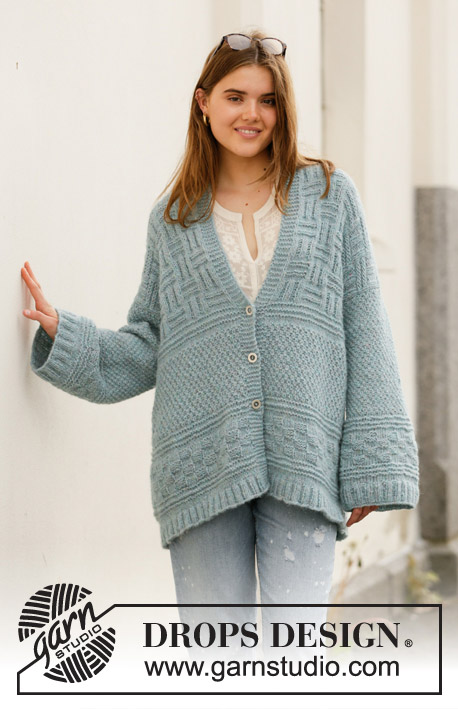
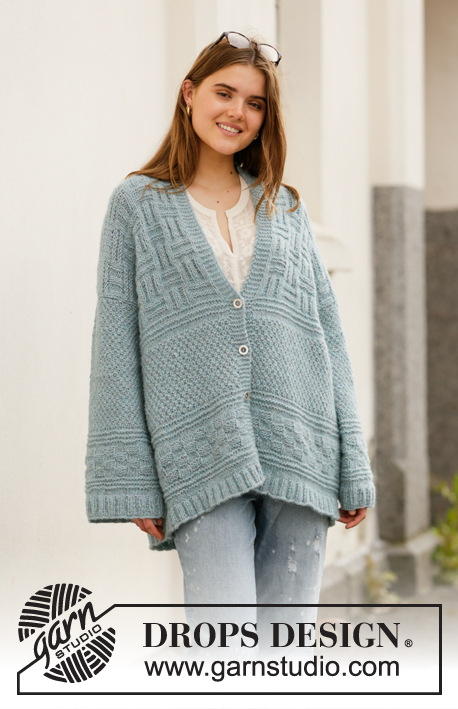
Knitted jacket in DROPS Air. The piece is worked with textured pattern and shawl-collar. Sizes S - XXXL.
DROPS 207-12 |
|||||||
|
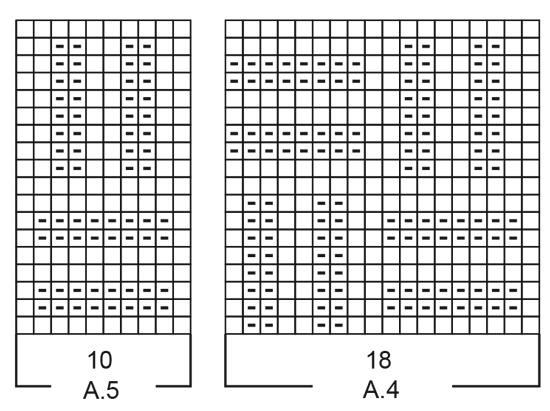
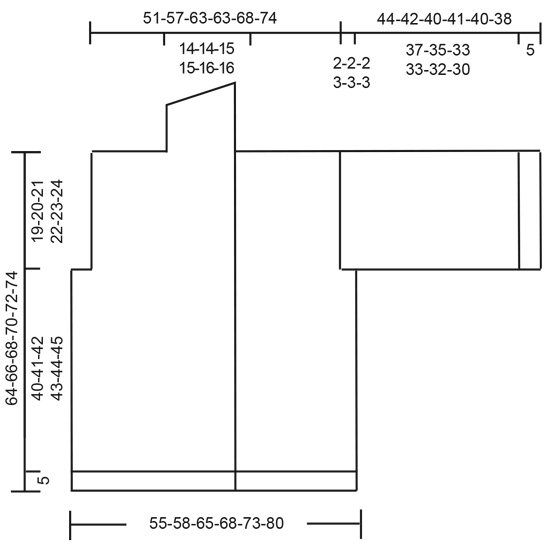
------------------------------------------------------- EXPLANATIONS FOR THE PATTERN: ------------------------------------------------------- RIDGE/GARTER STITCH (worked back and forth): Knit all rows. 1 ridge in height = Knit 2 rows. PATTERN: See diagrams A.1 to A.5. The diagrams show all rows in the pattern seen from the right side. DECREASE TIP (evenly spaced): To work out how to decrease evenly, count the total number of stitches on needle (e.g. 108 stitches), minus the 1 edge stitch on each side and divide by number of decreases to be made (e.g. 18) = 5.8. In this example decrease by knitting approx. each 5th and 6th stitch together. INCREASE TIP (evenly spaced): To work out how to increase evenly, count the total number of stitches on needle (e.g. 94 stitches), minus 1 edge stitch on each side and divide by the number of increases to be made (e.g. 5) = 18.4. In this example, increase by making 1 yarn over after alternately each 18th and 19th stitch. On the next row work the yarn overs twisted to avoid holes. BUTTONHOLES (bottom up): Work buttonholes on the right band. 1 BUTTONHOLE = Knit together the third and fourth stitch from the edge and then make 1 yarn over. On the next row knit the yarn over = hole. Work buttonholes as follows: Buttonhole 1: Worked on 7th row in A.1 the second time the diagram is worked in height. Buttonhole 2. Worked after you have completed 6-7-8-7-8-7 cm = 2⅜"-2¾"-3⅛"-2¾"-3⅛"-2¾" of pattern A.3. Buttonhole 3: Worked on the 7th row in A.1 the third time the diagram is worked in height. ------------------------------------------------------- START THE PIECE HERE: ------------------------------------------------------- JACKET – SHORT OVERVIEW OF THE PIECE: The piece is worked back and forth in sections which are sewn together to finish. The sleeves are worked in the round with short circular needle. BACK PIECE: Cast on 108-112-128-132-140-156 stitches with circular needle size 4.5 mm = US 7 and Air. Purl 1 row from the wrong side then work rib as follows: 1 edge stitch in GARTER STITCH – read description above, (knit 2/ purl 2) until there are 3 stitches left on row, knit 2 and 1 edge stitch in garter stitch. When the rib measures 5 cm = 2", knit 1 row from the right side where you decrease 18-18-22-22-22-26 stitches evenly spaced – read DECREASE TIP = 90-94-106-110-118-130 stitches. Change to circular needle size 5.5 mm = US 9 and purl 1 row back from the wrong side. Now work pattern as follows: A.1 with 1 edge stitch in garter stitch on each side. When A.1 has been worked in height work A.2 over A.1. Work A.2 in height a total of 2 times. REMEMBER THE KNITTING GAUGE! The piece measures approx. 17 cm = 6¾". Now work A.1 over A.2. When A.1 has been completed in height work A.3 over A.1. Continue until the piece measures 32-34-36-34-36-34 cm = 12½"-13⅜"-14¼"-13⅜"-14¼"-13⅜" – adjust so you finish after a row from the right side (i.e. rows 1,3,5 or 7 in the diagram). Cut the strand and continue from the right side (2 rows worked from the right side after each other): Work A.1 with 1 edge stitch in garter stitch on each side. On the second to last row in A.1 increase 0-5-2-0-1-0 stitches evenly spaced – read INCREASE TIP = 90-99-108-110-119-130 stitches. Now work pattern in the different sizes as follows: Sizes S, L, XL, XXXL: 1 edge stitch in garter stitch, knit 3-3-4-5, A.4 (= 18 stitches) a total of 4-5-5-6 times in width, A.5 (= 10 stitches), knit 3-3-4-5 and 1 edge stitch in garter stitch. Sizes M and XXL: 1 edge stitch in garter stitch, knit 3-4, A.4 (= 18 stitches) a total of 5-6 times in width, knit 4-5 and 1 edge stitch in garter stitch. All sizes: Continue back and forth until the piece measures 45-46-47-48-49-50 cm = 17¾"-18"-18½"-19"-19¼"-19¾". Now bind off 3-3-3-4-4-5 stitches at the beginning of the next 2 rows for the armholes = 84-93-102-102-111-120 stitches. Continue with pattern and 1 edge stitch in garter stitch on each side. When the piece measures 62-64-66-68-70-72 cm = 24⅜"-25¼"-26"-26¾"-27½"-28⅜", bind off the middle 20-21-22-22-23-24 stitches for neck and each shoulder is finished separately. Then bind off 1 stitch on the next row from the neck = 31-35-39-39-43-47 stitches. Continue working as many stitches in the pattern as there is room for until the armhole measures 18-19-20-21-22-23 cm = 7"-7½"-8"-8¼"-8¾"-9" (the piece measures a total of 63-65-67-69-71-73 cm = 24¾"-25½"-26⅜"-28"-28¾") – adjust so you finish after row 4, 8, 14 or 18 in A.4/A.5. Work 1 ridge over all stitches. Bind off. Work the other shoulder the same way. The piece measures approx. 64-66-68-70-72-74 cm = 25¼"-26"-26¾"-27½"-28⅜"-29⅛" from the shoulder down. RIGHT FRONT PIECE: Cast on 59-63-67-75-79-83 stitches with circular needle size 4.5 mm = US 7 and Air. Purl 1 row from the wrong side. Then work rib as follows from the right side: 6 band stitches in garter stitch, (knit 2/ purl 2) until there is 1 stitch left, 1 edge stitch in garter stitch. When the rib measures 5 cm = 2", knit 1 row from the right side where you decrease 8-8-8-12-12-12 stitches evenly spaced = 51-55-59-63-67-71 stitches. Change to circular needle size 5.5 mm = US 9 and purl 1 row back from the wrong side (edge and band stitches worked in garter stitch). Now work pattern as follows: 6 band stitches in garter stitch, A.1 until there is 1 stitch left and 1 edge stitch in garter stitch. When A.1 has been completed in height work A.2 over A.1. Work A.2 in height a total of 2 times. The piece measures 17 cm = 6¾". Now work A.1 over A.2 – remember BUTTONHOLES on right band – read description above. When A.1 has been completed in height work A.3 over A.1. Continue until the piece measures 32-34-36-34-36-34 cm = 12½"-13⅜"-14¼"-13⅜"-14¼"-13⅜" – adjust so you finish after a row from the right side (i.e. rows 1,3,5 or 7 in the diagram). Cut the strand and continue from the right side (2 rows worked from the right side after each other) as follows: 6 band stitches in garter stitch (i.e. purl 6 on this row), A.1 until there is 1 stitch left and 1 edge stitch in garter stitch (purled on this row). On the last row in A.1 adjust the number of stitches to 47-56-56-57-66-67 stitches (do not decrease/increase on the band). Now work pattern in the different sizes as follows: Sizes S, XXL, XXXL: 6 band stitches in garter stitch, A.4 (= 18 stitches) a total of 2-3-3 in width, knit 4-5-6, 1 edge stitch in garter stitch. Sizes M, L and XL: 6 band stitches in garter stitch, A.4 (= 18 stitches) a total of 2-2-2 times in width, A.5 (= 10 stitches), knit 3-3-4, 1 edge stitch in garter stitch. All sizes: Continue like this back and forth. When the piece measures 45-46-47-48-49-50 cm = 17¾"-18"-18½"-19"-19¼"-19¾", bind off 3-3-3-4-4-5 stitches at the beginning of the next row from the side for the armhole = 44-53-53-53-62-62 stitches. Continue with pattern as before. When the piece measures 62-64-66-68-70-72 cm = 24⅜"-25¼"-26"-26¾"-27½"-28⅜", work the next row from the right side as follows: Knit the first 13-14-14-14-15-15 stitches (= shawl-collar), knit the next 31-39-39-39-47-47 stitches and decrease at the same time 0-4-0-0-4-0 stitches evenly spaced = 31-35-39-39-43-47 stitches on shoulder. Turn and knit just the shoulder stitches (keep the collar stitches on the needle), turn and bind off. Cut the strand. The piece measures approx. 64-66-68-70-72-74 cm = 25¼"-26"-26¾"-27½"-28⅜"-29⅛" from the shoulder down. Now work the 13-14-14-14-15-15 collar stitches starting from the wrong side as follows: ROWS 1-5: Knit all stitches. ROW 6: Knit the first 6-7-7-7-7-7 stitches, turn, tighten strand. ROW 7: Knit back. ROW 8.: Knit all stitches. Repeat rows 1-8 until the collar measures 7-7-7½-7½-8-8 cm = 2¾"-2¾"-2⅞"-2⅞"-3⅛"-3⅛" down to the shoulder, at the shortest point. Bind off. LEFT FRONT PIECE: Cast on 59-63-67-75-79-83 stitches with circular needle size 4.5 mm = US 7 and Air. Purl 1 row from the wrong side. Then work rib as follows from the right side: 1 edge stitch in garter stitch, (knit 2/ purl 2) until there are 6 stitches left, 6 band stitches in garter stitch. When the rib measures 5 cm = 2", knit 1 row from the right side where you decrease 8-8-8-12-12-12 stitches evenly spaced = 51-55-59-63-67-71 stitches. Change to circular needle size 5.5 mm = US 9 and purl 1 row back from the wrong side (edge and band stitches worked in garter stitch). Now work pattern as follows: 1 edge stitch in garter stitch, A.1 until there are 6 stitches left and 6 band stitches in garter stitch. When A.1 has been completed in height work A.2 over A.1. Work A.2 in height a total of 2 times. The piece measures 17 cm = 6¾". Now work A.1 over A.2. When A.1 has been completed in height work A.3 over A.1. Continue until the piece measures 32-34-36-34-36-34 cm = 12½"-13⅜"-14¼"-13⅜"-14¼"-13 3/8 – adjust so you finish after a row from the right side (i.e. rows 1,3,5 or 7 in the diagram). Cut the strand and continue from the right side (2 rows worked from the right side after each other): 1 edge stitch in garter stitch (i.e. purl 1 on this row), A.1 until there are 6 stitches left and 6 band stitches in garter stitch (purled on this row). On the last row in A.1 adjust the number of stitches to 47-56-56-57-66-67 stitches (do not decrease/increase on the band). Now work pattern in the different sizes as follows: Sizes S, XXL, XXXL: 1 edge stitch in garter stitch, knit 4-5-6, A.4 (= 18 stitches) a total of 2-3-3 in width, 6 band stitches in garter stitch. Sizes M, L and XL: 1 edge stitch in garter stitch, knit 3-3-4, A.5 (= 10 stitches), A.4 (= 18 stitches) a total of 2-2-2 times in width, 6 band stitches in garter stitch. All sizes: Continue like this back and forth. When the piece measures 45-46-47-48-49-50 cm = 17¾"-18"-18½"-19"-19¼"-19¾", bind off 3-3-3-4-4-5 stitches at the beginning of the next row from the side for the armhole = 44-53-53-53-62-62 stitches. Continue with pattern as before. When the piece measures 62-64-66-68-70-72 cm = 24⅜"-25¼"-26"-26¾"-27½"-28⅜", work the next row from the right side as follows: Knit the first 31-39-39-39-47-47 stitches and decrease at the same time 0-4-0-0-4-0 stitches evenly spaced knit the last 13-14-14-14-15-15 stitches (= shawl-collar). Turn and knit all stitches. Turn and bind off the first 31-35-39-39-43-47 stitches for the shoulder. The piece measures approx. 64-66-68-70-72-74 cm = 25¼"-26"-26¾"-27½"-28⅜"-29⅛" from the shoulder down. Now work the 13-14-14-14-15-15 collar stitches starting from the right side as follows: ROWS 1-5: Knit all stitches. ROW 6: Knit the first 6-7-7-7-7-7 stitches, turn, tighten strand. ROW 7: Knit back. ROW 8.: Knit all stitches. Repeat rows 1-8 until the collar measures 7-7-7½-7½-8-8 cm = 2¾"-2¾"-2⅞"-2⅞"-3⅛"-3⅛" down to the shoulder, at the shortest point. Bind off. SLEEVE: The sleeve is worked in the round with short circular needle. Cast on 76-76-88-88-96-96 stitches with short circular needle size 4.5 mm = US 7 and Air. Knit 1 round then work rib (= knit 2/ purl 2) for 5 cm = 2". Knit 1 round where you decrease 12-12-16-16-16-16 stitches evenly spaced = 64-64-72-72-80-80 stitches. Change to circular needle size 5.5 mm = US 9 and work pattern as follows: Knit 1 round then work pattern A.1. When A.1 has been completed in height work A.2 a total of 2 times in height. The piece measures approx. 17 cm = 6¾". Now work A.1, AT THE SAME TIME on the first round decrease 4-0-4-2-6-4 stitches evenly spaced = 60-64-68-70-74-76 stitches. When A.1 has been completed, work A.3. Continue working until the piece measures 42-40-38-38-37-35 cm = 16½"-15¾"-15"-15"-14½"-13¾". Now continue with A.3 but working back and forth on the needle to give a small split under the sleeve (makes it easier to sew the sleeve to the armhole). When the sleeve measures 44-42-40-41-40-38 cm = 17¼"-16½"-15¾"-16⅛"-15¾"-15" (shorter measurements in larger sizes due to broader shoulders) bind off. Work the other sleeve in the same way. ASSEMBLY: Sew the shoulder seams with grafting stitches inside the bind-off edge. Sew the sleeves to the body inside the 1 edge stitch on the body and the bind-off edge on the sleeve. The last part of the sleeve which was worked back and forth is sewn to the body where the 3-3-3-4-4-5 stitches were bind off. Sew the side seams inside the edge stitch on each side. Sew the collar together mid back inside the bind-off edge and then sew the collar to the back of the neck. Sew buttons onto left band. |
|||||||
Diagram explanations |
|||||||
|
|||||||
 |
|||||||
 |
|||||||
 |
|||||||
Have you finished this pattern?Tag your pictures with #dropspattern #innercityjacket or submit them to the #dropsfan gallery. Do you need help with this pattern?You'll find 24 tutorial videos, a Comments/Questions area and more by visiting the pattern on garnstudio.com. © 1982-2026 DROPS Design A/S. We reserve all rights. This document, including all its sub-sections, has copyrights. Read more about what you can do with our patterns at the bottom of each pattern on our site. |
|||||||


With over 40 years in knitting and crochet design, DROPS Design offers one of the most extensive collections of free patterns on the internet - translated to 17 languages. As of today we count 325 catalogs and 12298 patterns - 12288 of which are translated into English (US/in).
We work hard to bring you the best knitting and crochet have to offer, inspiration and advice as well as great quality yarns at incredible prices! Would you like to use our patterns for other than personal use? You can read what you are allowed to do in the Copyright text at the bottom of all our patterns. Happy crafting!
Post a comment to pattern DROPS 207-12
We would love to hear what you have to say about this pattern!
If you want to leave a question, please make sure you select the correct category in the form below, to speed up the answering process. Required fields are marked *.