
Popular categories
Looking for a yarn?


Comments / Questions (88)
![]() Hildur Hatlen wrote:
Hildur Hatlen wrote:
Ved halsåpning står det at det skal legges opp ekstra 5masker 1 gang. Etter mitt syn blir vel halsåpningen skjev da ?
02.10.2021 - 18:26DROPS Design answered:
Hej Hildur, de modsvarer de 5 masker du lukkede af i den anden side af halsen :)
06.10.2021 - 15:01
![]() Marlen wrote:
Marlen wrote:
Muy buena idea gracias desde Bogotá Colombia
07.06.2021 - 16:58
![]() Claire wrote:
Claire wrote:
Le nombre de mailles ne correspond pas du tout pour l échantillon de 10cm sur 10cm
31.05.2021 - 12:31DROPS Design answered:
Bonjour Claire, pour obtenir les mesures de ce pull, vous devez avoir un échantillon de 15 mailles x 42 rangs en côtes anglaises (= 21 rangs visibles en hauteur) = 10 x10 cm. Lavez votre échantillon et laissez-le sécher bien à plat avant de le mesurer; si vous n'avez pas les bonnes mesures, recommencez en ajustant la taille des aiguilles - retrouvez ici plus d'infos sur l'échantillon. Bon tricot!
31.05.2021 - 15:44
![]() Südling wrote:
Südling wrote:
Vielen Dank für den Hiinweis. Jetzt komme ich zurecht.
14.04.2021 - 20:05
![]() Südling wrote:
Südling wrote:
In der Erklärung für Vollpatent schreiben Sie: "1. REIHE (= Hin-Reihe): 1 Masche kraus rechts, * 1 Masche rechts....." Wie stricke ich 1 Masche kruas rechts?
14.04.2021 - 14:15DROPS Design answered:
Liebe Frau Südling, die Randmaschen werden bei jeder Reihe rechts gestrickt (kraus rechts). Dieses Video zeigt, wie man Vollpatent mit 1 kraus rechte Masche beidseitig strickt. Viel Spaß beim stricken!
14.04.2021 - 15:28
![]() Jill Dunsford wrote:
Jill Dunsford wrote:
In the pattern it says, “ Decrease to neck on every row from the neck as follows: 1 stitch 8 times = 75-77-80-82-87-89 stitches. ” Does this mean decrease 1 stitch at the neck edge on every row or at the neck edge on alternate rows when you are knitting away from the neck edge? Thanks, Jill
22.03.2021 - 12:23DROPS Design answered:
Dear Jill, it means, you should decrease in ecery other row, when you are knitting avay from the neck edge. Happy Knitting!
22.03.2021 - 12:44
![]() Mirland wrote:
Mirland wrote:
Bonjour je suis débutante aux aiguilles et je cherche des modèles faciles pour moi dans les tricots mais le voudrais essayer '' les dentelles '' sur les bords de tricots... Merci d avance
14.02.2021 - 17:48DROPS Design answered:
Bonjour Mme Mirland, consultez nos différents modèles et lisez attentivement les explications, vous pouvez poser une question dans la rubrique du modèle concerné, tout comme vous l'avez fait ici. Pour toute assistance individuelle, votre magasin saura vous conseiller et vous assister, même par mail ou téléphone. Bon tricot!
15.02.2021 - 09:08
![]() Lilian wrote:
Lilian wrote:
Hej er det en god begynder trøje??Jeg vil gerne have den i noget lækker uldgarn feks snow drop hvor meget skal jeg have til et str XL
11.02.2021 - 13:36DROPS Design answered:
Hej Lilian, Ja denne trøje kan du strikke, men strikkefastheden passer ikke med DROPS Snow. Du kan også søge på "nybegynder - dame" Du skal vælge en med en strikkefasthed på 9-10-11 masker på 10 cm, så passer det med DROPS Snow
16.02.2021 - 14:17
![]() Janine wrote:
Janine wrote:
Is that guage and right? 15 Stitches x 42 rows doexnt sound correct.
11.01.2021 - 05:00DROPS Design answered:
Dear Janine, gauge is right, you should have 42 rows in English rib (brioche) - this means 21 rows with visible knit stitches in height. Happy knitting!
11.01.2021 - 10:39
![]() Grandet wrote:
Grandet wrote:
Thank you very much.
04.01.2021 - 16:31
|
||||||||||
Daily Wonder#dailywondersweater |
||||||||||
 |
 |
|||||||||
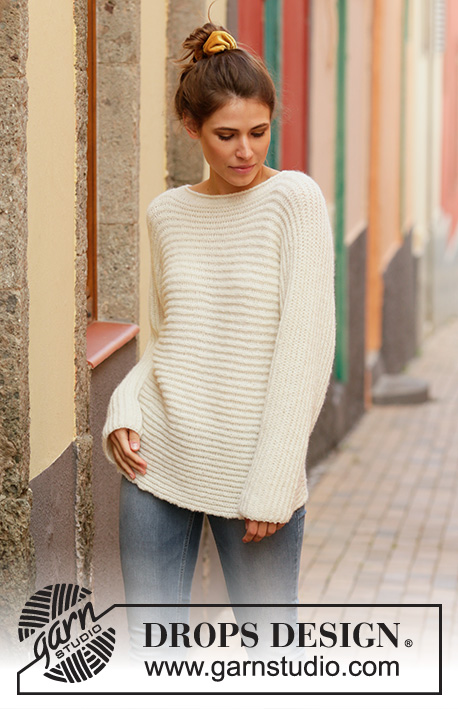
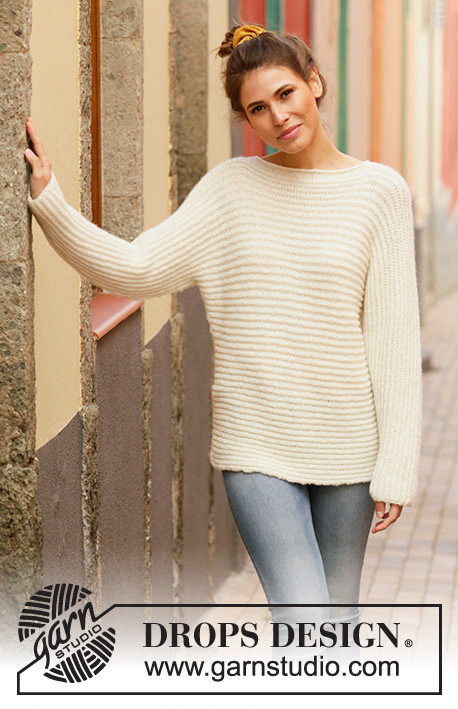
Sweater knitted sideways in DROPS Sky. The piece is worked in English rib. Sizes S - XXXL.
DROPS 201-7 |
||||||||||
|
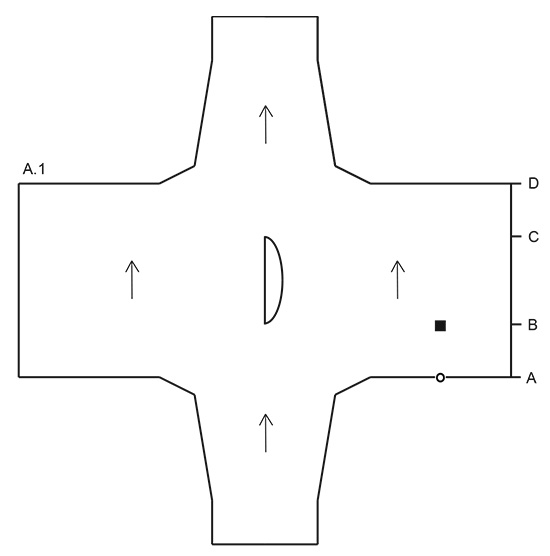
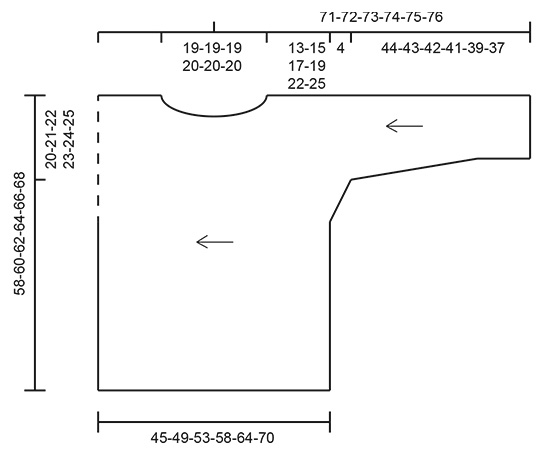
------------------------------------------------------- EXPLANATIONS FOR THE PATTERN: ------------------------------------------------------- KNITTING TIP: Make sure the garment lies flat when measuring. As this garment is worked sideways it is even more important than usual that the measurements are exact and taken on the suggested part of the garment. See sketch and Figure A.1. Figure A.1 has marks where the body should be and where the marker thread for the neck should be. All measurements for body and neck are taken in middle of garment and not by the neck, to avoid the neck/width of body being wrong. ENGLISH RIB: ROW 1 (= right side): 1 stitch in garter stitch, * knit 1, 1 yarn over, slip 1 stitch as if to purl *, work from *-* until there are 2 stitches left on the row and finish with knit 1 and 1 stitch in garter stitch. ROW 2 (= wrong side): 1 stitch in garter stitch, * 1 yarn over, slip 1 stitch as if to purl, knit together next stitch and yarn over *, work from *-* until there are 2 stitches left on row and finish with 1 yarn over, slip 1 stitch as if to purl and 1 stitch in garter stitch. ROW 3 (= right side): 1 stitch in garter stitch, * knit together next stitch and yarn over, 1 yarn over, slip 1 stitch as if to purl *, work from *-* until there are 2 stitches left on row, knit together next stitch and yarn over and 1 stitch in garter stitch. Repeat ROWS 2-3 - NOTE: From ROW 2 the stitches with yarn overs are always knitted. The yarn over lies over the stitch and is knitted together with the stitch. ------------------------------------------------------- START THE PIECE HERE: ------------------------------------------------------- SWEATER - SHORT OVERVIEW OF THE PIECE: The piece is worked back and forth with circular needle in one piece from the sleeve to the neck. It is then divided and front and back pieces are worked separately until the neck is finished. The piece is joined again and continued in one piece. It is very important to get the correct measurements as you work, read KNITTING TIP in description above. SWEATER: Cast on 39-41-43-43-45-45 stitches with circular needle size 4.5 mm = US 7 and Sky (= bottom of sleeve). Work ENGLISH RIB - see description above. When the piece measures 12 cm = 4¾" increase 1 stitch in each side inside the 1 stitch every 3-2½-2½-2-2-1½ cm = 1⅛"-1"-1"-¾"-¾"-½" a total of 10-11-11-13-13-15 times = 59-63-65-69-71-75 stitches - the increased stitches are worked into the English rib as you go. REMEMBER THE KNITTING GAUGE! When the piece measures 44-43-42-41-39-37 cm = 17¼"-17"-16½"-16⅛"-15¼"-14½", loosely cast on stitches on both sides at the end of each row as follows: 2 stitches 2 times, 4 stitches 6 times and then 30-30-32-32-36-36 stitches 1 time. You have now cast on stitches for the body; insert a marker in the middle of the last stitches cast on - this is the side of the body and you now measure from here - read KNITTING TIP in description above and see Figure A.1 point A! There are 175-179-185-189-199-203 stitches on the needle. Continue with English rib. When the piece measures 13-15-17-19-22-25 cm = 5⅛"-6"-6¾"-7½"-8¾"-9¾" from the marker in the side (from point A to point B in Figure A.1), work the next row as follows (make sure this row is worked from the wrong side): Work 87-89-92-94-99-101 stitches (= back piece) and then place these stitches on a thread, bind off 5 stitches for neck, work 83-85-88-90-95-97 stitches (= front piece). Insert a marker thread in the middle of the piece here; the neck is measured from here (position the marker thread so that it is directly over the marker in the side, see Figure A.1, there is 13-15-17-19-22-25 cm = 5⅛"-6"-6¾"-7½"-8¾"-9¾" between the marker (point A) and the marker thread (point B)). Now continue by working the front piece at the same time as you decrease for neck. FRONT PIECE: There are 83-85-88-90-95-97 stitches on the needle. Decrease to neck on every row from the neck as follows: 1 stitch 8 times = 75-77-80-82-87-89 stitches. Work until the piece measures 15-15-15-16-16-16 cm = 6"- 6"- 6"-6¼"-6¼"-6¼"- from the marker thread (point B) and 28-30-32-35-38-41 cm = 11"-11¾"-12½"-13¾"-15"-16⅛" from the marker in the side of body (point A). Loosely cast on for neck, at the end of each row towards the neck as follows: 1 stitch 8 times and 5 stitches 1 time = 88-90-93-95-100-102 stitches. The neck measures approx. 19-19-19-20-20-20 cm = 7½"-7½"-7½"-8"-8"-8" from the marker thread (from point B to point C). Then place all stitches on a thread and continue with the back piece. Cut the strand. BACK PIECE: Place the 87-89-92-94-99-101 stitches from the thread on the circular needle. Continue with the back piece until the neck measures 19-19-19-20-20-20 cm = 7½"-7½"-7½"-8"-8"-8" (see Figure A.1 point C) - adjust so that you have worked the same length as on the front piece. Both pieces can now be placed on the same needle and you continue working in one piece. FRONT AND BACK PIECE: Place the 88-90-93-95-100-102 stitches from the thread on the same circular needle as the back piece = 175-179-185-189-199-203 stitches. Continue working until the front/back pieces measures 45-49-53-58-64-70 cm = 17¾"-19¼"-21"-22¾"-25¼"-27½" from the marker in the side of the body (from point A to point D). Now loosely bind off on each side, at the beginning of each row as follows: 30-30-32-32-36-36 stitches 1 time, 4 stitches 6 times and 2 stitches 2 times = 59-63-65-69-71-75 stitches. Insert 1 new marker here and now measure from here. Work the same length over the stitches as on the other sleeve after the last increase, then decrease 1 stitch on each side inside the 1 stitch every 3-2½-2½-2-2-1½ cm = 1⅛"-1"-1"-¾"-¾"-½" a total of 10-11-11-13-13-15 times = 39-41-43-43-45-45 stitches. Work until the piece measures 44-43-42-41-39-37 cm = 17¼"-17"-16½"-16⅛"-15¼"-14½" from the marker and loosely bind off. NOTE! When binding off, work the yarn overs together with their stitches below AT THE SAME TIME as you bind off. ASSEMBLY: Fold the piece, wrong side to wrong side. Start sewing outermost on sleeve. Sew in the outermost loop of the outermost stitch along the whole sleeve and then down the side of front/back piece. Repeat on other side. NECK: Knit up stitches around the whole neck inside the 1 edge stitch (make sure you knit up in purled stitches mid front and along the neck on the back piece). Knit up approx. 90-106 stitches from the right side with short circular needle size 4.5 mm = US 7 and Sky. Work 8 rounds of stockinette stitch and then loosely bind off. The edge should roll. |
||||||||||
Diagram explanations |
||||||||||
|
||||||||||
 |
||||||||||
 |
||||||||||
Have you finished this pattern?Tag your pictures with #dropspattern #dailywondersweater or submit them to the #dropsfan gallery. Do you need help with this pattern?You'll find 20 tutorial videos, a Comments/Questions area and more by visiting the pattern on garnstudio.com. © 1982-2026 DROPS Design A/S. We reserve all rights. This document, including all its sub-sections, has copyrights. Read more about what you can do with our patterns at the bottom of each pattern on our site. |
||||||||||


With over 40 years in knitting and crochet design, DROPS Design offers one of the most extensive collections of free patterns on the internet - translated to 17 languages. As of today we count 324 catalogs and 12239 patterns - 12229 of which are translated into English (US/in).
We work hard to bring you the best knitting and crochet have to offer, inspiration and advice as well as great quality yarns at incredible prices! Would you like to use our patterns for other than personal use? You can read what you are allowed to do in the Copyright text at the bottom of all our patterns. Happy crafting!
Post a comment to pattern DROPS 201-7
We would love to hear what you have to say about this pattern!
If you want to leave a question, please make sure you select the correct category in the form below, to speed up the answering process. Required fields are marked *.