
Popular categories
Looking for a yarn?


Comments / Questions (210)
![]() Mara wrote:
Mara wrote:
Hi I saw this pattern has changed so I restarted but I am a little confused regarding the body part (and after). It says when 3cm cast off the edge stitches and then cast on 3 stitches on each side. However, the number of stitches on the needle does not match with what is said (for example: 120 for size 6/9 months when it should be 118. You had 114 cast of 2 stitches, so 112+6=118). Does this mean I should not cast off the edge stitches? The math on the rest of the piece follows 120 stitches
16.12.2025 - 15:14DROPS Design answered:
Dear Mara, thanks for noticing, pattern has been fixed, you should cast on 4 sts on each side. Happy knitting!
17.12.2025 - 11:25
![]() Susanne Magnussen wrote:
Susanne Magnussen wrote:
Hvor er diagrammet til denne opskrift? Jeg kan se at flere har spurgt om det samme, men uden at få svar?
07.12.2025 - 21:53DROPS Design answered:
Hei Susanne. Diagrammene er nå synlig igjen. mvh DROPS Design
08.12.2025 - 11:14
![]() Margareta wrote:
Margareta wrote:
Jag kan inte se hela diagrammet. Varför?
06.12.2025 - 16:46DROPS Design answered:
Hei Margareta. Diagrammene er nå synlig igjen. mvh DROPS Design
08.12.2025 - 12:50
![]() Siv wrote:
Siv wrote:
Am i the only one who cant see the entire diagram? I’ve tried different browsers and printing, but I can only see 1 row of diagram A.
05.12.2025 - 18:22DROPS Design answered:
Dear Siv, thanks for noticing, diagrams are now visible again. Happy knitting!
08.12.2025 - 07:35
![]() Mara wrote:
Mara wrote:
Hi I saw this pattern has changed so I restarted but I am a little confused regarding the body part (and after). It says when 3cm cast off the edge stitches and then cast on 3 stitches on each side. However, the number of stitches on the needle does not match with what is said (for example: 120 for size 6/9 months when it should be 118. You had 114 cast of 2 stitches, so 112+6=118). Does this mean I should not cast off the edge stitches? The math on the rest of the piece follows 120 stitches.
05.12.2025 - 00:11
![]() Lilian wrote:
Lilian wrote:
Hello, I’ve gotten to the point of shaping the neck, but I don’t understand where the 8 (for 0/1month old) stitches that are on the stitch holder comes into play again? I’ve skimmed through the whole pattern and it seems to be not mentioned again and I cannot see on the model picture where this pattern would correspond. I’ve cast off the 2 and 1 stitches according to the pattern, and completed to the recommended length and unsure how to proceed.
01.12.2025 - 15:50DROPS Design answered:
Dear Lillian, these 8stitches will be worked again afterwards when you will pick up the stitches around the neck for hood: you will then work these stitches, pick up sts in the cast off stitches for neck (in your size: 2 sts 1 time and 1 st 1 time) + alon gthe shoulder and along neck on back piece. Happy knitting!
01.12.2025 - 16:28
![]() Franca wrote:
Franca wrote:
Non riesco a capire come unire la gamba destra con la destra gli aumenti per le gambe sono uguali ma in modo diverso tra l'inizio e la fine del ferro. Come devo iniziare? Sono bloccata
21.11.2025 - 18:12DROPS Design answered:
Buonasera Franca, il modello è stato rivisto e aggiornato, ma la procedura di cucitura delle gambe non è cambiata: deve cucire all'interno della maglia di vivagno. Buon lavoro!
05.12.2025 - 00:29
![]() Lisa wrote:
Lisa wrote:
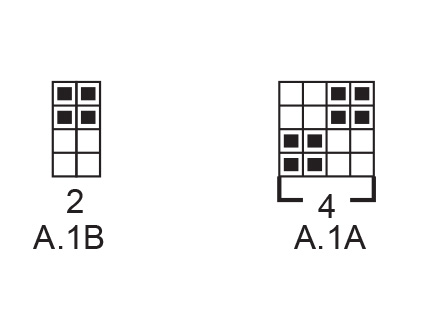
Ich bin gerade dabei das rechte Bein zu stricken. Wenn ich in Reihen Muster A1A und A1B stricke, habe ich immer am Ende/am Anfang der Reihe vier "gleiche" Maschen hintereinander, d.h. entweder 4 rechte oder vier linke (je nachdem ob Hin- oder Rückreihe). Ist das so richtig?
19.11.2025 - 16:48DROPS Design answered:
Liebe Lisa, in allen Größen wird man bei den Hinreihen A.1A (=4M) wiederholen dann mit den 2 Maschen A.1B enden, so hat man bei der 1. Reihe z.B.: (2 M re, 2 M li) für A.1A dann 2 M re für A.1B, die Maschen stricken Sie bein den Rückreihen wie sie erscheinen (2. Reihe Diagramme): 2 M li (A.1B) und (2 re, 2 li) für A.1A wiederholen. Viel Spaß beim Stricken!
20.11.2025 - 08:45
![]() Lisa wrote:
Lisa wrote:
Wenn ich einfach alles drehe, passt es wunderbar. Also als vordere Mitte die 5 (bzw 10) neuen M, hinten die 6 (bzw 12) neuen M. Macht für mich auch Sinn, dass es am Po breiter sein muss als vorn. Ich finde die richtige Erklärung nicht. Danke
28.10.2025 - 11:24
![]() Lisa wrote:
Lisa wrote:
Hallo, habe alle Komm. gelesen aber kann nicht re und li Bein auf eine Nadel legen. Die erste der 6 neuen M ist kraus re. Die verbleibenden 5 neuen M kann ich nicht im Muster stricken, da es keine gerade Zahl ist. Daher passt es auch nicht mit dem Muster.
28.10.2025 - 11:23DROPS Design answered:
Liebe Lisa, Sie stricken das Muster so weiter, dass es über das bestehende Muster passt. Die Beine müssten Sie wie beschrieben auf die Nadel legen können, die Anleitung ist stimmig. Wenn Sie für sich eine Lösung gefunden haben, ist das ja auch gut. Viel Spaß beim Weiterstricken!
04.11.2025 - 20:56
|
|||||||
Truly Wooly#trulywoolyonesie |
|||||||
 |
 |
||||||
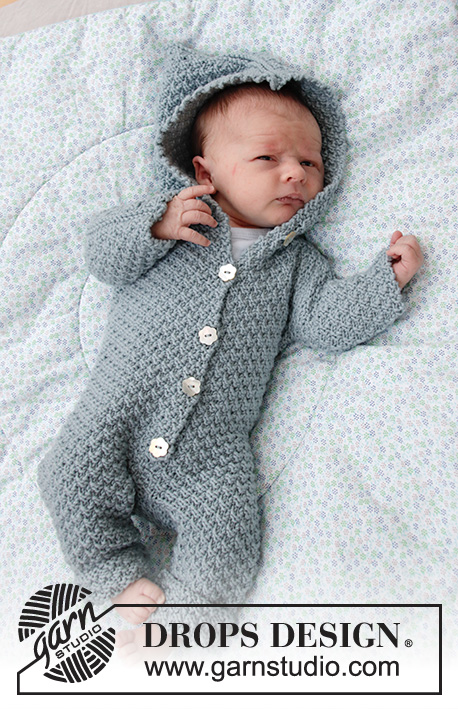
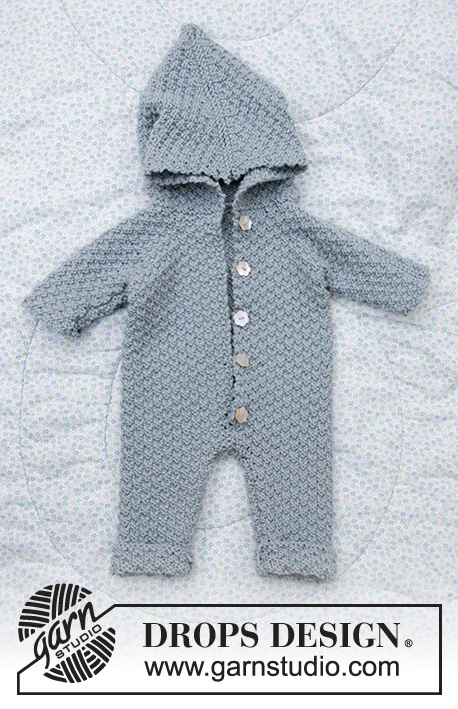
Knitted suit for baby in DROPS Merino Extra Fine. Piece is knitted with textured pattern and hood. Size premature - 4 years
DROPS Baby 33-8 |
|||||||
|
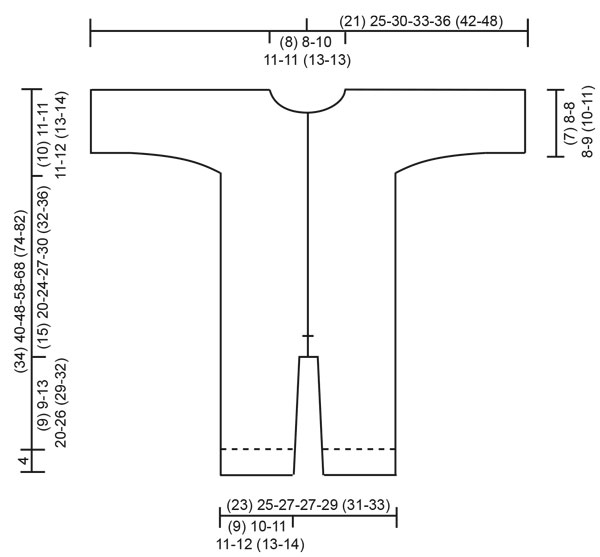
---------------------------------------------------------- EXPLANATION FOR THE PATTERN: ---------------------------------------------------------- GARTER STITCH (back and forth): 1 ridge = knit 2 rows. 1 edge stitch in garter stitch = knit stitch from right side and knit stitch from wrong side. PATTERN: See diagram A.1. Diagrams show all rows in pattern seen from the right side. INCREASE TIP-1: Increase 1 stitch inside 1 edge stitch in garter stitch by making 1 yarn over. On next row work yarn overs twisted to avoid holes. Work the increased stitches in A.1. INCREASE TIP-2 (evenly): To calculate how to increase evenly, use the total number of stitches on row (e.g. 44 stitches) and divide stitches by number of increases to be done (e.g. 14) = 3.1. In this example increase by making 1 yarn over after approx. every 3rd stitch. On next row knit yarn overs twisted to avoid holes. BUTTONHOLES (bottom up): Decrease for buttonholes on right band. 1 BUTTONHOLE = knit third and fourth stitch from edge together and make 1 yarn over. On next row purl or knit yarn over (depending on where in the diagram you are) to make holes. Decrease for buttonholes when piece measures (measured from where legs where put together): (premature): 5, 10, 15 and 20 cm = 2", 4", 6" and 8" 0/1 months: 6, 11, 16, 21 and 26 cm = 2⅜", 4⅜", 6¼", 8¼" and 10¼" 1/3 months: 5, 10, 15, 20, 25 and 30 cm = 2", 4", 6", 8", 9¾" and 11¾" 6/9 months: 6, 12, 17, 22, 27 and 32 cm = 2⅜", 4¾", 6¾", 8¾", 10⅝" and 12½" 12/18 months: 6, 12, 18, 24, 30 and 36 cm = 2⅜", 4¾", 7", 9½", 11¾" and 14¼" 2 years: 9, 15, 21, 27, 33 and 39 cm = 3½", 6", 8¼", 10⅝", 13" and 15¼" 3/4 years: 7, 13, 19, 25, 31, 37 and 43 cm = 2¾", 5⅛", 7½", 9¾", 12¼", 14½" and 17" ---------------------------------------------------------- START THE PIECE HERE: ---------------------------------------------------------- SUIT - SHORT OVERVIEW OF THE PIECE: Work each leg back and forth on circular needle, bottom up. Place legs together and work back and forth on circular needle from mid front up to sleeves. Then cast on new stitches for sleeves in each side and finish front pieces and back piece separately. Sew piece together on the shoulder. Finish by picking up stitches around the neck and work a hood. RIGHT LEG (when suit is worn): Cast on (40) 44-48-48-52 (56-60) stitches on circular needle size 4 MM = US 6 with Merino Extra Fine. Work first row as follows from right side: 1 edge stitch in GARTER STITCH – read explanation above, work A.1A until 3 stitches remain on row (= 9-10-11-11-12 (13-14) repetitions of 4 stitches), work A.1B (= 2 stitches) and finish with 1 edge stitch in garter stitch. Continue pattern like this. REMEMBER THE KNITTING GAUGE! When piece measures 4 cm = 1½", insert 1 marker in piece (marks fold). When piece measures (5) 5-7-8-10 (12-14) cm = (2") 2"-2¾"-3⅛"-4" (4¾"-5½") increase 1 stitch in each side – read INCREASE TIP-1. Repeat increase when piece measures (8) 8-12-18-20 (22-24) cm = (3⅛") 3⅛"-4¾"-7"-8" (8¾"-9½") = (44) 48-52-52-56 (60-64) stitches on needle. Work until piece measures (12) 12-16-23-31 (32-35) cm = (4¾") 4¾"-6¼"-9"-12¼" (12½"-13¾") from cast-on edge, adjust so that next row is worked from right side. Bind off 1 stitch at beginning of the next 2 rows (i.e. bind off edge stitches) = (42) 46-50-50-54 (58-62) stitches. Then work the next 2 rows as follows, begin from right side: Work as before over all stitches and cast on 3 new stitches at the end of row (= mid back). Turn piece, work A.1 as before over all stitches, but make sure to continue pattern correctly, then cast on (4) 4-4-4-4 (4-4) stitches at the end of row from wrong side (= mid front). There are now (49) 53-57-57-61 (65-69) stitches on needle and piece measures approx. (13) 13-17-24-30 (33-36) cm = (5⅛") 5⅛"-6¾"-9½"-11¾" (13"-14¼") from cast-on edge. Put piece aside and work left leg as explained below. LEFT LEG (when suit is worn): Cast on (40) 44-48-48-52 (56-60) stitches on circular needle size 4 MM = US 6 and work first row as follows from right side: 1 edge stitch in garter stitch, work A.1A until 3 stitches remain on row (=9-10-11-11-12 (13-14) repetitions of 4 stitches), work A.1B (= 2 stitches) and finish with 1 edge stitch in garter stitch. Continue pattern like this. When piece measures 4 cm = 1½", insert 1 marker in piece (marks fold). When piece measures (5) 5-7-8-10 (12-14) cm = (2") 2"-2¾"-3⅛"-4" (4¾"-5½") increase 1 stitch in each side – remember INCREASE TIP-. Repeat increase when piece measures (8) 8-12-18-20 (22-24) cm = (3⅛") 3⅛"-4¾"-7"-8" (8¾"-9½") = (44) 48-52-52-56 (60-64) stitches on needle. Work until piece measures (12) 12-16-23-31 (32-35) cm = (4¾") 4¾"-6¼"-9"-12¼" (12½"-13¾") from cast-on edge, adjust so that next row is worked from right side. Bind off 1 stitch at beginning of the next 2 rows (i.e. bind off edge stitches) = (42) 46-50-50-54 (58-62) stitches. Then work the next 2 rows as follows, begin from right side: Work as before over all stitches and cast on 4 new stitches at the end of row (= mid front). Turn piece, work A.1 as before over all stitches, but make sure to continue pattern correctly, then cast on 3 stitches at the end of row from wrong side (= mid back). There are now (49) 53-57-57-61 (65-69) stitches on needle and piece measures approx. (13) 13-17-24-30 (33-36) cm = (5⅛") 5⅛"-6¾"-9½"-11¾" (13"-14¼") from cast-on edge. Cut the yarn. Now place the parts together as explained below. BODY: Place right leg and left leg on same circular needle with right leg first. Begin from right side on right leg, work 1 edge stitch in garter stitch, continue A.1 as before over the remaining stitches on right leg (make sure to continue pattern correct according to finish on leg), then continue pattern over the first (48) 52-56-56-60 (64-68) stitches on left leg (make sure to continue pattern correct) and finish with 1 edge stitch in garter stitch = (98) 106-114-114-122 (130-138) stitches on needle. Insert another marker in piece! NOW MEASURE PIECE FROM THIS MARKER! Continue A.1 back and forth with 1 edge stitch in garter stitch in each side towards mid front. When piece measures (3) 3-3-3-4 (5-5) cm = (1⅛") 1⅛"-1⅛"-1⅛"-1½" (2"-2") from marker (adjust to work next row from right side) bind off 1 stitch at beginning of the next 2 rows (i.e. bind off edge stitches). Then work the next 2 rows as follows, begin from right side: Work as before over all stitches and cast on 4 new stitches at the end of row (= left band at the front). Turn piece, work A.1 as before over all stitches (make sure to continue pattern correctly) and cast on 4 new stitches at the end of row from wrong side (= right band at the front). There are now (104) 112-120-120-128 (136-144) stitches on needle. Continue A.1 back and forth over all stitches (i.e. do not work edge stitches in garter stitch). Remember BUTTONHOLES on right band - read explanation above. When piece measures (15) 20-24-27-30 (32-36) cm = (6") 8"-9½"-10⅝"-11¾" (12½"-14¼") from the new marker, i.e. (28) 33-41-51-60 (65-72) cm = (11") 13"-16⅛"-20"-23⅝" (25½"-28⅜") from cast-on edge, divide the piece in each side. Finish front pieces and back piece separately as explained below. RIGHT FRONT PIECE: Begin from right side and work as before over the first (27) 29-31-31-33 (35-37) stitches, then cast on (7) 13-13-17-17 (21-25) new stitches for sleeve. Slip the remaining stitches on 1 stitch holder for back piece and left front piece. Continue A.1 back and forth as before but make sure that pattern fits over all stitches. AT THE SAME TIME cast on (6) 7-11-12-14 (18-21) new stitches for sleeve at the end of the next 2 rows from right side = (46) 56-66-72-78 (92-104) stitches on needle. Continue pattern back and forth over all stitches until piece measures (22) 28-32-35-38 (41-45) cm = (8¾") 11"-12½"-13¾"-15" (16⅛"-17¾") from marker, i.e. (35) 41-49-59-68 (74-81) cm = (13¾") 16⅛"-19¼"-23¼"-26¾" (29⅛"-32") from cast-on edge. At the beginning of next row from right side slip the first (8) 8-9-11-11 (12-12) stitches on 1 stitch holder for neck but to avoid cutting the yarn work them before slipping them on the stitch holder. Continue pattern back and forth as before and bind off for neck at the beginning of every row from mid front as follows: Bind off 2 stitches 1 time and 1 stitch (1) 1-2-2-2 (3-3) times = (35) 45-53-57-63 (75-87) stitches remain on needle. Then work until the entire suit measures approx. (24) 30-34-37-41 (44-49) cm = (9½") 11¾"-13⅜"-14½"-16⅛" (17¼"-19¼") from marker, i.e. (37) 43-51-61-71 (77-85) cm = (14½") 17"-20"-24"-28" (30⅜"-33½") from cast-on edge, but adjust so that next row is worked from right side. Work 1 ridge back and forth over all stitches. Then bind off by knitting from the right side. The entire suit measures approx. (38) 44-52-62-72 (78-86) cm = (15") 17¼"-20½"-24⅜"-28⅜" (30¾"-33⅞") from cast-on edge. Now work back piece as explained below. BACK PIECE: Slip the first (50) 54-58-58-62 (66-70) stitches on stitch holder (seen from right side) on circular needle size 4 MM = US 6 and continue A.1 back and forth over these stitches as before. AT THE SAME TIME cast on new stitches for sleeves at the end of every row in each side as follows: Cast on (7) 13-13-17-17 (21-25)stitches 1 time in each side and then (6) 7-11-12-14 (18-21) stitches 2 times in each side = (88) 108-128-140-152 (180-204) stitches on needle. Continue pattern back and forth over all stitches until piece measures (23) 29-33-36-40 (43-48) cm = (9") 11⅜"-13"-14¼"-15¾" (17"-19") from marker). On next row bind off the middle (14) 14-18-22-22 (26-26) stitches for neck and finish each shoulder/sleeve separately. Then bind off 2 stitches on next row from neck = (35) 45-53-57-63 (75-87) stitches remain on needle for shoulder/sleeve. Then work until the entire suit measures approx. (24) 30-34-37-41 (44-49) cm = (9½") 11¾"-13⅜"-14½"-16⅛" (17¼"-19¼") from marker, but adjust according to front piece and make sure that next row is from right side. Work 1 ridge back and forth over all stitches. Then bind off by knitting from the right side. Work the other shoulder/sleeve the same way. Then work left front piece as explained below. LEFT FRONT PIECE: Slip the remaining (27) 29-31-31-33 (35-37) stitches on stitch holder back on needle size 4 MM = US 6. Begin from right side and continue A.1 back and forth as before. AT THE SAME TIME cast on new stitches for sleeve at the end of the next 3 rows from wrong side as follows: Cast on (7) 13-13-17-17 (21-25) stitches 1 time and then (6) 7-11-12-14 (18-21) stitches 2 times = (46) 56-66-72-78 (92-104) stitches on needle. Continue pattern back and forth over all stitches until piece measures (22) 28-32-35-36 38 (41-45) cm = (8¾") 11"-12½"-13¾"-14¼" 15" (16⅛"-17¾") from marker, i.e. (35) 41-49-59-68 (74-81) cm = (13¾") 16⅛"-19¼"-23¼"-26¾" (29⅛"-32") from cast-on edge. At the beginning of next row from wrong side slip the first (8) 8-9-11-11 (12-12) stitches on 1 stitch holder for neck but to avoid cutting the yarn work them before slipping them on the stitch holder. Continue pattern back and forth as before and bind off for neck at the beginning of every row from mid front as follows: Bind off 2 stitches 1 time and 1 stitch (1) 1-2-2-2 (3-3) times = (35) 45-53-57-63 (75-87) stitches remain on needle. Then work until the entire suit measures approx. (24) 30-34-37-41 (44-49) cm = (9½") 11¾"-13⅜"-14½"-16⅛" (17¼"-19¼") from marker, i.e. (37) 43-51-61-71 (77-85) cm = (14½") 17"-20"-24"-28" (30⅜"-33½") from cast-on edge, but measure so that next row is worked from right side. Work 1 ridge back and forth over all stitches. Then bind off by knitting from the right side. The entire suit measures approx. (38) 44-52-62-72 (78-86) cm = (15") 17¼"-20½"-24⅜"-28⅜" (30¾"-33⅞") from cast-on edge. ASSEMBLY: Sew shoulder seams inside bind-off edges. Sew the seams under the sleeve. Sew seam on inside of both legs inside 1 edge stitch in each side. Sew seam mid front from bottom of band and down inside 1 edge stitch in each side. Sew together the opening between the legs. Fold the end of legs at the marker. Sew the buttons on to the left band. HOOD: Pick up from right side approx. 44 to 70 stitches around the neck (including stitches on stitch holders at the front). Knit 1 row from wrong side while increasing evenly to (58) 70-74-74-78 (86-86) stitches – read INCREASE TIP-2. Knit 1 row from right side and knit 1 row from wrong side. Work next row as follows from right side: Work A.1A until 2 stitches remain on needle and finish with A.1B (= 2 stitches). Continue pattern like this until piece measures (17) 18-19-20-21 (22-23) cm = (6¾") 7"-7½"-8"-8¼" (8¾"-9") from ridge in the neck, but adjust so that next row is from right side. Work 1 ridge back and forth over all stitches. Then bind off by knitting from the right side. Place the hood double and sew seam at the top inside bind-off edge. |
|||||||
Diagram explanations |
|||||||
|
|||||||
 |
|||||||
 |
|||||||
Have you finished this pattern?Tag your pictures with #dropspattern #trulywoolyonesie or submit them to the #dropsfan gallery. Do you need help with this pattern?You'll find 27 tutorial videos, a Comments/Questions area and more by visiting the pattern on garnstudio.com. © 1982-2026 DROPS Design A/S. We reserve all rights. This document, including all its sub-sections, has copyrights. Read more about what you can do with our patterns at the bottom of each pattern on our site. |
|||||||


With over 40 years in knitting and crochet design, DROPS Design offers one of the most extensive collections of free patterns on the internet - translated to 17 languages. As of today we count 325 catalogs and 12298 patterns - 12288 of which are translated into English (US/in).
We work hard to bring you the best knitting and crochet have to offer, inspiration and advice as well as great quality yarns at incredible prices! Would you like to use our patterns for other than personal use? You can read what you are allowed to do in the Copyright text at the bottom of all our patterns. Happy crafting!
Post a comment to pattern DROPS Baby 33-8
We would love to hear what you have to say about this pattern!
If you want to leave a question, please make sure you select the correct category in the form below, to speed up the answering process. Required fields are marked *.