
Popular categories
Looking for a yarn?


Comments / Questions (210)
![]() Gerd Marit wrote:
Gerd Marit wrote:
Sliter med å forstå hvordan strukturen i mønsteret er. Skal det strikkes 2 rette og 2 vrange i 2 omganger og omvendt de to neste.
30.03.2020 - 20:49DROPS Design answered:
Hej Ja det stämmer. Mvh DROPS Design
31.03.2020 - 07:13
![]() Jannicke wrote:
Jannicke wrote:
Hei! Hvordan gjør man det med armer? «39cm fra merket» er ikke langt nok til armer? Og ikke noen egen forklart måte å strikke de på? :)
24.03.2020 - 10:30DROPS Design answered:
Hej Jannicke, jo du legger op masker i hver side til ermer. Følg forklaringen under HØYRE FORSTYKKE så får du længden på ermerne ifølge måleskitsen nederst i opskriften. God fornøjelse!
25.03.2020 - 09:16
![]() Linda wrote:
Linda wrote:
How can I do this pattern on two needles please Many thanks Linda
23.03.2020 - 22:55DROPS Design answered:
Hi Linda, This pattern is worked back and forth, so possible to do on 2 needles. However, we recommend using a circular needle so you do not lose stitches off the end of the straight needles. Happy knitting!
24.03.2020 - 07:34
![]() Linda wrote:
Linda wrote:
Hello there Can you help me do the pattern about on two needles instead of Circular needles hope you can help many thanks Linda x
17.03.2020 - 21:54DROPS Design answered:
Dear Linda, yes you can do that. HERE you can find a tutoril that explains just how can you do that. Happy Knitting!
18.03.2020 - 00:19
![]() Raubaly wrote:
Raubaly wrote:
Bonjour Je realise la capuche je dois relever entre 40 et 70 mailles. Combien dous je faire d augmentation, 70 mailles ? Au maximum je me retrouve avec 140 mailles ? Est ce bien cela ? Merci pour vos réponses Cordialement
17.03.2020 - 10:17DROPS Design answered:
Bonjour Mme Raubaly, vous devez relever entre 40 et 70 mailles et ensuite augmenter à intervalles réguliers pour que vous ayez à la fin de ce premier rang entre 58 et 86 mailles - soit 70 mailles dans la 2ème taille, admettons que vous ayez relevé 50 mailles, vous allez augmenter 20 mailles à intervalles réguliers pour avoir 70 mailles au total. Bon tricot!
17.03.2020 - 10:25
![]() Linda wrote:
Linda wrote:
Can or have you got this pattern knitted on two needles instead of a circular needle please
09.03.2020 - 23:25DROPS Design answered:
Dear Linda. Yes, it is possible for most of our patterns to modify them for using two straight needle and knit them flat / back and forth. We have a lesson that explains just how you can do that. Happy Crafting!
10.03.2020 - 05:20
![]() Rebekka wrote:
Rebekka wrote:
Fór yfir mynstur (6/9mán), þetta passar ekki. Hægri: 6 uppfit L - A1A 36L - A1B 2L - 5 uppfit L. Vinstri: 5 uppfit L - A1A 36L - A1B 2L - 6 uppfit L. Byrja á hægri, 1 kantlykkja, þá eru eftir 5L í mynstur sem þarf slétta tölu af L fjölda. Er uppfitjunar fjöldi og staðsetning (byrja á 6 á hægri? byrja á 5 á vinstri? o.s.frv.) í mynstri rétt? OG hvernig á vinstri skálm að snúa á prjóni? Á A1B mynstur að mæta í miðju? utanverðu? ein utan og ein í miðju?
18.01.2020 - 10:37DROPS Design answered:
Við miðju að aftan er felld af 1 lykkja = kantlykkja og fitjaðar eru upp 3-5-7 lykkjur. Þannig að þegar þú setur stykkin saman þá eru 6-10-14 lykkjur = þær eru settar saman í mynstur A.1A/A.1B = þá er hægt að prjóna mynstur yfir nýjar lykkjur.
27.01.2020 - 12:35
![]() Rebekka wrote:
Rebekka wrote:
Er að byrja á fram- og bakstykki. Lykkjufjöldi passar ekki við mynstur; 6 lykkjur í byrjun hægra stykkis þýðir að ein lykkja verði útundan við mynstur. Sama á við vinstra stykki. Einnig, ef 5 lykkjur eiga að mætast í miðju hvors stykkis þá er A1B mynstur að utanverðu á hægra stykki en innanverðu á vinstra stykki. Er það rétt?
17.01.2020 - 20:12DROPS Design answered:
Blessuð, það sem mér dettur í hug er að þú hafir gleymt að fækka um 2 kantlykkjur í vinstri skálm. Fellið af 1 lykkju í byrjun á 2 næstu umferðum (þ.e.a.s. kantlykkjur eru felldar af) = (30) 34-38-38-42 (42-50) lykkjur. Vona að þetta gangi þá upp.
17.01.2020 - 20:30
![]() Anna wrote:
Anna wrote:
Vad gör man med tråden som ska klippas av i slutet på VÄNSTER BEN? Fästas på något sätt?
11.01.2020 - 22:48DROPS Design answered:
Hej Anna, ja du fäster alla lösa tråder när du har stickat klart. Lycka till :)
15.01.2020 - 15:55
![]() Paula wrote:
Paula wrote:
Hallo, ik ben het lijfje aan het breien maar ik begrijp niet zo goed tot waar de knoopsgaten moeten komen. Als het lijfje in totaal 24 cm vanaf de nieuwe markering is, kan er toch niet op 30 cm nog een knoopsgat komen? Hoe zit dat precies? Alvast dank, Danielle
11.01.2020 - 21:43DROPS Design answered:
Dag Paula,
De opgegeven afmetingen voor de knoopsgaten zijn vanaf waar de pijpen samengevoegd zijn. Voor elke maat staat aangegeven waar ze precies komen (bij instructies bovenaan het patroon).
14.01.2020 - 20:45
|
|||||||
Truly Wooly#trulywoolyonesie |
|||||||
 |
 |
||||||
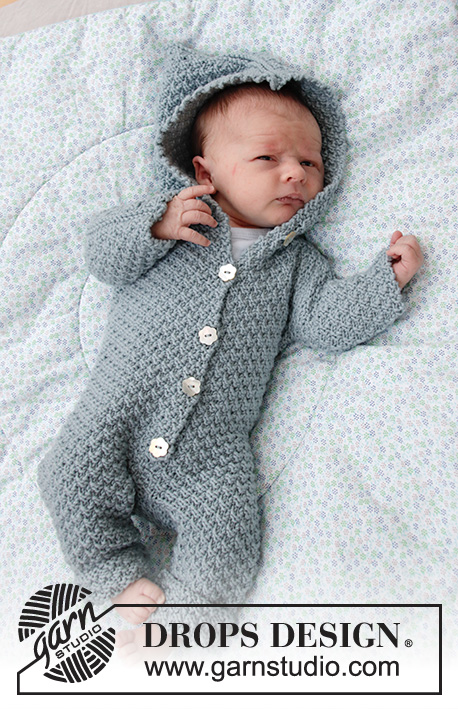
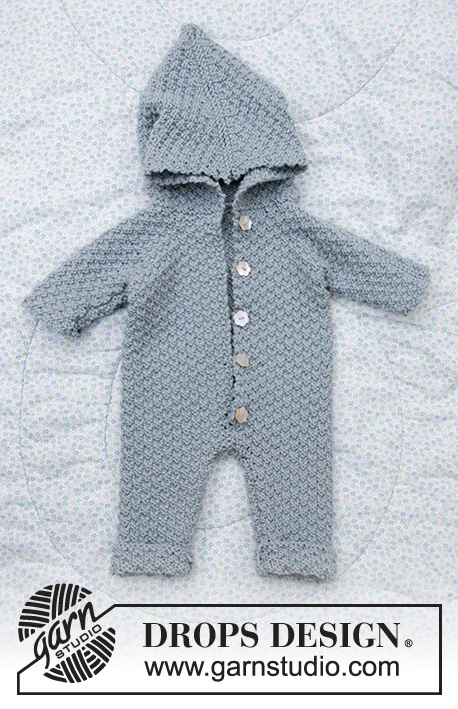
Knitted suit for baby in DROPS Merino Extra Fine. Piece is knitted with textured pattern and hood. Size premature - 4 years
DROPS Baby 33-8 |
|||||||
|
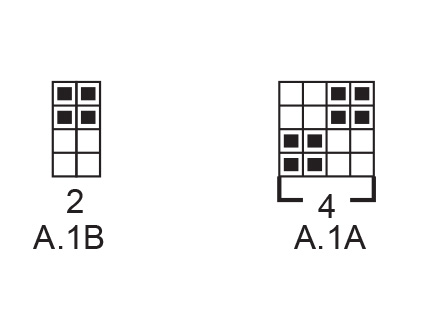
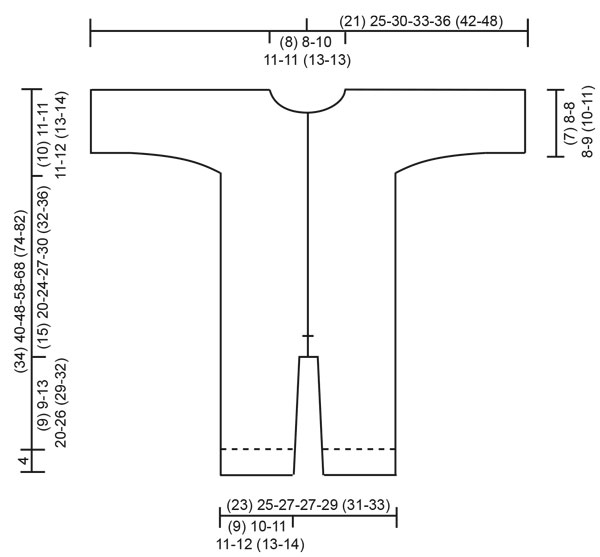
---------------------------------------------------------- EXPLANATION FOR THE PATTERN: ---------------------------------------------------------- GARTER STITCH (back and forth): 1 ridge = knit 2 rows. 1 edge stitch in garter stitch = knit stitch from right side and knit stitch from wrong side. PATTERN: See diagram A.1. Diagrams show all rows in pattern seen from the right side. INCREASE TIP-1: Increase 1 stitch inside 1 edge stitch in garter stitch by making 1 yarn over. On next row work yarn overs twisted to avoid holes. Work the increased stitches in A.1. INCREASE TIP-2 (evenly): To calculate how to increase evenly, use the total number of stitches on row (e.g. 44 stitches) and divide stitches by number of increases to be done (e.g. 14) = 3.1. In this example increase by making 1 yarn over after approx. every 3rd stitch. On next row knit yarn overs twisted to avoid holes. BUTTONHOLES (bottom up): Decrease for buttonholes on right band. 1 BUTTONHOLE = knit third and fourth stitch from edge together and make 1 yarn over. On next row purl or knit yarn over (depending on where in the diagram you are) to make holes. Decrease for buttonholes when piece measures (measured from where legs where put together): (premature): 5, 10, 15 and 20 cm = 2", 4", 6" and 8" 0/1 months: 6, 11, 16, 21 and 26 cm = 2⅜", 4⅜", 6¼", 8¼" and 10¼" 1/3 months: 5, 10, 15, 20, 25 and 30 cm = 2", 4", 6", 8", 9¾" and 11¾" 6/9 months: 6, 12, 17, 22, 27 and 32 cm = 2⅜", 4¾", 6¾", 8¾", 10⅝" and 12½" 12/18 months: 6, 12, 18, 24, 30 and 36 cm = 2⅜", 4¾", 7", 9½", 11¾" and 14¼" 2 years: 9, 15, 21, 27, 33 and 39 cm = 3½", 6", 8¼", 10⅝", 13" and 15¼" 3/4 years: 7, 13, 19, 25, 31, 37 and 43 cm = 2¾", 5⅛", 7½", 9¾", 12¼", 14½" and 17" ---------------------------------------------------------- START THE PIECE HERE: ---------------------------------------------------------- SUIT - SHORT OVERVIEW OF THE PIECE: Work each leg back and forth on circular needle, bottom up. Place legs together and work back and forth on circular needle from mid front up to sleeves. Then cast on new stitches for sleeves in each side and finish front pieces and back piece separately. Sew piece together on the shoulder. Finish by picking up stitches around the neck and work a hood. RIGHT LEG (when suit is worn): Cast on (40) 44-48-48-52 (56-60) stitches on circular needle size 4 MM = US 6 with Merino Extra Fine. Work first row as follows from right side: 1 edge stitch in GARTER STITCH – read explanation above, work A.1A until 3 stitches remain on row (= 9-10-11-11-12 (13-14) repetitions of 4 stitches), work A.1B (= 2 stitches) and finish with 1 edge stitch in garter stitch. Continue pattern like this. REMEMBER THE KNITTING GAUGE! When piece measures 4 cm = 1½", insert 1 marker in piece (marks fold). When piece measures (5) 5-7-8-10 (12-14) cm = (2") 2"-2¾"-3⅛"-4" (4¾"-5½") increase 1 stitch in each side – read INCREASE TIP-1. Repeat increase when piece measures (8) 8-12-18-20 (22-24) cm = (3⅛") 3⅛"-4¾"-7"-8" (8¾"-9½") = (44) 48-52-52-56 (60-64) stitches on needle. Work until piece measures (12) 12-16-23-31 (32-35) cm = (4¾") 4¾"-6¼"-9"-12¼" (12½"-13¾") from cast-on edge, adjust so that next row is worked from right side. Bind off 1 stitch at beginning of the next 2 rows (i.e. bind off edge stitches) = (42) 46-50-50-54 (58-62) stitches. Then work the next 2 rows as follows, begin from right side: Work as before over all stitches and cast on 3 new stitches at the end of row (= mid back). Turn piece, work A.1 as before over all stitches, but make sure to continue pattern correctly, then cast on (4) 4-4-4-4 (4-4) stitches at the end of row from wrong side (= mid front). There are now (49) 53-57-57-61 (65-69) stitches on needle and piece measures approx. (13) 13-17-24-30 (33-36) cm = (5⅛") 5⅛"-6¾"-9½"-11¾" (13"-14¼") from cast-on edge. Put piece aside and work left leg as explained below. LEFT LEG (when suit is worn): Cast on (40) 44-48-48-52 (56-60) stitches on circular needle size 4 MM = US 6 and work first row as follows from right side: 1 edge stitch in garter stitch, work A.1A until 3 stitches remain on row (=9-10-11-11-12 (13-14) repetitions of 4 stitches), work A.1B (= 2 stitches) and finish with 1 edge stitch in garter stitch. Continue pattern like this. When piece measures 4 cm = 1½", insert 1 marker in piece (marks fold). When piece measures (5) 5-7-8-10 (12-14) cm = (2") 2"-2¾"-3⅛"-4" (4¾"-5½") increase 1 stitch in each side – remember INCREASE TIP-. Repeat increase when piece measures (8) 8-12-18-20 (22-24) cm = (3⅛") 3⅛"-4¾"-7"-8" (8¾"-9½") = (44) 48-52-52-56 (60-64) stitches on needle. Work until piece measures (12) 12-16-23-31 (32-35) cm = (4¾") 4¾"-6¼"-9"-12¼" (12½"-13¾") from cast-on edge, adjust so that next row is worked from right side. Bind off 1 stitch at beginning of the next 2 rows (i.e. bind off edge stitches) = (42) 46-50-50-54 (58-62) stitches. Then work the next 2 rows as follows, begin from right side: Work as before over all stitches and cast on 4 new stitches at the end of row (= mid front). Turn piece, work A.1 as before over all stitches, but make sure to continue pattern correctly, then cast on 3 stitches at the end of row from wrong side (= mid back). There are now (49) 53-57-57-61 (65-69) stitches on needle and piece measures approx. (13) 13-17-24-30 (33-36) cm = (5⅛") 5⅛"-6¾"-9½"-11¾" (13"-14¼") from cast-on edge. Cut the yarn. Now place the parts together as explained below. BODY: Place right leg and left leg on same circular needle with right leg first. Begin from right side on right leg, work 1 edge stitch in garter stitch, continue A.1 as before over the remaining stitches on right leg (make sure to continue pattern correct according to finish on leg), then continue pattern over the first (48) 52-56-56-60 (64-68) stitches on left leg (make sure to continue pattern correct) and finish with 1 edge stitch in garter stitch = (98) 106-114-114-122 (130-138) stitches on needle. Insert another marker in piece! NOW MEASURE PIECE FROM THIS MARKER! Continue A.1 back and forth with 1 edge stitch in garter stitch in each side towards mid front. When piece measures (3) 3-3-3-4 (5-5) cm = (1⅛") 1⅛"-1⅛"-1⅛"-1½" (2"-2") from marker (adjust to work next row from right side) bind off 1 stitch at beginning of the next 2 rows (i.e. bind off edge stitches). Then work the next 2 rows as follows, begin from right side: Work as before over all stitches and cast on 4 new stitches at the end of row (= left band at the front). Turn piece, work A.1 as before over all stitches (make sure to continue pattern correctly) and cast on 4 new stitches at the end of row from wrong side (= right band at the front). There are now (104) 112-120-120-128 (136-144) stitches on needle. Continue A.1 back and forth over all stitches (i.e. do not work edge stitches in garter stitch). Remember BUTTONHOLES on right band - read explanation above. When piece measures (15) 20-24-27-30 (32-36) cm = (6") 8"-9½"-10⅝"-11¾" (12½"-14¼") from the new marker, i.e. (28) 33-41-51-60 (65-72) cm = (11") 13"-16⅛"-20"-23⅝" (25½"-28⅜") from cast-on edge, divide the piece in each side. Finish front pieces and back piece separately as explained below. RIGHT FRONT PIECE: Begin from right side and work as before over the first (27) 29-31-31-33 (35-37) stitches, then cast on (7) 13-13-17-17 (21-25) new stitches for sleeve. Slip the remaining stitches on 1 stitch holder for back piece and left front piece. Continue A.1 back and forth as before but make sure that pattern fits over all stitches. AT THE SAME TIME cast on (6) 7-11-12-14 (18-21) new stitches for sleeve at the end of the next 2 rows from right side = (46) 56-66-72-78 (92-104) stitches on needle. Continue pattern back and forth over all stitches until piece measures (22) 28-32-35-38 (41-45) cm = (8¾") 11"-12½"-13¾"-15" (16⅛"-17¾") from marker, i.e. (35) 41-49-59-68 (74-81) cm = (13¾") 16⅛"-19¼"-23¼"-26¾" (29⅛"-32") from cast-on edge. At the beginning of next row from right side slip the first (8) 8-9-11-11 (12-12) stitches on 1 stitch holder for neck but to avoid cutting the yarn work them before slipping them on the stitch holder. Continue pattern back and forth as before and bind off for neck at the beginning of every row from mid front as follows: Bind off 2 stitches 1 time and 1 stitch (1) 1-2-2-2 (3-3) times = (35) 45-53-57-63 (75-87) stitches remain on needle. Then work until the entire suit measures approx. (24) 30-34-37-41 (44-49) cm = (9½") 11¾"-13⅜"-14½"-16⅛" (17¼"-19¼") from marker, i.e. (37) 43-51-61-71 (77-85) cm = (14½") 17"-20"-24"-28" (30⅜"-33½") from cast-on edge, but adjust so that next row is worked from right side. Work 1 ridge back and forth over all stitches. Then bind off by knitting from the right side. The entire suit measures approx. (38) 44-52-62-72 (78-86) cm = (15") 17¼"-20½"-24⅜"-28⅜" (30¾"-33⅞") from cast-on edge. Now work back piece as explained below. BACK PIECE: Slip the first (50) 54-58-58-62 (66-70) stitches on stitch holder (seen from right side) on circular needle size 4 MM = US 6 and continue A.1 back and forth over these stitches as before. AT THE SAME TIME cast on new stitches for sleeves at the end of every row in each side as follows: Cast on (7) 13-13-17-17 (21-25)stitches 1 time in each side and then (6) 7-11-12-14 (18-21) stitches 2 times in each side = (88) 108-128-140-152 (180-204) stitches on needle. Continue pattern back and forth over all stitches until piece measures (23) 29-33-36-40 (43-48) cm = (9") 11⅜"-13"-14¼"-15¾" (17"-19") from marker). On next row bind off the middle (14) 14-18-22-22 (26-26) stitches for neck and finish each shoulder/sleeve separately. Then bind off 2 stitches on next row from neck = (35) 45-53-57-63 (75-87) stitches remain on needle for shoulder/sleeve. Then work until the entire suit measures approx. (24) 30-34-37-41 (44-49) cm = (9½") 11¾"-13⅜"-14½"-16⅛" (17¼"-19¼") from marker, but adjust according to front piece and make sure that next row is from right side. Work 1 ridge back and forth over all stitches. Then bind off by knitting from the right side. Work the other shoulder/sleeve the same way. Then work left front piece as explained below. LEFT FRONT PIECE: Slip the remaining (27) 29-31-31-33 (35-37) stitches on stitch holder back on needle size 4 MM = US 6. Begin from right side and continue A.1 back and forth as before. AT THE SAME TIME cast on new stitches for sleeve at the end of the next 3 rows from wrong side as follows: Cast on (7) 13-13-17-17 (21-25) stitches 1 time and then (6) 7-11-12-14 (18-21) stitches 2 times = (46) 56-66-72-78 (92-104) stitches on needle. Continue pattern back and forth over all stitches until piece measures (22) 28-32-35-36 38 (41-45) cm = (8¾") 11"-12½"-13¾"-14¼" 15" (16⅛"-17¾") from marker, i.e. (35) 41-49-59-68 (74-81) cm = (13¾") 16⅛"-19¼"-23¼"-26¾" (29⅛"-32") from cast-on edge. At the beginning of next row from wrong side slip the first (8) 8-9-11-11 (12-12) stitches on 1 stitch holder for neck but to avoid cutting the yarn work them before slipping them on the stitch holder. Continue pattern back and forth as before and bind off for neck at the beginning of every row from mid front as follows: Bind off 2 stitches 1 time and 1 stitch (1) 1-2-2-2 (3-3) times = (35) 45-53-57-63 (75-87) stitches remain on needle. Then work until the entire suit measures approx. (24) 30-34-37-41 (44-49) cm = (9½") 11¾"-13⅜"-14½"-16⅛" (17¼"-19¼") from marker, i.e. (37) 43-51-61-71 (77-85) cm = (14½") 17"-20"-24"-28" (30⅜"-33½") from cast-on edge, but measure so that next row is worked from right side. Work 1 ridge back and forth over all stitches. Then bind off by knitting from the right side. The entire suit measures approx. (38) 44-52-62-72 (78-86) cm = (15") 17¼"-20½"-24⅜"-28⅜" (30¾"-33⅞") from cast-on edge. ASSEMBLY: Sew shoulder seams inside bind-off edges. Sew the seams under the sleeve. Sew seam on inside of both legs inside 1 edge stitch in each side. Sew seam mid front from bottom of band and down inside 1 edge stitch in each side. Sew together the opening between the legs. Fold the end of legs at the marker. Sew the buttons on to the left band. HOOD: Pick up from right side approx. 44 to 70 stitches around the neck (including stitches on stitch holders at the front). Knit 1 row from wrong side while increasing evenly to (58) 70-74-74-78 (86-86) stitches – read INCREASE TIP-2. Knit 1 row from right side and knit 1 row from wrong side. Work next row as follows from right side: Work A.1A until 2 stitches remain on needle and finish with A.1B (= 2 stitches). Continue pattern like this until piece measures (17) 18-19-20-21 (22-23) cm = (6¾") 7"-7½"-8"-8¼" (8¾"-9") from ridge in the neck, but adjust so that next row is from right side. Work 1 ridge back and forth over all stitches. Then bind off by knitting from the right side. Place the hood double and sew seam at the top inside bind-off edge. |
|||||||
Diagram explanations |
|||||||
|
|||||||
 |
|||||||
 |
|||||||
Have you finished this pattern?Tag your pictures with #dropspattern #trulywoolyonesie or submit them to the #dropsfan gallery. Do you need help with this pattern?You'll find 27 tutorial videos, a Comments/Questions area and more by visiting the pattern on garnstudio.com. © 1982-2026 DROPS Design A/S. We reserve all rights. This document, including all its sub-sections, has copyrights. Read more about what you can do with our patterns at the bottom of each pattern on our site. |
|||||||


With over 40 years in knitting and crochet design, DROPS Design offers one of the most extensive collections of free patterns on the internet - translated to 17 languages. As of today we count 325 catalogs and 12298 patterns - 12288 of which are translated into English (US/in).
We work hard to bring you the best knitting and crochet have to offer, inspiration and advice as well as great quality yarns at incredible prices! Would you like to use our patterns for other than personal use? You can read what you are allowed to do in the Copyright text at the bottom of all our patterns. Happy crafting!
Post a comment to pattern DROPS Baby 33-8
We would love to hear what you have to say about this pattern!
If you want to leave a question, please make sure you select the correct category in the form below, to speed up the answering process. Required fields are marked *.