
Popular categories
Looking for a yarn?


Comments / Questions (33)
![]() Katharina Söderström wrote:
Katharina Söderström wrote:
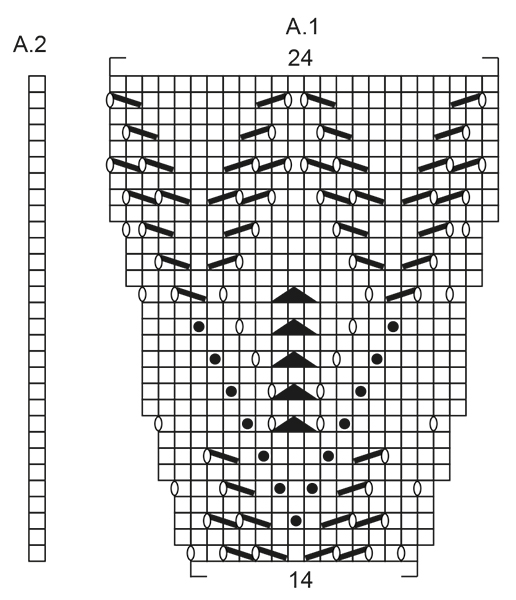
Ska nu börja med första raden i diagrammet. Enl beskr ska det bli 14 maskor men jag får det till 1 6. har jag räknat fel?
29.01.2024 - 10:10DROPS Design answered:
Hei Katharina. I diagram A.1og 1. rad strikker man over 14 masker, men man strikker 4 ganger 2 masker sammen og gjør 6 kast. Da vil man på neste rad ha 16 masker over 14 masker. mvh DROPS Design a
05.02.2024 - 12:55
![]() Jen wrote:
Jen wrote:
Furthermore to comment dated 4 October 2021, should the UK English version be corrected? After 283 stitches on needle, please adjust the knit 2 "together" to just knit 2. Thank you.
29.07.2022 - 05:24DROPS Design answered:
Dear Jen, thanks for your feedback, UK-pattern has now been edited. Happy knitting!
01.08.2022 - 16:34
![]() Joy wrote:
Joy wrote:
After reaching 283 stitches the pattern moves on to the next increase row on the right side. The instructions in UK English say to knit 2 together then make 93 increases in the y/o, k2t, y/o, k1 pattern, totalling 93 increases for that row. Wouldn't the k2t make it 92 increases and a stitch count of 375 for that row, rather than 376? How should I continue?
04.10.2021 - 10:45DROPS Design answered:
Dear Joy, knit 2, then repeat (YO, K2 tog, YO, K1 = 3 sts increased to 4 sts) a total of 93 times, end the row with K2 = you have increased 93 sts (=283+93=376 sts on needle now). Happy knitting!
04.10.2021 - 15:31
![]() Kerstin wrote:
Kerstin wrote:
Wow, was für ein tolles Tuch! Vielen lieben Dank für die Anleitung. Es war mein diesjähriges Urlaubsprojekt und hat jede Menge Spaß gemacht! Gestrickt habe ich mit einem reinen Alpaka LACE Garn. Mit der Anleitung kam ich gut zurecht, allerdings fiel mir auf, dass die Noppen, lt schriftlicher Anweisung, als Nupps, wie beim estnischen Stricken, gearbeitet werden und NICHT wie im unten gezeigten Video! Das Tuch ist so leicht vom Gewicht her und so megaschön geworden. Klasse!!😃
04.09.2021 - 15:37
![]() Magda wrote:
Magda wrote:
Bardzo fajny wzór. Świetnie wytłumaczony. Na początku robiłam supełki metodą 2 - szydełkiem, ale mi nie wyszło. Supełki powędrowały na lewą stronę robótki i były kulfoniaste. Natomiast metoda 1 sprawdziła się doskonale. To moja pierwsza fantazyjna chusta. Jestem bardzo zadowolona.
20.06.2021 - 21:21DROPS Design answered:
Witaj Magdo, bardzo się cieszymy. Koniecznie podziel się z nami zdjęciem swojej chusty albo w galerii dropsfan, albo na facebooku (grupa drops workshop). Powodzenia w dalszych pracach!
21.06.2021 - 15:57
![]() Shannon wrote:
Shannon wrote:
Do you have a video explaining the bind off? I am a little confused about doing a yarn over on the yarn over of the previous row and then bind off? I am not sure how to work that.
26.05.2021 - 16:32DROPS Design answered:
Dear Shannon, you can always find the relevant videos linked just below the pattern. Among them, this time is THIS one. I hope this helps. Happy Knitting!
26.05.2021 - 18:52
![]() Dea wrote:
Dea wrote:
Buonasera c'è un errore nella legenda dello schema. Il quadrato vuoto e bianco sono maglie a legaccio, quindi diritti sul diritto e diritto sul rovescio, è indicato così sia nella versione norvegese che in quella inglese.
29.06.2020 - 21:25DROPS Design answered:
Buonasera Dea, grazie per la segnalazione, abbiamo corretto la legenda. Buon lavoro!
29.06.2020 - 22:48
![]() Dea wrote:
Dea wrote:
Buongiorno, sto lavorando il modello e ho trovato un errore. "Poi lavorare il ferro successivo come segue dal diritto del lavoro: 2 maglie insieme a diritto * 1 gettato , 2 maglie insieme a diritto, 1 gettato, 1 maglia diritto, * lavorare *-* 93 volte in totale e lavorare 2 maglie diritto (= 93 aumenti) = 376 maglie sul ferro." Vi è scritto di fare 2 m insieme a dir all'inizio del ferro, ma facendo i calcoli alla fine avrei 375 m e non 376 m.
14.06.2020 - 17:33DROPS Design answered:
Buongiorno Dea. Abbiamo corretto il testo: sono due maglie diritto. La ringraziamo per la segnalazione. Buon lavoro!
14.06.2020 - 22:37
![]() Idalia wrote:
Idalia wrote:
El diagrama de La terminación del chal, no es muy claro,no pude entenderlo. No se si se teje de arriba hacia abajo o al contrario.
09.06.2020 - 06:12
![]() Sharron Haworth wrote:
Sharron Haworth wrote:
Sorry, I still don't understand as *1yo, k2 tog, 1yo, k1* means 1 st increased, this is carried out 8 times therefore 8 stitches increased, plus the 2 yarn overs at the beginning of the row equals 10 stitches increased on the row, not 2. ????????
01.11.2019 - 23:38DROPS Design answered:
Hello Sharon. When it says to repeat rows 1 and 2, you must repeat the two rows explained at the beginning of the pattern, i.e the following two rows: ROW 1 (= right side): Make 1 yarn over, knit 1, 1 yarn over and knit the rest of stitches (= 2 stitches increased). ROW 2 (= wrong side): Make 1 yarn over, knit 1, 1 yarn over and knit the rest of stitches (= 2 stitches increased). Happy knitting!
02.11.2019 - 16:22
|
|||||||||||||||||||
Daydreamer#daydreamershawl |
|||||||||||||||||||
 |
 |
||||||||||||||||||
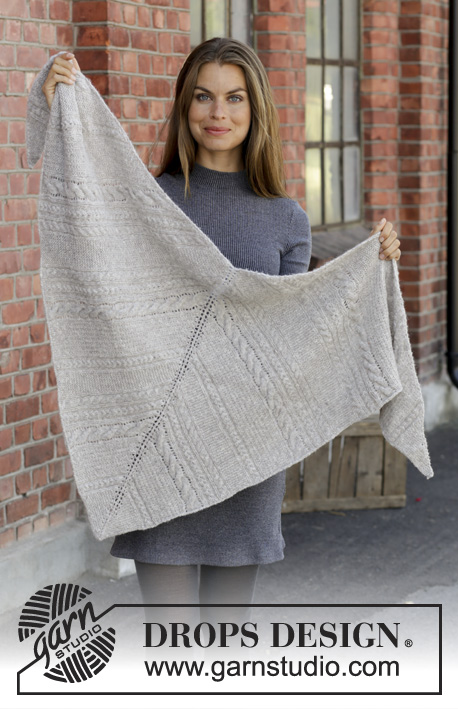
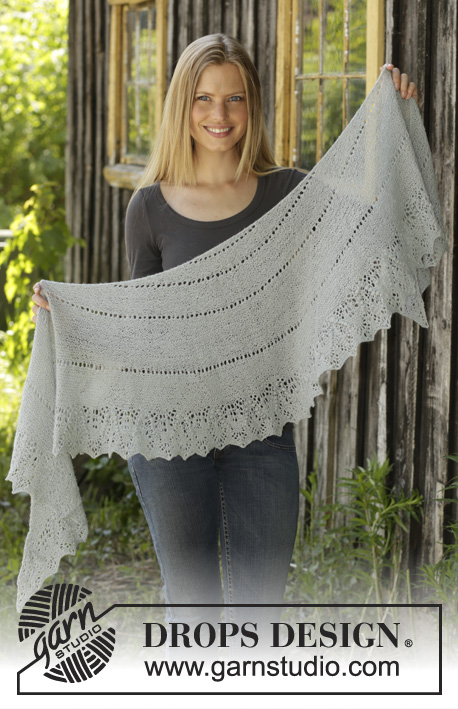
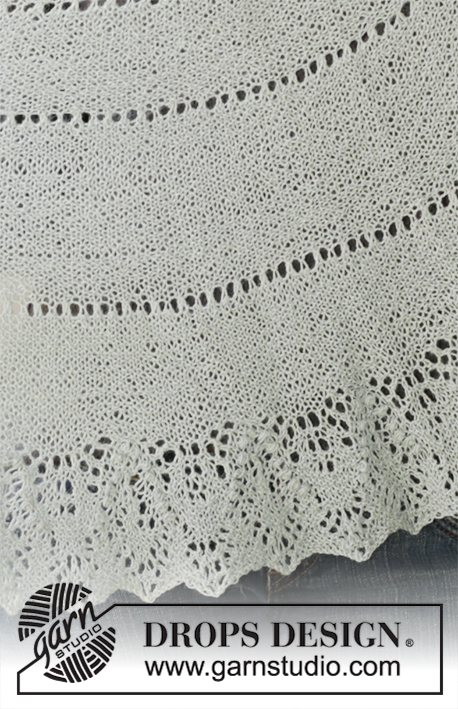
Knitted shawl in DROPS Lace or BabyAlpaca Silk with garter stitch and lace pattern.
DROPS 195-17 |
|||||||||||||||||||
|
EXPLANATION FOR THE PATTERN: ---------------------------------------------------------- GARTER STITCH (back and forth): Knit all rows. PATTERN: See diagrams A.1 and A.2. Diagrams show all rows in pattern seen from the right side. BOBBLE: A bobble can be made in different ways. Method 1 makes a bobble that is worked together on next row from wrong side. Method 2 makes a bobble with crochet hook and this bobble is done on this row. Choose the method that suits you best, make a test as there are many stitches on the needle when working the diagram. METHOD 1: Work 7 stitches in 1 stitch as follows: * Knit 1, 1 yarn over *, work from *-* 3 times in total and finish with knit 1 = 7 stitches. It is important to make the stitches somewhat loose (approx. 1 cm / ⅜" long) or it might be difficult to knit them together later. Do not turn piece but work the rest of row as explained in pattern/diagram. When working next row from wrong side, purl all the 7 stitches in each bobble together. METHOD 2: Use a crochet hook in the same size as needle. Use the crochet hook as a knitting needle and work 7 stitches in 1 stitch as follows: * Knit 1, 1 yarn over *, work from *-* 3 times in total and finish with knit 1 = 7 stitches. It is important to work the stitches somewhat loose (approx. 1 cm / ⅜" long). Make 1 yarn over on hook and then pull it through all loops/stitches on hook, tighten yarn and slip loop on hook on to right needle. BIND-OFF: To avoid a tight bind-off edge make yarn overs when binding off. Make a yarn over over all yarn overs from previous row with yarn over, bind off yarn over as regular stitches along the way. Make sure not to tighten the yarn. If the edges still are tight use a larger needle size for bind-off. SHAPING: When using another yarn than Lace from yarn group A, there is no need to stretch to measurements, but place it gently out in shape. Leave to dry. Repeat the process when the shawl has been washed. ---------------------------------------------------------- START THE PIECE HERE: ---------------------------------------------------------- SHAWL - SHORT OVERVIEW OF THE PIECE: Work back and forth, top down on circular needle in GARTER STITCH - see explanation above. SHAWL: Cast on 13 stitches on circular needle size 3.5 mm / US 4 with Lace or BabyAlpaca Silk. Knit 1 row from wrong side. Work next row as follows: ROW 1 (= right side): Make 1 yarn over, knit 1, 1 yarn over and knit the rest of stitches (= 2 stitches increased). ROW 2 (= wrong side): Make 1 yarn over, knit 1, 1 yarn over and knit the rest of stitches (= 2 stitches increased). Work ROWS 1-2 3 more times (4 times in total) = 29 stitches on needle. Then work next row as follows from right side: Make 1 yarn over, knit 1, 1 yarn over, knit 1, * 1 yarn over, knit 2 together, 1 yarn over, knit 1 *, work from *-* 8 times in total and knit 3 (= 10 stitches increased) = 39 stitches on needle. Work next row as follows from wrong side: Make 1 yarn over, knit 1, 1 yarn over and knit the rest of stitches (= 2 stitches increased) = 41 stitches on needle. Work ROWS 1-2 10 times in total = 81 stitches on needle. Then work next row as follows from right side: Make 1 yarn over, knit 1, 1 yarn over, knit 2, * 1 yarn over, knit 2, 1 yarn over, knit 1 *, work from *-* 25 times in total and knit 3 (= 27 stitches increased) = 108 stitches on needle. Work next row as follows from wrong side: Make 1 yarn over, knit 1, 1 yarn over and knit the rest of stitches (= 2 stitches increased) = 110 stitches on needle. Work ROWS 1-2 15 times in total = 170 stitches on needle. Then work next row as follows from right side: Make 1 yarn over, knit 1, 1 yarn over, knit 1, * 1 yarn over, knit 2 together, 1 yarn over, knit 1 *, work from *-* 55 times in total and knit 3 (= 57 stitches increased) = 227 stitches on needle. Work next row as follows from wrong side: Make 1 yarn over, knit 1, 1 yarn over and knit the rest of stitches (= 2 stitches increased) = 229 stitches on needle. Work ROWS 1-2 5 times in total = 249 stitches on needle. NOTE: Now the increase in the side changes, work next row as follows: ROW 3 (= right side): Knit 1, 1 yarn over and knit the rest of stitches (= 1 stitches increased). ROW 4 (= wrong side): Knit 1, 1 yarn over and knit the rest of stitches (= 1 stitches increased). Work ROWS 3-4 17 times in total = 283 stitches on needle. Then work next row as follows from right side: Knit 2, * 1 yarn over, knit 2 together, 1 yarn over, knit 1 *, work from *-* 93 times in total and knit 2 (= 93 stitches increased) = 376 stitches on needle. Work next row as follows from wrong side: Knit 1, 1 yarn over and knit the rest of stitches (= 1 stitch increased) = 377 stitches on needle. Work ROWS 3-4 15 times in total = 407 stitches on needle. then work according to diagram A.1 and A.2 – READ ALL OF THE FOLLOWING SECTION BEFORE CONTINUING! There are many stitches on the needle and we recommend that you use marker threads or markers to mark where each diagram begins and ends. Insert a marker thread/marker after every 14th stitch and move them upwards when working. Next row is from right side and is worked as follows: Work A.1 29 times in total in width, work A.2 over the last stitch. Work diagrams 1 time vertically. When diagrams are done, loosely bind off on next row from right side - read BIND-OFF in explanation above. BLOCKING: Place the shawl in lukewarm water until it is soaking wet. Carefully squeeze the water out of the shawl - do not twist the shawl - then roll the shawl in a towel and squeeze to remove more water - the shawl will now only be moist. Use another yarn than Lace from yarn group A - read SHAPING in explanation above. Place the shawl on a carpet or mattress - carefully stretch it out to size and fasten it with pins. Leave shawl to dry. Repeat the process when the shawl has been washed. |
|||||||||||||||||||
Diagram explanations |
|||||||||||||||||||
|
|||||||||||||||||||
 |
|||||||||||||||||||
Have you finished this pattern?Tag your pictures with #dropspattern #daydreamershawl or submit them to the #dropsfan gallery. Do you need help with this pattern?You'll find 20 tutorial videos, a Comments/Questions area and more by visiting the pattern on garnstudio.com. © 1982-2026 DROPS Design A/S. We reserve all rights. This document, including all its sub-sections, has copyrights. Read more about what you can do with our patterns at the bottom of each pattern on our site. |
|||||||||||||||||||


With over 40 years in knitting and crochet design, DROPS Design offers one of the most extensive collections of free patterns on the internet - translated to 17 languages. As of today we count 324 catalogs and 12290 patterns - 12280 of which are translated into English (US/in).
We work hard to bring you the best knitting and crochet have to offer, inspiration and advice as well as great quality yarns at incredible prices! Would you like to use our patterns for other than personal use? You can read what you are allowed to do in the Copyright text at the bottom of all our patterns. Happy crafting!
Post a comment to pattern DROPS 195-17
We would love to hear what you have to say about this pattern!
If you want to leave a question, please make sure you select the correct category in the form below, to speed up the answering process. Required fields are marked *.