DROPS Sky
DROPS Sky
74% Alpaca, 18% Polyamide, 8% Wool
from 7.20 $ /50g
Get the yarn to make this pattern from 50.40$.

The yarn cost is calculated from the pattern’s smallest size and the yarn’s cheapest product type. Looking for an even better price? You might find it on the DROPS Deals!

DROPS SS24

Forward

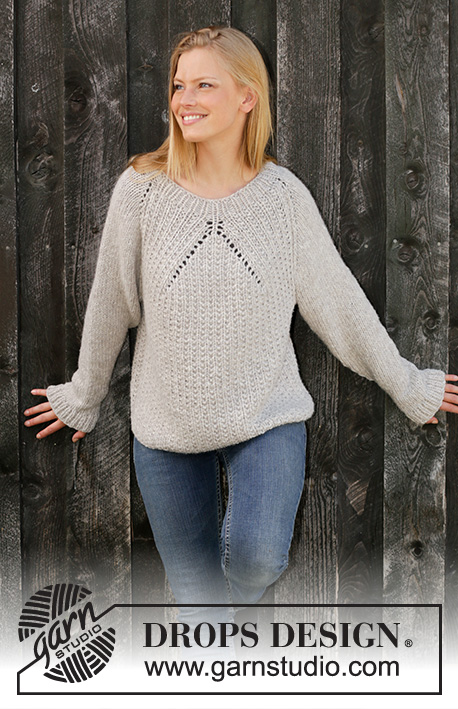
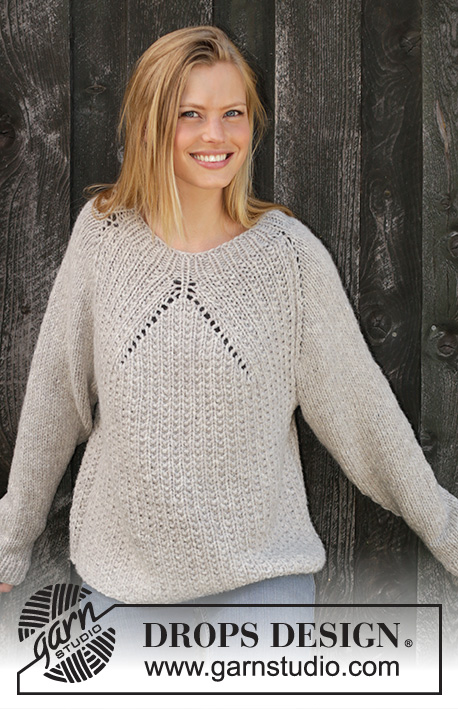
Knitted sweater with raglan in 2 strands DROPS Sky. The piece is worked top down with texture. Size S – XXXL.

DROPS 195-28
DROPS Design: Pattern no sk-007
Yarn group B + B
-------------------------------------------------------

Sizes: S - M - L - XL - XXL - XXXL
Materials:
DROPS SKY from Garnstudio (belongs to yarn group B)
350-400-450-450-500-550 g color 03, light beige

-------------------------------------------------------
ACCESSORIES FOR THE PIECE:

KNITTING GAUGE:
13 stitches in width and 15 rows in height with stockinette stitch and 2 strands = 4" x 4" (10 x 10 cm).

NEEDLES:
DROPS DOUBLE POINTED NEEDLES SIZE 7 MM / US 10.75: for texture/stockinette stitch.
DROPS CIRCULAR NEEDLE SIZE 7 MM / US 10.75: length 40 cm and 80 cm/16" and 32" for texture/stockinette stitch.
DROPS DOUBLE POINTED NEEDLES SIZE 6 MM / US 10: for rib.
DROPS CIRCULAR NEEDLE SIZE 6 MM / US 10: length 40 cm/16" for rib.
The needle size is only a guide. If you get too many stitches on 10 cm / 4", change to a larger needle size. If you get too few stitches on 10 cm / 4", change to a smaller needle size.

-------------------------------------------------------

Alternative Yarn – See how to change yarns here
Yarn Groups A to F – Use the same pattern and change the yarn here
Yarn usage using an alternative yarn – Use our yarn converter here

-------------------------------------------------------

DROPS Sky
DROPS Sky
74% Alpaca, 18% Polyamide, 8% Wool
from 7.20 $ /50g
Get the yarn to make this pattern from 50.40$.

The yarn cost is calculated from the pattern’s smallest size and the yarn’s cheapest product type. Looking for an even better price? You might find it on the DROPS Deals!

Pattern instructions

NOTE: This pattern is written in American English. All measurements in charts are in cm. For conversion from inches to cm - click here. There are different terms for crocheting in American and British English. If this pattern includes crochet, click for "crochet terms" here. For this pattern in British English, please click here.
-------------------------------------------------------

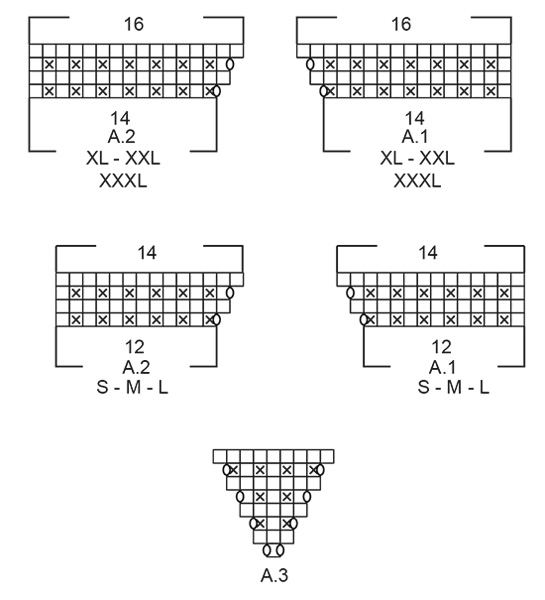
EXPLANATIONS FOR THE PATTERN:

-------------------------------------------------------

PATTERN: 
See diagrams A.1 to A.3. Choose diagram for your size (applies to diagrams A.1 and A.2).

RAGLAN (on sleeves):
Increase 1 stitch before/after the marker thread on the sleeves as follows: Work as far as the first marker thread on the sleeve, knit 1, make 1 yarn over, work as far as 1 stitch before the next marker thread, make 1 yarn over, knit 1. Repeat on the other sleeve (= 4 stitches increased on the round. On the next round knit the yarn overs to make holes. Then work the new stitches in stockinette stitch

DECREASE TIP (for sleeves): 
Decrease 1 stitch on each side of the marker thread as follows: Work until there are 3 stitches left before the marker thread, knit 2 together, knit 2 (the marker thread sits in the middle of these 2 stitches), slip 1 stitch as if to knit, knit 1, pass the slipped stitch over the knitted stitch.

-------------------------------------------------------

START THE PIECE HERE:

-------------------------------------------------------

SWEATER - SHORT OVERVIEW OF THE PIECE:
The piece is worked in the round with circular needle, top down. The sleeves are worked in the round with short circular needle/double pointed needles.

NECK:
Cast on 60-60-64-68-72-72 stitches with short circular needle size 6 mm / US 10 and 2 strands Sky. Knit 1 round. Insert a marker thread at the beginning of the round (marks the transition between left sleeve and back piece). The marker thread follows your work onwards. Now work rib (knit 1 / purl 1) in the round for 4 cm / 1½". The next round is worked as follows: Knit over knit and purl over purl over the first 25-25-25-29-29-29 stitches, insert a marker thread here (marks the transition between back piece and right sleeve), knit the next 5-5-7-5-7-7 stitches and at the same time increase 1-2-2-2-1-2 stitches over these stitches, insert a marker thread here (marks the transition between right sleeve and front piece), knit over knit and purl over purl over the next 25-25-25-29-29-29 stitches, insert a marker thread here (marks the transition between front piece and left sleeve), knit the next 5-5-7-5-7-7 stitches and at the same time increase 1-2-2-2-1-2 stitches evenly over these stitches = 62-64-68-72-74-76 stitches.

YOKE:
Change to circular needle size 7 mm / US 10.75. Now work pattern as follows: * Work A.1 (choose diagram for your size) over the first 12-12-12-14-14-14 stitches, knit 1 (= mid-stitch on back/front piece), work A.2 (choose diagram for your size) over the next 12-12-12-14-14-14 stitches, (the marker thread sits here), knit 1, make 1 yarn over (= increase to raglan), knit the next 4-5-7-5-6-7 stitches, make 1 yarn over (= increase to raglan), knit 1 (marker thread sits here) *, work from *-* 1 more time on the round. Continue in the round with pattern like this and increase to RAGLAN (on the sleeves) – read description above, every 2nd round until A.1 and A.2 have been completed in height. You have now increased 2 stitches in each A.1 and 2 stiches in each A.2 (= 8 stitches increased) and increased 2 stitches to raglan in each side of the sleeves (= 8 stitches increased) = 78-80-84-88-90-92 stitches.
Now work pattern as follows: * Work texture as before over the 14-14-14-16-16-16 stitches in A.1, work A.3 (= 1 stitch) over mid-stitch on back/front piece, work texture as before over the 14-14-14-16-16-16 stitches in A.2, (marker thread sits here), knit 1, make 1 yarn over (= increase to raglan), knit until there is 1 knitted stitch left before the next marker thread, make 1 yarn over (= increase to raglan), knit 1, (marker thread sits here) *, work from *-* 1 more time on the round. You have now increased 2 stitches in A.3 on front/back piece (= 4 stitches increased) and increased 1 stitch to raglan on each side of each sleeve (= 4 stitches increased) = 86-88-92-96-98-100 stitches.
Continue with pattern in the round like this and increase to raglan (on sleeves) every 2nd round 12 -14-15-18-19-20 more times (= a total of 15-17-18-21-22-23 stitches increased on each side of each sleeve from the start of the yoke) and continue A.3 and increase on each side of A.3 every 2nd round until you have increased 13-13-15-17-21-25 more times (= a total of 14-14-16-18-22-26 times from the first round in A.3). NOTE: Each time you increase in the side of A.3 you work 2 more stitches in texture between the yarn overs.
When all the increases are finished there are 186-196-212-236-258-280 stitches on the round. Continue with texture on the front and back pieces and knit on sleeves until the piece measures 25-27-29-31-33-35 cm / 9 ¾"-10⅝"-11⅜"-12⅛"-13"-13 ¾".
The next round is worked as follows: Work as before over the first 57-57-61-69-77-85 stitches (= back piece), place the next 36-41-45-49-52-55 stitches on a thread (= sleeve), cast on 9 stitches on needle (= in side under sleeve), work the next 57-57-61-69-77-85 stitches as before (= front piece), place the next 36-41-45-49-52-55 stitches on a thread (= sleeve), cast on 9 new stitches on the needle (= in side under sleeve). THE PIECE IS NOW MEASURED FROM HERE!

BODY:
= 132-132-140-156-172-188 stitches. Continue in the round with texture. Work structure over the new stitches cast on in each side under the sleeves so that the textured pattern fits all the way around the body. When the piece measures 30 cm / 11¾" from the division in all sizes bind off with knit. To avoid the bind-off edge being tight, you can make a yarn over after each 6th stitch; the yarn overs are bind off as normal stitches. The sweater measures a total of 58-60-62-64-66-68 cm / 22¾"-23⅝"-24⅜"-25¼"-26"-26¾" from the shoulder down.

SLEEVE:
Place the 36-41-45-49-52-55 stitches from the thread on the one side of the piece on short circular needle/double pointed needles size 7 mm / US 10.75 and, in addition, knit up 1 stitch in each of the 9 stitches cast on under the sleeve = 45-50-54-58-61-64 stitches. Insert 1 marker thread in the middle stitch of the 9 stitches under the sleeve. Continue with knit in the round. When the piece measures 4-4-4-4-3-2 cm / 1 ½"-1 ½"-1 ½"-1 ½"-1⅛"-¾" from the division, decrease 2 stitches mid under sleeve – read DECREASE TIP. Decrease like this every 6-4-4-3-3-3 round a total of 8-10-11-12-13-14 times = 29-30-32-34-35-36 stitches. Continue working until the piece measures 36-35-34-32-30-29 cm / 14⅛"-13 ¾"-13⅜"-12 ½"-11 ¾"-11⅜" from the division (shorter measurements in larger sizes due to wider neck and longer yoke). Knit 1 round where you increase 3-4-4-6-7-8 stitches evenly on round = 32-34-36-40-42-44 stitches. Change to double pointed needles size 6 mm / US 10 and work rib in the round (= knit 1 / purl 1) for 4 cm / 1½". Bind off with knit over knit and purl over purl, but to avoid the bind-off edge being tight, you can make a yarn over after each 6th stitch; the yarn overs are bind off as normal stitches. The sleeve measures approx. 40-39-38-36-34-33 cm / 15 ¾"-15 ¼"-14⅞"-14⅛"-13⅜"-13" from the division. Work the other sleeve in the same way.

This pattern has been corrected.

Updated online: 01.10.2018
Correction: SLEEVE:... Decrease like this every 6-4-4-3-3-3 round a total of 8-10-11-12-13-14 times = 29-30-32-34-35-36 stitches.(previously decrease like this every x cm)

Diagram

All measurements in charts are in cm.

symbols = knit
symbols = purl
symbols = between 2 stitches make 1 yarn over. On the next round knit the yarn over to leave a hole
diagram
diagram

Each of our patterns has specific tutorial videos to help you.

Do you have a question? See a list of frequently asked questions (FAQ)

Knitting tension is what determines the final measurements of your work, and is usually measured per 10 x 10 cm. It is provided like so: number of stitches in width x number of rows in height - eg: 19 stitches x 26 rows = 10 x 10 cm.

The knitting tension is very individual; some people knit/crochet loosely while others work tightly. You adjust the knitting tension with the needle size, which is why the suggested needle size only serve as a guide! You need to adjust this (up or down) to ensure that YOUR knitting tension matches the knitting tension provided in the pattern. If you work with a different knitting tension than provided you will have a different yarn consumption, and your work will have different measurements than what the pattern suggests.

The knitting tension also determines which yarns can replace each other. As long as you achieve the same knitting tension you can replace one yarn with another.

See DROPS lesson: How to measure your tension/gauge

See DROPS video: How to make a gauge tension swatch

The required amount of yarn is provided in grams, eg: 450 g. To calculate how many balls you’ll need you first need to know how many grams are in 1 ball (25g, 50g or 100g). This information is available if you click on the individual yarn quality on our pages. Divide the amount required with the amount of each ball. For example, if each ball is 50g (the most common amount), the calculation will be as follows: 450 / 50 = 9 balls.

The important thing when changing from one yarn to another is that the knitting/crochet tension remains the same. This is so that the measurements of the finished piece will be the same as on the sketch provided. It is easier to achieve the same knitting tension using yarns from the same yarn group. It is also possible to work with multiple strands of a thinner yarn to achieve the knitting tension of a thicker one. Please try our yarn converter. We recommend you to always work a test swatch.

Please NOTE: when changing yarn the garment might have a different look and feel to the garment in the photo, due to individual properties and qualities of each yarn.

See DROPS lesson: Can I use a different yarn than the one mentioned in the pattern?

All our yarns are categorised into yarn groups (from A to F) according to thickness and knitting tension – group A contains the thinnest yarns and group F the thickest. This makes it easier for you to find alternative yarns to our patterns, should you wish to switch yarn. All yarns within the same group have a similar knitting tension and can easily replace each other. However, different yarn qualities have different structures and properties which will give the finished work a unique look and feel.

Click here for an overview of the yarns in each yarn group

At the top of all our patterns you’ll find a link to our yarn converter, which is a helpful tool should you wish to use a different yarn than suggested. By filling in the yarn quality you wish to replace, the amount (in your size) and number of strands, the converter will present good alternative yarns with the same knitting tension. Additionally it will tell you how much you’ll require in the new qualities and whether you’ll need to work with multiple strands. Most skeins are 50g (some are 25g or 100g).

If the pattern is worked with multiple colours, every colour will have to be converted separately. Similarly, if the pattern is worked with several strands of different yarns (for example 1 strand Alpaca and 1 strand Kid-Silk) you will have to find alternatives for each, individually.

Click here to see our yarn converter

Since different yarns have different qualities and textures we have chosen to keep the original yarn in our patterns. However, you can easily find options among our available qualities by using our yarn converter, or simply pick a yarn from the same yarn group.

It is possible that some retailers still have discontinued yarns in stock, or that someone has a few skeins at home that they would like to find patterns for.

The yarn converter will provide both alternative yarn as well as required amount in the new quality.

If you think it's hard to decide what size to make, it can be a good idea to measure a garment you own already and like the size of. Then you can pick the size by comparing those measures with the ones available in the pattern's size chart.

You'll find the size chart at the bottom of the pattern.

See DROPS lesson: How to read size chart

The needle size provided in the pattern serves only as a guide, the important thing is to follow the knitting tension. And since knitting tension is very individual, you will have to adjust the needle size to ensure that YOUR tension is the same as in the pattern – maybe you’ll have to adjust 1, or even 2 needle sizes, up or down to achieve the correct tension. For this, we recommend that you work test swatches.

Should you work with a different knitting tension than the one provided, the measurements of the finished garment might deviate from the measurement sketch.

See DROPS lesson: How to measure your tension/gauge

See DROPS video: How to make a gauge tension swatch

Working a garment top-down provides more flexibility and room for personal adjustment. For example it is easier to try the garment on while working, as well as making adjustments to length of yoke and shoulder caps.

The instructions are carefully explaining every step, in the correct order. Diagrams are adjusted to the knitting direction and are worked as usual.

The diagram depicts all rows/rounds, and every stitch seen from the right side. It is read from bottom to top, from right to left. 1 square = 1 stitch.

When working back and forth, every other row is worked from the right side and every other row is worked from the wrong side. When working from the wrong side, the diagram will have to be worked reversed: from left to right, knit stitches are purled, purl stitches are knit etc.

When working in the round every round is worked from the right side and the diagram are worked from right to left on all rounds.

See DROPS lesson: How to read knitting diagrams

The diagram depicts all rows/rounds, and every stitch seen from the right side. It is worked from bottom to top, from right to left.

When working back and forth every other row is worked from the right side: from right to left and every other row is worked from the wrong side: from left to right.

When working in the round, every row in the diagram are worked from the right side, from right to left.

When working a circular diagram you start in the middle and work your way outwards, counter clockwise, row by row.

The rows usually start with a given number of chain stitches (equivalent to the height of the following stitch), this will either be depicted in the diagram or explained in the pattern.

See DROPS lesson: How to read crochet diagrams

Instructions for working several diagrams after each other on the same row/round, will often be written like so: “work A.1, A.2, A.3 a total of 0-0-2-3-4 times". This means you work A.1 once, then A.2 is worked once, and A.3 is repeated (in width) the number of times provided for your size – in this case like so: S = 0 times, M = 0 times, L=2 times, XL= 3 times and XXL = 4 times.

The diagrams are worked as usual: begin with the first row in A.1, then work the first row in A.2 etc.

See DROPS lesson: How to read knitting diagrams

See DROPS lesson: How to read crochet diagrams

The total width of the garment (from wrist-to-wrist) will be larger in the larger sizes, despite the actual sleeves being shorter. The larger sizes have longer sleeve caps and wider shoulders, so there will be a good fit in all sizes.

The measurement sketch/schematic drawing provides information regarding the full length of the garment. If it’s a jumper or a jacket the length is measured from the highest point on the shoulder (usually closest to the neckline), and straight down to the bottom of the garment. It is NOT measured from the tip of shoulder. Similarly, the length of yoke is measured from the highest point on the shoulder and down to where yoke is split into body and sleeves.

See DROPS lesson: How to read a schematic drawing

Diagrams are often repeated on the round or in height. 1 repeat is the diagram the way it appears in the pattern. If it says to work 5 repeats of A.1 in the round, then you work A.1 a total of 5 times after/next to each other in the round. If it says to work 2 repeats of A.1 vertically/in height you work the entire diagram once, then begin again at the start and work the entire diagram one more time.

Chain stitches are slightly narrower than other stitches and to avoid working the cast-on edge too tight, we simply chain more stitches to begin with. The stitch count will be adjusted on the following row to fit the pattern and measurement sketch.

The rib edge is more elastic and will contract slightly compared to, for example, stocking stitch. By increasing before the rib edge, you avoid a visible difference in width between the rib edge and the rest of the body.

It’s very easy to cast off too tightly, and by making yarn overs while casting off (and simultaneously casting these off) you avoid a too tight cast off edge.

See DROPS video: How to bind off with yarn overs (yo)

To achieve an even increase (or decrease) you can increase on, for example: every 3rd and 4th row alternately, like so: work 2 rows and increase on the 3rd row, work 3 rows and increase on the 4th. Repeat this until the increase is complete.

See DROPS lesson: Increase or decrease 1 st on every 3rd and 4th row alternately

Should you prefer to work in the round instead of back and forth, you may of course adjust the pattern. You’ll need to add steeks mid-front (usually 5 stitches), and follow the instructions. When you would normally turn and work from the wrong side, simply work across the steek and continue in the round. At the end you’ll cut the piece open, pick up stitches to work bands, and cover the cut edges.

See DROPS video: How to knit steeks and cut open

Should you prefer to work back and forth instead of in the round, you may of course adjust the pattern so you work the pieces separately and then assemble them at the end. Divide the stitches for the body in 2, add 1 edge stitch in each side (for sewing) and work the front and back pieces separately.

See DROPS lesson: Can I adapt a pattern for circular needles into straight needles?

Pattern repeats can vary slightly in the different sizes, in order to get the correct proportions. If you’re not working the exact same size as the garment in the photo, yours might deviate slightly. This has been carefully developed and adjusted so that the complete impression of the garment is the same in all sizes.

Make sure to follow instructions and diagrams for your size!

If you have found a pattern you like which is available in women’s size it’s not very difficult to convert it to men’s size. The biggest difference will be the length of sleeves and body. Start working on the women size that you think would fit across the chest. The additional length will be worked right before you cast off for the armhole/sleeve cap. If the pattern is worked top-down you can add the length right after the armhole or before the first decrease on sleeve.

Regarding additional yarn amount, this will depend on how much length you add, but it is better with a skein too many than too few.

All yarns will have excess fibres (from production) that might come off as lint or shedding. Brushed yarns (ie hairier yarns) have more of these loose, excess fibres, causing more shedding.

Shedding also depends on what is worn under or over the garment, and whether this pulls at the yarn fibres. It’s therefore not possible to guarantee that there will be no shedding

Below are some tips on how to get the best result when working with hairier yarns:

1. When the garment is finished (before you wash it) shake it vigorously so the looser hairs come off. NOTE: do NOT use a lint roller, brush or any method that pulls at the yarn.

2. Place the garment in a plastic bag and put it in your freezer - the temperature will cause the fibres to become less attached to each other, and excess fibres will come off easier.

3. Leave in the freezer for a few hours before taking it out and shaking it again.

4. Wash the garment according to the instructions on the yarn label.

Pilling is a natural process that happens to even the most exclusive of fibers. It's a natural sign of wear and tear that is hard to avoid, and that is most visible in high friction areas of your garment like a sweater's arms and cuffs.

You can make your garment look as new by removing the pilling, using a fabric comb or a pill/lint remover.

Still can't find the answer you need? Then scroll down and leave your question so one of our experts can try to help you. This will be done normally within 5 to 10 working days.
In the meantime, you can read the questions and answers that others have left to this pattern or join the DROPS Workshop on Facebook to get help from fellow knitters/crocheters!

You might also like...

Post a comment to pattern DROPS 195-28

We would love to hear what you have to say about this pattern!

If you want to leave a question, please make sure you select the correct category in the form below, to speed up the answering process. Required fields are marked *.

Comments / Questions (27)

country flag Nathalie Schmutz wrote:

Guten Tag Brauche ich für Grösse L jetzt 450g oder 900g damit ich es mit 2 Fäden stricken kann?

09.10.2022 - 17:05

DROPS Design answered:

Liebe Frau Schmutz, in L brauchen Sie 450 g DROPS Sky und dann stricken Sie mit 2 Fäden. Viel Spaß beim stricken!

10.10.2022 - 09:19

country flag Luciana wrote:

Gracias por la explicación sobre aumentos. Otra consulta, habiendo tejido las disminuciones de una manga como está descripto, cómo se realizan las disminuciones de la manga opuesta para que el motivo quede en espejo y no igual en ambas?

16.06.2022 - 04:48

DROPS Design answered:

Hola Luciana, las mangas se trabajan igual, no tienen ningún motivo por lo que no tiene que quedar en espejo. Se trabaja todo de derecho, con las disminuciones en el centro bajo la manga, por lo que quedan igual en las dos mangas.

16.06.2022 - 20:17

country flag Luciana wrote:

Buenos días! Con respecto al aumento previsto en las mangas cerca del puño, de qué manera sugieren realizarlos? Con lazadas o tejiendo puntos doblemente por el derecho y por el revés? De esta última forma me quedan puntos tejidos del revés que no se ven bien en la manga en jersey derecho después de la vuelta de aumentos. Gracias!

04.06.2022 - 15:38

DROPS Design answered:

Hola Luciana, puedes hacer los aumentos con lazadas o levantando el hilo entre los puntos y trabajandolo retorcido, como prefieras.

04.06.2022 - 18:03

country flag Fabienne wrote:

Re, ok je cherchais à comprendre pourquoi il fallait comprendre les explications mais en fait il faut suivre les diagrammes en ajoutant un maille endroit entre A1 et A2 et en faisant le raglan normalement. Puis on intègre A3. Désolée de ne pas avoir compris.

14.01.2021 - 17:12

country flag Fabienne wrote:

Bonjour, juste une question. Empiècement: on fait le premier tour (A1, A2) puis il faut répéter une fois. Est-ce que l'on répète sans faire de tour endroit entre deux ? Donc on fait des jetés deux tours de suite ? Et est-ce que ce premier tour est compté dans le diagramme ou commence t on le diagramme que lorsque vous dites "Continuer en rond ainsi...". Merci pour votre réponse.

14.01.2021 - 13:06

DROPS Design answered:

Bonjour Fabienne, je ne suis pas bien sûre de comprendre votre question, le descriptif au début de l'empiècement (= entre les * et *) indique comment tricoter la moitié des mailles, autrement dit, vous tricotez 2 fois comme indiqué entre *et* (= dos/manche + devant/manche). Les augmentations du raglan se font comme indiqué tous les 2 tours sur les manches et tous les 2 tours comme dans les diagrammes A.1/A.2 (puis A.3). Bon tricot!

14.01.2021 - 15:52

country flag Kris wrote:

Bonjour, je n'arrive pas à avoir des jours réguliers: selon que les jetés sont avant des mailles endroit ou envers, cela change la taille et je ne trouve pas comment faire pour que ce soit régulier; pouvez vous m'aider? Merci

06.01.2021 - 16:09

DROPS Design answered:

Bonjour Kris, vous pouvez par exemple essayer de serrer un peu plus les jetés qui ont tendance à être trop larges, de laver et de faire sécher votre échantillon pour voir si après lavage/blocage, les mailles sont plus régulières, parfois la matière des aiguilles change la façon de tricoter et permet d'obtenir un tricot plus régulier. Votre magasin aura probablement d'autres astuces pour vous, n'hésitez pas à lui demander, ou bien rejoignez notre groupe DROPS Workshop pour demander conseil à d'autres tricoteuses qui auront peut-être des idées supplémentaires. Bon tricot!

07.01.2021 - 09:11

country flag Fabienne wrote:

Bonjour, depuis quelque temps les diagrammes ne s'impriment plus est-ce que vous savez pourquoi ?

29.12.2020 - 11:40

DROPS Design answered:

Bonjour Fabienne, nous n'avons pas ce type d'erreurs, avez-vous bien vérifié les paramètres de votre imprimante? N'aurait-elle pas conservé en mémoire un nombre de pages qui ne vous permet pas d'imprimer toutes les pages des modèles, y compris les diagrammes et schémas?

04.01.2021 - 11:43

country flag Anna wrote:

Hej, jag vill använda ett garn som går att tvätta i maskin och som inte kliar. Vilket garn kan jag byta till och hur mycket av det garnet behövs? Jag får inte upp några alternativ i garnkonverteraren.

21.01.2020 - 21:44

DROPS Design answered:

Hei Anna. Om du bruker garnkalkulatoren kommer det opp 8 andre garnkvaliteter, f.eks klør ikke Muskat (bomull), Belle (bomull, lin, viscose), Merino Extra Fine (ull), Cotton Light (bomull) og Cotton Merino (bomull og ull). På vår side over garnkvaliteter kan du lese mer om hvordan disse kvalitetene skal vaskes. God Fornøyelse!

27.01.2020 - 14:58

country flag Simona Campus wrote:

Gentilissimi, Filati alternativi Drops con cui fare questo modello? Usandola vostra applicazione non vengono prospettate soluzioni. Grazie

02.01.2020 - 18:09

DROPS Design answered:

Buongiorno Simona. Può usare un filato del gruppo B, messo doppio. A questa pagina trova suggerimenti utili per la sostituzione dei filati. Verifichi sempre la correttezza del campione. Per ulteriori aiuti, può rivolgersi al suo rivenditore Drops di fiducia. Buon lavoro!

03.01.2020 - 08:52

country flag Joan wrote:

Hvorfor bliver mine ærmer så smalle?

09.11.2019 - 21:48

DROPS Design answered:

Hei Joan. Usikke på hvorfor dine ermer blir så smale. Sjekk om strikkefastheten din stemmer med det som står skrevet i oppskriften. mvh DROPS design

11.11.2019 - 13:28