
Popular categories
Looking for a yarn?


Comments / Questions (55)
![]() Andrea Denby wrote:
Andrea Denby wrote:
Are you aware that this pattern picture (and a load of your other designs) is being used by a clothing website whicestyle.com. They are offering clothing in these styles, illegally I assume!
23.11.2020 - 19:34
![]() Mette Gade wrote:
Mette Gade wrote:
Jeg er en meget stor dame og ville rigtig gerne strikke denne trøje til mig selv. Er der en måde at øge mønsteret på, så jeg kan lave en trøje jeg kan passe?
18.09.2020 - 01:44DROPS Design answered:
Hei Mette. Om du tar utgangspunkt i den største størrelsen og strikker ovenfra og ned kan du prøve bærestykket underveis. Om du ønsker å øke med noen masker, pass på at du øker med et antall masker slik at mønstret går opp. Øker du maskenatallet på bærestykket, vil ermene også bli kortere. Det fine med å strikke et plagg ovenfra og ned, er at du hele tiden kan prøve og se om den passer og evnt gjøre endringer underveis. God Fornøyelse!
21.09.2020 - 10:44
![]() Ann wrote:
Ann wrote:
Hvor langt ned skal ermer og bole gå på denne genseren?
07.09.2020 - 20:08DROPS Design answered:
Hei Ann, Det finnes en skisse med mål til de forskjellige størrelsene på bunnen av oppskriften. God fornøyelse!
08.09.2020 - 07:11
![]() Silje Lehn-Pedersen wrote:
Silje Lehn-Pedersen wrote:
Når i oppskriften bør en bytte fra liten rundpinne til 80cm
13.07.2020 - 22:34DROPS Design answered:
Hei Silje. Du kan bytte når du har økt nok masker til at man fint kan bruke en 80 cm. Er du usikker, bytt til 80 cm og strikk 1 omgang, ser du ved omgangens ende at det fremdeles er for få masker, bytt tilbake til 40 cm. mvh DROPS design
14.07.2020 - 07:00
![]() Susanne Vigsø Møller wrote:
Susanne Vigsø Møller wrote:
Hej. Flot trøje. Efter udtagning pil 2 synes jeg at jeg har flere masker mellem 2 x mosegrøn kryds. Skal jeg gå efter at mønster med perlegrå kommer i midten af mosegrøn kryds eller skal jeg tælle 7 skovgrønne masker? Håber mit spørgsmål giver mening.
07.07.2020 - 22:12DROPS Design answered:
Hei Susanne. Pga av økningene jevnt fordelt vil mønstret forskyve seg. Når du har økt ved pil 2, så start neste omgang slik du ser i diagrammet. God Fornøyelse!
13.07.2020 - 08:33
![]() Marianne Vatne wrote:
Marianne Vatne wrote:
Drops 196-9 På str L, skal 28 m økes når vi begynner på bolen eller på siste omgang før vrangborden? Hvis det er begynnelsen på bolen stemmer ikke økningen på bolen før vrangborden Totalt maskeantall skal være 212 før vrangbord. Ved økning av 28 m kommer de i tillegg når økningene er ferdig på bryst og bol. Håper på snarlig svar
05.07.2020 - 19:57DROPS Design answered:
Hei Marianne, Du øker 28 masker før vrangbord slik at vrangbordet ikke strammer. God fornøyelse!
06.07.2020 - 07:33
![]() Kristin Bjorøy Viksøy wrote:
Kristin Bjorøy Viksøy wrote:
Lengden på genseren står at skal bli 62cm i L og det synes eg er passe, men når eg følger oppskriften så får eg det til å bli 59cm? Overdel blir 27cm pluss 26cm før vrangbord og 6cm vrangbord.. kan eg bare legge til 3cm på den siste delen, nermer meg vrangbord nå?
28.06.2020 - 21:48DROPS Design answered:
Hej Kristin, du kan altid prøve genseren og strikke den længde som passer dig. Det er fordelen ved at strikke ovenfra og ned. God fornøjelse!
02.07.2020 - 11:36
![]() Carla wrote:
Carla wrote:
Me encanta!! quisiera saber si hay un diseño similar o con colores similares para hombres?
08.04.2020 - 23:19DROPS Design answered:
Hola Carla. En este link puedes consultar la colección de modelos para hombres: https://www.garnstudio.com/search.php?action=browse&c=4&lang=es
14.04.2020 - 21:15
![]() Joy wrote:
Joy wrote:
Hej 😊 Jeg har nu sat maskerne til det første ærme af på en tråd, og skal nu slå slå 8 masker op (=i siden af ærmet). Hvordan gør jeg det? På forhånd tak.
01.02.2020 - 22:17DROPS Design answered:
Hei Joy. Ta en titt på hjelpevideoene som ligger nederst på oppskriften. Der finner du videoen: Hvordan legge opp nye masker i siden på et arbeid. God Fornøyelse!
03.02.2020 - 11:15
![]() Bente Pedersen wrote:
Bente Pedersen wrote:
Skal de 6 masker der slås op når der sættes masker af til ærmer, strikkes med i ryg og forstykke ?
10.01.2020 - 18:23DROPS Design answered:
Hej Bente, ja det er de masker som danner siden under ærmerne. God fornøjelse!
15.01.2020 - 15:58
|
|||||||||||||||||||
Bardu#bardusweater |
|||||||||||||||||||
 |
 |
||||||||||||||||||
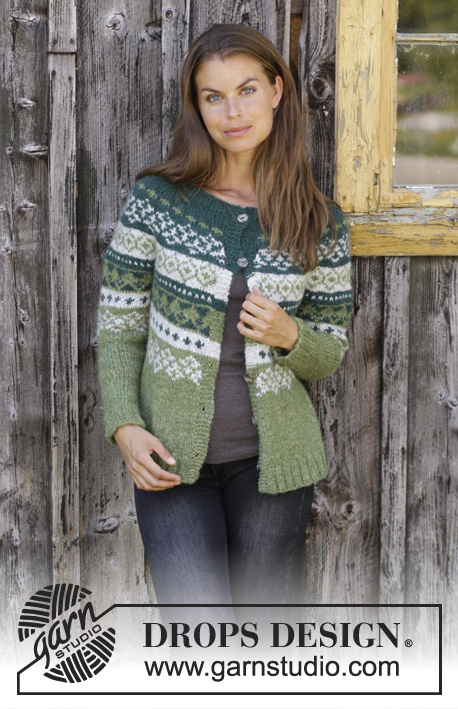
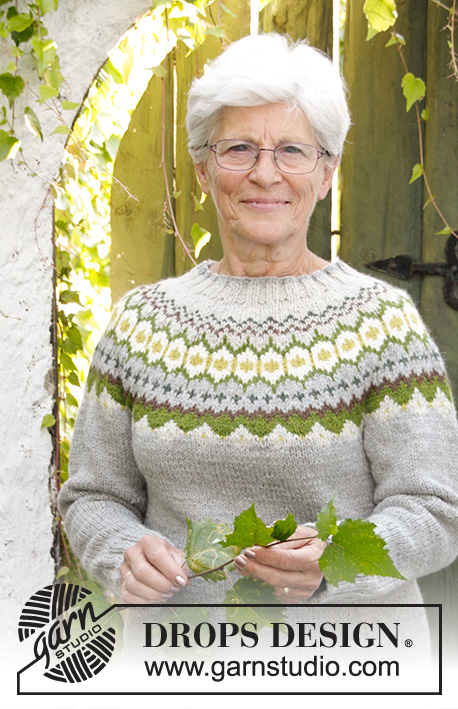
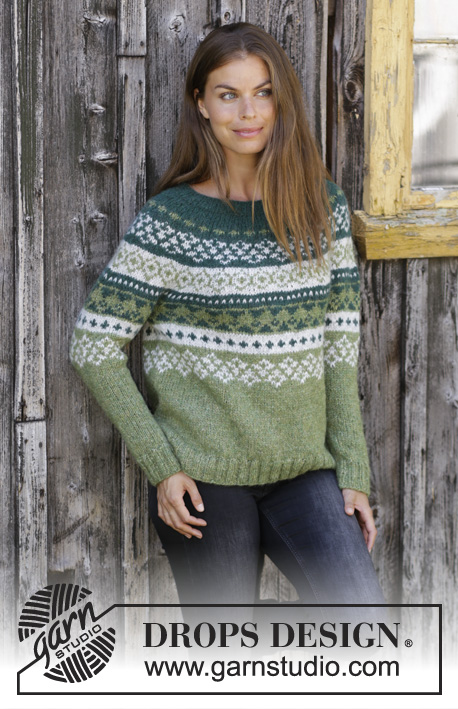
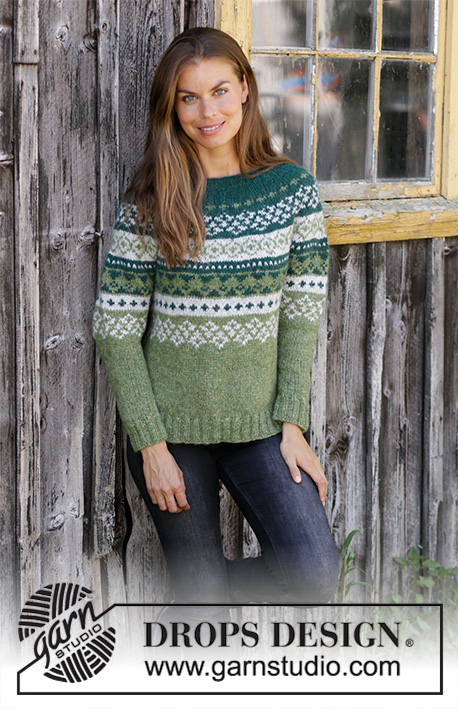
Knitted sweater with round yoke in DROPS Air. The piece is worked top down with Nordic pattern. Sizes S - XXXL.
DROPS 196-9 |
|||||||||||||||||||
|
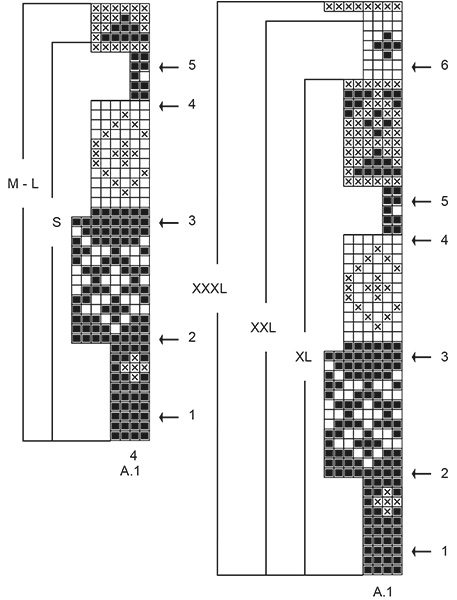
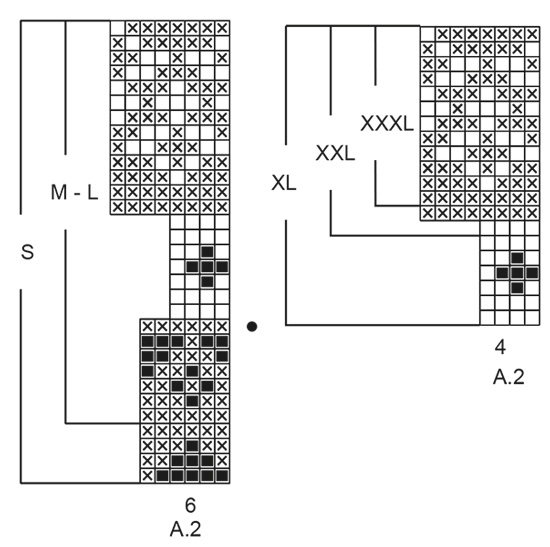
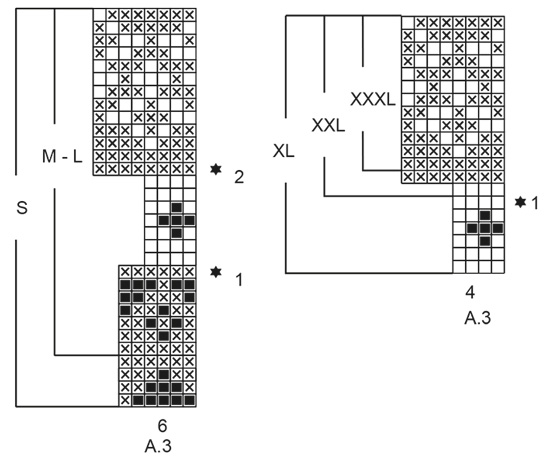
------------------------------------------------------- EXPLANATIONS FOR THE PATTERN: ------------------------------------------------------- PATTERN: See diagrams A.1 to A.3. Find your size in the diagrams. The whole pattern is worked in stockinette stitch. KNITTING TIP-1: To avoid the knitting gauge becoming tighter when working pattern it is important that the strands at the back of the piece are not tight. You can use a larger needle size when working pattern if this is a problem. KNITTING TIP-2: It is important that the knitting gauge is maintained also in height, or the yoke will be too short and the armholes too small! Check the gauge as you go and if it is right in width but not in length, you can work extra rows with forest green after the 2nd and/or the 3rd rows with increases (row with arrow) to get the right length for your size. INCREASE TIP-1 (evenly spaced): To work out how to increase evenly, count the total number of stitches on the needle (e.g. 84 stitches) and divide by the number of increases to be made (e.g. 20) = 4.2. In this example, increase by making 1 yarn over after approx. each 4th stitch. On the next round knit the yarn overs twisted to avoid holes. INCREASE TIP-2 (for sides of body): Work until there are 2 stitches left before the marker thread, 1 yarn over, knit 4 (marker thread sits in the middle of these 4 stitches), 1 yarn over (= 2 stitches increased). On the next round knit the yarn overs twisted to avoid holes. DECREASE TIP-1 (evenly spaced): To work out how to decrease evenly, count the total number of stitches on the needle (e.g. 54 stitches) and divide by the number of decreases to be made (e.g. 2) = 27. In this example, decrease by knitting each 26th and 27th stitch together. DECREASE TIP-2 (for sleeves): Decrease 1 stitch on each side of the marker thread as follows: Work until there are 3 stitches left before the marker thread, knit 2 together, knit 2 (marker thread sits in the middle of these 2 stitches), slip 1 stitch as if to knit, knit 1 and pass the slipped stitch over the knitted stitch (= 2 stitches decreased). ------------------------------------------------------- START THE PIECE HERE: ------------------------------------------------------- SWEATER - SHORT OVERVIEW OF THE PIECE: The piece is worked in the round with circular needle, from mid back and top down. The sleeves are worked in the round with double pointed needles/short circular needle, top down. SWEATER: NECK: Cast on 84-88-92-100-104-108 stitches with short circular needle size 4.5 mm / US 7 and forest green. Knit 1 round. Now work rib (knit 2, purl 2) until the rib measures 4 cm / 1½". YOKE: Change to short circular needle SIZE 5.5 mm/US 9. Now knit 1 round where you increase 20-20-24-24-28-28 stitches evenly on round – read INCREASE TIP-1 = 104-108-116-124-132-136 stitches. Knit 1 round. Now work pattern A.1 (find your size in the diagram) in the round and increase stitches evenly on the rounds marked with an arrow in the diagram. REMEMBER THE GAUGE! Read KNITTING TIP-1 and KNITTING TIP-2! ARROW-1: Increase 24-28-32-32-32-32 stitches evenly on round = 128-136-148-156-164-168 stitches. ARROW-2: Increase 32-32-36-36-36-40 stitches evenly on round = 160-168-184-192-200-208 stitches. ARROW-3: Increase 32-36-38-36-40-44 stitches evenly on round = 192-204-222-228-240-252 stitches. ARROW-4: Increase 24-30-30-30-30-36 stitches evenly on round = 216-234-252-258-270-288 stitches. ARROW-5: Increase 6-12-24-30-30-36 stitches evenly on round = 222-246-276-288-300-324 stitches. When the increases on the round marked with arrow-5 are finished, continue as follows in the different sizes: Sizes S, M, L and XL: Continue until there is 1 round left in the diagrams. The piece should now measure 25-27-27-30 cm / 9 ¾"-10⅝"-10⅝"-11 ¾" from the cast-on edge down. Sizes XXL and XXXL: Continue with pattern as before and increase as follows: ARROW-6: Increase 28-28 stitches evenly on round = 328-352 stitches. When the increases on the round marked with arrow-6 are finished, continue until there is 1 round left in the diagrams. The piece should now measure 33-34 cm / 13"-13⅜" from the cast-on edge down. ALL SIZES: Work the last round in the diagrams as follows: Work the first 31-34-39-42-48-52 stitches (= half back piece), place the next 48-54-60-60-68-72 stitches on a thread for sleeve, cast on 6-6-6-8-8-8 new stitches on the needle (= in side under sleeve), work the next 63-69-78-84-96-104 stitches (= front piece), place the next 48-54-60-60-68-72 stitches on a thread for sleeve, cast on 6-6-6-8-8-8 new stitches on the needle (= in side under sleeve), work the remaining 32-35-39-42-48-52 stitches (= half back piece). THE PIECE IS NOW MEASURED FROM HERE! BODY: = 138-150-168-184-208-224 stitches. Now work pattern as follows: Work A.2 (find your size in diagram) in the round. The pattern on the body should match the pattern on the yoke so that each repeat of A.2 is over each repeat of A.1! In sizes S and M increase 6-2 stitches evenly on the row marked with a black dot in A.2 (do not increase in sizes L, XL, XXL and XXXL) = 144-152-168-184-208-224 stitches. When A.2 has been completed in height continue with moss green and stockinette stitch. Now insert 1 marker thread in each side as follows: Insert the first marker thread after the first 36-38-42-46-52-56 stitches, then the second marker thread after the next 72-76-84-92-104-112 stitches. There are 36-38-42-46-52-56 stitches left on the round after the second marker thread. On the next round increase 2 stitches in each side (= 4 stitches increased on the row) - read INCREASE TIP-2. Increase like this every 4-2-3-4-5-6 cm / 1 ½"-¾"-1⅛"-1 ½"-1⅞"-2⅜" a total of 2-4-4-4-3-3 times = 152-168-184-200-220-236 stitches. When the piece measures 24-24-26-25-24-25 cm / 9⅜"-9⅜"-10 ¼"-9 ¾"-9⅜"-9 ¾" increase 24-28-28-32-36-36 stitches evenly on round = 176-196-212-232-256-272 stitches. Change to circular needle size 4.5 mm / US 7. Work rib (knit 2, purl 2). When the rib measures 6 cm / 2⅜" bind off with knit over knit and purl over purl; but to avoid the bind off edge being tight you can make 1 yarn over after each 4th stitch (yarn overs bind off as normal stitches). The piece measures approx. 58-60-62-64-66-68 cm / 22¾"-23⅝"-24⅜"-25¼"-26"-26¾" from the shoulder down. SLEEVE: Place the 48-54-60-60-68-72 stitches from the thread on the one side of the piece on double pointed needles/short circular needle SIZE 5.5 mm/US 9 and knit up 1 stitch in each of the 6-6-6-8-8-8 new stitches cast on under the sleeve = 54-60-66-68-76-80 stitches. Insert a marker thread mid under sleeve, i.e. in the middle of the 6-6-6-8-8-8 stitches cast on under sleeve. Let marker thread follow in piece, it is used for the decrease under the sleeve. Continue in the round with A.3 (find your size in the diagram). NOTE (applies to sizes S, M and L): Because the yoke was finished in the middle of a pattern repeat, it is important that the pattern on the sleeve matches the pattern on the yoke so that each repeat of A.3 is over each repeat of A.2! Make sure that you start on the right stitch in the diagram so that the pattern fits around the whole sleeve. Now work as follows in the different sizes: Sizes S, M and L: On the first round with a star in A.3 decrease 2-4-2 stitches evenly – read DECREASE TIP-1 and on the second round with a star decrease 4-8-8 stitches evenly = 48-48-56 stitches. Sizes XL, XXL and XXXL: On the round with a star in A.3 decrease 4-4-0 stitches evenly – read DECREASE TIP-1 = 64-72-80 stitches. When A.3 has been completed, continue with stockinette stitch and moss green. On the next round start to decrease under the sleeve - read DECREASE TIP-2. Decrease like this approx. every 2-2-1-1-1-1 cm / ¾"-¾"-⅜"-⅜"-⅜"-⅜" a total of 7-7-10-13-16-19 times = 34-34-36-38-40-42 stitches. When the sleeve measures 34-32-33-30-27-27 cm / 13⅜"-12 ½"-13"-11 ¾"-10⅝"-10⅝" from the division, knit 1 round where you increase 6-6-8-6-8-10 stitches evenly = 40-40-44-44-48-52 stitches. Change to double pointed needles size 4.5 mm / US 7. Work rib (knit 2 /purl 2) for 6 cm / 2⅜". Bind off with knit over knit and purl over purl. The sleeve measures approx. 40-38-39-36-33-33 cm / 15 ¾"-14⅞"-15 ¼"-14⅛"-13"-13". Work the other sleeve in the same way. |
|||||||||||||||||||
Diagram explanations |
|||||||||||||||||||
|
|||||||||||||||||||
 |
|||||||||||||||||||
 |
|||||||||||||||||||
 |
|||||||||||||||||||
 |
|||||||||||||||||||
Have you finished this pattern?Tag your pictures with #dropspattern #bardusweater or submit them to the #dropsfan gallery. Do you need help with this pattern?You'll find 25 tutorial videos, a Comments/Questions area and more by visiting the pattern on garnstudio.com. © 1982-2026 DROPS Design A/S. We reserve all rights. This document, including all its sub-sections, has copyrights. Read more about what you can do with our patterns at the bottom of each pattern on our site. |
|||||||||||||||||||


With over 40 years in knitting and crochet design, DROPS Design offers one of the most extensive collections of free patterns on the internet - translated to 17 languages. As of today we count 324 catalogs and 12291 patterns - 12281 of which are translated into English (US/in).
We work hard to bring you the best knitting and crochet have to offer, inspiration and advice as well as great quality yarns at incredible prices! Would you like to use our patterns for other than personal use? You can read what you are allowed to do in the Copyright text at the bottom of all our patterns. Happy crafting!
Post a comment to pattern DROPS 196-9
We would love to hear what you have to say about this pattern!
If you want to leave a question, please make sure you select the correct category in the form below, to speed up the answering process. Required fields are marked *.