
Looking for a yarn?


Comments / Questions (25)
![]() Aase Bager wrote:
Aase Bager wrote:
Kan ikke få mønsteret til at passe? Efter billedet er der i første mønster diagram kun mosgrøn og skovgrøn - på diagram er der også tegnet perlegrå? Er det lodret eller vandret diagrammerne skal læse?
10.12.2024 - 17:29DROPS Design answered:
Hej Aase, du starter i diagrammets nederste højre hjørne og strikker mod venstre, nøjagtig som du strikker. Næste pind i diagrammet strikkes fra vrangen og da følger du diagrammet fra venstre mod højre :)
11.12.2024 - 13:45
![]() Eva-Britt Ejderbring wrote:
Eva-Britt Ejderbring wrote:
Komplettering av min fråga. Står på fram/bakstycke i mossgrönt att sticka tills arbetet mäter 24 cm(M) men varifrån mäter jag?
25.09.2024 - 15:00DROPS Design answered:
Hej Eva-Britt. Du mäter från ärmhålet (där du la upp nya maskor under ärmarna). Mvh DROPS Design
26.09.2024 - 08:15
![]() Eva-Britt Ejderbring wrote:
Eva-Britt Ejderbring wrote:
Är på fram/bakstycke med mossgrönt. Står jag ska sticka när arbetet mäter 24 cm. Varifrån mäter jag?
25.09.2024 - 14:56DROPS Design answered:
Hej Eva-Britt. Du mäter från ärmhålet (där du la upp nya maskor under ärmarna). Mvh DROPS Design
26.09.2024 - 08:15
![]() Carina wrote:
Carina wrote:
Hola. Si quiero hacer una elevación de cuello, la hago inmediatamente después del elástico? Y con cuántos puntos tendría que empezar, es decir, cuál sería la secuencia de puntos? Gracias
06.01.2022 - 02:22DROPS Design answered:
Hola Carina, lo haces inmediatamente después del elástico, toma como ejemplo el patron del mismo grupo de lanas AQUI. Saludos!
06.01.2022 - 09:57
![]() Mary wrote:
Mary wrote:
Hei, i want to know that on increase stitches row,should i count from first stitch i-e garter stitch or should i do 5 garter stitches and after that start counting to place marker?
22.02.2021 - 11:01DROPS Design answered:
Dear Mary, when you should increase as explained under INCREASE TIP-1 (evenly spaced):, you should remove the 5 front band sts on each side to get the place of the increases. or.. which marker are you talking about? Not sure I understand your question properly.
22.02.2021 - 13:30
![]() Lilian Paus Vadem wrote:
Lilian Paus Vadem wrote:
Strikker jakke, skal mønster A 1 og A 2 strikkes samtidig?eller A1 først uten økning? I såfall betyr det en mønster rapport er 5 masker i starten?
11.09.2020 - 18:26DROPS Design answered:
Hei Lilian. A.1 og A.2 strikkes samtidig. A.1 strikkes kun over 1 maske, slik at det blir likt på hver siden av stolpemaskene. Det vil da strikkes slik: 5 stolpemasker i riller, A.1, A.2 (A.2 strikkes til det gjenstår 5 masker) og tilslutt 5 stolpemasker i riller. Du øker kun i A.2. God Fornøyelse!
14.09.2020 - 10:02
![]() Ida wrote:
Ida wrote:
Jeg strikker denne i størrelse S nå, og det holdt IKKE med bare ett nøste av farge 19, skogsgrønn. Strikkefastheten min er noe strammere enn det i oppskriften, men jeg mangler nå skogsgrønn til siste mønster på bolen og mønster på begge armene. Greit å vite for andre dersom noen skal kjøpe garn til denne oppskriften.
29.08.2020 - 17:54
![]() Helene Hansen wrote:
Helene Hansen wrote:
Jeg får ikke mænster og antall masker til å gå opp. Jeg begynte med møster beskrivelse A2 str. L. Er usikker på hvordan mønsteret A.1 skal brukes i forhold til mønster A2. Lurer på om feilen ligger der.
31.10.2019 - 20:57
![]() Lotta Sjöholm wrote:
Lotta Sjöholm wrote:
Hello, I got problems with getting the pattern to fit with the amount of stitches for a size M jacket. After increasing at the first arrow on A.1-2 i got 147 stitches + 5 garter stitches on each side. However, when i repeat the 7th row on A.2, after knitting the stitche on A.1 once, i get an incomplete figure at the end. The figure is 2 stitches short. Am i doing something wrong?
09.08.2019 - 17:52DROPS Design answered:
Dear Mrs Sjöholm, you start yoke with 119 sts in size M then increase evenly 28 sts on first row with an arrow in A.2 = 147 sts; work then (seen from RS): 5 sts in garter st, A.1 (= 1 st), repeat A.2 (= 4 sts on row 4) a total of 34 times and finish with 5 sts in garter st = 5 + 1 + 4x34 + 5 = 147 sts. On row 7 you should have 2 sts in forest green inside the front band sts before the st in moss green. Happy knitting!
12.08.2019 - 07:17
![]() Sabine Fournier wrote:
Sabine Fournier wrote:
Beste, de vraag is opgelost. Mijn excuses. Ik heb het niet goed gelezen, had het verkeerde cijfer omcirkeld en daardoor kwam het niet uit. :)
28.07.2019 - 18:13
|
|||||||||||||||||||
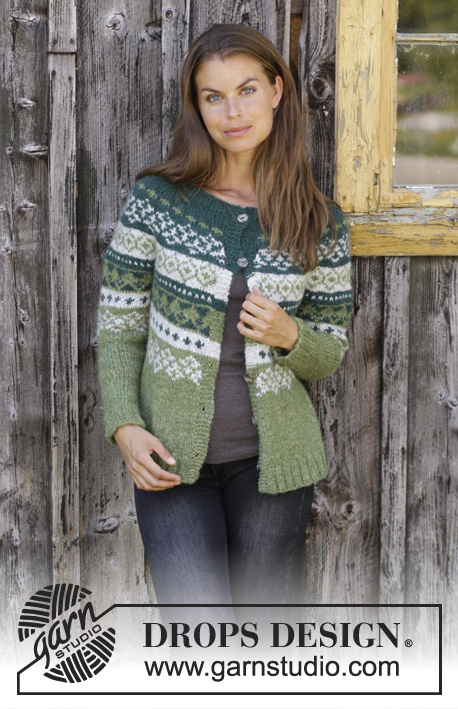
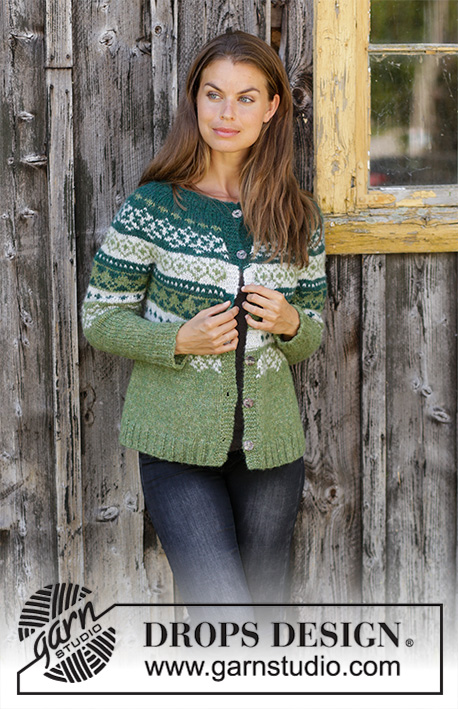
Bardu Jacket#bardujacket |
|||||||||||||||||||
 |
 |
||||||||||||||||||
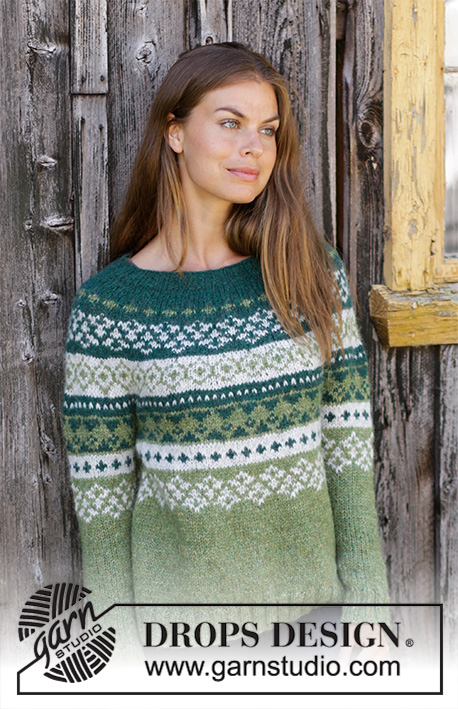
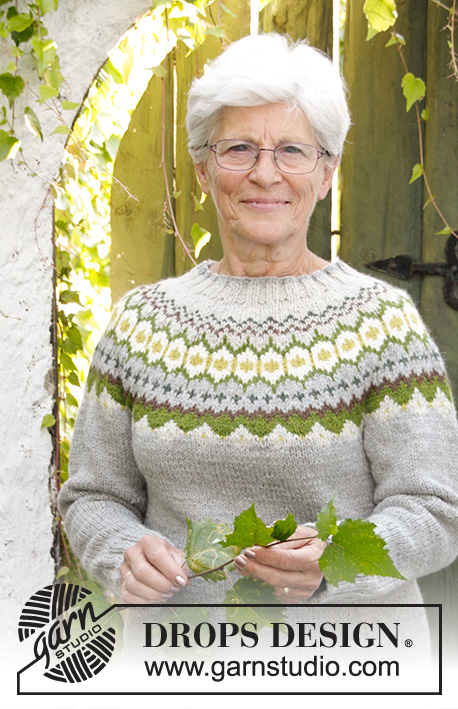
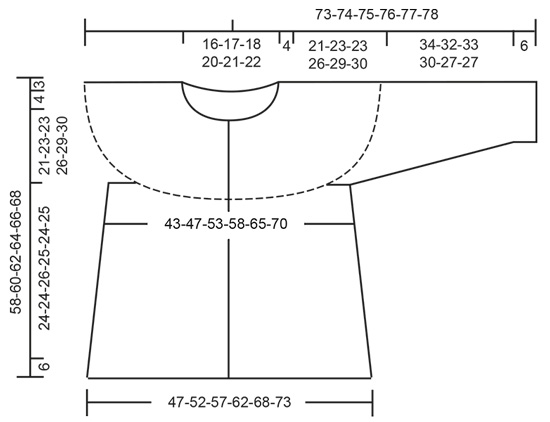
Knitted jacket with round yoke in DROPS Air. The piece is worked top down with Nordic pattern. Sizes S - XXXL.
DROPS 196-10 |
|||||||||||||||||||
|
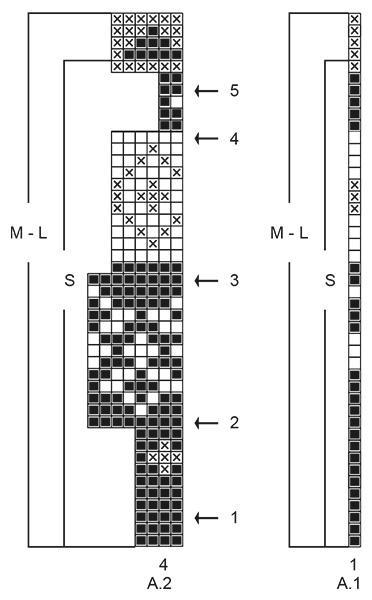
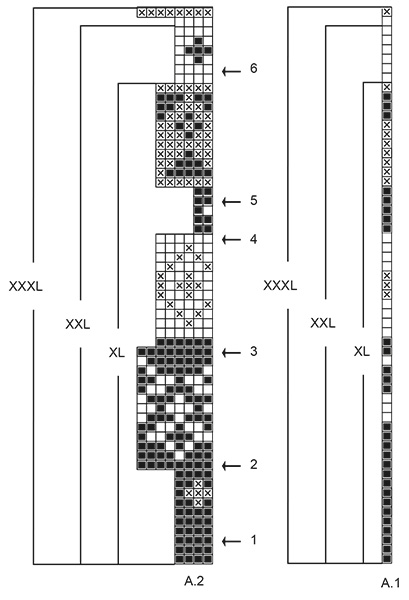
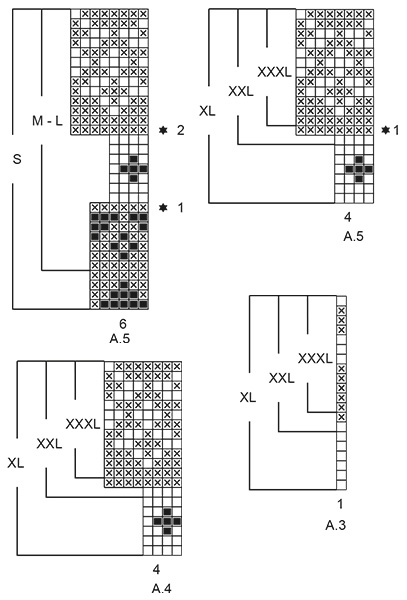
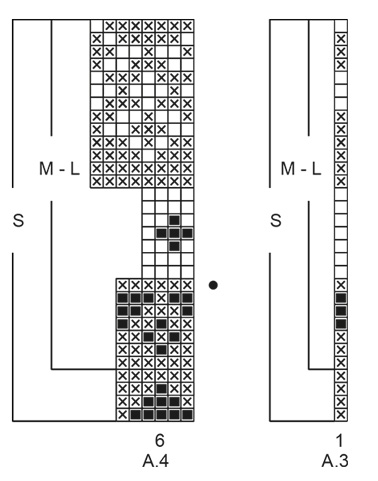
------------------------------------------------------- EXPLANATIONS FOR THE PATTERN: ------------------------------------------------------- RIDGE/GARTER STITCH (worked back and forth): 1 ridge = Knit 2 rows. PATTERN: See diagrams A.1 to A.5. Find your size in the diagrams. The whole pattern is worked in stockinette stitch. KNITTING TIP-1: To avoid the knitting gauge becoming tighter when working pattern it is important that the strands at the back of the piece are not tight. You can use a larger needle size when working pattern if this is a problem. The band stitches are worked in the background color on rows worked with pattern. KNITTING TIP-2: It is important that the knitting gauge is maintained also in height, or the yoke will be too short and the armholes too small! Check the gauge as you go and if it is right in width but not in length, you can work extra rows with forest green after the 2nd and/or the 3rd rows with increases (row with arrow) to get the right length for your size. The number of extra rows must be made in even numbers (2, 4, 6 etc.) so that the increases on the remaining rows with arrow comes on a row from the right side. INCREASE TIP-1 (evenly spaced): All increases are made from the right side! To work out how to increase evenly, count the total number of stitches on the needle (e.g. 92 stitches) minus the bands (e.g.10 stitches) and divide the remaining stitches by the number of increases to be made (e.g. 23) = 3.5. In this example, increase by making 1 yarn over after alternately each 3rd and 4th stitch. On the next round (wrong side) purl the yarn overs twisted to avoid holes. INCREASE TIP-2 (for sides of body): Work until there are 2 stitches left before the marker thread, 1 yarn over, knit 4 (marker thread sits in the middle of these 4 stitches), 1 yarn over (= 2 stitches increased). On the next row purl the yarn overs twisted to avoid holes. DECREASE TIP-1 (evenly spaced): All decreases are made from the right side! To work out how to decrease evenly, count the total number of stitches on the needle (e.g. 54 stitches) and divide by the number of decreases to be made (e.g. 2) = 27. In this example, decrease by knitting each 26th and 27th stitch together. DECREASE TIP-2 (for sleeves): Decrease 1 stitch on each side of the marker thread as follows: Work until there are 3 stitches left before the marker thread, knit 2 together, knit 2 (marker thread sits in the middle of these 2 stitches), slip 1 stitch as if to knit, knit 1 and pass the slipped stitch over the knitted stitch (= 2 stitches decreased). BUTTONHOLE: Work buttonholes on right band (when the garment is worn). 1 buttonhole = Work from the right side until there are 3 stitches left on the row, make 1 yarn over, knit 2 together and knit 1. On the next row (wrong side) knit the yarn over to leave a hole. The first buttonhole is worked when the rib in the neck measures approx. 2½-3 cm. Then work the next 5-5-5-5-6-6 buttonholes with approx. 9-9-9½-9½-9-9 cm between each one. ------------------------------------------------------- START THE PIECE HERE: ------------------------------------------------------- JACKET - SHORT OVERVIEW OF THE PIECE: The piece is worked back and forth with circular needle from mid front and top down. The sleeves are worked in the round with double pointed needles/short circular needle, top down. JACKET: NECK: Cast on 92-96-100-108-112-116 stitches (including 5 band stitches in each side towards mid front) with circular needle size 4.5 mm / US 7 and forest green. Purl 1 row (= wrong side). Now work rib as follows: 5 band stitches in GARTER STITCH – read description above (knit 2, purl 2) until there are 7 stitches left on the row, knit 2 and then 5 band stitches in garter stitch. Continue back and forth like this until the rib measures 4 cm / 1½" – remember BUTTONHOLES – read description above, and adjust so that the last row of rib is worked from the wrong side. YOKE: Change to circular needle SIZE 5.5 mm/US 9. Now work from the right side as follows: 5 band stitches in garter stitch, knit until there are 5 stitches left on the row at the same time as you increase 23-23-27-27-31-31 stitches evenly over these knitted stitches – read INCREASE TIP-1, 5 band stitches in garter stitch = 115-119-127-135-143-147 stitches. Purl 1 row, but the 5 band stitches in each side are worked in garter stitch. Now work pattern and increase stitches evenly on the rows marked with an arrow in the diagram: Work 5 band stitches in garter stitch, A.1 (find your size in the diagram) over the next stitch, work A.2 (find your size in the diagram) until there are 5 stitches left on the row and 5 band stitches in garter stitch. REMEMBER THE GAUGE! Read KNITTING TIP-1 and KNITTING TIP-2! ARROW-1: Increase 24-28-32-32-32-32 stitches evenly on row = 139-147-159-167-175-179 stitches. ARROW-2: Increase 32-32-36-36-36-40 stitches evenly on row = 171-179-195-203-211-219 stitches. ARROW-3: Increase 32-36-38-36-40-44 stitches evenly on row = 203-215-233-239-251-263 stitches. ARROW-4: Increase 24-30-30-30-30-36 stitches evenly on row = 227-245-263-269-281-299 stitches. ARROW-5: Increase 6-12-24-30-30-36 stitches evenly on row = 233-257-287-299-311-335 stitches. When the increases on the row marked with arrow-5 are finished, continue in the different sizes as follows: Sizes S, M, L and XL: Continue working until there is 1 row left in the diagrams. The piece should now measure 25-27-27-30 cm / 9 ¾"-10⅝"-10⅝"-11 ¾" from the cast-on edge down. Sizes XXL and XXXL: Continue with pattern as before and increase as follows: ARROW-6: Increase 28-28 stitches evenly on row = 339-363 stitches. When the increases on the row marked with arrow-6 are finished continue working until there is 1 row left in the diagrams. The piece should now measure 33-34 cm / 13"-13⅜" from the cast-on edge down. Continue with the next section. ALL SIZES: Work the last row in the diagrams as follows from the right side: Work the first 37-40-44-47-53-57 stitches (= front piece), place the next 48-54-60-60-68-72 stitches on a thread for sleeve and cast on 6-6-6-8-8-8 new stitches on the needle (= in side under sleeve), work the next 63-69-79-85-97-105 stitches (= back piece), place the next 48-54-60-60-68-72 stitches on a thread for sleeve and cast on 6-6-6-8-8-8 new stitches on the needle (= in side under sleeve) and work the remaining 37-40-44-47-53-57 stitches (= front piece). THE PIECE IS NOW MEASURED FROM HERE! BODY: = 149-161-179-195-219-235 stitches. Now work pattern as follows (first row = wrong side): Work 5 band stitches in garter stitch, work A.4 (find your size in diagram) until there are 6 stitches left on the row, A.3 (find your size in diagram) over the next stitch and 5 band stitches in garter stitch. The pattern on the body should match the pattern on the yoke so that each repeat of A.4 is over each repeat of A.2! In sizes S and M increase 6-2 stitches evenly on the row marked with a black dot in A.4 (do not increase in sizes L, XL, XXL and XXXL) = 155-163-179-195-219-235 stitches. When A.3 and A.4 have been completed in height continue with moss green, stockinette stitch and 5 band stitches in garter stitch in each side towards mid front. On the next row from the right side adjust the number of stitches to 152-164-180-196-218-238 stitches. Now insert 1 marker 42-45-48-52-57-63 stitches in from each side (= 68-74-84-92-104-112 stitches for the back piece between the 2 markers). On the next row from the right side increase 2 stitches in each side (= 4 stitches increased on the row) - read INCREASE TIP-2. Increase like this every 4-2-2-5-7-0 cm / 1 ½"-¾"-¾"-1⅞"-2 ¾"-" a total of 2-3-3-3-2-1 times = 160-176-192-208-226-242 stitches. When the piece measures 24-24-26-25-24-25 cm / 9⅜"-9⅜"-10 ¼"-9 ¾"-9⅜"-9 ¾" increase 24-28-28-32-36-36 stitches evenly inside the 5 band stitches in garter stitch in each side = 184-204-220-240-262-278 stitches. Change to circular needle size 4.5 mm / US 7. Work rib as follows: 5 band stitches in garter stitch, (knit 2, purl 2) until there are 7 stitches left on the row, knit 2 and 5 band stitches in garter stitch. When the rib measures 6 cm / 2⅜" bind off with garter stitch over garter stitch, knit over knit and purl over purl; but to avoid the bind off edge being tight you can make 1 yarn over after each 4th stitch (yarn overs bind off as normal stitches). The piece measures approx. 58-60-62-64-66-68 cm / 22¾"-23⅝"-24⅜"-25¼"-26"-26¾" from the shoulder down. SLEEVE: Place the 48-54-60-60-68-72 stitches from the thread on the one side of the piece on double pointed needles/short circular needle SIZE 5.5 mm/US 9 and knit up 1 stitch in each of the 6-6-6-8-8-8 new stitches cast on under the sleeve = 54-60-66-68-76-80 stitches. Insert a marker thread mid under sleeve, i.e. in the middle of the 6-6-6-8-8-8 stitches cast on under sleeve. Let marker thread follow in piece, it is used for the decrease under the sleeve. Continue in the round with A.5 (find your size in the diagram). NOTE (applies to sizes S, M and L): Because the yoke was finished in the middle of a pattern repeat, it is important that the pattern on the sleeve matches the pattern on the yoke so that each repeat of A.5 is over each repeat of A.2! Make sure that you start on the right stitch in the diagram so that the pattern fits around the whole sleeve. Now work as follows in the different sizes: Sizes S, M and L: On the first round with a star in A.5 decrease 2-4-2 stitches evenly – read DECREASE TIP-1 and on the second round with a star decrease 4-8-8 stitches evenly = 48-48-56 stitches. Sizes XL, XXL and XXXL: On the round with a star in A.5 decrease 4-4-0 stitches evenly – read DECREASE TIP-1 = 64-72-80 stitches. When A.5 has been completed, continue with stockinette stitch and moss green. On the next round start to decrease under the sleeve - read DECREASE TIP-2. Decrease like this approx. every 2-2-1-1-1-1 cm / ¾"-¾"-⅜"-⅜"-⅜"-⅜" a total of 7-7-10-13-16-19 times = 34-34-36-38-40-42 stitches. When the sleeve measures 34-32-33-30-27-27 cm / 13⅜"-12 ½"-13"-11 ¾"-10⅝"-10⅝" from the division, knit 1 round where you increase 6-6-8-6-8-10 stitches evenly = 40-40-44-44-48-52 stitches. Change to double pointed needles size 4.5 mm / US 7. Work rib (knit 2 /purl 2) for 6 cm / 2⅜". Bind off with knit over knit and purl over purl. The sleeve measures approx. 40-38-39-36-33-33 cm / 15 ¾"-14⅞"-15 ¼"-14⅛"-13"-13". Work the other sleeve in the same way. ASSEMBLY: Sew buttons onto left band. |
|||||||||||||||||||
Diagram explanations |
|||||||||||||||||||
|
|||||||||||||||||||
|
|||||||||||||||||||
|
|||||||||||||||||||
|
|||||||||||||||||||
|
|||||||||||||||||||
|
|||||||||||||||||||
Have you finished this pattern?Tag your pictures with #dropspattern #bardujacket or submit them to the #dropsfan gallery. Do you need help with this pattern?You'll find 26 tutorial videos, a Comments/Questions area and more by visiting the pattern on garnstudio.com. © 1982-2025 DROPS Design A/S. We reserve all rights. This document, including all its sub-sections, has copyrights. Read more about what you can do with our patterns at the bottom of each pattern on our site. |
|||||||||||||||||||


With over 40 years in knitting and crochet design, DROPS Design offers one of the most extensive collections of free patterns on the internet - translated to 17 languages. As of today we count 314 catalogs and 11821 patterns - 11811 of which are translated into English (US/in).
We work hard to bring you the best knitting and crochet have to offer, inspiration and advice as well as great quality yarns at incredible prices! Would you like to use our patterns for other than personal use? You can read what you are allowed to do in the Copyright text at the bottom of all our patterns. Happy crafting!
Post a comment to pattern DROPS 196-10
We would love to hear what you have to say about this pattern!
If you want to leave a question, please make sure you select the correct category in the form below, to speed up the answering process. Required fields are marked *.