DROPS Air
DROPS Air
65% Alpaca, 28% Polyamide, 7% Wool
from 4.80 £ /50g
Get the yarn to make this pattern from 24.00£.

The yarn cost is calculated from the pattern’s smallest size and the yarn’s cheapest product type. Looking for an even better price? You might find it on the DROPS Deals!

DROPS Super Sale

Bardu

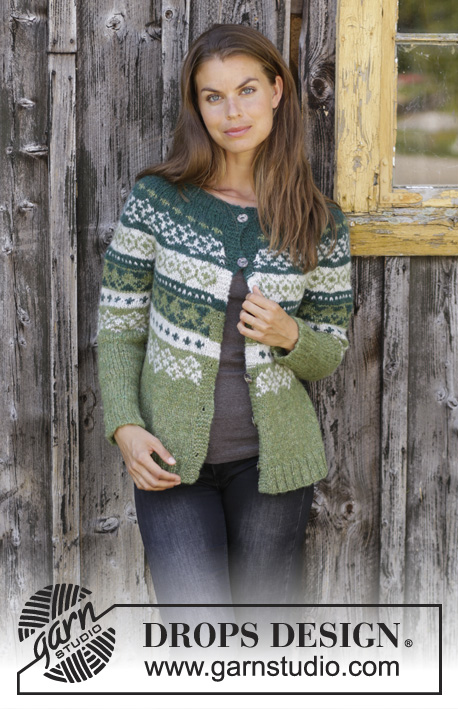
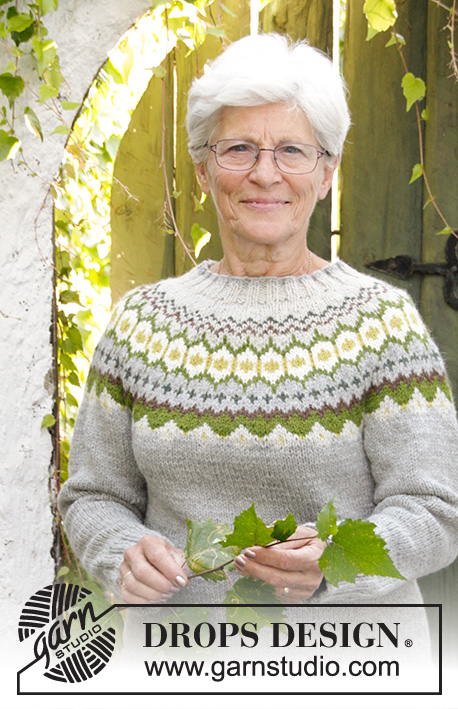
Knitted jumper with round yoke in DROPS Air. The piece is worked top down with Nordic pattern. Sizes S - XXXL.

DROPS 196-9
DROPS Design: Pattern no ai-152
Yarn group C or A + A
-------------------------------------------------------

Sizes: S - M - L - XL - XXL - XXXL
Materials:
DROPS AIR from Garnstudio (belongs to yarn group C)
150-150-200-200-200-250 g colour 12, moss green
50-100-100-100-100-100 g colour 19, forest green
50-50-100-100-100-100 colour 03, pearl grey

-------------------------------------------------------
ACCESSORIES FOR THE PIECE:

KNITTING TENSION:
16 stitches in width and 20 rows in height with stocking stitch and Nordic pattern = 10 x 10 cm.

NEEDLES:
DROPS DOUBLE POINTED NEEDLES SIZE 5.5 MM – for stocking stitch and Nordic pattern.
DROPS CIRCULAR NEEDLE SIZE 5.5 MM: length 40 and 80 cm for stocking stitch and Nordic pattern.
DROPS DOUBLE POINTED NEEDLES SIZE 4.5 MM – for rib.
DROPS CIRCULAR NEEDLE SIZE 4.5 MM: length 40 and 80 cm for rib.
The needle size is only a guide. If you have too many stitches on 10 cm, change to a larger needle size. If you have too few stitches on 10 cm, change to a smaller needle size.

-------------------------------------------------------

-------------------------------------------------------

Alternative Yarn – See how to change yarns here
Yarn Groups A to F – Use the same pattern and change the yarn here
Yarn usage using an alternative yarn – Use our yarn converter here

-------------------------------------------------------

DROPS Air
DROPS Air
65% Alpaca, 28% Polyamide, 7% Wool
from 4.80 £ /50g
Get the yarn to make this pattern from 24.00£.

The yarn cost is calculated from the pattern’s smallest size and the yarn’s cheapest product type. Looking for an even better price? You might find it on the DROPS Deals!

DROPS Super Sale

SAVE 30% on 6 cotton favourites!
Valid until 12.04.2024

Pattern instructions

NOTE: This pattern is written in British English. All measurements in charts are in cm. For conversion from cm to inches - click here. There are different terms for crocheting in British and American English. If this pattern includes crochet, click for "crochet terms" here. For this pattern in American English, please click here.
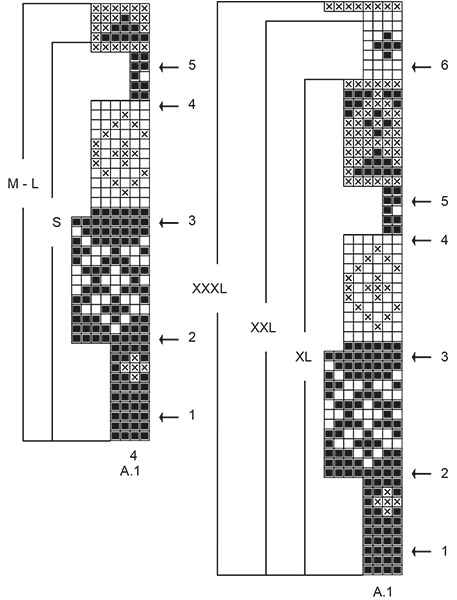
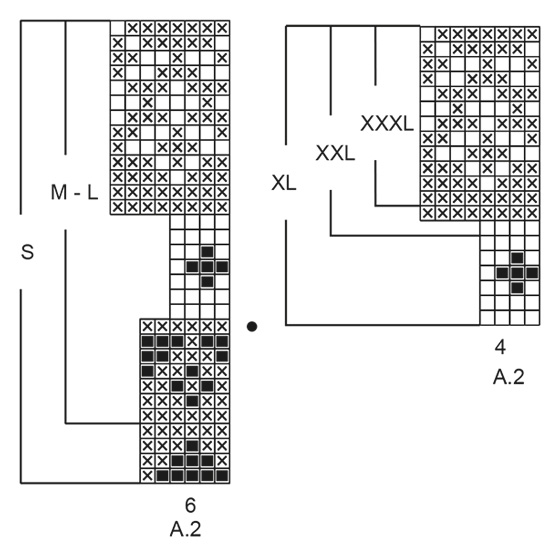
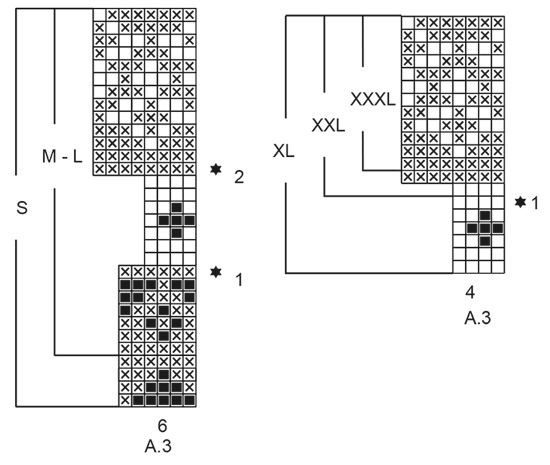
EXPLANATIONS FOR THE PATTERN:

-------------------------------------------------------

PATTERN: 
See diagrams A.1 to A.3. Find your size in the diagrams. The whole pattern is worked in stocking stitch.

KNITTING TIP-1:
To avoid the knitting tension becoming tighter when working pattern it is important that the strands at the back of the piece are not tight. You can use a larger needle size when working pattern if this is a problem.

KNITTING TIP-2:
It is important that the knitting tension is maintained also in height, or the yoke will be too short and the armholes too small! Check the tension as you go and if it is right in width but not in length, you can work extra rows with forest green after the 2nd and/or the 3rd rows with increases (row with arrow) to get the right length for your size.

INCREASE TIP-1 (evenly spaced):
To work out how to increase evenly, count the total number of stitches on the needle (e.g. 84 stitches) and divide by the number of increases to be made (e.g. 20) = 4.2. 
In this example, increase by making 1 yarn over after approx. each 4th stitch. On the next round knit the yarn overs twisted to avoid holes.

INCREASE TIP-2 (for sides of body):
Work until there are 2 stitches left before the marker thread, 1 yarn over, knit 4 (marker thread sits in the middle of these 4 stitches), 1 yarn over (= 2 stitches increased). On the next round knit the yarn overs twisted to avoid holes.

DECREASE TIP-1 (evenly spaced):
To work out how to decrease evenly, count the total number of stitches on the needle (e.g. 54 stitches) and divide by the number of decreases to be made (e.g. 2) = 27. 
In this example, decrease by knitting each 26th and 27th stitch together.

DECREASE TIP-2 (for sleeves): 
Decrease 1 stitch on each side of the marker thread as follows: Work until there are 3 stitches left before the marker thread, knit 2 together, knit 2 (marker thread sits in the middle of these 2 stitches), slip 1 stitch as if to knit, knit 1 and pass the slipped stitch over the knitted stitch (= 2 stitches decreased).

-------------------------------------------------------

START THE PIECE HERE:

-------------------------------------------------------

JUMPER - SHORT OVERVIEW OF THE PIECE:
The piece is worked in the round with circular needle, from mid back and top down. The sleeves are worked in the round with double pointed needles/short circular needle, top down.

JUMPER:
NECK:
Cast on 84-88-92-100-104-108 stitches with short circular needle size 4.5 mm and forest green. Knit 1 round. Now work rib (knit 2, purl 2) until the rib measures 4 cm.

YOKE:
Change to short circular needle size 5.5 mm. Now knit 1 round where you increase 20-20-24-24-28-28 stitches evenly on round – read INCREASE TIP-1 = 104-108-116-124-132-136 stitches. Knit 1 round.


Now work pattern A.1 (find your size in the diagram) in the round and increase stitches evenly on the rounds marked with an arrow in the diagram. REMEMBER THE KNITTING TENSION! Read KNITTING TIP-1 and KNITTING TIP-2!
ARROW-1: Increase 24-28-32-32-32-32 stitches evenly on round = 128-136-148-156-164-168 stitches.
ARROW-2: Increase 32-32-36-36-36-40 stitches evenly on round = 160-168-184-192-200-208 stitches.
ARROW-3: Increase 32-36-38-36-40-44 stitches evenly on round = 192-204-222-228-240-252 stitches.
ARROW-4: Increase 24-30-30-30-30-36 stitches evenly on round = 216-234-252-258-270-288 stitches.
ARROW-5: Increase 6-12-24-30-30-36 stitches evenly on round = 222-246-276-288-300-324 stitches. When the increases on the round marked with arrow-5 are finished, continue as follows in the different sizes:

Sizes S, M, L and XL:
Continue until there is 1 round left in the diagrams. The piece should now measure 25-27-27-30 cm from the cast-on edge down.

Sizes XXL and XXXL:
Continue with pattern as before and increase as follows:
ARROW-6: Increase 28-28 stitches evenly on round = 328-352 stitches. When the increases on the round marked with arrow-6 are finished, continue until there is 1 round left in the diagrams. The piece should now measure 33-34 cm from the cast-on edge down.

ALL SIZES:
Work the last round in the diagrams as follows: Work the first 31-34-39-42-48-52 stitches (= half back piece), place the next 48-54-60-60-68-72 stitches on a thread for sleeve, cast on 6-6-6-8-8-8 new stitches on the needle (= in side under sleeve), work the next 63-69-78-84-96-104 stitches (= front piece), place the next 48-54-60-60-68-72 stitches on a thread for sleeve, cast on 6-6-6-8-8-8 new stitches on the needle (= in side under sleeve), work the remaining 32-35-39-42-48-52 stitches (= half back piece). THE PIECE IS NOW MEASURED FROM HERE!

BODY:
= 138-150-168-184-208-224 stitches. Now work pattern as follows: Work A.2 (find your size in diagram) in the round. The pattern on the body should match the pattern on the yoke so that each repeat of A.2 is over each repeat of A.1! In sizes S and M increase 6-2 stitches evenly on the row marked with a black dot in A.2 (do not increase in sizes L, XL, XXL and XXXL) = 144-152-168-184-208-224 stitches. When A.2 has been completed in height continue with moss green and stocking stitch. Now insert 1 marker thread in each side as follows: Insert the first marker thread after the first 36-38-42-46-52-56 stitches, then the second marker thread after the next 72-76-84-92-104-112 stitches. There are 36-38-42-46-52-56 stitches left on the round after the second marker thread. On the next round increase 2 stitches in each side (= 4 stitches increased on the row) - read INCREASE TIP-2. Increase like this every 4-2-3-4-5-6 cm a total of 2-4-4-4-3-3 times = 152-168-184-200-220-236 stitches. When the piece measures 24-24-26-25-24-25 cm increase 24-28-28-32-36-36 stitches evenly on round = 176-196-212-232-256-272 stitches. Change to circular needle size 4.5 mm. Work rib (knit 2, purl 2). When the rib measures 6 cm cast off with knit over knit and purl over purl; but to avoid the cast off edge being tight you can make 1 yarn over after each 4th stitch (yarn overs cast off as normal stitches). The piece measures approx. 58-60-62-64-66-68 cm from the shoulder down.

SLEEVE:
Place the 48-54-60-60-68-72 stitches from the thread on the one side of the piece on double pointed needles/short circular needle size 5.5 mm and knit up 1 stitch in each of the 6-6-6-8-8-8 new stitches cast on under the sleeve = 54-60-66-68-76-80 stitches. Insert a marker thread mid under sleeve, i.e. in the middle of the 6-6-6-8-8-8 stitches cast on under sleeve. Let marker thread follow in piece, it is used for the decrease under the sleeve. Continue in the round with A.3 (find your size in the diagram). NOTE (applies to sizes S, M and L): Because the yoke was finished in the middle of a pattern repeat, it is important that the pattern on the sleeve matches the pattern on the yoke so that each repeat of A.3 is over each repeat of A.2! Make sure that you start on the right stitch in the diagram so that the pattern fits around the whole sleeve.
Now work as follows in the different sizes:

Sizes S, M and L:
On the first round with a star in A.3 decrease 2-4-2 stitches evenly – read DECREASE TIP-1 and on the second round with a star decrease 4-8-8 stitches evenly = 48-48-56 stitches.

Sizes XL, XXL and XXXL:
On the round with a star in A.3 decrease 4-4-0 stitches evenly – read DECREASE TIP-1 = 64-72-80 stitches.

When A.3 has been completed, continue with stocking stitch and moss green. On the next round start to decrease under the sleeve - read DECREASE TIP-2. Decrease like this approx. every 2-2-1-1-1-1 cm a total of 7-7-10-13-16-19 times = 34-34-36-38-40-42 stitches. When the sleeve measures 34-32-33-30-27-27 cm from the division, knit 1 round where you increase 6-6-8-6-8-10 stitches evenly = 40-40-44-44-48-52 stitches. Change to double pointed needles size 4.5 mm. Work rib (knit 2 /purl 2) for 6 cm. Cast off with knit over knit and purl over purl. The sleeve measures approx. 40-38-39-36-33-33 cm. Work the other sleeve in the same way.

Diagram

symbols = moss green
symbols = forest green
symbols = pearl grey
symbols = increase round - read description in text
symbols = decrease round (for sleeves) - read description in text
symbols = increase round (for body in sizes S and M) - read description in text
diagram
diagram
diagram
diagram

Each of our patterns has specific tutorial videos to help you.

Do you have a question? See a list of frequently asked questions (FAQ)

Knitting tension is what determines the final measurements of your work, and is usually measured per 10 x 10 cm. It is provided like so: number of stitches in width x number of rows in height - eg: 19 stitches x 26 rows = 10 x 10 cm.

The knitting tension is very individual; some people knit/crochet loosely while others work tightly. You adjust the knitting tension with the needle size, which is why the suggested needle size is only meant as a guide! You need to adjust this (up or down) to ensure that YOUR knitting tension matches the knitting tension provided in the pattern. If you work with a different knitting tension than provided you will have a different yarn consumption, and your work will have different measurements than what the pattern suggests.

The knitting tension also determines which yarns can replace each other. As long as you achieve the same knitting tension you can replace one yarn with another.

See DROPS lesson: How to measure your tension/gauge

See DROPS video: How to make a gauge tension swatch

The required amount of yarn is provided in grams, eg: 450 g. To calculate how many balls you’ll need you first need to know how many grams are in 1 ball (25g, 50g or 100g). This information is available if you click on the individual yarn quality on our pages. Divide the amount required with the amount of each ball. For example, if each ball is 50g (the most common amount), the calculation will be as follows: 450 / 50 = 9 balls.

The important thing when changing from one yarn to another is that the knitting/crochet tension remains the same. This is so that the measurements of the finished piece will be the same as on the sketch provided. It is easier to achieve the same knitting tension using yarns from the same yarn group. It is also possible to work with multiple strands of a thinner yarn to achieve the knitting tension of a thicker one. Please try our yarn converter. We recommend you to always work a test swatch.

Please NOTE: when changing yarn the garment might have a different look and feel to the garment in the photo, due to individual properties and qualities of each yarn.

See DROPS lesson: Can I use a different yarn than the one mentioned in the pattern?

All our yarns are categorised into yarn groups (from A to F) according to thickness and knitting tension – group A contains the thinnest yarns and group F the thickest. This makes it easier for you to find alternative yarns to our patterns, should you wish to switch yarn. All yarns within the same group have a similar knitting tension and can easily replace each other. However, different yarn qualities have different structures and properties which will give the finished work a unique look and feel.

Click here for an overview of the yarns in each yarn group

At the top of all our patterns you’ll find a link to our yarn calculator, which is a helpful tool should you wish to use a different yarn than suggested. By filling in the yarn quality you wish to replace, the amount (in your size) and number of strands, the calculator will present good alternative yarns with the same knitting tension. Additionally it will tell you how much you’ll require in the new qualities and whether you’ll need to work with multiple strands. Most skeins are 50g (some are 25g or 100g).

If the pattern is worked with multiple colours, every colour will have to be calculated separately. Similarly, if the pattern is worked with several strands of different yarns (for example 1 strand Alpaca and 1 strand Kid-Silk) you will have to find alternatives for each, individually.

Click here to see our yarn calculator

Since different yarns have different qualities and textures we have chosen to keep the original yarn in our patterns. However, you can easily find options among our available qualities by using our yarn calculator, or simply pick a yarn from the same yarn group.

It is possible that some retailers still have discontinued yarns in stock, or that someone has a few skeins at home that they would like to find patterns for.

The yarn calculator will provide both alternative yarn as well as required amount in the new quality.

If you think it's hard to decide what size to make, it can be a good idea to measure a garment you own already and like the size of. Then you can pick the size by comparing those measures with the ones available in the pattern's size chart.

You'll find the size chart at the bottom of the pattern.

See DROPS lesson: How to read size chart

The needle size provided in the pattern serves only as a guide, the important thing is to follow the knitting tension. And since knitting tension is very individual, you will have to adjust the needle size to ensure that YOUR tension is the same as in the pattern – maybe you’ll have to adjust 1, or even 2 needle sizes, up or down to achieve the correct tension. For this, we recommend that you work test swatches.

Should you work with a different knitting tension than the one provided, the measurements of the finished garment might deviate from the measurement sketch.

See DROPS lesson: How to measure your tension/gauge

See DROPS video: How to make a tension/gauge swatch

Working a garment top-down provides more flexibility and room for personal adjustment. For example it is easier to try the garment on while working, as well as making adjustments to length of yoke and shoulder caps.

The instructions are carefully explaining every step, in the correct order. Diagrams are adjusted to the knitting direction and are worked as usual.

The diagram depicts all rows/rounds, and every stitch seen from the right side. It is read from bottom to top, from right to left. 1 square = 1 stitch.

When working back and forth, every other row is worked from the right side and every other row is worked from the wrong side. When working from the wrong side, the diagram will have to be worked reversed: from left to right, knit stitches are purled, purl stitches are knit etc.

When working in the round every round is worked from the right side and the diagram are worked from right to left on all rounds.

See DROPS lesson: How to read knitting diagrams

The diagram depicts all rows/rounds, and every stitch seen from the right side. It is worked from bottom to top, from right to left.

When working back and forth every other row is worked from the right side: from right to left and every other row is worked from the wrong side: from left to right.

When working in the round, every row in the diagram are worked from the right side, from right to left.

When working a circular diagram you start in the middle and work your way outwards, counter clockwise, row by row.

The rows usually start with a given number of chain stitches (equivalent to the height of the following stitch), this will either be depicted in the diagram or explained in the pattern.

See DROPS lesson: How to read crochet diagrams

Instructions for working several diagrams after each other on the same row/round, will often be written like so: “work A.1, A.2, A.3 a total of 0-0-2-3-4 times". This means you work A.1 once, then A.2 is worked once, and A.3 is repeated (in width) the number of times provided for your size – in this case like so: S = 0 times, M = 0 times, L=2 times, XL= 3 times and XXL = 4 times.

The diagrams are worked as usual: begin with the first row in A.1, then work the first row in A.2 etc.

See DROPS lesson: How to read knitting diagrams

See DROPS lesson: How to read crochet diagrams

The total width of the garment (from wrist-to-wrist) will be larger in the larger sizes, despite the actual sleeves being shorter. The larger sizes have longer sleeve caps and wider shoulders, so there will be a good fit in all sizes.

The measurement sketch/schematic drawing provides information regarding the full length of the garment. If it’s a jumper or a jacket the length is measured from the highest point on the shoulder closest to the neckline, and straight down to the bottom of the garment. It is NOT measured from the tip of shoulder. Similarly, the length of yoke is measured from the highest point on the shoulder and down to where yoke is split into body and sleeves.

On a jacket measures are never taken along bands, unless specifically stated. Always measure inside band stitches when measuring the length.

See DROPS lesson: How to read a schematic drawing

Diagrams are often repeated on the round or in height. 1 repeat is the diagram the way it appears in the pattern. If it says to work 5 repeats of A.1 in the round, then you work A.1 a total of 5 times after/next to each other in the round. If it says to work 2 repeats of A.1 vertically/in height you work the entire diagram once, then begin again at the start and work the entire diagram one more time.

Chain stitches are slightly narrower than other stitches and to avoid working the cast-on edge too tight, we simply chain more stitches to begin with. The stitch count will be adjusted on the following row to fit the pattern and measurement sketch.

The rib edge is more elastic and will contract slightly compared to, for example, stocking stitch. By increasing before the rib edge, you avoid a visible difference in width between the rib edge and the rest of the body.

It’s very easy to cast off too tightly, and by making yarn overs while casting off (and simultaneously casting these off) you avoid a too tight cast off edge.

See DROPS video: How to bind off with yarn overs (yo)

To achieve an even increase (or decrease) you can increase on, for example: every 3rd and 4th row alternately, like so: work 2 rows and increase on the 3rd row, work 3 rows and increase on the 4th. Repeat this until the increase is complete.

See DROPS lesson: Increase or decrease 1 st on every 3rd and 4th row alternately

Should you prefer to work in the round instead of back and forth, you may of course adjust the pattern. You’ll need to add steeks mid-front (usually 5 stitches), and follow the instructions. When you would normally turn and work from the wrong side, simply work across the steek and continue in the round. At the end you’ll cut the piece open, pick up stitches to work bands, and cover the cut edges.

See DROPS video: How to knit steeks and cut open

Should you prefer to work back and forth instead of in the round, you may of course adjust the pattern so you work the pieces separately and then assemble them at the end. Divide the stitches for the body in 2, add 1 edge stitch in each side (for sewing) and work the front and back pieces separately.

See DROPS lesson: Can I adapt a pattern for circular needles into straight needles?

Pattern repeats can vary slightly in the different sizes, in order to get the correct proportions. If you’re not working the exact same size as the garment in the photo, yours might deviate slightly. This has been carefully developed and adjusted so that the complete impression of the garment is the same in all sizes.

Make sure to follow instructions and diagrams for your size!

If you have found a pattern you like which is available in women’s size it’s not very difficult to convert it to men’s size. The biggest difference will be the length of sleeves and body. Start working on the women size that you think would fit across the chest. The additional length will be worked right before you cast off for the armhole/sleeve cap. If the pattern is worked top-down you can add the length right after the armhole or before the first decrease on sleeve.

Regarding additional yarn amount, this will depend on how much length you add, but it is better with a skein too many than too few.

All yarns will have excess fibres (from production) that might come off as lint or shedding. Brushed yarns (ie hairier yarns) have more of these loose, excess fibres, causing more shedding.

Shedding also depends on what is worn under or over the garment, and whether this pulls at the yarn fibres. It’s therefore not possible to guarantee that there will be no shedding

Below are some tips on how to get the best result when working with hairier yarns:

1. When the garment is finished (before you wash it) shake it vigorously so the looser hairs come off. NOTE: do NOT use a lint roller, brush or any method that pulls at the yarn.

2. Place the garment in a plastic bag and put it in your freezer - the temperature will cause the fibres to become less attached to each other, and excess fibres will come off easier.

3. Leave in the freezer for a few hours before taking it out and shaking it again.

4. Wash the garment according to the instructions on the yarn label.

Pilling is a natural process that happens to even the most exclusive of fibers. It's a natural sign of wear and tear that is hard to avoid, and that is most visible in high friction areas of your garment like a sweater's arms and cuffs.

You can make your garment look as new by removing the pilling, using a fabric comb or a pill/lint remover.

Still can't find the answer you need? Then scroll down and leave your question so one of our experts can try to help you. This will be done normally within 5 to 10 working days.
In the meantime, you can read the questions and answers that others have left to this pattern or join the DROPS Workshop on Facebook to get help from fellow knitters/crocheters!

You might also like...

Bardu

Johanna, Finland

Bardu

Véronique Bach, France

Bardu

Leabrook

Bardu

gabriellejaques, United States

Bardu

Viki, Canada

Bardu

Marta, Poland

Bardu

@sukkaisjuttuja, Finland

Bardu

@sukkaisjuttuja, Finland

Post a comment to pattern DROPS 196-9

We would love to hear what you have to say about this pattern!

If you want to leave a question, please make sure you select the correct category in the form below, to speed up the answering process. Required fields are marked *.

Comments / Questions (46)

country flag Heather wrote:

I am confused about when to mark out the sleeves. I am doing the large size, and I am reading the pattern to start the sleeves after the A.2 chart is completed in height. But looking at the photos, that's the end of colour work. Help please? Thanks!

21.01.2024 - 19:15

DROPS Design answered:

Dear Heather, you divide yoke on last round in A.1 then work A.2 on body but work A.3 on sleeves. Then after diagrams have been worked, just continue in stocking stitch. Happy knitting!

22.01.2024 - 10:27

country flag Petra Magdlung wrote:

Hallo,ich habe Probleme,die Anleitung zu drucken,die Diagramme werden nicht gedruckt,ich kann die Anleitung auch nicht in meinen Datein speichern

28.12.2023 - 17:50

DROPS Design answered:

Liebe Frau Maglung, beachten Sie, daß alle Seiten gedruckt werden; und auch daß Sie nicht schon zuviele Favorite haben. Viel Spaß beim stricken!

02.01.2024 - 09:41

country flag Fiona McB wrote:

Hi Have started knitting the Bardu sweater pattern. I’m confused as to how to align the pattern when are increasing stitches in the yoke - means can either align the design horizontally or vertically. If vertically would mean that there will be gaps in the pattern horizontally where stitches were increased. If horizontally the crosses will not sit in same place above the diamonds, for example. I guess must seek to align it horizontally, except when get to lining up A2 above A1 (?) Thank you

09.09.2022 - 09:59

DROPS Design answered:

Dear Fiona, when working the diagrams, the different stripes won't be lined up as in diagram because of the increases worked evenly, but you have enough stitches to repeat the new stripe over the new number of sts. Happy knitting!

09.09.2022 - 15:33

country flag Karoline wrote:

Heisann! Jeg strikker Bardu genseren i størrelse M og er nesten ferdig med bolen, men målene på genseren min stemmer ikke overens med størrelsesdiagrammet. Målet over bolen skal ifølge diagrammet være på 47 cm, men hos meg er den 36. Jeg mener at jeg har fulgt oppskriften til punkt og prikke, kan dette være en feil i oppskriften, eller har jeg gjort noe galt på veien? Dette er første gang jeg strikker en genser.

18.04.2022 - 21:32

DROPS Design answered:

Hei Karoline. Hvordan er strikkefastheten din? Når du strikker skal du få at 16 masker i bredden = 10 cm. Når man strikker mønster er det fort å strikke for stramt og noen ganger kan det hjelpe å strikke med en pinne større. Husk at den oppgitte pinne str. er kun veilledene. Får du for mange masker på 10 cm, bytt til tykkere pinner. Får du for få masker på 10 cm, bytt til tynnere pinner. mvh DROPS Design

19.04.2022 - 13:58

country flag Judy wrote:

I am choosing my next project from your wonderful selection. I would like to make a traditional yolk sweater in yarn group C and I have found three possibles. The yarn requirements for Lillehammer and Gemstone are about 17/18 balls whereas for Bardu I am getting 6 balls. Such a discrepancy does not seen likely . Thank you.

15.03.2022 - 11:33

DROPS Design answered:

Dear Judy, Lillehammer is worked with DROPS Nepal / 50 g = approx. 75 m; while this jumper is worked with DROPS Air which is approx. 150 m (= double in length), reason why the total number of balls required is different for these 2 jumpers. Happy knitting!

15.03.2022 - 13:45

country flag Lis wrote:

50 g skovgrøn er ikke helt nok i str S, så måtte desværre købe 1 ekstra nøgle.

11.03.2022 - 18:53

country flag Cecile Lovigny wrote:

Hvordan forandrer jeg oppskrift fra S til XS

10.02.2022 - 14:00

DROPS Design answered:

Hej Cecile, brystmålet på den mindste er 86 cm. Vi kan ikke hjælpe med at skrive opskriften om, men hvis du strikker den med en tyndere pind og får 17 masker på 10 cm (i stedet for de 16 m på 10 cm vi skriver i opskriften), så vil den blive lidt mindre...

11.02.2022 - 08:04

country flag Lieu wrote:

Hi Garnstudio, Is the amount of materials correct? I was looking at 2 different designs with the same yarn group-group C. This one needs 300g for size M for a jumper. While the blue pine shore needs 350g for size M and it’s a sleeveless top. I’m a beginner so I just wanted to make sure that I’ll get enough yarns. Thank you

30.12.2021 - 11:36

DROPS Design answered:

Hi Lieu, it is correct, DROPS Air is much more lighter and longer than DROPS Paris. Air -weight/length: 50 g = approx 150 m, Paris - weight/length: 50 g = approx 75 m. Happy knitting!

30.12.2021 - 13:48

country flag Yvette wrote:

Liebes Drops Team, ich stricke das Model Bardu in M und habe eine Frage zum Rumpfteil. Ich habe 34 M gestrickt (passend A2 über A1 = 6M). 34 ist nicht durch 6 teilbar, wenn ich nach den 6 aufgenommenen Ärmelmaschen im Vorderteil weiterstricke verschiebt sich das Muster. Jetzt frage ich mich, wie ich weiterstricke, zumal ich das gesamte A2 Diagramm noch vor mir habe.

11.12.2021 - 13:48

DROPS Design answered:

Liebe Yvette, stricken Sie weiter mit A.2 wie zuvor, aber sollte das Muster nicht in Runden passen, dann stricken Sie das Muster soviel möglich ist bis unter den Ärmel, damit A.2 in der Höhe wie zuvor gestrickt wird (wird nur nicht auf jeder Seite dann anpassen). Viel Spaß beim stricken!

13.12.2021 - 09:08

country flag Elvira wrote:

Ho comprato da voi la kana x realizzare questo modello ma vorrei utilizzare ferri 3.5 come posso ricalcolare la quantità di maglie da mettere?

02.05.2021 - 12:05

DROPS Design answered:

Buonasera Elvira, per questo modello deve utilizzare il numero di ferri che le consente di ottenere il campione indicato. Buon lavoro!

02.05.2021 - 20:04