
Popular categories
Looking for a yarn?


Comments / Questions (23)
![]() Alina Gabriela Milosan wrote:
Alina Gabriela Milosan wrote:
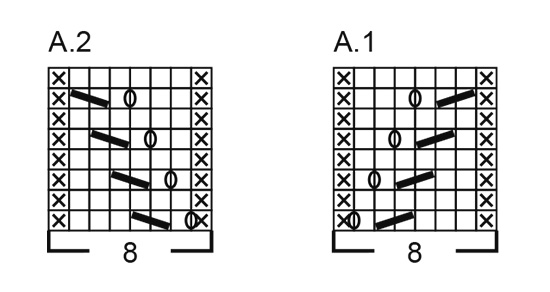
Dear knitting expert, I’m a little confused as per where the pattern A1 and A2 starts. Is it from the top or bottom of the diagram?
29.10.2024 - 18:30DROPS Design answered:
Dear Mrs Milosan, the diagrams are read from the bottom up and right towards the left on every round. Happy knitting!
30.10.2024 - 08:57
![]() Alexandra wrote:
Alexandra wrote:
I am making this with Andes. I wonder if the cast-on of 60 can be wrong? It gives a very wide neck, not like in the picture. I looked at other projects completed on Ravelry of this pattern and some also have a very wide neckline, and not a turtleneck as on your picture. Can you please tell me if I should cast on less?
14.12.2023 - 04:59DROPS Design answered:
Dear Alexandra, should your tension with larger needles be right, then the neck shouldn't be that wide as you are working ribbing (which tighten piece together in width). You can adjust the length of the neck if you like. After neck, you will decrease evenly before continuing with larger needles. Happy knitting!
14.12.2023 - 08:43
![]() Jacqueline wrote:
Jacqueline wrote:
Buenas tardes, tengo un problema al realizar el canesú en talla M. He seguido las indicaciones pero tengoe 54 puntos y no 58 como se indica en la explicación. agradezco me puedan ayudar para terminar mi labor.
03.08.2022 - 00:32
![]() Jacqueline wrote:
Jacqueline wrote:
Buenas tardes, tengo un problema al realizar el canesú tengo 54 puntos . y no 58 como se indica en la explicación. agradezco me puedan ayudar para terminar mi labor.
03.08.2022 - 00:28
![]() Anette Jensen wrote:
Anette Jensen wrote:
Hejsa Er Drops Snow garnet meget blødt? Min hud er meget sart og jeg vil derfor ikke have noget garn der kradser. På forhånd mange tak for hjælpen. Mvh. Anette Jensen
24.05.2022 - 19:28DROPS Design answered:
Hej Anette, ja DROPS Snow er meget blødt og så er det faktisk muligt at DROPS Wish er endnu blødere... den kan strikkes på samme opskrifter :)
25.05.2022 - 13:35
![]() Haydee wrote:
Haydee wrote:
Me gustan los modelos de Drops Desing ,pero me gustaría que nos pusieran un video para poder guiarnos de cómo hacer el trabajo para las personas que no somos tan expertas en el tema.GRACIAS.
09.07.2021 - 17:57
![]() May De Neve wrote:
May De Neve wrote:
Hoe moet ik een halsboord breien aan een trui?
15.03.2021 - 01:05DROPS Design answered:
Dag May,
In het geval van dit patroon wordt de halsboord gelijk aan het begin gebreid. dus je zet op voor de halsboord en breit eerst deze boord van boven naar beneden. Dan ga je gelijk met de steken van de boord verder met de pas, zoals beschreven in het patroon.
02.04.2021 - 11:41
![]() Danielle wrote:
Danielle wrote:
Hej igen, Jag har svårt att förstå instruktionerna. När jag gjort första varvet på oket, så kommer mönster A1 och A2 bli på baksidan där jag har min förhöjning.
07.11.2020 - 12:45DROPS Design answered:
Hei Danielle. Har du husket å klippe tråden etter forhøydningen? Klipp tråden. Start neste omgang (dvs på bærestykke) etter de første 6-6-6-7-7-8 maskene på omgangen. mvh DROPS design
09.11.2020 - 12:47
![]() Danielle wrote:
Danielle wrote:
Hej! Jag förstår inte det här \"* Sticka 1 avigmaska, sticka 2 rätmaskor i var och en av de 3 nästa maskorna (sticka i främre och i bakre maskbågen = 3 maskor ökade), 1 avigmaska, 1 rätmaska (= ärmkulle), 1 avigmaska, sticka 2 rätmaskor i var och en av de 3 nästa maskorna (= 3 maskor ökade)" Hur kan det blir ökat med tre med avig och rätsticking?
07.11.2020 - 10:20
![]() Anna wrote:
Anna wrote:
Hello, I don't understand the diagram explanation "purl from right side, knit from wrong side" or "knit from right side, purl from wrong side". Could you explain it better or is there a video that shows the technique? Thank you, Anna
30.01.2020 - 22:38DROPS Design answered:
Dear Anna, a stitch worked purl from RS/knit from WS is a reversed stocking stitch. The diagrams are here worked in the round, this mean you will simply purl the stitches with a cross (=x) on every round - and knit the white squares. Happy knitting!
31.01.2020 - 07:23
|
||||||||||||||||
Warm Fall#warmfallsweater |
||||||||||||||||
 |
 |
|||||||||||||||
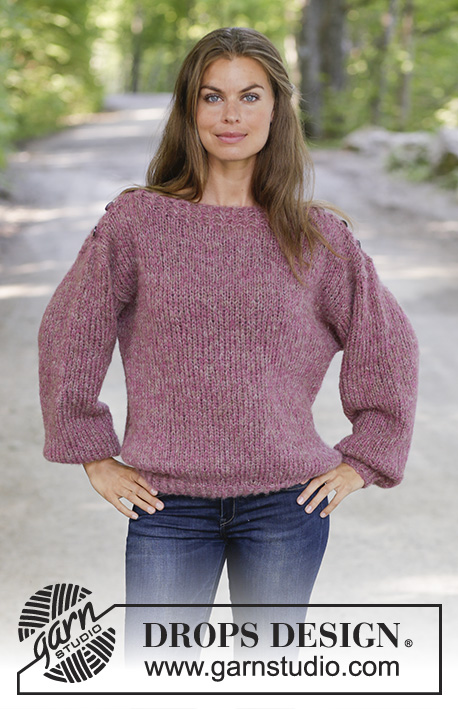
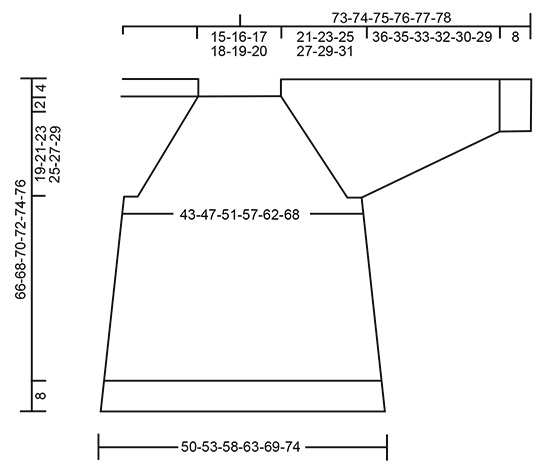
Knitted sweater with raglan in DROPS Snow. The piece is worked top down with lace pattern and high neck. Sizes S - XXXL.
DROPS 196-35 |
||||||||||||||||
|
------------------------------------------------------- EXPLANATIONS FOR THE PATTERN: ------------------------------------------------------- RIDGE/GARTER STITCH (worked in the round): 1 ridge = 2 rounds. Knit 1 round and purl 1 round. DECREASE/INCREASE TIP (evenly spaced): To work out how to decrease/increase evenly, count the total number of stitches to be decreased/increased over (e.g. 56 stitches), and divide by the number of decreases/increases to be made (e.g. 12) = 4.7. In this example, decrease by knitting together alternately each 3rd and 4th stitch and each 4th and 5th stitch (approx.). When increasing evenly, make 1 yarn over alternately after each 4th and 5th stitch. On the next round knit the yarn overs twisted to avoid holes. PATTERN: See diagrams A.1 and A.2. The diagrams show all the rows in the pattern seen from the right side. RAGLAN: Increase 1 stitch on each side of A.1/A.2 in each transition between body and sleeves (= 8 stitches increased on the round). Increase 1 stitch by making 1 yarn over. On the next round knit the yarn overs twisted to avoid holes. Then work the new stitches in stockinette stitch. INCREASE TIP (for sides of body): Work until there are 2 stitches left before the marker thread, 1 yarn over, knit 4 (the marker thread sits in the middle of these 4 stitches), 1 yarn over. On the next round knit the yarn overs twisted to avoid holes. Then work the new stitches in stockinette stitch. DECREASE TIP (for sleeves): Decrease 1 stitch on each side of the marker thread as follows: Work until there are 3 stitches left before the marker thread, knit 2 together, knit 2 (the marker thread sits in the middle of these 2 stitches), slip 1 stitch as if to knit, knit 1, pass the slipped stitch over the knitted stitch. ------------------------------------------------------- START THE PIECE HERE: ------------------------------------------------------- SWEATER - SHORT OVERVIEW OF THE PIECE: The piece is worked in the round with double pointed needles/circular needle, top down. After the neck is finished, you can work an elevation in the back of the neck to give a better fit, so that the yoke is slightly higher at the back. This elevation can be left out; the neck will then be the same front and back – see description of elevation further down in the text. After the yoke, the body is worked in the round with circular needle. The sleeves are worked in the round with double pointed needles, top down. NECK: Cast on 56-56-60-60-64-64 stitches with double pointed needles size 10 mm / US 15 and Snow. Change to double pointed needles size 9 mm / US 13 and work rib (= knit 2 / purl 2) for 14 cm / 5½". Then work 2 RIDGES – read description above, AT THE SAME TIME on the third round (= a knitted round) decrease 12-10-14-12-14-12 stitches evenly on round – read DECREASE/INCREASE TIP = 44-46-46-48-50-52 stitches. Change back to double pointed needles size 10 mm / US 15. Now you can either work an elevation in the back of the neck or go straight to working the yoke if you do not want an elevation. ELEVATION IN BACK OF NECK: Skip this section if you do not want an elevation. Insert 1 marker at the beginning of the round = mid back. Start from the right side and knit 6-6-7-7-7-8 stitches past the marker, turn, tighten the strand and purl 12-12-14-14-14-16 stitches from the wrong side, turn, tighten the strand and knit 18-18-21-21-21-24 stitches, turn, tighten the strand and purl 24-24-28-28-28-32 stitches, turn, tighten the strand and knit to mid back. Cut the strand. Start the next round (i.e. on the yoke) after the first 6-6-6-7-7-8 stitches on the round. YOKE: THE PIECE IS NOW MEASURED FROM HERE! Insert 1 marker at the beginning of the round and work the first round as follows: * Purl 1, knit 2 stitches in each of the next 3 stitches (knit in both front and back loops = 3 stitches increased), purl 1, knit 1 (= sleeve top), purl 1, knit 2 stitches in each of the next 3 stitches (= 3 stitches increased), purl 1, knit 11-12-12-13-14-15 (= front piece/back piece) *, work from *-* a total of 2 times = 56-58-58-60-62-64 stitches on the needle. The next round is worked as follows: * Work A.1 (= 8 stitches), make 1 yarn over, knit 1 (= sleeve top), make 1 yarn over, work A.2 (= 8 stitches), make 1 yarn over, knit 11-12-12-13-14-15 stitches (= front piece/back piece)), make 1 yarn over *, work from *-* a total of 2 times = 64-66-66-68-70-72 stitches. The first increase to RAGLAN – read description above, is now finished (= 8 stitches increased on the round). Continue this pattern and increase to raglan every 2nd round a total of 7-8-11-9-12-13 times (including the increase on the last round worked) and then every 4th round a total of 2-2-1-3-2-2 times. REMEMBER THE GAUGE! After the last increase to raglan there are 128-138-154-156-174-184 stitches on the needle. Continue the pattern as before but without increasing until the piece measures 21-23-25-27-29-31 cm / 8¼"-9"-9¾"-10⅝"-11⅜"-12¼" from the marker at the beginning of the yoke. The next round is worked as follows: Work 3-3-3-4-4-5 stitches in stockinette stitch (= on the back piece), place the next 29-31-35-33-37-37 stitches on 1 thread for sleeve, cast on 4-4-4-6-6-6 new stitches on the needle (= in side under sleeve), work stockinette stitch over the next 35-38-42-45-50-55 stitches (= front piece), place the next 29-31-35-33-37-37 stitches on 1 thread for sleeve, cast on 4-4-4-6-6-6 new stitches on the needle (= in side under sleeve), work stockinette stitch over the last 32-35-39-41-46-50 stitches (= back piece). The body and sleeves are now finished separately. THE PIECE IS NOW MEASURED FROM HERE! BODY: = 78-84-92-102-112-122 stitches. Insert 1 marker thread in the middle of the 4-4-4-6-6-6 stitches cast on under each sleeve. Start the round by one of the marker threads and allow the marker threads to follow your work onwards. Continue with stockinette stitch. When the piece measures 4 cm / 1½" from the division increase 1 stitch on each side of both marker threads – read INCREASE TIP- (= 4 stitches increased). Increase like this every 10 cm / 4" a total of 3 times = 90-96-104-114-124-134 stitches. When the piece measures 33 cm from the division (approx. 58-60-62-64-66-68 cm / 22¾"-23⅝"-24⅜"-25¼"-26"-26¾" from the shoulder) knit 1 round where you increase 14-16-16-22-20-26 stitches evenly on round – remember DECREASE/INCREASE TIP = 104-112-120-136-144-160 stitches. Change to circular needle size 9 mm / US 13 and work rib (= knit 2 / purl 2). When the rib measures 5 cm / 2", increase every other purl-2 to purl-3 = 117-126-135-153-162-180 stitches. Continue with knit over knit and purl over purl until the rib measures 8 cm / 3⅛". Loosely bind off with knit over knit and purl over purl. The sweater measures approx. 66-68-70-72-74-76 cm / 26"-26¾"-27½"-28⅜"-29⅛"-30" / 26"-26¾"-27½"-28⅜"-29⅛"-30" from the shoulder down. SLEEVE: Place the 29-31-35-33-37-37 stitches from the thread on the one side of the piece on double pointed needles size 10 mm / US 15. In addition, knit up 1 stitch in each of the 4-4-4-6-6-6 stitches cast on under the sleeve = 33-35-39-39-43-43 stitches. Insert 1 marker thread in the middle of the 4-4-4-6-6-6 stitches under the sleeve and start the round here. Work stockinette stitch in the round. When the piece measures 2 cm / ¾" from the division, decrease 2 stitches mid under sleeve – read DECREASE TIP. Decrease like this every 5-5-3½-4-3-3 cm/2"-2"-1¼"-1½"-1"-1" a total of 7-7-9-8-10-9 times = 19-21-21-23-23-25 stitches. Continue working until the piece measures 36-35-33-32-30-29 cm / 14⅛"-13 ¾"-13"-12 ½"-11 ¾"-11⅜" from the division (shorter measurements in the larger sizes due to longer yoke). Knit 1 round where you increase 5-3-3-5-5-7 stitches evenly on round = 24-24-24-28-28-32 stitches. Change to double pointed needles size 9 mm / US 13 and work rib (= knit 2 / purl 2) for 8 cm / 3⅛". The sleeve measures approx. 44-43-41-40-38-37 cm / 17¼"-17"-16⅛"-15¾"-15"-14½" from the division. Loosely bind off with knit over knit and purl over purl – to avoid the bind-off edge being tight, you can make 1 yarn over after each 4th stitch while binding off (the yarn overs are bind off as normal stitches). Work the other sleeve in the same way. |
||||||||||||||||
Diagram explanations |
||||||||||||||||
|
||||||||||||||||
 |
||||||||||||||||
 |
||||||||||||||||
Have you finished this pattern?Tag your pictures with #dropspattern #warmfallsweater or submit them to the #dropsfan gallery. Do you need help with this pattern?You'll find 34 tutorial videos, a Comments/Questions area and more by visiting the pattern on garnstudio.com. © 1982-2026 DROPS Design A/S. We reserve all rights. This document, including all its sub-sections, has copyrights. Read more about what you can do with our patterns at the bottom of each pattern on our site. |
||||||||||||||||


With over 40 years in knitting and crochet design, DROPS Design offers one of the most extensive collections of free patterns on the internet - translated to 17 languages. As of today we count 325 catalogs and 12298 patterns - 12288 of which are translated into English (US/in).
We work hard to bring you the best knitting and crochet have to offer, inspiration and advice as well as great quality yarns at incredible prices! Would you like to use our patterns for other than personal use? You can read what you are allowed to do in the Copyright text at the bottom of all our patterns. Happy crafting!
Post a comment to pattern DROPS 196-35
We would love to hear what you have to say about this pattern!
If you want to leave a question, please make sure you select the correct category in the form below, to speed up the answering process. Required fields are marked *.