
Popular categories
Looking for a yarn?


Comments / Questions (59)
![]() Sue Craver wrote:
Sue Craver wrote:
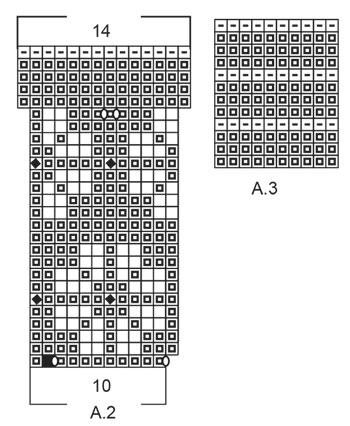
Ok I give up. On the A2 chart for the Daisy sweater, what does the little football shaped symbol mean in the first row?
25.06.2020 - 03:06DROPS Design answered:
Dear Mrs Craver, this symbol is the 5th from diagram key, it's a yarn over - to increase for round yoke in A.2 you will make some yarn overs on first row 5 = 2 yarn overs) and on 21sts row (so that there will be 14 sts in each A.2). Happy knitting!
25.06.2020 - 09:06
![]() Sue Craver wrote:
Sue Craver wrote:
Pattern 196-2, can the size S be knit with Sublime baby cashmere merino silk dk yarn with size 3 needles? My granddaughter picked out the yarn and I don’t know how to determine if it could be substituted.
17.05.2020 - 08:18DROPS Design answered:
Hi Sue, You will need to do a swatch to see how many rows and stitches you need to get 4 x 4" and then adjust the numbers in the pattern accordingly. Happy knitting!
19.05.2020 - 08:10
![]() Sue Craver wrote:
Sue Craver wrote:
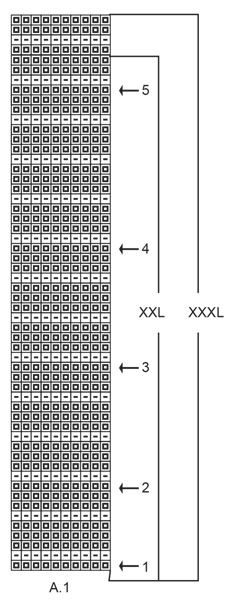
In reading the chart for Daisy Delight 196-2, the A-1 chart for size S has a blank row at the bottom. What does this represent?
17.05.2020 - 02:40DROPS Design answered:
Hi Sue, The first row in A.1 for both sizes S and M is a knit row with Plum. Happy knitting!
18.05.2020 - 08:07
![]() Sue Craver wrote:
Sue Craver wrote:
I want to make this for my 12 year old granddaughter. I just knit the daisy delight pattern for her and it was 2 sizes too small. Her chest measurement is 29 1/2 inches. What size should I knit for her in this pattern? I’m not sure if measurements are in inches or centimeters.
14.05.2020 - 03:22DROPS Design answered:
Dear Mrs Craver, this pattern is available in children size to 12 years - see Daisy Delight. Measurements in chart are all in cm. Happy knitting!
14.05.2020 - 08:01
![]() Irmeli Andersson wrote:
Irmeli Andersson wrote:
En oikein saa tolkkua ohjeeseen jossa kehoitetaan lisämään kuvion A2 toiseksi viimeisellä kerroksella 12 silmää ja tuloksena on 320 s koossa M kun silmukoita ennen lisäystä on 220. Mikähän multa on mennyt ohi?
24.03.2020 - 08:55
![]() Brandenburg wrote:
Brandenburg wrote:
Ich verstehe die Maschenzunahme nach dem Muster A2. Nach dem Muster A1 habe ich 220 Maschen, in der vorletzten Runde von A2 sollen 12 Maschen verteilt zugenommen werden. Dann sollen es 320 Maschen sein. Wenn aber nur 12 Maschen zugenommen werden sollen, wie kommmen dann die 320 Maschen zustande?
17.12.2019 - 10:06DROPS Design answered:
Liebe Frau Brandenburg, nach A.1 haben Sie 220 M (Größe M), dann stricken Sie A.2 (= 10 Maschen x 22); im A.2 werden Sie insgesamt 4 Maschen + 12 Maschen gleichmäßig verteilt in der vorletzen Runde in A.2 so daß Sie nach A.2: 14 Maschen x 22 = 308 M + 12 Zunahmen = 320 M haben. Viel Spaß beim stricken!
17.12.2019 - 10:13
![]() Rosita wrote:
Rosita wrote:
Buonasera,non riesco a capire questo passaggio:* 1 maglia diritto, 2 maglie a punto legaccio *, ripetere da *-* ,il le faccio e il punto diritto sono la stessa cosa.grazie in anticipo per la vs.gentile risposta!
21.11.2019 - 21:13DROPS Design answered:
Buongiorno Rosita. Le coste devono risultare come 1 maglia diritto / 2 m a legaccio. Quindi, lavorando in tondo, lavora la maglia a diritto sempre a diritto, e lavora le 2 m a legaccio su un giro a diritto e sul giro successivo a rovescio. Buon lavoro!
21.11.2019 - 22:26
![]() Roselyne wrote:
Roselyne wrote:
Cela veut donc dire que le 1° rang est tout à l'endroit ? j'avoue que je ne comprends pas très bien
07.11.2019 - 15:06DROPS Design answered:
Bonjour Roselyne, tout à fait, car les mailles endroit des côtes vont se tricoter tous les tours à l'endroit, mais les mailles point mousse vont devoir se tricoter 1 tour à l'endroit, 1 tour à l'envers (cf cette vidéo du point mousse en rond). Bon tricot!
07.11.2019 - 15:22
![]() Roselyne wrote:
Roselyne wrote:
Je suis en train de terminer le corps de ce très beau pull mais je ne comprends pas comment tricoter les côtes *1 maille endroit, 2 mailles au point mousse* pour terminer. Pouvez-vous me donner une explication ? merci
07.11.2019 - 13:17DROPS Design answered:
Bonjour Roselyne, vous allez répéter ces 2 tours: Tour 1: *3 mailles endroit*, répétez de *-* ; Tour 2: *1 m end, 2 m env*, répétez de *-*. Ainsi, vous aurez 1 m end (= tricotée tous les rangs à l'endroit) et 2 m point mousse (vous les tricotez alternativement à l'endroit et à l'envers). Bon tricot!
07.11.2019 - 13:48
![]() Rosita wrote:
Rosita wrote:
Buongiorno alla voce "Quando il lavoro misura 4 cm dalla separazione, aumentare 2 maglie da ciascun lato - vedere il SUGGERIMENTO PER GLI AUMENTI-2 (= 4 maglie aumentate)."Si intende sotto la manica?è l'unico segno che ho lasciato !grazie,saluti
04.11.2019 - 14:51DROPS Design answered:
Buongiorno Rosita. I 4 cm vanno misurati da dove vengono messe in attesa le maglie delle maniche. Ha poi 2 segnapunti, inseriti al centro delle maglie avviate sotto la manica, che indicano i lati del maglione . Deve aumentare come indicato nel suggerimento per gli aumenti 2. Buon lavoro!
04.11.2019 - 17:00
|
||||||||||||||||||||||
Daisy Delight#daisydelightsweater |
||||||||||||||||||||||
 |
 |
|||||||||||||||||||||
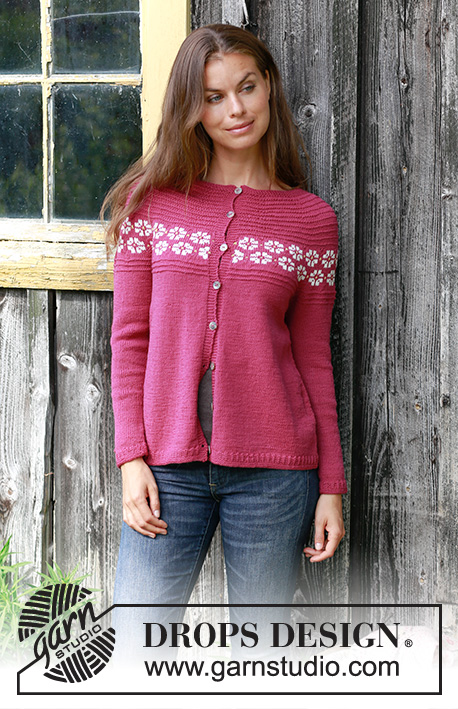
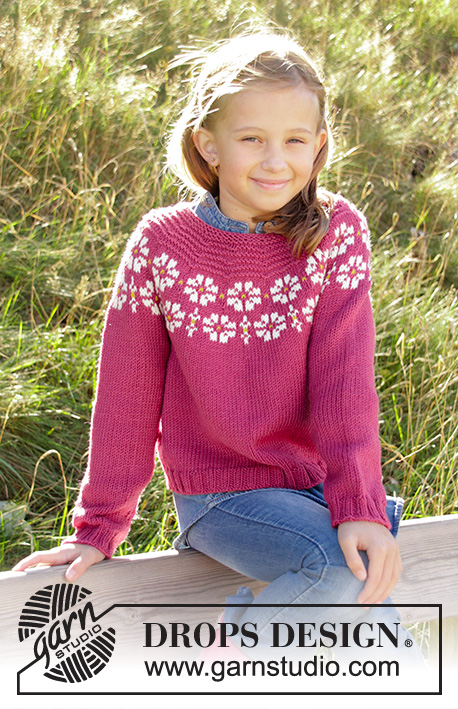
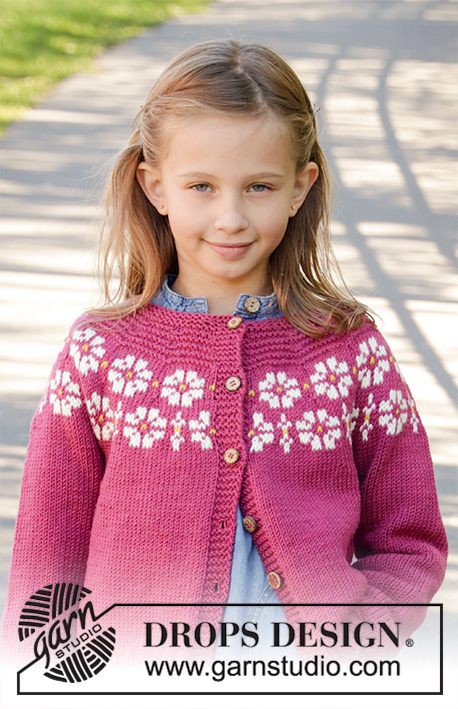
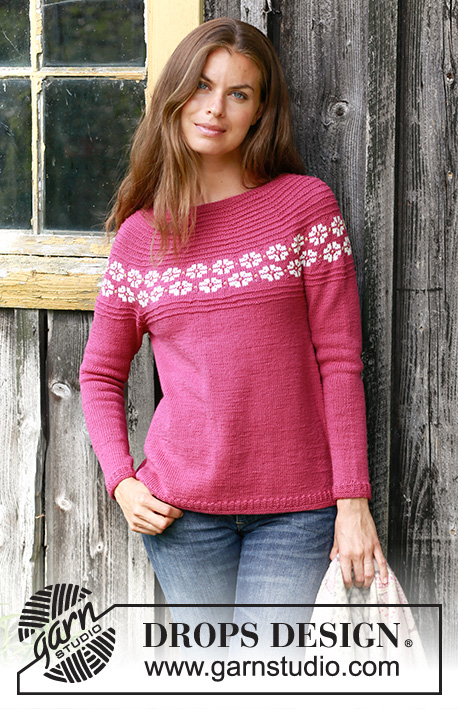
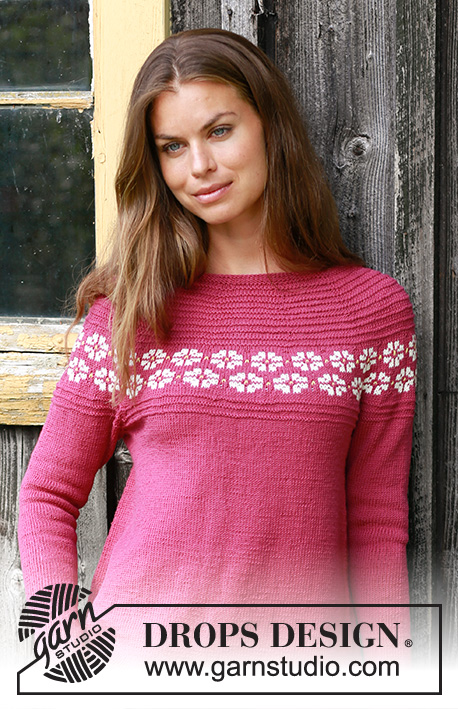
Knitted sweater with round yoke in DROPS BabyMerino. Piece is knitted top down with Nordic pattern and garter stitch. Size: S - XXXL
DROPS 196-2 |
||||||||||||||||||||||
|
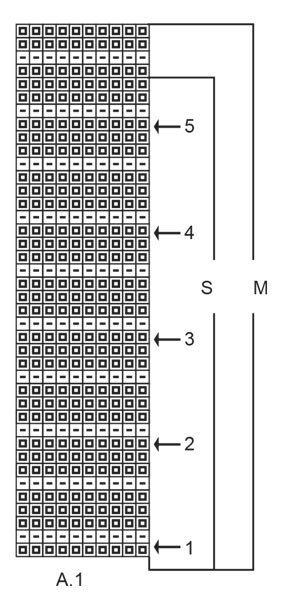
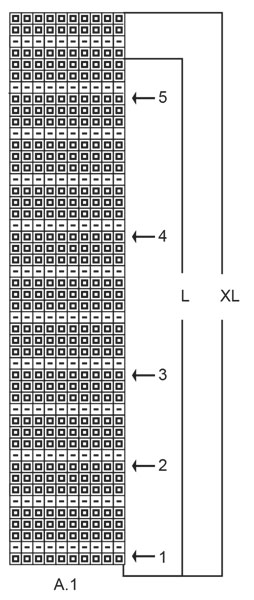
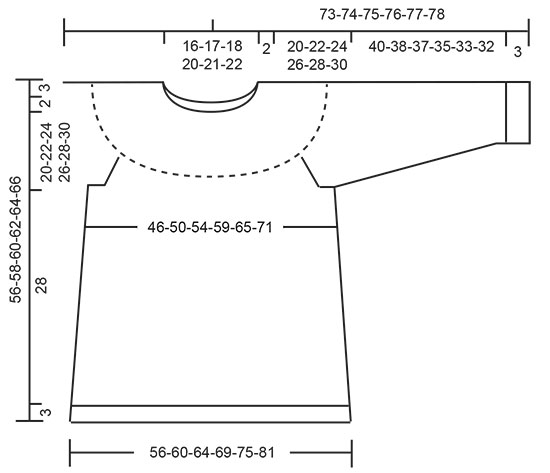
---------------------------------------------------------- EXPLANATION FOR THE PATTERN: ---------------------------------------------------------- GARTER STITCH (worked in the round): 1 ridge = 2 rounds. Knit 1 round and purl 1 round. PATTERN: See diagrams A.1 to A.3. Choose diagram for your size (applies to A.1). KNITTING TIP: To avoid the garment losing elasticity when working pattern, it is important not to tighten the strands on back side of piece. Switch to a higher needle number when working pattern if the pattern is somewhat tight. INCREASE TIP-1 (evenly): To calculate how to increase evenly, use the total number of stitches on row (e.g. 106 stitches) and divide stitches by number of increases to be done (e.g. 4) = 26.5. In this example increase by making 1 yarn over after alternately every 26th and 27th stitch. On next round work yarn over twisted to avoid hole. INCREASE TIP-2 (applies to sides of body): Work until 8 stitches remain before marker thread, make 1 yarn over, knit 16 (marker thread is in the middle of these stitches), make 1 yarn over. On next round knit yarn over twisted to avoid holes. ELEVATION: Insert a marker thread mid back = beginning of round. Begin from right side with plum and work in stockinette stitch until 8-8-8-9-9-10 stitches have been worked past marker, turn, tighten yarn and work 16-16-16-18-18-20 stitches in stockinette stitch. Turn, tighten yarn and work 24-24-24-27-27-30 stitches in stockinette stitch, turn, tighten yarn and work 32-32-32-36-36-40 stitches in stockinette stitch, turn, tighten yarn and work until mid back. RAGLAN: Increase 1 stitch on each side of every marker thread (= 8 stitches increased on round) as follows: Work until 1 stitch remains before marker thread, make 1 yarn over, knit 2 (marker thread is between these stitches), make 1 yarn over. Repeat at the other marker threads. On next round work yarn overs twisted to avoid holes. DECREASE TIP (applies to sleeves): Decrease 1 stitch on each side of marker thread as follows: Work until 3 stitches remain before marker thread and knit 2 together, knit 2 (marker thread is between these stitches), slip 1 stitch knitwise, knit 1, pass slipped stitch over stitch worked. ---------------------------------------------------------- START THE PIECE HERE: ---------------------------------------------------------- SWEATER - SHORT OVERVIEW OF THE PIECE: Worked in the round on circular needle, top down. Work sleeves in the round on double pointed needles/a short circular needle. NECK EDGE: Cast on 106-110-115-125-130-134 stitches on a short circular needle size 2.5 mm = US 1,5 with plum. Work 5 ridges in GARTER STITCH - read explanation above. YOKE: Switch to circular needle size 3 mm = US 2,5. Knit 1 round while increasing 4-10-15-15-20-26 stitches evenly - read INCREASE TIP-1 = 110-120-130-140-150-160 stitches. Knit 1 round (all stitches are knitted twisted to avoid holes). For better fit work an elevation at the back of neck so that yoke is somewhat higher on back piece. This elevation can be skipped, to make the neck the same at the front and back - read ELEVATION. Insert 9-10-10-10-11-11 marker threads in piece without working as follows: Insert first marker thread after 7-6-7-7-5-5 stitches, insert each of the next 8-9-9-9-10-10 marker threads after 12-12-13-14-14-15 stitches, 7-6-6-7-5-5 stitches remain on round after last marker thread. Move the marker threads upwards when working. Now work pattern A.1 (choose diagram for your size) the entire round – read KNITTING TIP, AT THE SAME TIME on every round with arrow in diagram increase on each side of marker threads as follows: REMEMBER THE KNITTING GAUGE! ARROW-1: Increase 1 stitch on each side of every marker thread (= 18-20-20-20-22-22 stitches increased) = 128-140-150-160-172-182 stitches. ARROW-2: Increase 1 stitch on each side of every marker thread (= 18-20-20-20-22-22 stitches increased) = 146-160-170-180-194-204 stitches. ARROW-3: Increase 1 stitch on each side of every marker thread (= 18-20-20-20-22-22 stitches increased) = 164-180-190-200-216-226 stitches. ARROW-4: Increase 1 stitch on each side of every marker thread (= 18-20-20-20-22-22 stitches increased) = 182-200-210-220-238-248 stitches. ARROW-5: Increase 1 stitch on each side of every marker thread (= 18-20-20-20-22-22 stitches increased) = 200-220-230-240-260-270 stitches. When entire A.1 has been worked vertically, piece measures approx. 11-12-13-14-15-16 cm = 4¼"-4¾"-5"-5½"-6"-6¼" from cast-on edge and down mid front. Remove the marker threads. Now work pattern A.2 (= 20-22-23-24-26-27 repetitions of 10 stitches) in the round. On next to last round in A.2 increase 10-12-14-16-12-12 stitches evenly = 290-320-336-352-376-390 stitches. When entire A.2 has been worked vertically, piece measures approx. 19-20-21-22-23-24 cm = 7½"-8"-8¼"-8¾"-9"-9½" from cast-on edge and down mid front. Now insert 4 marker threads in the piece as follows: Insert 1st marker thread after the first 45-49-51-55-60-64 stitches (= half back piece), insert 2nd marker thread after the next 55-62-66-66-68-67 stitches (= sleeve), insert 3rd marker thread after the next 90-98-102-110-120-128 stitches (= front piece) and insert 4th marker thread after the next 55-62-66-66-68-67 stitches (= sleeve). 45-49-51-55-60-64 stitches remain on round after last marker thread (= half back piece). Now work pattern A.3 in the round, at the same time on first round begin increase for RAGLAN – read explanation above. Increase like this every other round 5-6-8-10-11-13 times in total = 330-368-400-432-464-494 stitches. NOTE: When A.3 has been worked vertically 1 time, continue with stockinette stitch until all increases for raglan are done and piece measures 22-24-26-28-30-32 cm = 8¾"-9½"-10¼"-11"-11¾"-12½" from cast-on edge. Work next round as follows: 50-55-59-65-71-77 stitches in stockinette stitch (= half back piece), slip the next 65-74-82-86-90-93 stitches on 1 stitch holder for sleeve, cast on 10-10-12-12-14-16 new stitches on row (= in the side under sleeve), work 100-110-118-130-142-154 stitches in stockinette stitch (= front piece), slip the next 65-74-82-86-90-93 stitches on 1 stitch holder for sleeve edges, cast on 10-10-12-12-14-16 new stitches on row (= in the side under sleeve) and work the remaining 50-55-59-65-71-77 stitches in stockinette stitch (= half back piece). Finish body and sleeves separately. NOW MEASURE THE PIECE FROM HERE! BODY: = 220-240-260-284-312-340 stitches. Insert 1 marker thread in each side in the middle of the 10-10-12-12-14-16 stitches cast on under each sleeve (= 110-120-130-142-156-170 stitches between marker threads). Continue in the round with plum and in stockinette stitch. When piece measures 4 cm =1½" from division, increase 2 stitches in each side - read INCREASE TIP-2 (= 4 stitches increased). Increase like this approx. every 2 cm = ¾" 12 times in total = 268-288-308-332-360-388 stitches. Work the new stitches in stockinette stitch. When piece measures 28 cm =11" from division, increase 8-12-13-13-15-17 stitches = 276-300-321-345-375-405 stitches. Switch to circular needle size 2.5 mm = US 1,5. Work rib * knit 1, 2 stitches in garter stitch *, work from *-* in the round for 2 cm = ¾". Work 2 ridges and bind off. Sweater measures approx. 56-58-60-62-64-66 cm = 22"-22¾"-23½"-24½"-25¼"-26" from shoulder and down. SLEEVE: Slip the 65-74-82-86-90-93 stitches from stitch holder in one side of piece on double pointed needles or a short circular needle size 3 mm = US 2,5 and pick in addition up 1 stitch in each of the 10-10-12-12-14-16 new stitches cast on under sleeve = 75-84-94-98-104-109 stitches. Insert 1 marker thread in the middle of the 10-10-12-12-14-16 stitches mid under sleeve and begin round here. Continue with plum and in stockinette stitch. When piece measures 4 cm = 1½", decrease 2 stitches mid under sleeve - read DECREASE TIP. Decrease like this every 8th-6th-5th-4th-4th-3rd round 13-17-21-22-23-24 times in total = 49-50-52-54-58-61 stitches. Continue until piece measures 40-38-37-35-33-32 cm =15¾"-15"-14½"-13¾"-13"-12¾" from division (shorter measurements in the larger sizes because of wider neck and longer yoke). Knit 1 round while increasing 2-4-5-6-5-5 stitches evenly = 51-54-57-60-63-66 stitches. Switch to double pointed needles size 2.5 mm = US 1,5. Now work rib * knit 1, 2 stitches in garter stitch *, work from *-* in the round for 2 cm = ¾". Work 2 ridges and bind off. Work the other sleeve the same way. |
||||||||||||||||||||||
Diagram explanations |
||||||||||||||||||||||
|
||||||||||||||||||||||
 |
||||||||||||||||||||||
 |
||||||||||||||||||||||
 |
||||||||||||||||||||||
 |
||||||||||||||||||||||
 |
||||||||||||||||||||||
Have you finished this pattern?Tag your pictures with #dropspattern #daisydelightsweater or submit them to the #dropsfan gallery. Do you need help with this pattern?You'll find 28 tutorial videos, a Comments/Questions area and more by visiting the pattern on garnstudio.com. © 1982-2026 DROPS Design A/S. We reserve all rights. This document, including all its sub-sections, has copyrights. Read more about what you can do with our patterns at the bottom of each pattern on our site. |
||||||||||||||||||||||


With over 40 years in knitting and crochet design, DROPS Design offers one of the most extensive collections of free patterns on the internet - translated to 17 languages. As of today we count 325 catalogs and 12291 patterns - 12281 of which are translated into English (US/in).
We work hard to bring you the best knitting and crochet have to offer, inspiration and advice as well as great quality yarns at incredible prices! Would you like to use our patterns for other than personal use? You can read what you are allowed to do in the Copyright text at the bottom of all our patterns. Happy crafting!
Post a comment to pattern DROPS 196-2
We would love to hear what you have to say about this pattern!
If you want to leave a question, please make sure you select the correct category in the form below, to speed up the answering process. Required fields are marked *.