
Popular categories
Looking for a yarn?


Comments / Questions (21)
![]() Carina wrote:
Carina wrote:
Har trivts så bra i denna snygga stickade tröja, och när det blev dax för tvätt, så följde jag tvättråd till punkt och pricka. Men till min stora förvåning hade tröjan töjt sig något enormt under tvätten. Den blev så stor att den ej går att använda. Vågar inte sticka i detta garn igen om jag inte kan få hjälp, eller en vettig förklaring.
08.04.2024 - 15:11
![]() Helle Knudsen wrote:
Helle Knudsen wrote:
Tusind tak for en skøn opskrift. Jeg er meget glad for det færdige resultat i variationen med grøn bund og rosa blomster. Og det er min voksne datter også, så jeg må i pindene igen 😊
24.05.2023 - 23:38
![]() Julie Hindle wrote:
Julie Hindle wrote:
Please can someone explain why this pattern is written in detail and the childs pattern is very vague? I have shared it with multiple knitting groups and no one appears to understand it. I would appreciate some help or guidance on doing the childs pattern please. I really don't want to disappoint my grandaughter. Thank you. Julie
14.03.2023 - 17:02DROPS Design answered:
Dear Mrs Hindle, sorry to hear you have troubles with the pattern for child, you are welcome to ask your question giving more info about the sections you don't understand, the size you are working etc... using the question form at the bottom of the pattern you are working on. Thanks for your comprehension.
15.03.2023 - 09:37
![]() MONBLANC wrote:
MONBLANC wrote:
Bonjour J’ai une question : après la flèche 5 j’ai 231 mailles et a l’avant dernier rang de A2 et A3 je dois augmenter de 11 mailles = 242 et non 330. Ai-je oublié des augmentations ? Merci de votre réponse Cordialement Anne Marie
11.09.2022 - 15:08DROPS Design answered:
Cf réponse ci-dessous :)
12.09.2022 - 11:11
![]() MONBLANC wrote:
MONBLANC wrote:
Bonjour J’ai un souci puisqu’a la flèche 5 en taille M j’ai 231 mailles et à l’avant dernier rang de A2 et A3 je dois faire 11 augmentations = 242. Or vous dites 330 mailles ! Ai-je oublié des augmentations ? Merci de votre aide Cordialement Anne Marie
11.09.2022 - 15:04DROPS Design answered:
Bonjour Mme Monblanc, après la flèche 5 vous avez 231 mailles, mais en tricotant A.3 vous devez augmenter (on passe de 10 à 14 m dans chaque A.3), autrement dit vous aurez: 5 m + 1 m de A.2 + 22 x 14 m de A.3 (= 308) + 5 m = 319 m + 11 augmentations à l'avant-dernier rang = 330 m. Bon tricot!
12.09.2022 - 11:11
![]() Hanne wrote:
Hanne wrote:
Strikker str. s Har strikket A1 ( 211 m ) nu strikkes A2 og A3 - A2 er 1 maske og A3 er over 10 m, der er 2 omslag på 1. pind, det er 12 m 20 gange. Det kan ikke give 301 m. Hvad menes med næst sidste pind, hvor der tages 10 m ud, jeg er jo lige startet? Jeg forstår det ikke, håber du kan hjælpe ( kan ikke regne ud hvordan I kommer frem til disse 301 m ) ellers en fin trøje. Vh Hanne Strunge
24.04.2022 - 22:04DROPS Design answered:
Hei Hanne. Du har 211 masker og skal nå strikke A.2 + A.3. Det strikkes slik: 5 stoplemasker + A.2 (1 maske) + A.3 (10 masker x 20 ganger = 200 m) + 5 stolpemasker = 211 masker. Når du strikker 1. rad av A.3 øker du med 2 masker hver gang A.3 strikkes, så på 2.rad av A.3 har du: 5 stoplemasker + A.2 + A.3 (12 masker x 20 ganger = 240) + 5 stolpemasker = 251 masker. På 21. rad øker du også med 2 masker hver gang A.3 strikkes. Da vil du ha: 5 stoplemasker + A.2 + A.3 (14 masker x 20 ganger = 280) + 5 stolpemasker = 291 masker. MEN husk på nest siste pinne i A.2 og A.3 økes det 10 masker jevnt fordelt = 291 + 10= 301 masker på pinnen. mvh DROPS Design
25.04.2022 - 14:14
![]() Heléne Ahnell wrote:
Heléne Ahnell wrote:
Hej! Förstår inte beskrivningen för resåren nertill på tröjan. 1 rät och 2 m i rätstickning, alltså hela varvet rätstickning? och på nästa varv? Tacksam för närmare förklaring. Tack!
04.02.2022 - 00:09DROPS Design answered:
Hej Heléne. Ja första varvet blir då bara med räta maskor. Från avigsidan stickar du sen den ensamma rätmaskan avig och de 2 maskorna i rätstickning stickas räta. (Framkantsmaskorna stickas räta på alla varv). Mvh DROPS Design
04.02.2022 - 12:27
![]() Sharlene wrote:
Sharlene wrote:
I am doing the elevation and wonder if instead of 24 (for the L size) i should turn and work 32 stitches.
02.02.2022 - 19:26DROPS Design answered:
Dear Sharlene, the elevation should be enough as written in the pattern (24), so that it matches the photo. First, to get to 32, you may need to work more rows, to get from 16 to 32 stitches by working 8 stitches more each time (so you would need to work 2 extra rows, at least). Also, the back will be even higher than the original pattern, so it may cause a deformation in the shape of the jacket. Happy knitting!
05.02.2022 - 19:15
![]() Robinet wrote:
Robinet wrote:
Bonjour Je fais une taille S , jusqu'au dernier étape pour les manches. Après avoir monté 10mailles sous la manche, elle devient 75 mailles. Quand l ouvrage est à 4cm, diminue 2 mailles, =73. Puis diminuer 13 mailles =60mailles. Question: pourquoi il vous reste 49 mailles à la fin, et non 60 mailles? Merci pour votre explication
25.10.2021 - 03:30DROPS Design answered:
Bonjour Mme Robinet. Quand l'ouvrage mesure 4 cm, diminuer 2 mailles au milieu sous la manche - voir DIMINUTIONS. Diminuer ainsi au total (la premiere diminution inclus) 13 fois tous les 8 tours. Cela veut dire que vous diminuez 2 mailes 13 fois (=26 mailles diminuees). 75-26=49. Bon tricot!
25.10.2021 - 09:40
![]() Sheela Wadalkar wrote:
Sheela Wadalkar wrote:
I am knitting the medium sized cardigan. In the first row of the A 3 pattern, how do we increase 4 stitches in each of the 10 stitches? I see only 2 yarn overs in the first row of A3. Also, the 21st row shows two yarn overs. Have I understood the pattern correctly? Very confused. Please help,
23.09.2021 - 07:28DROPS Design answered:
Dear Mrs Wadalkar, yes correct, you first increase 2 sts on first row (with 2 yarn overs) and then increase one more time on the 21st row = each A.3 will be then 14 sts - on the next to last row in A.2/A.3 increase 11 sts evenly and you will get -330 sts. Happy knitting!
23.09.2021 - 08:53
|
||||||||||||||||||||||
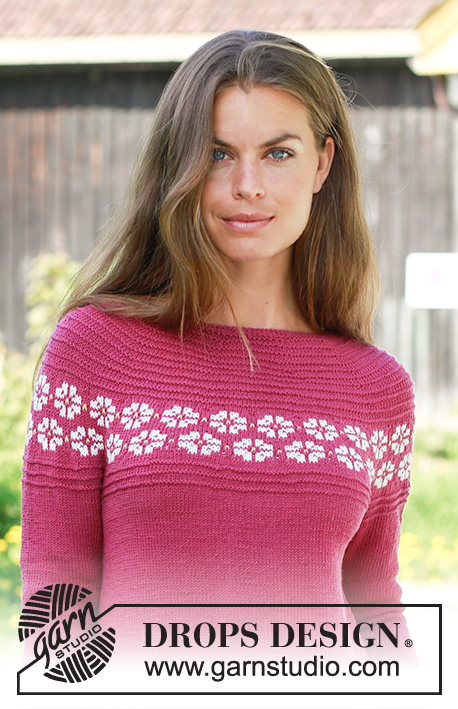
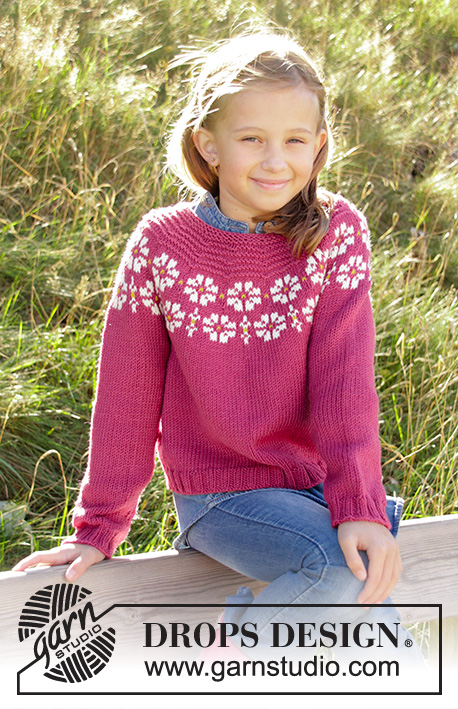
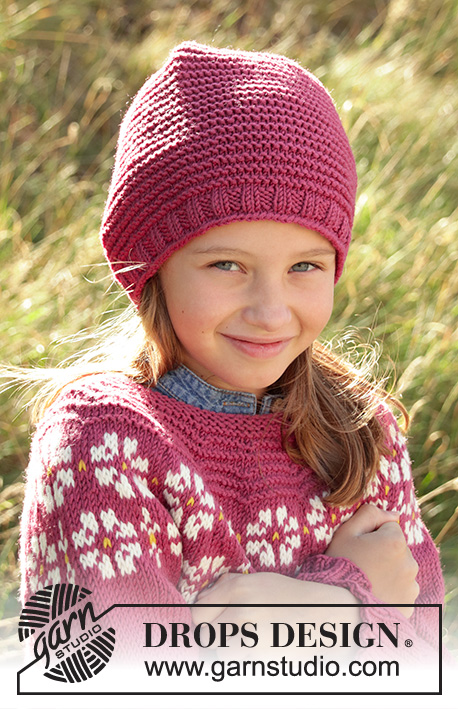
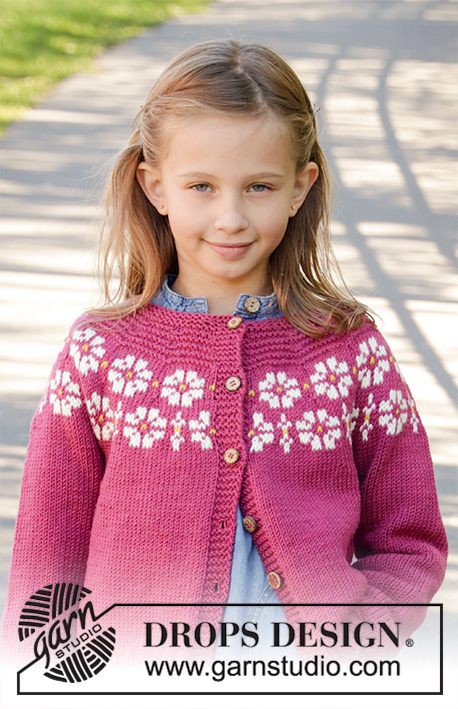
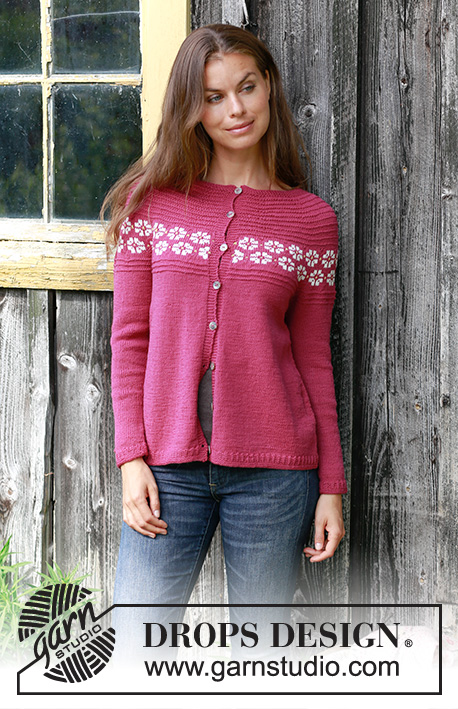
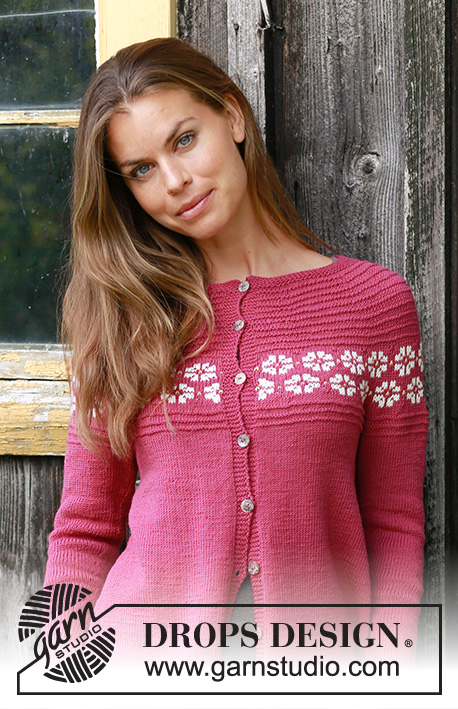
Daisy Delight Cardigan#daisydelightcardigan |
||||||||||||||||||||||
 |
 |
|||||||||||||||||||||
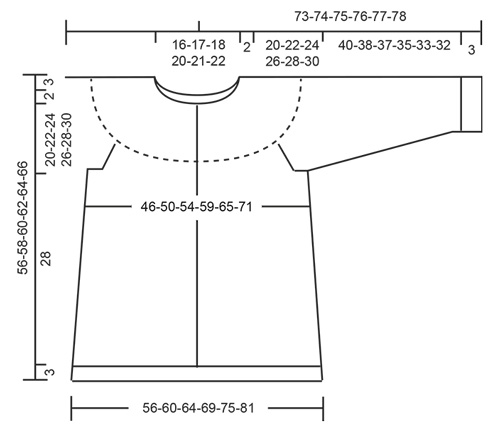
Knitted jacket with round yoke in DROPS BabyMerino. Piece is knitted top down with Nordic pattern and garter stitch. Size: S - XXXL
DROPS 196-3 |
||||||||||||||||||||||
|
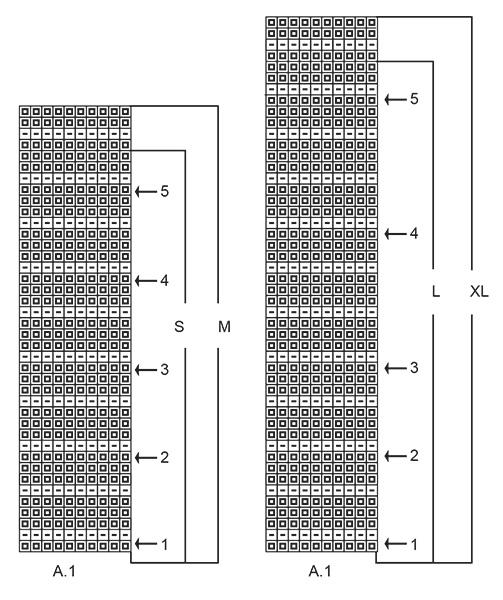
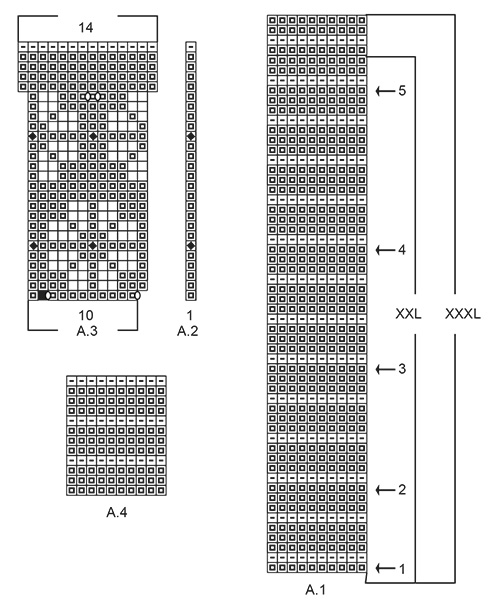
---------------------------------------------------------- EXPLANATION FOR THE PATTERN: ---------------------------------------------------------- GARTER STITCH (worked in the round): 1 ridge = 2 rounds. Knit 1 round and purl 1 round. GARTER STITCH (back and forth): 1 ridge = knit 2 rows. PATTERN: See diagrams A.1 to A.4. Choose diagram for your size (applies to A.1). Diagrams show all rows in pattern seen from the right side. KNITTING TIP: To avoid the garment losing elasticity when working pattern, it is important not to tighten the strands on back side of piece. Switch to a higher needle number when working pattern if the pattern is somewhat tight. INCREASE TIP-1 (evenly): To calculate how to increase evenly, use the total number of stitches on row (e.g. 116 stitches), minus bands (= 5 stitches in each side of piece = 10 stitches) and divide stitches by number of increases to be done (e.g. 5) = 21.2. In this example increase by making 1 yarn over after approx. every 21st stitch. On next row work yarn overs twisted to avoid holes. INCREASE TIP-2 (applies to sides of body): All increases are done from the right side. Work until 8 stitches remain before marker thread, make 1 yarn over, knit 16 (marker thread is in the middle of these stitches), make 1 yarn over. On next row purl yarn over twisted to avoid hole. ELEVATION: Insert 1 marker thread in the middle stitch on needle (= mid back). Begin from right side with plum and work in stockinette stitch until 8-8-8-9-9-10 stitches have been worked past marker, turn, tighten yarn and work 16-16-16-18-18-20 stitches in stockinette stitch. Turn, tighten yarn and work 24-24-24-27-27-30 stitches in stockinette stitch, turn, tighten yarn and work in stockinette stitch until 5 stitches remain on needle, 5 band stitches in garter stitch. Work 1 row from wrong side. RAGLAN: All increases are done from the right side. Increase 1 stitch on each side of every marker thread (= 8 stitches increased on round): Work until 1 stitch remains before marker thread, make 1 yarn over, knit 2 (marker thread is between these stitches), make 1 yarn over. Repeat at the other marker threads. On next row work yarn overs twisted to avoid holes DECREASE TIP (applies to sleeves): Decrease 1 stitch on each side of marker thread as follows: Work until 3 stitches remain before marker thread and knit 2 together, knit 2 (marker thread is between these stitches), slip 1 stitch knitwise, knit 1, pass slipped stitch over stitch worked. BUTTONHOLES: Decrease for buttonholes on right band (when garment is worn). 1 BUTTONHOLE = work from right side until 3 stitches remain on needle, make 1 yarn over, knit 2 together and finish by knitting 1. On next row (wrong side) knit the yarn over to make a hole. Decrease first buttonhole when neck edge measures 1½-2 cm. Then decrease the next 7-7-7-8-8-8 buttonholes, approx. 7 cm / 2¾" apart. ---------------------------------------------------------- START THE PIECE HERE: ---------------------------------------------------------- JACKET - SHORT OVERVIEW OF THE PIECE: Worked back and forth on circular needle, top down. Work sleeves in the round on double pointed needles/a short circular needle. NECK EDGE: Cast on 116-120-125-135-140-144 stitches on circular needle size 2.5 mm / US 1.5 with plum. Work 5 ridges in GARTER STITCH - read explanation above. Decrease for BUTTONHOLES on right band - read explanation above. YOKE: Switch to circular needle size 3 mm / US 2.5. Work next row as follows from right side: 5 band stitches in garter stitch, stockinette stitch until 5 stitches remain on needle, AT THE SAME TIME increase 5-11-16-16-21-27 stitches evenly – read INCREASE TIP-1, 5 band stitches in garter stitch = 121-131-141-151-161-171 stitches. Work 1 row from wrong side. For better fit work an elevation at the back of neck so that yoke is somewhat higher on back piece. This elevation can be skipped, to make the neck the same at the front and back - read ELEVATION. Insert 9-10-10-10-11-11 marker threads in piece without working as follows: Insert first marker thread after 12-11-12-12-10-10 stitches, insert each of the next 8-9-9-9-10-10 marker threads after 12-12-13-14-14-15 stitches, 13-12-12-13-11-11 stitches remain on row after last marker thread. Move the marker threads upwards when working. Now work pattern A.1 (choose diagram for your size) – read KNITTING TIP, with 5 band stitches in garter stitch in each side, AT THE SAME TIME on every row with arrow in diagram increase on each side of marker threads as follows: REMEMBER THE GAUGE! ARROW-1: Increase 1 stitch on each side of every marker thread (= 18-20-20-20-22-22 stitches increased) = 139-151-161-171-183-193 stitches. ARROW-2: Increase 1 stitch on each side of every marker thread (= 18-20-20-20-22-22 stitches increased) = 157-171-181-191-205-215 stitches. ARROW-3: Increase 1 stitch on each side of every marker thread (= 18-20-20-20-22-22 stitches increased) = 175-191-201-211-227-237 stitches. ARROW-4: Increase 1 stitch on each side of every marker thread (= 18-20-20-20-22-22 stitches increased) = 193-211-221-231-249-259 stitches. ARROW-5: Increase 1 stitch on each side of every marker thread (= 18-20-20-20-22-22 stitches increased) = 211-231-241-251-271-281 stitches. When entire A.1 has been worked vertically, piece measures approx. 11-12-13-14-15-16 cm / 4⅜"-4¾"-5⅛"-5½"-6"-6¼" from cast-on edge and down mid front. Remove the marker threads. Now work pattern as follows: 5 band stitches in garter stitch, A.2 (= 1 stitch), work A.3 until 5 stitches remain on row (= 20-22-23-24-26-27 repetitions of 10 stitches) and 5 band stitches in garter stitch. On next to last row in A.2 and A.3 increase 10-11-12-14-11-11 stitches evenly = 301-330-345-361-386-400 stitches. When entire A.2 and A.3 has been worked vertically, piece measures approx. 19-20-21-22-23-24 cm / 7½"-8"-8¼"-8¾"-9"-9½" from cast-on edge and down mid front. Now insert 4 marker threads in the piece as follows: Insert 1st marker thread after the first 50-54-56-60-65-69 stitches (= left front piece), insert 2nd marker thread after the next 55-62-66-66-68-67 stitches (= sleeve), insert 3rd marker thread after the next 91-98-101-109-120-128 stitches (= back piece) and insert 4th marker thread after the next 55-62-66-66-68-67 stitches (= sleeve). 50-54-56-60-65-69 stitches remain on row after last marker thread (= right front piece). Now work pattern A.4 with 5 band stitches in garter stitch in each side, at the same time on first row from right side begin increase for RAGLAN – read explanation above. Increase like this every other row 5-6-8-10-11-13 times in total = 341-378-409-441-474-504 stitches. NOTE: When A.4 has been worked vertically 1 time, continue with stockinette stitch and 5 band stitches in garter stitch in each side until all increases for raglan are done and piece measures 22-24-26-28-30-32 cm / 8⅝"-9⅜"-10 ¼"-11"-11 ¾"-12 ½" from cast-on edge. Work next row as follows from wrong side: 5 band stitches in garter stitch, 50-55-59-65-71-77 stitches in stockinette stitch (= right front piece), slip the next 65-74-82-86-90-93 stitches on 1 stitch holder for sleeve, cast on 10-10-12-12-14-16 new stitches on row (= in the side under sleeve), work 101-110-117-129-142-154 stitches (= back piece), slip the next 65-74-82-86-90-93 stitches on 1 stitch holder for sleeve edges, cast on 10-10-12-12-14-16 new stitches on row (= in the side under sleeve) and work the remaining 50-55-59-65-71-77 stitches in stockinette stitch (= left front piece), 5 band stitches in garter stitch. Finish body and sleeves separately. NOW MEASURE THE PIECE FROM HERE! BODY: = 231-250-269-293-322-350 stitches. Insert 1 marker thread 60-65-70-76-83-90 stitches in from each side (there are now 111-120-129-141-156-170 stitches between marker threads on back piece). Continue with plum, stockinette stitch and 5 band stitches in garter stitch in each side towards mid front. When piece measures 4 cm / 1½" from division, increase 2 stitches in each side - read INCREASE TIP-2 (= 4 stitches increased). Increase like this approx. every 2 cm / ¾" 12 times in total = 279-298-317-341-370-398 stitches. Work the new stitches in stockinette stitch. When piece measures 28 cm from division, increase 8-10-12-12-16-18 stitches = 287-308-329-353-386-416 stitches. Switch to circular needle size 2.5 mm / US 1.5. Work rib as follows: 5 band stitches in garter stitch, * knit 1, 2 stitches in garter stitch *, work from *-* back and forth for 2 cm / ¾". Work 2 ridges and bind off. Jacket measures approx. 56-58-60-62-64-66 cm / 22"-22¾"-23⅝"-24⅜"-25¼"-26" from shoulder and down. SLEEVE: Slip the 65-74-82-86-90-93 stitches from stitch holder in one side of piece on double pointed needles or a short circular needle size 3 mm / US 2.5 and pick in addition up 1 stitch in each of the 10-10-12-12-14-16 new stitches cast on under sleeve = 75-84-94-98-104-109 stitches. Insert 1 marker thread in the middle of the 10-10-12-12-14-16 stitches mid under sleeve and begin round here. Continue with plum and in stockinette stitch. When piece measures 4 cm / 1½", decrease 2 stitches mid under sleeve - read DECREASE TIP. Decrease like this every 8th-6th-5th-4th-4th-3rd round 13-17-21-22-23-24 times in total = 49-50-52-54-58-61 stitches. Continue until piece measures 40-38-37-35-33-32 cm / 15 ¾"-14⅞"-14 ½"-13 ¾"-13"-12 ½" from division (shorter measurements in the larger sizes because of wider neck and longer yoke). Knit 1 round while increasing 2-4-5-6-5-5 stitches evenly = 51-54-57-60-63-66 stitches. Switch to double pointed needles size 2.5 mm / US 1.5. Now work rib * knit 1, 2 stitches in garter stitch *, work from *-* in the round for 2 cm / ¾". Work 2 ridges and bind off. Work the other sleeve the same way. ASSEMBLY: Sew the buttons on to left band. |
||||||||||||||||||||||
Diagram explanations |
||||||||||||||||||||||
|
||||||||||||||||||||||
|
||||||||||||||||||||||
|
||||||||||||||||||||||
|
||||||||||||||||||||||
Have you finished this pattern?Tag your pictures with #dropspattern #daisydelightcardigan or submit them to the #dropsfan gallery. Do you need help with this pattern?You'll find 31 tutorial videos, a Comments/Questions area and more by visiting the pattern on garnstudio.com. © 1982-2025 DROPS Design A/S. We reserve all rights. This document, including all its sub-sections, has copyrights. Read more about what you can do with our patterns at the bottom of each pattern on our site. |
||||||||||||||||||||||


With over 40 years in knitting and crochet design, DROPS Design offers one of the most extensive collections of free patterns on the internet - translated to 17 languages. As of today we count 314 catalogs and 11822 patterns - 11812 of which are translated into English (US/in).
We work hard to bring you the best knitting and crochet have to offer, inspiration and advice as well as great quality yarns at incredible prices! Would you like to use our patterns for other than personal use? You can read what you are allowed to do in the Copyright text at the bottom of all our patterns. Happy crafting!
Post a comment to pattern DROPS 196-3
We would love to hear what you have to say about this pattern!
If you want to leave a question, please make sure you select the correct category in the form below, to speed up the answering process. Required fields are marked *.