
Popular categories
Looking for a yarn?


Comments / Questions (35)
![]() Julie wrote:
Julie wrote:
Hej. Jeg har lidt problemer med ærmerne. Jeg har lukket af på retsiden (altså den side jeg strikker ret), hvilket vil sige jeg skal sætte ærmerne på vangsiden. Men hvis jeg gør dette vil ærmerne vende forkert - altså sidde på inderside af jakke og ikke vende ud af. Hvad er det jeg gør forkert?
10.04.2020 - 10:50DROPS Design answered:
Hej Det går helt fint att sätta dit ärmarna på vrangsidan. Du stickar bara ärmarna från vrangsidan också så blir det riktigt. Lycka till! Mvh DROPS Design
22.04.2020 - 09:09
![]() Judith Mueller wrote:
Judith Mueller wrote:
Der Garnumrechner ist arg verbesserungswürdig, denn er lässt mich nicht alle Garne der Garngruppe A auswählen. Sehr benutzerunfreundlich! Warum liefert er nur eine begrenzte Auswahl an Garnen? Ich werde die Jacke mit Drops Safran stricken und das benötigte Garn nun eben selbst ausrechnen.
21.03.2020 - 20:41
![]() Karen M wrote:
Karen M wrote:
Tak for svar. Jeg mente med mit spørgsmål om trøjen ikke skal være højere i nakken end foran, jeg tænker trøjen må være irriterende at have på, hvis for og bag er lige høje i halsen?
07.10.2019 - 17:20DROPS Design answered:
Hej Karen, nej ikke just denne model :)
08.10.2019 - 08:33
![]() Karen M wrote:
Karen M wrote:
Hej, er det korrekt at der på forstykkerne ikke skal lukkes af til hals?
07.10.2019 - 03:40DROPS Design answered:
Hei Karen. Ja, det stemmer. Når du er ferdig med bærestykke, skal venstre og højre forkant strikkes og felles av. Deretter strikkes det opp 5 masker i hver av forkantene og det strikkes en vrangbord før det felles av. God Fornøyelse!
07.10.2019 - 13:33
![]() ANA CUEVAS wrote:
ANA CUEVAS wrote:
En la talla 12/18 meses. cuando hago el cuerpo, el patrón dice: tejer 1 punto de orillo,30 puntos para el delantero, rematar 8, tejer 60, rematar 8 y por último 30 + 1 punto de orillo. al colocar el canesú dice: 34+marcador, 46 de la manga y 68 de la espalda. si lo hago así, no me cuadra, quedaría el raglán metido en la manga. no corresponden los puntos de la pechera con los del cuerpo.es correcto? gracias
26.06.2019 - 00:56DROPS Design answered:
Hola Ana. El patrón es correcto. Los 4 puntos a cada lado de la manga pasan a las partes del delantero y la espalda. Asi en la parte del canesú se aumentan los puntos del delantero y la espalda y se disminuye la parte de los puntos en las mangas.
28.10.2019 - 20:45
![]() Iveta Jonesova wrote:
Iveta Jonesova wrote:
Dobrý den prosím o řadu s ujimanim s vystrihem u svetriku pletene na 4 jehlicich zacla jsem na 32 ok
27.03.2019 - 13:30DROPS Design answered:
Dobrý den, promiňte, ale nerozumím dotazu - můžete upřesnit, co konkrétně vám nevychází? 4 jehlice v tomto případě nepoužíváme, praktičtější je kruhová jehlice, na které pleteme v řadách od kraje ke kraji. Hezký den! Hana
06.12.2019 - 17:37
![]() Lena wrote:
Lena wrote:
Hej! Luddigt vad som är vad här!!! Vill sticka 12-18 mån...hur mycket skall jag lägga upp! Tycker mig ändå vara en van stickerska.. 🤔 Tack för svar! Mvh Lena
16.01.2019 - 18:19DROPS Design answered:
Hej Lena, du lägger upp 138 m och följer storleken innan ( ) Lycka till :)
17.01.2019 - 08:45
![]() Tania wrote:
Tania wrote:
Este patern encontra-se com erros em português. A indicação é que o casaco é feito de cima para baixo, mas na descrição é feito de baixo para cima. Além disso a medida das agulhas não pode estar correta, já que esta lã se tricota com agulhas num 5 e na descrição fala em agulhas num 2,5
01.12.2018 - 16:27
![]() Malika wrote:
Malika wrote:
Ich stricke die Jacke in der zweitkleinsten Größe. Für die linke Blende sollen 58 Maschen aus 1 Randmasche aufgenommen werden. Meine Jacke hat mehr als 58 Reihen. Bedeutet das, dass nicht aus jeder Randmasche eine Masche für die Blende aufgenommen wird und wie verteile ich die Aufnahme auf die gesamte Jackenhöhe? Vielen Dank!
02.11.2018 - 17:16DROPS Design answered:
Liebe Malike, dieses Video zeigt, wie man Maschen seitlich auffasst, dh ca 3 M auf 4 Reihen. Sollten Sie am Ende zu wenig/zu viel Maschen haben, können Sie bei der erste Reihe regelmäßig auf- bzw abnehmen. Viel Spaß beim stricken!
05.11.2018 - 08:07
![]() Käte Negendahl wrote:
Käte Negendahl wrote:
Når jeg tæller størrelserne angivet øverst i opskriften, får jeg 5 størrelser: 1/3, 6/9, 12/18 mdr, 2 år og 3/4 år. I opskriften mener jeg at der er 7 størrelser, da der er 7 forsklellige antal opslag: 90,102, 118,126, 146 og 162 masker. Jeg skal strikke størrelse 2 år, og er i tvivl om hvilket maskebal jeg skal vælge. Har nu slået 138 masker op, men blev så i tvivl. Venlig hilsen Käte
22.09.2018 - 17:24DROPS Design answered:
Hej Käte, hvis du kigger på jakken så har vi skrevet den i 7 størrelser. Str 2 år er den første størrelse i parentesen. God fornøjelse!
24.09.2018 - 11:07
|
|
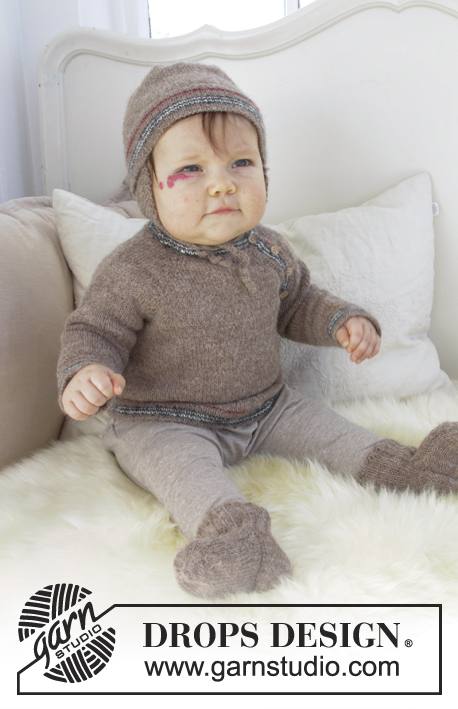
Baby Duck#babyduckjacket |
|
 |
 |
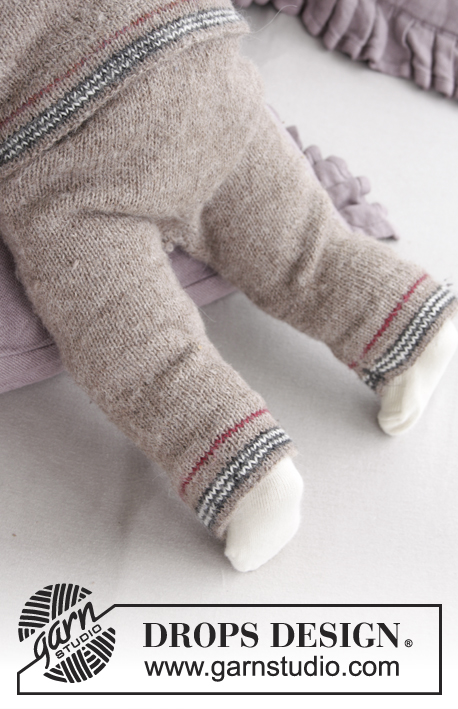
The set consists of: Knitted baby jacket with raglan and socks. Sizes premature - 4 years. The piece is worked in DROPS Alpaca.
DROPS Baby 31-9 |
|
|
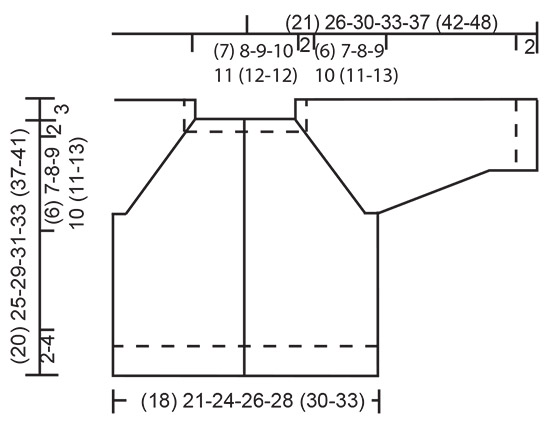
INFORMATION FOR THE PATTERN: RIDGE/GARTER STITCH (worked back and forth): 1 ridge = Knit 2 rows. INCREASE TIP (for sleeves): Work until there is 1 stitch left before the marker, 1 yarn over, knit 2 stitches (the marker sits in the middle of these 2 stitches), 1 yarn over (= a total of 2 stitches increased). The yarn overs are knitted twisted on the next round to avoid holes. DECREASE TO RAGLAN (for jacket): All decreases are made from the right side! Work until there are 3 stitches left before the marker, knit 2 stitches together (= 1 stitch decreased), knit 2 (the marker sits in the middle of these 2 stitches), slip 1 stitch as if to knit, knit 1, pass the slipped stitch over (= 1 stitch decreased). Decrease like this at each marker (= 2 stitches decreased at each marker and a total of 8 stitches decreased on the row). DECREASE TIP-1 (for socks): Decrease 1 stitch before 1 purled stitch as follows: Work until there are 2 stitches left before the 1 purled stitch, knit 2 stitches together. Decrease 1 stitch after the 1 purled stitch as follows: Slip 1 stitch as if to knit, knit 1, pass the slipped stitch over. TOE DECREASE (for socks): Decrease as follows 3 stitches before the marker: Knit 2 stitches together, knit 1. Decrease as follows after the marker: Knit 1, slip 1 stitch as if to knit, knit 1, pass the slipped stitch over. ---------------------------------------------------------- JACKET: The piece is worked bottom up. The body is first worked back and forth. Then the sleeves are worked in the round with double pointed needles before the sleeves and body are continued together back and forth. The bands are then worked and the neck to finish. BODY: The piece is worked back and forth. Cast on (90) 102-118-126-138 (146-162) stitches (including 1 edge stitch in each side of the piece; the bands will be worked later inside this stitch) with circular needle size 2.5 mm/ US 1.5 and Alpaca. Work rib as follows: Knit 1 edge stitch in GARTER STITCH – see description above, knit 1, * purl 2, knit 2 *, work from *-* until there are 4 stitches left, finish with purl 2, knit 1 and 1 edge stitch in garter stitch. Continue like this until the piece measures (2) 2-3-3-3 (4-4) cm = (3/4") ¾"-1⅛"-1⅛"-1⅛" (1½"-1½"). Change to circular needle size 3 mm/ US 2.5. Continue with stocking stitch and 1 edge stitch in garter stitch in each side of the piece. REMEMBER THE KNITTING TENSION! When the piece measures (9) 13-16-17-18 (21-23) cm = (3½") 5⅛"-6¼"-6¾"-7" (8¼"-9") cast off stitches for the armholes on the next row from the right side as follows: Work 1 edge stitch in garter stitch, (19) 22-25-27-30 (32-36) stitches stocking stitch (= right front piece), cast off the next (6) 6-8-8-8 (8-8) stitches, work (38) 44-50-54-60 (64-72) stitches stocking stitch (= back piece), cast off the next (6) 6-8-8-8 (8-8) stitches, work (19) 22-25-27-30 (32-36) stitches stocking stitch and finish with 1 edge stitch in garter stitch (= left front piece) = (78) 90-102-110-122 (130-146) stitches. Lay the piece to one side and work the sleeves. SLEEVE: The piece is worked in the round. Cast on (36) 36-36-36-40 (40-44) stitches with double pointed needles size 2.5 mm/ US 1.5 and Alpaca. Work rib (= knit 2 / purl 2). When the rib measures 2 cm = ¾", change to double pointed needles size 3 mm/ US 2.5, insert 1 marker at the beginning of the round (= mid under sleeve) and continue with stocking stitch. When the piece measures 4 cm = 1 ½" increase 1 stitch on each side of the marker mid under the sleeve – read INCREASE TIP. Increase like this every (2) 1½-1½-1-1 (1½-1½) cm = (¾") ½"- ½"-⅜"-⅜" (½"- ½") a total of (3) 6-8-11-11 (13-14) times = (42) 48-52-58-62 (66-72) stitches. When the piece measures (9½) 13-15½-17-19½ (23-27) cm = (3 ¾") 5⅛"-6⅛"-6 ¾"-7 ¾" (9"-10⅝") cast off the first and last (3) 3-4-4-4 (4-4) stitches (= a total of (6) 6-8-8-8 (8-8) stitches cast off) = (36) 42-44-50-54 (58-64) stitches. Lay the piece to one side and work the other sleeve. YOKE: Place the sleeves on the same circular needle as the body, where you cast off stitches for the armholes = (150) 174-190-210-230 (246-274) stitches. On the first row, insert 4 markers in the piece as follows, the row is worked from the wrong side: Work 1 edge stitch in garter stitch, (22) 25-28-31-34 (36-40) stitches stocking stitch, insert 1 marker, (30) 36-38-42-46 (50-56) stitches stocking stitch, insert 1 marker, (44) 50-56-62-68 (72-80) stitches stocking stitch, insert 1 marker, (30) 36-38-42-46 (50-56) stitches stocking stitch, insert 1 marker and finish with (22) 25-28-31-34 (36-40) stitches stocking stitch and 1 edge stitch in garter stitch. Work (3) 0-0-0-0 (0-0) rows stocking stitch with 1 edge stitch in garter stitch in each side of the piece. On the next row from the right side decrease to raglan on each side of each marker – read DECREASE TO RAGLAN! Decrease like this on each row from the right side (= every 2nd row) a total of (8) 11-12-14-16 (18-21) times = (86) 86-94-98-102 (102-106) stitches. On the next row from the right side decrease (10) 10-10-14-14 (14-14) stitches evenly on row = (76) 76-84-84-88 (88-92) stitches. Leave the stitches on the needle; you will now work the bands on each front piece, then work the neck over these stitches. LEFT BAND: The piece is worked back and forth. Knit up (42) 58-70-74-78 (90-102) stitches from the right side inside the 1 edge stitch in garter stitch mid front with circular needle size 2.5 mm/ US 1.5 and Alpaca. Work rib (= knit 2 / purl 2) until there are 2 stitches left, finish with knit 2. When the band measures approx. 2 cm = ¾", cast off all stitches, make sure that the cast-off edge is not tight; you can use a needle size larger if necessary. RIGHT BAND: Work as for the left band but work (4) 5-6-6-6 (6-7) buttonholes evenly spread along the band when it measures approx. 1 cm = ⅜" (later you will work 1 buttonhole on the neck so the first buttonhole on the band is worked approx. 3-4 cm = 1⅛"-1½" down from the neck. Make the buttonholes approx. 4-5 cm = 1 ½"-2" apart, make them in the purl sections). 1 buttonhole = purl 2 together and make 1 yarn over. NECK: Knit up 5 stitches in each of the bands in each side of the piece, inside 1 stitch and place all stitches on circular needle size 2.5 mm/ US 1.5 = (86) 86-94-94-98 (98-102) stitches. Work rib (= knit 2 / purl 2) for 2 cm = ¾" - cast off for buttonholes by purling the 2 first stitches together and making 1 yarn over on 1st row (= from right side). Cast off, and make sure that the cast-off edge is not tight; you can use a needle size larger if necessary. ASSEMBLY: Sew the openings under each sleeve. Sew buttons onto the left band. ---------------------------------------------------------- SOCK: Cast on 40-44-48 (52-56) stitches with double pointed needles size 2.5 mm/ US 1.5 and light beige. Work rib in the round (= knit 2 /purl 2) until the piece measures 5-6-7 (9-10) cm = 2"-2⅜"-2¾" (3½"-4"). Place the last stitch worked on the same needle as the first 19-19-23 (23-27) stitches on the round = 20-20-24 (24-28) stitches on needle for heel. The other 20-24-24 (28-28) stitches (= top of foot) are placed on 1 thread - the rib on top of the foot will now start and finish with purl 1. Work stocking stitch back and forth over the heel stitches for 3-3-4 (4-4) cm = 1⅛"-1⅛"-1½" (1½"-1½"). REMEMBER THE KNITTING TENSION! Insert 1 marker in the middle of these stitches (= 10-12-12 (14-14) stitches on each side of the marker). On the next row from the right side decrease as follows: ROW 1 (= from the right side): Knit until there are 4 stitches left before the marker, slip 1 stitch as if to knit, knit 1, pass the slipped stitch over (= 1 stitch decreased), knit 4, knit the next 2 stitches together (= 1 stitch decreased), knit to end of row = 18-18-22 (22-26) stitches. ROW 2 (= from wrong side): Purl. ROW 3: Knit until there are 3 stitches left before the marker, slip 1 stitch as if to knit, knit 1, pass the slipped stitch over (= 1 stitch decreased), knit 2, knit the next 2 stitches together (= 1 stitch decreased), knit to end of row = 16-16-20 (20-24) stitches. Cast off the remaining stitches and sew them together in the outermost loop of the outermost stitch (= mid under the foot). Then knit up 24-24-28 (28-32) stitches in the outermost loop of the outermost stitch over the heel. Place the stitches from the thread back on the needles = 44-48-52 (56-60) stitches. Continue working in the round. NOTE: Work rib over the 20-24-24 (28-28) stitches on top of foot and stocking stitch over the 24-24-28 (28-32) stitches under the foot. AT THE SAME TIME on every 2nd round decrease 1 stitch on each side of the rib on top of foot – read DECREASE TIP-1! Decrease like this a total of 2 times = 40-44-48 (52-56) stitches. When the sock measures 7½-8½-9 (11-12) cm = 3"-3¼"-3½" (4⅜"-4¾") from the back of the heel, (there is now approx. 2½-2½-3 (3-4) cm = 1"-1"-1⅛" (1⅛"-1½") left to finished length) divide the stitches so that there are 20-22-24 (26-28) stitches both on top of and under the foot. Insert 1 marker in each side. Work stocking stitch in the round over all stitches - AT THE SAME TIME decrease 1 stitch on each side of each marker – read TOE DECREASE! Decrease like this every 2nd round a total of 5-5-6 (6-7) times = 20-24-24 (28-28) stitches. Work all stitches together 2 and 2 = 10-12-12 (14-14) stitches. Cut the strand, pull it through the remaining stitches, pull tight and fasten well. The sock measures approx. 10-11-12 (14-16) cm = 4"-4⅜"-4¾" (5½"-6¼"). Work the other sock in the same way. |
|
 |
|
Have you finished this pattern?Tag your pictures with #dropspattern #babyduckjacket or submit them to the #dropsfan gallery. Do you need help with this pattern?You'll find 33 tutorial videos, a Comments/Questions area and more by visiting the pattern on garnstudio.com. © 1982-2026 DROPS Design A/S. We reserve all rights. This document, including all its sub-sections, has copyrights. Read more about what you can do with our patterns at the bottom of each pattern on our site. |
|


With over 40 years in knitting and crochet design, DROPS Design offers one of the most extensive collections of free patterns on the internet - translated to 17 languages. As of today we count 324 catalogs and 12278 patterns - 12268 of which are translated into English (US/in).
We work hard to bring you the best knitting and crochet have to offer, inspiration and advice as well as great quality yarns at incredible prices! Would you like to use our patterns for other than personal use? You can read what you are allowed to do in the Copyright text at the bottom of all our patterns. Happy crafting!
Post a comment to pattern DROPS Baby 31-9
We would love to hear what you have to say about this pattern!
If you want to leave a question, please make sure you select the correct category in the form below, to speed up the answering process. Required fields are marked *.