DROPS Alpaca
DROPS Alpaca
100% Alpaca
from 4.85 $ /50g
Get the yarn to make this pattern from 19.40$.

The yarn cost is calculated from the pattern’s smallest size and the yarn’s cheapest product type. Looking for an even better price? You might find it on the DROPS Deals!

DROPS SS24

Baby Duck

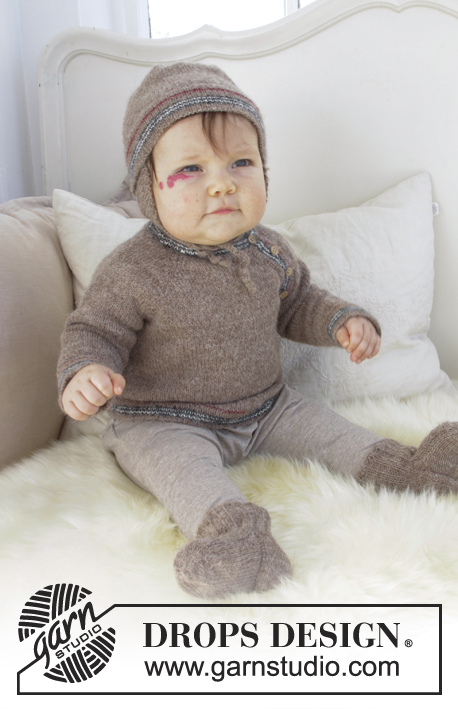
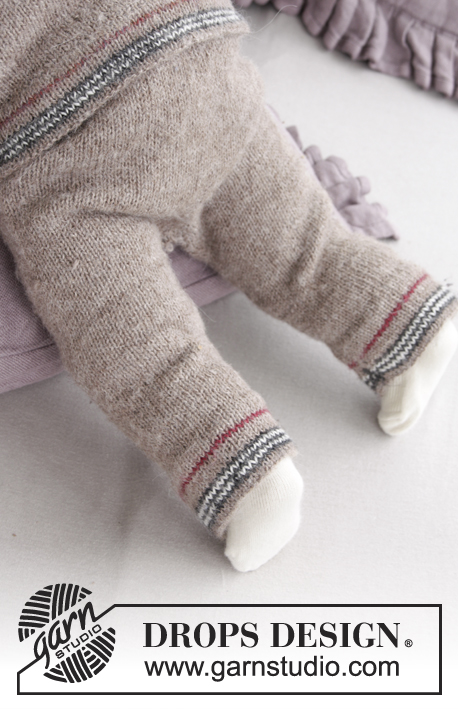
The set consists of: Knitted baby jacket with raglan and socks. Sizes premature - 4 years. The piece is worked in DROPS Alpaca.

DROPS Baby 31-9
DROPS Design: Pattern no z-101-by
Yarn group A
-----------------------------------------------------------

FOR THE WHOLE SET YOU WILL NEED:
Sizes: 1/3 - 6/9 - 12/18 months (2 - 3/4) years
Size equivalent to approx. child’s length in cm:
56/62 - 68/74 - 80/86 (92 - 98/104) = 22"/24⅜" - 26¾"/29⅛"- 31½"/33⅞" (36¼"-38½"/41")
Fits foot length: 10-11-12 (14-16) cm = 4"-4⅜"-4¾" (5½"-6¼")
All measurements in chart are in cm.
Materials:
DROPS ALPACA from Garnstudio (belongs to yarn group A)
150-150-200 (200-200) g colour 2923, goldenrod
50-50-50 (50-50) g colour 618, light beige

The piece can also be knitted with yarn from:
"Alternative yarn (Yarn group A)" – see link below.

DROPS DOUBLE POINTED NEEDLES AND CIRCULAR NEEDLE (60 or 80 cm = 24" or 32") SIZE 3 MM/US 2.5 – or the size needed to get 24 stitches and 32 rows of stocking stitch on 10 cm/4" in width and 10 cm/4" in height.

DROPS DOUBLE POINTED NEEDLES AND CIRCULAR NEEDLE (60 or 80 cm = 24" or 32") SIZE 2.5 MM / US 1.5- or the size needed to get 26 stitches and 34 rows of stocking stitch on 10 cm /4" in width and 10 cm/4" in height.

DROPS MOTHER OF PEARL BUTTONS, Arched (white) N0 521: (5) 6-7-7-7 (7-8) items
-----------------------------------------------------------

JACKET:
Sizes: (<0) 0/1 - 1/3 - 6/9 - 12/18 months (2 - 3/4) years
Size equivalent to approx. child’s length in cm:
(40/44) 48/52 - 56/62 - 68/74 - 80/86 (92 - 98/104) =  (15 ¾"/17 ¼") 19"/20 ½" - 22"/24 ⅜" - 26 ¾"/29 ⅛" - 31 ½"/33 ⅞" (36 ¼"-38 ½"/41") 
Materials:
DROPS ALPACA from Garnstudio (belongs to yarn group A)
(150) 150-150-150-200 (200-200) g colour 2923, goldenrod

The piece can also be knitted with yarn from:
"Alternative yarn (Yarn group A)" – see link below.

DROPS DOUBLE POINTED NEEDLES AND CIRCULAR NEEDLE (60 or 80 cm = 24" or 32") SIZE 3 MM / US 2.5– or the size needed to get 24 stitches and 32 rows of stocking stitch on 10 cm /4" in width and 10 cm/4" in height.

DROPS DOUBLE POINTED NEEDLES AND CIRCULAR NEEDLE (60 or 80 cm = 24" or 32") SIZE 2.5 MM/ US 1.5 for the rib - or the size needed to get 26 stitches and 34 rows of stocking stitch on 10 cm/4" in width and 10 cm/4" in height.

DROPS MOTHER OF PEARL BUTTONS, Arched (white) N0 521: (5) 6-7-7-7 (7-8) items
----------------------------------------------------------

SOCKS:
Sizes: 1/3 - 6/9 - 12/18 months (2 – 3/4) years
Fits foot length: 10-11-12 (14-16) cm = 4"-4⅜"-4¾" (5½"-6¼")
Materials:
DROPS ALPACA from Garnstudio (belongs to yarn group A)
50-50-50 (50-50) g colour 618, light beige

The piece can also be knitted with yarn from:
"Alternative yarn (Yarn group A)" – see link below.

DROPS DOUBLE POINTED NEEDLES SIZE 2.5 MM/ US 1.5 – or the size needed to get 26 stitches and 34 rows of stocking stitch on 10 cm/4" in width and 10 cm/4" in height.
----------------------------------------------------------

-------------------------------------------------------

Alternative Yarn – See how to change yarns here
Yarn Groups A to F – Use the same pattern and change the yarn here
Yarn usage using an alternative yarn – Use our yarn converter here

-------------------------------------------------------

DROPS Alpaca
DROPS Alpaca
100% Alpaca
from 4.85 $ /50g
Get the yarn to make this pattern from 19.40$.

The yarn cost is calculated from the pattern’s smallest size and the yarn’s cheapest product type. Looking for an even better price? You might find it on the DROPS Deals!

Pattern instructions

NOTE: This pattern is written in American English. All measurements in charts are in cm. For conversion from inches to cm - click here. There are different terms for crocheting in American and British English. If this pattern includes crochet, click for "crochet terms" here. For this pattern in British English, please click here.
INFORMATION FOR THE PATTERN:

RIDGE/GARTER STITCH (worked back and forth):
1 ridge = Knit 2 rows.

INCREASE TIP (for sleeves):
Work until there is 1 stitch left before the marker, 1 yarn over, knit 2 stitches (the marker sits in the middle of these 2 stitches), 1 yarn over (= a total of 2 stitches increased). The yarn overs are knitted twisted on the next round to avoid holes.

DECREASE TO RAGLAN (for jacket):
All decreases are made from the right side!
Work until there are 3 stitches left before the marker, knit 2 stitches together (= 1 stitch decreased), knit 2 (the marker sits in the middle of these 2 stitches), slip 1 stitch as if to knit, knit 1, pass the slipped stitch over (= 1 stitch decreased). Decrease like this at each marker (= 2 stitches decreased at each marker and a total of 8 stitches decreased on the row).

DECREASE TIP-1 (for socks):
Decrease 1 stitch before 1 purled stitch as follows: Work until there are 2 stitches left before the 1 purled stitch, knit 2 stitches together.
Decrease 1 stitch after the 1 purled stitch as follows: Slip 1 stitch as if to knit, knit 1, pass the slipped stitch over.

TOE DECREASE (for socks):
Decrease as follows 3 stitches before the marker: Knit 2 stitches together, knit 1.
Decrease as follows after the marker: Knit 1, slip 1 stitch as if to knit, knit 1, pass the slipped stitch over. 
----------------------------------------------------------

JACKET:
The piece is worked bottom up. The body is first worked back and forth. Then the sleeves are worked in the round with double pointed needles before the sleeves and body are continued together back and forth. The bands are then worked and the neck to finish.

BODY:
The piece is worked back and forth.
Cast on (90) 102-118-126-138 (146-162) stitches (including 1 edge stitch in each side of the piece; the bands will be worked later inside this stitch) with circular needle size 2.5 mm/ US 1.5 and Alpaca. Work rib as follows: Knit 1 edge stitch in GARTER STITCH – see description above, knit 1, * purl 2, knit 2 *, work from *-* until there are 4 stitches left, finish with purl 2, knit 1 and 1 edge stitch in garter stitch. Continue like this until the piece measures (2) 2-3-3-3 (4-4) cm = (3/4") ¾"-1⅛"-1⅛"-1⅛" (1½"-1½"). Change to circular needle size 3 mm/ US 2.5. Continue with stocking stitch and 1 edge stitch in garter stitch in each side of the piece. REMEMBER THE KNITTING TENSION! When the piece measures (9) 13-16-17-18 (21-23) cm = (3½") 5⅛"-6¼"-6¾"-7" (8¼"-9") cast off stitches for the armholes on the next row from the right side as follows: Work 1 edge stitch in garter stitch, (19) 22-25-27-30 (32-36) stitches stocking stitch (= right front piece), cast off the next (6) 6-8-8-8 (8-8) stitches, work (38) 44-50-54-60 (64-72) stitches stocking stitch (= back piece), cast off the next (6) 6-8-8-8 (8-8) stitches, work (19) 22-25-27-30 (32-36) stitches stocking stitch and finish with 1 edge stitch in garter stitch (= left front piece) = (78) 90-102-110-122 (130-146) stitches. Lay the piece to one side and work the sleeves.

SLEEVE:
The piece is worked in the round.
Cast on (36) 36-36-36-40 (40-44) stitches with double pointed needles size 2.5 mm/ US 1.5 and Alpaca. Work rib (= knit 2 / purl 2). When the rib measures 2 cm = ¾", change to double pointed needles size 3 mm/ US 2.5, insert 1 marker at the beginning of the round (= mid under sleeve) and continue with stocking stitch. When the piece measures 4 cm = 1 ½" increase 1 stitch on each side of the marker mid under the sleeve – read INCREASE TIP. Increase like this every (2) 1½-1½-1-1 (1½-1½) cm = (¾") ½"- ½"-⅜"-⅜" (½"- ½") a total of (3) 6-8-11-11 (13-14) times = (42) 48-52-58-62 (66-72) stitches.
When the piece measures (9½) 13-15½-17-19½ (23-27) cm = (3 ¾") 5⅛"-6⅛"-6 ¾"-7 ¾" (9"-10⅝") cast off the first and last (3) 3-4-4-4 (4-4) stitches (= a total of (6) 6-8-8-8 (8-8) stitches cast off) = (36) 42-44-50-54 (58-64) stitches. Lay the piece to one side and work the other sleeve.

YOKE:
Place the sleeves on the same circular needle as the body, where you cast off stitches for the armholes = (150) 174-190-210-230 (246-274) stitches. On the first row, insert 4 markers in the piece as follows, the row is worked from the wrong side: Work 1 edge stitch in garter stitch, (22) 25-28-31-34 (36-40) stitches stocking stitch, insert 1 marker, (30) 36-38-42-46 (50-56) stitches stocking stitch, insert 1 marker, (44) 50-56-62-68 (72-80) stitches stocking stitch, insert 1 marker, (30) 36-38-42-46 (50-56) stitches stocking stitch, insert 1 marker and finish with (22) 25-28-31-34 (36-40) stitches stocking stitch and 1 edge stitch in garter stitch. Work (3) 0-0-0-0 (0-0) rows stocking stitch with 1 edge stitch in garter stitch in each side of the piece.
On the next row from the right side decrease to raglan on each side of each marker – read DECREASE TO RAGLAN! Decrease like this on each row from the right side (= every 2nd row) a total of (8) 11-12-14-16 (18-21) times = (86) 86-94-98-102 (102-106) stitches. On the next row from the right side decrease (10) 10-10-14-14 (14-14) stitches evenly on row = (76) 76-84-84-88 (88-92) stitches.
Leave the stitches on the needle; you will now work the bands on each front piece, then work the neck over these stitches.

LEFT BAND:
The piece is worked back and forth.
Knit up (42) 58-70-74-78 (90-102) stitches from the right side inside the 1 edge stitch in garter stitch mid front with circular needle size 2.5 mm/ US 1.5 and Alpaca. Work rib (= knit 2 / purl 2) until there are 2 stitches left, finish with knit 2. When the band measures approx. 2 cm = ¾", cast off all stitches, make sure that the cast-off edge is not tight; you can use a needle size larger if necessary.

RIGHT BAND:
Work as for the left band but work (4) 5-6-6-6 (6-7) buttonholes evenly spread along the band when it measures approx. 1 cm = ⅜" (later you will work 1 buttonhole on the neck so the first buttonhole on the band is worked approx. 3-4 cm = 1⅛"-1½" down from the neck. Make the buttonholes approx. 4-5 cm = 1 ½"-2" apart, make them in the purl sections). 1 buttonhole = purl 2 together and make 1 yarn over.

NECK:
Knit up 5 stitches in each of the bands in each side of the piece, inside 1 stitch and place all stitches on circular needle size 2.5 mm/ US 1.5 = (86) 86-94-94-98 (98-102) stitches. Work rib (= knit 2 / purl 2) for 2 cm = ¾" - cast off for buttonholes by purling the 2 first stitches together and making 1 yarn over on 1st row (= from right side). Cast off, and make sure that the cast-off edge is not tight; you can use a needle size larger if necessary.

ASSEMBLY:
Sew the openings under each sleeve. Sew buttons onto the left band.
---------------------------------------------------------- 

SOCK: 
Cast on 40-44-48 (52-56) stitches with double pointed needles size 2.5 mm/ US 1.5 and light beige. Work rib in the round (= knit 2 /purl 2) until the piece measures 5-6-7 (9-10) cm = 2"-2⅜"-2¾" (3½"-4").
Place the last stitch worked on the same needle as the first 19-19-23 (23-27) stitches on the round = 20-20-24 (24-28) stitches on needle for heel.
The other 20-24-24 (28-28) stitches (= top of foot) are placed on 1 thread - the rib on top of the foot will now start and finish with purl 1.
Work stocking stitch back and forth over the heel stitches for 3-3-4 (4-4) cm = 1⅛"-1⅛"-1½" (1½"-1½"). REMEMBER THE KNITTING TENSION! Insert 1 marker in the middle of these stitches (= 10-12-12 (14-14) stitches on each side of the marker). On the next row from the right side decrease as follows:
ROW 1 (= from the right side): Knit until there are 4 stitches left before the marker, slip 1 stitch as if to knit, knit 1, pass the slipped stitch over (= 1 stitch decreased), knit 4, knit the next 2 stitches together (= 1 stitch decreased), knit to end of row = 18-18-22 (22-26) stitches.
ROW 2 (= from wrong side): Purl.
ROW 3: Knit until there are 3 stitches left before the marker, slip 1 stitch as if to knit, knit 1, pass the slipped stitch over (= 1 stitch decreased), knit 2, knit the next 2 stitches together (= 1 stitch decreased), knit to end of row = 16-16-20 (20-24) stitches. Cast off the remaining stitches and sew them together in the outermost loop of the outermost stitch (= mid under the foot).
Then knit up 24-24-28 (28-32) stitches in the outermost loop of the outermost stitch over the heel. Place the stitches from the thread back on the needles = 44-48-52 (56-60) stitches. Continue working in the round. NOTE: Work rib over the 20-24-24 (28-28) stitches on top of foot and stocking stitch over the 24-24-28 (28-32) stitches under the foot. AT THE SAME TIME on every 2nd round decrease 1 stitch on each side of the rib on top of foot – read DECREASE TIP-1! Decrease like this a total of 2 times = 40-44-48 (52-56) stitches.
When the sock measures 7½-8½-9 (11-12) cm = 3"-3¼"-3½" (4⅜"-4¾") from the back of the heel, (there is now approx. 2½-2½-3 (3-4) cm = 1"-1"-1⅛" (1⅛"-1½") left to finished length) divide the stitches so that there are 20-22-24 (26-28) stitches both on top of and under the foot. Insert 1 marker in each side. Work stocking stitch in the round over all stitches - AT THE SAME TIME decrease 1 stitch on each side of each marker – read TOE DECREASE!
Decrease like this every 2nd round a total of 5-5-6 (6-7) times = 20-24-24 (28-28) stitches. Work all stitches together 2 and 2 = 10-12-12 (14-14) stitches. Cut the strand, pull it through the remaining stitches, pull tight and fasten well. The sock measures approx. 10-11-12 (14-16) cm = 4"-4⅜"-4¾" (5½"-6¼"). Work the other sock in the same way.

Diagram

All measurements in charts are in cm.

diagram measurements

Each of our patterns has specific tutorial videos to help you.

Do you have a question? See a list of frequently asked questions (FAQ)

Knitting tension is what determines the final measurements of your work, and is usually measured per 10 x 10 cm. It is provided like so: number of stitches in width x number of rows in height - eg: 19 stitches x 26 rows = 10 x 10 cm.

The knitting tension is very individual; some people knit/crochet loosely while others work tightly. You adjust the knitting tension with the needle size, which is why the suggested needle size only serve as a guide! You need to adjust this (up or down) to ensure that YOUR knitting tension matches the knitting tension provided in the pattern. If you work with a different knitting tension than provided you will have a different yarn consumption, and your work will have different measurements than what the pattern suggests.

The knitting tension also determines which yarns can replace each other. As long as you achieve the same knitting tension you can replace one yarn with another.

See DROPS lesson: How to measure your tension/gauge

See DROPS video: How to make a gauge tension swatch

The required amount of yarn is provided in grams, eg: 450 g. To calculate how many balls you’ll need you first need to know how many grams are in 1 ball (25g, 50g or 100g). This information is available if you click on the individual yarn quality on our pages. Divide the amount required with the amount of each ball. For example, if each ball is 50g (the most common amount), the calculation will be as follows: 450 / 50 = 9 balls.

The important thing when changing from one yarn to another is that the knitting/crochet tension remains the same. This is so that the measurements of the finished piece will be the same as on the sketch provided. It is easier to achieve the same knitting tension using yarns from the same yarn group. It is also possible to work with multiple strands of a thinner yarn to achieve the knitting tension of a thicker one. Please try our yarn converter. We recommend you to always work a test swatch.

Please NOTE: when changing yarn the garment might have a different look and feel to the garment in the photo, due to individual properties and qualities of each yarn.

See DROPS lesson: Can I use a different yarn than the one mentioned in the pattern?

All our yarns are categorised into yarn groups (from A to F) according to thickness and knitting tension – group A contains the thinnest yarns and group F the thickest. This makes it easier for you to find alternative yarns to our patterns, should you wish to switch yarn. All yarns within the same group have a similar knitting tension and can easily replace each other. However, different yarn qualities have different structures and properties which will give the finished work a unique look and feel.

Click here for an overview of the yarns in each yarn group

At the top of all our patterns you’ll find a link to our yarn converter, which is a helpful tool should you wish to use a different yarn than suggested. By filling in the yarn quality you wish to replace, the amount (in your size) and number of strands, the converter will present good alternative yarns with the same knitting tension. Additionally it will tell you how much you’ll require in the new qualities and whether you’ll need to work with multiple strands. Most skeins are 50g (some are 25g or 100g).

If the pattern is worked with multiple colours, every colour will have to be converted separately. Similarly, if the pattern is worked with several strands of different yarns (for example 1 strand Alpaca and 1 strand Kid-Silk) you will have to find alternatives for each, individually.

Click here to see our yarn converter

Since different yarns have different qualities and textures we have chosen to keep the original yarn in our patterns. However, you can easily find options among our available qualities by using our yarn converter, or simply pick a yarn from the same yarn group.

It is possible that some retailers still have discontinued yarns in stock, or that someone has a few skeins at home that they would like to find patterns for.

The yarn converter will provide both alternative yarn as well as required amount in the new quality.

If you think it's hard to decide what size to make, it can be a good idea to measure a garment you own already and like the size of. Then you can pick the size by comparing those measures with the ones available in the pattern's size chart.

You'll find the size chart at the bottom of the pattern.

See DROPS lesson: How to read size chart

The needle size provided in the pattern serves only as a guide, the important thing is to follow the knitting tension. And since knitting tension is very individual, you will have to adjust the needle size to ensure that YOUR tension is the same as in the pattern – maybe you’ll have to adjust 1, or even 2 needle sizes, up or down to achieve the correct tension. For this, we recommend that you work test swatches.

Should you work with a different knitting tension than the one provided, the measurements of the finished garment might deviate from the measurement sketch.

See DROPS lesson: How to measure your tension/gauge

See DROPS video: How to make a gauge tension swatch

Working a garment top-down provides more flexibility and room for personal adjustment. For example it is easier to try the garment on while working, as well as making adjustments to length of yoke and shoulder caps.

The instructions are carefully explaining every step, in the correct order. Diagrams are adjusted to the knitting direction and are worked as usual.

The diagram depicts all rows/rounds, and every stitch seen from the right side. It is read from bottom to top, from right to left. 1 square = 1 stitch.

When working back and forth, every other row is worked from the right side and every other row is worked from the wrong side. When working from the wrong side, the diagram will have to be worked reversed: from left to right, knit stitches are purled, purl stitches are knit etc.

When working in the round every round is worked from the right side and the diagram are worked from right to left on all rounds.

See DROPS lesson: How to read knitting diagrams

The diagram depicts all rows/rounds, and every stitch seen from the right side. It is worked from bottom to top, from right to left.

When working back and forth every other row is worked from the right side: from right to left and every other row is worked from the wrong side: from left to right.

When working in the round, every row in the diagram are worked from the right side, from right to left.

When working a circular diagram you start in the middle and work your way outwards, counter clockwise, row by row.

The rows usually start with a given number of chain stitches (equivalent to the height of the following stitch), this will either be depicted in the diagram or explained in the pattern.

See DROPS lesson: How to read crochet diagrams

Instructions for working several diagrams after each other on the same row/round, will often be written like so: “work A.1, A.2, A.3 a total of 0-0-2-3-4 times". This means you work A.1 once, then A.2 is worked once, and A.3 is repeated (in width) the number of times provided for your size – in this case like so: S = 0 times, M = 0 times, L=2 times, XL= 3 times and XXL = 4 times.

The diagrams are worked as usual: begin with the first row in A.1, then work the first row in A.2 etc.

See DROPS lesson: How to read knitting diagrams

See DROPS lesson: How to read crochet diagrams

The total width of the garment (from wrist-to-wrist) will be larger in the larger sizes, despite the actual sleeves being shorter. The larger sizes have longer sleeve caps and wider shoulders, so there will be a good fit in all sizes.

The measurement sketch/schematic drawing provides information regarding the full length of the garment. If it’s a jumper or a jacket the length is measured from the highest point on the shoulder (usually closest to the neckline), and straight down to the bottom of the garment. It is NOT measured from the tip of shoulder. Similarly, the length of yoke is measured from the highest point on the shoulder and down to where yoke is split into body and sleeves.

See DROPS lesson: How to read a schematic drawing

Diagrams are often repeated on the round or in height. 1 repeat is the diagram the way it appears in the pattern. If it says to work 5 repeats of A.1 in the round, then you work A.1 a total of 5 times after/next to each other in the round. If it says to work 2 repeats of A.1 vertically/in height you work the entire diagram once, then begin again at the start and work the entire diagram one more time.

Chain stitches are slightly narrower than other stitches and to avoid working the cast-on edge too tight, we simply chain more stitches to begin with. The stitch count will be adjusted on the following row to fit the pattern and measurement sketch.

The rib edge is more elastic and will contract slightly compared to, for example, stocking stitch. By increasing before the rib edge, you avoid a visible difference in width between the rib edge and the rest of the body.

It’s very easy to cast off too tightly, and by making yarn overs while casting off (and simultaneously casting these off) you avoid a too tight cast off edge.

See DROPS video: How to bind off with yarn overs (yo)

To achieve an even increase (or decrease) you can increase on, for example: every 3rd and 4th row alternately, like so: work 2 rows and increase on the 3rd row, work 3 rows and increase on the 4th. Repeat this until the increase is complete.

See DROPS lesson: Increase or decrease 1 st on every 3rd and 4th row alternately

Should you prefer to work in the round instead of back and forth, you may of course adjust the pattern. You’ll need to add steeks mid-front (usually 5 stitches), and follow the instructions. When you would normally turn and work from the wrong side, simply work across the steek and continue in the round. At the end you’ll cut the piece open, pick up stitches to work bands, and cover the cut edges.

See DROPS video: How to knit steeks and cut open

Should you prefer to work back and forth instead of in the round, you may of course adjust the pattern so you work the pieces separately and then assemble them at the end. Divide the stitches for the body in 2, add 1 edge stitch in each side (for sewing) and work the front and back pieces separately.

See DROPS lesson: Can I adapt a pattern for circular needles into straight needles?

Pattern repeats can vary slightly in the different sizes, in order to get the correct proportions. If you’re not working the exact same size as the garment in the photo, yours might deviate slightly. This has been carefully developed and adjusted so that the complete impression of the garment is the same in all sizes.

Make sure to follow instructions and diagrams for your size!

If you have found a pattern you like which is available in women’s size it’s not very difficult to convert it to men’s size. The biggest difference will be the length of sleeves and body. Start working on the women size that you think would fit across the chest. The additional length will be worked right before you cast off for the armhole/sleeve cap. If the pattern is worked top-down you can add the length right after the armhole or before the first decrease on sleeve.

Regarding additional yarn amount, this will depend on how much length you add, but it is better with a skein too many than too few.

All yarns will have excess fibres (from production) that might come off as lint or shedding. Brushed yarns (ie hairier yarns) have more of these loose, excess fibres, causing more shedding.

Shedding also depends on what is worn under or over the garment, and whether this pulls at the yarn fibres. It’s therefore not possible to guarantee that there will be no shedding

Below are some tips on how to get the best result when working with hairier yarns:

1. When the garment is finished (before you wash it) shake it vigorously so the looser hairs come off. NOTE: do NOT use a lint roller, brush or any method that pulls at the yarn.

2. Place the garment in a plastic bag and put it in your freezer - the temperature will cause the fibres to become less attached to each other, and excess fibres will come off easier.

3. Leave in the freezer for a few hours before taking it out and shaking it again.

4. Wash the garment according to the instructions on the yarn label.

Pilling is a natural process that happens to even the most exclusive of fibers. It's a natural sign of wear and tear that is hard to avoid, and that is most visible in high friction areas of your garment like a sweater's arms and cuffs.

You can make your garment look as new by removing the pilling, using a fabric comb or a pill/lint remover.

Still can't find the answer you need? Then scroll down and leave your question so one of our experts can try to help you. This will be done normally within 5 to 10 working days.
In the meantime, you can read the questions and answers that others have left to this pattern or join the DROPS Workshop on Facebook to get help from fellow knitters/crocheters!

You might also like...

Little Penguin

Isidor Knits, Germany

Cardigan for my niece

ssaras, Finland

Post a comment to pattern DROPS Baby 31-9

We would love to hear what you have to say about this pattern!

If you want to leave a question, please make sure you select the correct category in the form below, to speed up the answering process. Required fields are marked *.

Comments / Questions (34)

country flag AUFFRET Marie wrote:

Bonjour, Comment fait-on pour assembler les manches au dos et devant ? Peut-on les assembler en tricotant sur l'envers puisqu'on a fini le dos et devant par un rang endroit pour rabattre les mailles des emmanchures.

09.11.2020 - 14:45

DROPS Design answered:

Bonjour Mme Auffret, on glisse les mailles des manches sur la même aiguille circulaire que le dos et les devants, juste au-dessus des 6 ou 8 mailles rabattues pour les emmanchures à la fin du bas du gilet - cette vidéo montre comment faire, les premiers rangs peuvent paraître un peu difficile, mais après quelques rangs, c'est plus simple. Bon tricot!

09.11.2020 - 15:51

country flag Christiane wrote:

Hallo, wie muss ich die Maschen bei der Passe verteilen? Kann leider kein System erkennen, wie viele Maschen vom Rumpf und vom Ärmel jeweils gestrickt werden bis ein Markierer kommt. Ich habe insgesamt 246 Maschen, davon 34+1 jeweils außen am Rumpf, 68 in der Mitte vom Rumpf und jeweils 59 Maschen auf jedem Ärmel. Wo müssen die Markierer hin? Vielen Dank.

08.11.2020 - 01:47

DROPS Design answered:

Liebe Christiane, mit 246 Maschen stricken Sie die Größe 2 Jahre - aber die Verteilung erfolft so: 1 Rand-M kraus rechts, 36 M glatt rechts stricken (= Vorderteil), 1 Markierer, 50 M glatt rechts stricken (= Ärmel), 1 Markierer, 72 M glatt rechts stricken (= Rückenteil), 1 Markierer, 50 M glatt rechts stricken (= Ärmel), 1 Markierer und 36 M glatt rechts und 1 Rand-M kraus rechts (= Vorderteil) - jetzt nehmen Sie für Raglan ab - siehe RAGLANABNAHMEN: in jeder 2. Reihe 18 Mal = 246 - (8 M x 18) = 102 M bleiben. Viel Spaß beim stricken!

09.11.2020 - 10:41

country flag Christiane Leischner wrote:

Ich möchte die Jacke in Gr. 122 stricken. Können Sie mir mit der Maschenzahl helfen? Danke

07.11.2020 - 09:31

DROPS Design answered:

Liebe Frau Leischner, leider können wir jeder Anleitung nach jedem individuellen Frage anpassen und einzelne Modelle auf individuellen Wunsch hin umrechnen. Wenn sie Hilfe damit brauchen, wenden Sie sich bitte an dem Laden wo Sie die Wolle gekauft haben, dort hilft man Ihnen gerne weiter. Hier finden Sie alle unsere Anleitungen für Jacken für Kinder, hoffentlich kann es Ihnen etwas helfen. Viel Spaß beim stricken!

09.11.2020 - 09:33

country flag AUFFRET Marie wrote:

Bonjour "Rabattre les mailles restantes et les assembler dans le brin le plus à l'extérieur des mailles (= milieu sous le pied)."Je ne comprends pas bien: comment faire? Avez-vous une vidéo? Merci d'avance.

02.11.2020 - 10:12

country flag Christiane Beyer wrote:

Hallo! Ich verstehe die Größenangaben nicht ganz, ganz oben gibt es 5 verschiedene Größen, in der Anleitung selber werden aber immer 7 mögliche Größen angegeben. Welche sind denn jetzt welche? Außerdem wüsste ich gerne, wie breit denn der Ärmel bei Größe 68/74 am unteren und am oberen Ende sein soll. Mein Ärmel scheint mir recht groß (evtl. habe ich die Maschenprobe falsch hoch gerechnet), deswegen wäre eine Angabe in cm super. Viele Grüße Christiane

24.10.2020 - 23:13

DROPS Design answered:

Liebe Frau Beyer, das Set ist nur für 5 Größen aber die Jacke ist in 7 Größe, dh die Größe 68/74 bei dem Set ist die 2. Größe = 6/9 Monate und bei der Jacke ist es die 4. Größe. Bei dieser Grösse haben Sie 36 M. am Anfang der Ärmel und 58 M am Ende, mit 24 M = 10 cm mist die Ärmel ca 15 cm und 24 cm. Viel Spaß beim stricken!

26.10.2020 - 08:14

country flag Karoline wrote:

Hej, jag undrar om det går lika bra att göra ärmarna på rundstickor som på strumpstickor ? Om ja, hur gör man då isåfall? På samma sätt som beskrivningen? Tack på förhand !

03.07.2020 - 15:11

DROPS Design answered:

Hej Karoline. Ja du kan sticka på rundsticka om du hellre vill det och du stickar då på samma sätt som det står i beskrivningen. Eftersom det är så få maskor så är det nog enklast att använda sig av tekniken magic loop om du ska sticka på rundsticka. Lycka till!

06.07.2020 - 08:42

country flag Antonia wrote:

Ich möchte das Material für die Jacke bestellen. Welchen Durchmesser sollen die Knöpfe haben?

01.06.2020 - 21:14

DROPS Design answered:

Liebe Antonia, hier finden Sie die Knöpfe, sie sind 15 mm durchmesser. Viel Spaß beim stricken!

02.06.2020 - 10:30

country flag Jacqueline wrote:

Kan ik aub de opmerkingen voor dit truitje in het Nederlands zien? Can I see the remarks for this cardigan in Dutch please?

28.04.2020 - 21:19

DROPS Design answered:

Dag Jacqueline,

De opmerkingen en vragen bij patronen worden niet automatisch vertaald. Iedereen kan in zijn eigen taal een opmerking of vraag plaatsen. Eventueel kun je google translate gebruiken.

Verder kun je gerust je vraag stellen hoor, ook al staan er al een aantal in andere talen.

29.04.2020 - 08:57

country flag Julie wrote:

Hej. Jeg har lidt problemer med ærmerne. Jeg har lukket af på retsiden (altså den side jeg strikker ret), hvilket vil sige jeg skal sætte ærmerne på vangsiden. Men hvis jeg gør dette vil ærmerne vende forkert - altså sidde på inderside af jakke og ikke vende ud af. Hvad er det jeg gør forkert?

10.04.2020 - 10:50

DROPS Design answered:

Hej Det går helt fint att sätta dit ärmarna på vrangsidan. Du stickar bara ärmarna från vrangsidan också så blir det riktigt. Lycka till! Mvh DROPS Design

22.04.2020 - 09:09

country flag Judith Mueller wrote:

Der Garnumrechner ist arg verbesserungswürdig, denn er lässt mich nicht alle Garne der Garngruppe A auswählen. Sehr benutzerunfreundlich! Warum liefert er nur eine begrenzte Auswahl an Garnen?\r\n\r\nIch werde die Jacke mit Drops Safran stricken und das benötigte Garn nun eben selbst ausrechnen.

21.03.2020 - 20:41