
Popular categories
Looking for a yarn?


Comments / Questions (217)
![]() Treyer wrote:
Treyer wrote:
Bonjour, j’ai un doute sur les augmentations. Pouvez-vous, svp, me confirmer qu’il faut augmenter de 1 fois 4 mailles, 1 fois 6 mailles et 1 fois 19 mailles pour la taille 3 mois Merci beaucoup
08.01.2024 - 18:35DROPS Design answered:
Bonjour Mme Treyer, quand vous pensez augmentations, pensez-vous aux mailles des manches à monter en fin de rang? En taille 1/3 mois, vous allez alors monter 4 fois 6 mailles et 1 fois 19 mailles soit 43 mailles pour chaque manche. Bon tricot!
09.01.2024 - 07:32
![]() Diana Lovatt wrote:
Diana Lovatt wrote:
Hej igen, Du svarar ej på min fråga i meddelande 156 och hur jag skall tolka just "denna" maska i mönstret som sitter mitt på en linje mellan två maskor. Du ger bara förslag på de olika varianterna och ej svar på hur jag skall göra just denna maska i detta mönster.
08.01.2024 - 13:58DROPS Design answered:
Hej Diana, Vilket diagram, varv nummer (räkna nerifrån) og storlek, så skal vi beskrive raden med just den maskan för dig :)
11.01.2024 - 14:58
![]() Diana Lovatt wrote:
Diana Lovatt wrote:
Jag förstår ej hur jag stickar omslaget mellan 2 maskor. Jag har fått förslag på att sticka ihop 2 maskor + ett omslag, men då hamnar ju ej omslaget mellan de 2 maskorna. Tacksam för svar på hur detta görs.
28.12.2023 - 17:01DROPS Design answered:
Hei Diana. Du følger forklaringen til diagrammene. Noen steder gjør du et kast deretter strikkes 2 masker sammen (enten 2 masker rett sammen eller ta 1 maske løs av pinnen som om den skulle strikkes rett, 1 rett, løft den løse masken over). Gjørs dette vil kastet komme på "siden" av minskningen og du vil få et pent hull mønster. mvh DROPS Design
08.01.2024 - 13:40
![]() Ghislaine Lutz wrote:
Ghislaine Lutz wrote:
Vous dites que l échantillon fait 24x48, alors que sur la pelotes c'est noté 24x32 rangs.
11.12.2023 - 15:30DROPS Design answered:
Bonjour Mme Lutz, l'échantillon est toujours indiqué en jersey, ici, on le tricote au point mousse, il faudra donc 48 rangs point mousse pour avoir 10 cm de hauteur. Bon tricot!
12.12.2023 - 09:41
![]() Grazu wrote:
Grazu wrote:
Bonjour, Je ne comprends pas très bien l'assemblage. Il y a t-il deux techniques à suivre? Si oui, quelles sont-elles?
24.11.2023 - 12:36DROPS Design answered:
Bonjour Grazu, vous pouvez utiliser les 2 techniques que l'on montre dans la vidéo: la première pour le dessus des manches/les épaules et la 2ème pour le dessous des manches (pour éviter que la couture ne soit trop épaisse). Bon assemblage!
27.11.2023 - 07:38
![]() Karin Stensgaard wrote:
Karin Stensgaard wrote:
Antal masker stemme ikke. Stikker tøjlerne skal sætte 2x11 masker på hold og derefter strikke over de resterende 8 masker, men startede med 36 masker. Så hvad gør jeg?
19.10.2023 - 11:44DROPS Design answered:
Hej Karin, det ser ud til at du har glemt at tage de (6) 8-6-6-6- (10-14) masker ind jævnt fordelt på sidste pind fra retsiden = (30) 30-34-38-38 (42-42) masker.
24.10.2023 - 08:18
![]() Bensemhoun Deborah wrote:
Bensemhoun Deborah wrote:
Pour cet ensemble existe t’il une video tuto pour simplifier les choses ? Merci bcp
26.09.2023 - 14:43DROPS Design answered:
Bonjour Mme Bensemhoun, nous faisons en sorte de pouvoir faire autant de vidéos que possible pour accompagner nos modèles, sur la base des questions et demandes que nous recevons; nous avons ainsi de nombreuses vidéos où nous montrons les techniques, mais une vidéo entière pour un gilet bébé pendrait plusieurs heures et n'est donc pas d'actualité. Lisez attentivement les explications, regardez les vidéos et les leçons en bas de page, et, si vous avez une question, n'hésitez pas à utiliser cet espace, nous vous répondrons volontiers. Merci pour votre compréhension. Bon tricot!
26.09.2023 - 15:14
![]() Marit wrote:
Marit wrote:
I oppskriften til Odeta babysett er det oppgitt to forskjelligestrikkefastheter. Den ene for pinne 3 og den andre for pinne 2,5. det er to masker forskjell og vil utgjøre jo en forskjell på flere cm på den ferdige jakka
19.09.2023 - 12:42DROPS Design answered:
Hei Marit, Forskjellige pinnestørrelser har forskjellige antall masker og rad for å få til samme mål. Større pinner (3 mm) har færre masker/rad enn mindre pinner (2,5 mm) men allikevel blir det 10 x 10 cm. Du kan strikke prøvelappen med begge størrelsene. God fornøyelse!
20.09.2023 - 06:52
![]() Sylvia Holtz wrote:
Sylvia Holtz wrote:
Hallo, wie viele Maschen muss ich in der Größe 56/62 insgesamt für den Ärmel anschlagen? Danke...viele Grüße Sylvia
07.09.2023 - 18:13DROPS Design answered:
Liebe Frau Holz, es wird insgesamt für jeden Ärmel 43 Maschen in 56/62 angeschlagen: 6 Maschen 4 Mal + 19 Maschen 1 Mal. Viel Spaß beim stricken!
08.09.2023 - 07:54
![]() Marie Josée Coulombe wrote:
Marie Josée Coulombe wrote:
Allô Concernant le chausson Je suis embêté . Je fais la 3ème grandeur. Je dois tricoté 3 cm point mousse ( ok) Mettre marqueur à 1 1/2 cm (ok) S’est le diminuer maintenant ou j’ai questionnement. Dois tricoter tout mon 3cm et après faire diminution ou bien après le 1 1/2 a l’endroit du marqueur que je débute tout de suite les diminutions Merci
05.09.2023 - 19:05DROPS Design answered:
Bonjour Mme Coulombe, vous allez tricoter 3 cm au point mousse au total pour la semelle, mais après 1,5 cm vous allez commencer à diminuer tous les 2 rangs (tous les rangs sur l'endroit), autrement dit, vous tricotez 1,5 cm sans diminuer + 1,5 cm en diminuant tous les 2 rangs = 3 cm au total. Bon tricot!
06.09.2023 - 09:02
|
|||||||||||||||||||
Odeta#odetajacket |
|||||||||||||||||||
 |
 |
||||||||||||||||||
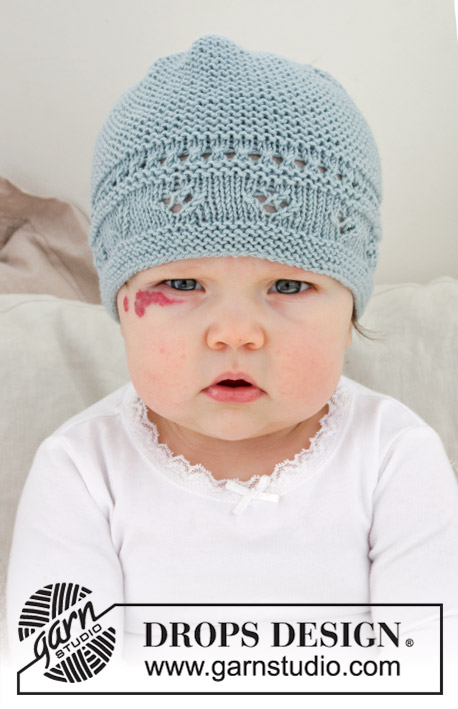
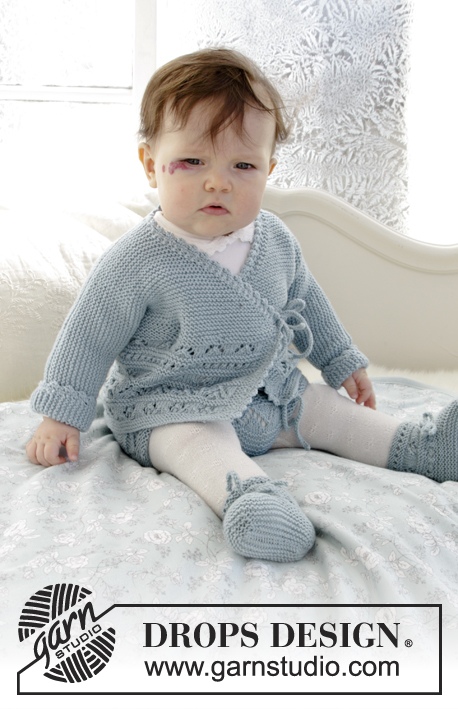
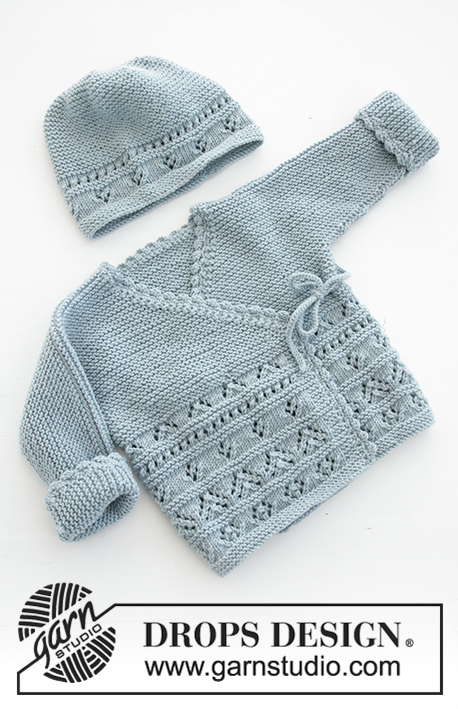
The set consists of: Knitted baby jacket and slippers with lace pattern and garter stitch. Sizes premature - 4 years. The set is worked in DROPS BabyMerino.
DROPS Baby 31-3 |
|||||||||||||||||||
|
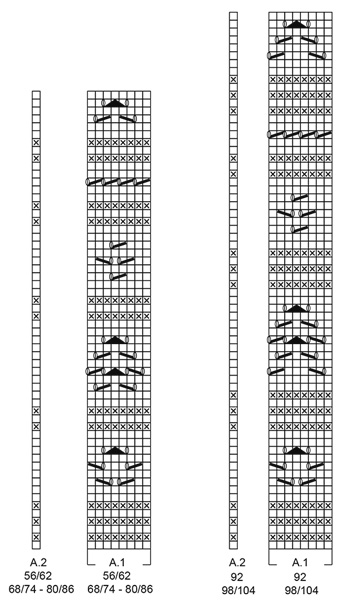
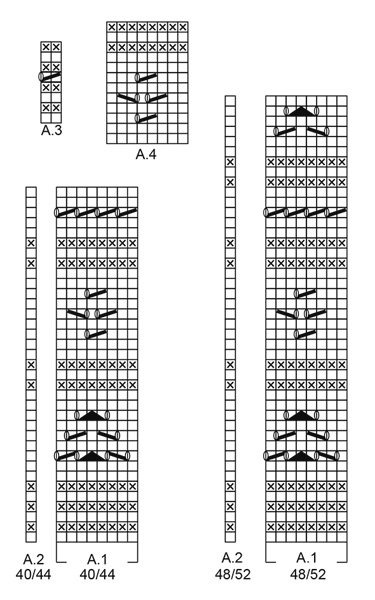
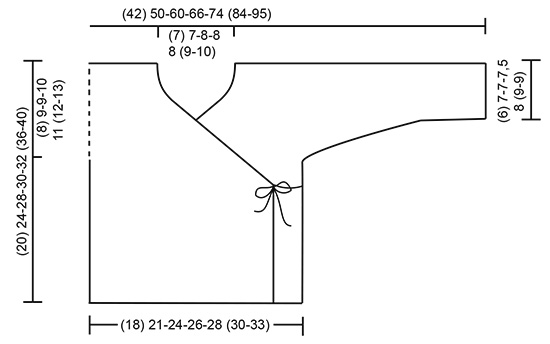
INFORMATION FOR THE PATTERN: RIDGE/GARTER STITCH (worked back and forth): 1 ridge = Knit 2 rows. PATTERN: Jacket: See diagrams A.1 and A.2. Choose diagram for your size. Slippers: See diagrams A.3 and A.4. The diagrams show all the rows in the pattern seen from the right side. DECREASE TIP (for jacket): Decrease inside the 1 band stitch in garter stitch. All decreases are made from the right side! Decrease as follows after the 1 band stitch: Slip 1 stitch as if to knit, knit 1, pass the slipped stitch over. Decrease as follows before the 1 band stitch: Knit 2 together. ---------------------------------------------------------- JACKET: The piece is worked back and forth with circular needle. The body is worked first, then stitches are cast on for sleeves and the front and back pieces are finished separately. BODY: Cast on (111) 125-145-157-173 (181-205) stitches with circular needle size 3 mm and BabyMerino. Work as follows from the right side: Work (3) 2-4-2-2 (2-2) stitches GARTER STITCH – see description above – (= band), work A.1 (= 8 stitches) over the next (104) 120-136-152-168 (176-200) stitches (= (13) 15-17-19-21 (22-25) times in width), work A.2 (= 1 stitch) and finish with (3) 2-4-2-2 (2-2) stitches garter stitch. REMEMBER THE KNITTING TENSION! On the last row in A.1 adjust the number of stitches to (112) 124-146-158-172 (182-204) stitches. When A.1 has been worked 1 time in height, continue in garter stitch to finished length. The piece measures approx. (10) 12-16-16-16 (19-19) cm or (4") 4 ¾"-6 ¼"-6 ¼"-6 ¼" (7 ½"-7 ½"). Insert 1 marker (34) 37-44-48-52 (55-62) stitches in from each side. Allow the markers to follow your work onwards, they mark the front and back pieces = (44) 50-58-62-68 (72-80) stitches on back piece. READ THE WHOLE OF THE NEXT SECTION BEFORE CONTINUING! DECREASE FOR NECK INSIDE 1 BAND STITCH IN EACH SIDE OF THE PIECE AT THE SAME TIME AS THE PIECE IS DIVIDED AND STITCHES ARE CAST ON FOR SLEEVES. DECREASE MID FRONT AS FOLLOWS: When the piece measures (10) 12-16-16-17 (20-23) cm or (4") 4 ¾"-6 ¼"-6 ¼"-6 ¾" (8"-9") – adjust so that the next row is worked from the right side, decrease 1 stitch for the neck inside the 1 band stitch in each side of the piece (= 2 stitches decreased) – read DECREASE TIP. Decrease like this every 2nd row a total of (18) 18-22-24-26 (28-32) times, then every 4th row a total of 2 times. THE PIECE IS NOW DIVIDED AND STITCHES ARE CAST ON FOR THE SLEEVES AS FOLLOWS: RIGHT FRONT PIECE: When the piece measures (12) 15-19-20-21 (24-27) cm or (4 ¾") 6"-7 ½"-8"-8 ¼" (9 ½"-10 ⅝"), divide the piece at the 2 markers and the front and back pieces are finished separately. Adjust so that the next row is from the right side. Now work over all the stitches as far as the first marker (= right front piece). Place the remaining stitches on a thread. Cast on new stitches at the end of each row from the right side (= towards the side) for the sleeve as follows: Cast on (3) 4-6-6-6 (6-6) stitches a total of (4) 4-4-5-6 (7-8) times and then (16) 19-19-18-19 (23-26) stitches 1 time. When all the stitches are cast on for the sleeve and the decreases to neck are finished, there are (42) 52-63-70-79 (90-102) stitches on the needle for shoulder/sleeve. Work garter stitch until the piece measures (20) 24-28-30-32 (36-40) cm or (8") 9 ½"-11"-11 ¾"-10 ½" (14 ¼"-15 ¾"). Cast off. LEFT FRONT PIECE: Work over the last stitches which were placed on the thread, as far as the marker in the side. Work as for the right front piece, but in reverse. In other words, cast on stitches for the shoulder/sleeve at the end of each row from the wrong side. Continue to decrease inside the 1 band stitch at the end of each row from the right side as before (towards neck). BACK PIECE: = (44) 50-58-62-68 (72-80) stitches. Cast on new stitches at the end of each row in each side of the piece for the sleeves as follows: Cast on (3) 4-6-6-6 (6-6) stitches a total of (4) 4-4-5-6 (7-8) times and then (16) 19-19-18-19 (23-26) stitches 1 time = (100) 120-144-158-178 (202-228) stitches. When the piece measures (19) 23-27-29-31 (35-39) cm or (7 ½") 9"-10 ⅝"-11 ⅜"-12 ¼" (13 ¾"-15 ¼") cast off the middle (16) 16-18-18-20 (22-24) stitches for neck and each shoulder/sleeve is finished separately = (42) 52-63-70-79 (90-102) stitches left on each shoulder/sleeve. Work until the piece measures (20) 24-28-30-32 (36-40) cm or (8") 9 ½"-11"-11 ¾"-10 ½" (14 ¼"-15 ¾"), adjust to match the front pieces. Cast off. Work the other shoulder/sleeve in the same way. ASSEMBLY: Sew the seams on top of sleeve with grafting stitches from the right side. Sew the seams under the sleeves edge to edge in the outermost loop of the outermost stitch. CROCHET EDGE: Crochet with hook size 2.5 mm/ US c/2 and BabyMerino around the whole jacket opening (i.e. work from the right front piece, up along the jacket opening, around the neck and down the opening to the cast on edge on the left front piece) as follows: ROW 1: Work 1 slip stitch in the cast on edge on the right front piece, * 1 chain stitch, skip approx. 2 stitches/rows, 1 single crochet in the next stitch/row *, work from *-* to the corner where the decreases for neck started. Work the cord as follows: 1 single crochet in the tip, then work chain stitches for approx. 20-25 cm (8"-9¾"), turn and work back with 1 slip stitch in each chain stitch, then work 1 single crochet in the tip of the front piece again, continue the crochet edge around the jacket and neck to the tip on the left front piece, work cord as on the right front piece, continue working down the left front piece and finish with 1 slip stitch in the cast on edge. ROW 2: Work 1 chain stitch, 1 single crochet around the first chain stitch on the previous row, * 4 chain stitches, 1 double crochet in the 4th chain stitch from the hook, skip 1 single crochet + 1 chain stitch + 1 single crochet, work 1 single crochet around the next chain stitch *, work from *-* (make sure you work over the cords so the cords lie underneath), finish with 1 slip stitch in the last stitch. Work rows 1 and 2 in the same way around the bottom of both sleeves (the rounds start with 1 chain stitch and finish with 1 slip stitch in the first chain stitch). Work 2 loose cords: Work chain stitches for approx. 20-25 cm or (8"-9 ¾"), turn and work back with 1 slip stitch in each chain stitch. Cut the strand and work 1 more cord in the same way. Sew 1 cord to the inside of the right side in the side and 1 cord on the outside of the left side in the side. Make sure the two cords are at the same height on each side. ---------------------------------------------------------- SLIPPER: The slipper is worked back and forth with circular needle from mid back, top down; i.e. you first work the leg then the foot. Cast on (36) 38-40-44-48 (52-56) stitches with circular needle size 2.5 mm and BabyMerino. Work 1 stitch in GARTER STITCH – see above, A.3 (= 2 stitches) until 1 stitch remains, work 1 stitch in garter stitch. When A.3 has been worked 1 time in height, work the next row from the right side as follows: Work (2) 3-0-2-0 (2-0) stitches stocking stitch, A.4 (= 8 stitches) a total of (4) 4-5-5-6 (6-7) times in width and finish with (2) 3-0-2-0 (2-0) stitches stocking stitch. REMEMBER THE KNITTING TENSION! When A.4 has been completed 1 time in height continue with A.3 as follows: work 1 stitch in garter stitch, A.3 until 1 stitch remains, and work 1 stitch in garter stitch (the cord is later thread through this row of holes). When A.3 has been completed in height, work 2 RIDGES – see description above and decrease (6) 8-6-6-6- (10-14) stitches evenly on the last row from the right side = (30) 30-34-38-38 (42-42) stitches. Cut the strand. Now place the first (11) 11-12-13-13 (15-15) stitches and the last (11) 11-12-13-13 (15-15) stitches on two separate threads. The piece is now worked in garter stitch to finished length. Work (3) 3½-4-4½-5½ (6½-8) cm or (1 ⅛")1 ¼"-1 ½"-1 ¾"-2 ⅛" (2 ¼"-3 ⅛"), over the middle (8) 8-10-12-12 (12-12) stitches (= mid top of slipper), cut the strand. The next row is worked as follows from the right side: Work the stitches from the one thread in the one side back onto the double pointed needles, knit up (7) 9-10-11-13 (16-21) stitches in the outermost loop of the outermost stitch along the side of the middle piece, work the (8) 8-10-12-12 (12-12) stitches on the needle (= front), knit up (7) 9-10-11-13 (16-21) stitches in the outermost loop of the outermost stitch along the other side of the middle piece and work the stitches from the other thread back onto the double pointed needles = (44) 48-54-60-64 (74-84) stitches on the needles. THE PIECE IS NOW MEASURED FROM HERE! Work a total of (2½) 3-3-4-5 (5-5) cm or (1") 1 ⅛"-1 ⅛"- 1 ½"-2" (2"-2") garter stitch over all stitches AT THE SAME TIME when you have worked approx. (1) 1½-1½-2-3 (3-3) cm or (⅜") ½"-½"-¾"-1 ⅛" (1 ⅛"-1 ⅛"), insert 1 marker (22) 24-27-30-32 (37-42) stitches in (= middle of slipper). Now decrease every 2nd row to finished length as follows: Knit 1 stitch, knit the next 2 stitches together (= 1 stitch decreased), knit until there are 2 stitches left before the marker, knit together the next 4 stitches, 2 and 2 (= 2 stitches decreased), knit until there are 3 stitches left, knit the next 2 stitches together (= 1 stitch decreased), knit 1 stitch (= 4 stitches decreased every 2nd row) = approx. (32) 36-42-48-52 (62-72) stitches. Cast off and sew the seam under the foot and up mid back in the outermost loop of the outermost stitch so the seam is flat. Work 1 more slipper in the same way. CORD: Work a cord as follows: Work chain stitches with hook size 2.5 mm and BabyMerino for approx. 30-40 cm (11 ¾"-15 ¾"), turn and work back with 1 slip stitch in each chain stitch. Cut and fasten the strand. Thread the cord in and out of the row of holes on the slipper (start and finish mid front of slipper). ---------------------------------------------------------- For shorts see DROPS number 31-4. ---------------------------------------------------------- |
|||||||||||||||||||
Diagram explanations |
|||||||||||||||||||
|
|||||||||||||||||||
 |
|||||||||||||||||||
 |
|||||||||||||||||||
 |
|||||||||||||||||||
Have you finished this pattern?Tag your pictures with #dropspattern #odetajacket or submit them to the #dropsfan gallery. Do you need help with this pattern?You'll find 26 tutorial videos, a Comments/Questions area and more by visiting the pattern on garnstudio.com. © 1982-2026 DROPS Design A/S. We reserve all rights. This document, including all its sub-sections, has copyrights. Read more about what you can do with our patterns at the bottom of each pattern on our site. |
|||||||||||||||||||


With over 40 years in knitting and crochet design, DROPS Design offers one of the most extensive collections of free patterns on the internet - translated to 17 languages. As of today we count 325 catalogs and 12298 patterns - 12288 of which are translated into English (US/in).
We work hard to bring you the best knitting and crochet have to offer, inspiration and advice as well as great quality yarns at incredible prices! Would you like to use our patterns for other than personal use? You can read what you are allowed to do in the Copyright text at the bottom of all our patterns. Happy crafting!
Post a comment to pattern DROPS Baby 31-3
We would love to hear what you have to say about this pattern!
If you want to leave a question, please make sure you select the correct category in the form below, to speed up the answering process. Required fields are marked *.