
Popular categories
Looking for a yarn?


Comments / Questions (217)
![]() Tonya Zheltyakov wrote:
Tonya Zheltyakov wrote:
Hello! I have a question about the cord. When you put the cadrigan on baby and try to tie the cord, it goes around the body of baby. So shouldn't the cord be longer?
15.01.2020 - 09:38DROPS Design answered:
Dear Mrs Zheltyakov, the cords will not go around the body, after the 2 cords worked together with the edge, you will crochet 2 other cords that will be fixed on the sides, and then you will tie these cords together. Happy knitting!
15.01.2020 - 09:54
![]() Barbara wrote:
Barbara wrote:
Hi, can I knit this on 2 needles instead of circular, thanks
13.01.2020 - 19:38DROPS Design answered:
Dear Barbara, you can work the jacket and the slippers on straight needles since they are worked back and forth on the circular needle to get enough room for all stitches. read more here. Happy knitting!
14.01.2020 - 07:34
![]() Nasreen Syed wrote:
Nasreen Syed wrote:
So how many st have we decreased are we decreasing the same time as casting for the sleeves
06.01.2020 - 20:24DROPS Design answered:
Dear Mrs Syed, on front piece you cast on the new stitches for sleeve when piece measures 12 cm - you started to decrease for neck when piece measures 10 cm, and you decrease a total of 20 stitches, when all new stitches are cast on for sleeve + all decreases for neck are done, there are 42 stitches. Happy knitting!
07.01.2020 - 08:20
![]() Beatriz wrote:
Beatriz wrote:
Adorei as peças e não achei a receita podes mandar ! Abraços e obrigada
04.01.2020 - 13:11
![]() Joni Perlette wrote:
Joni Perlette wrote:
I would like to knot this in dk weight cotton. Is that possible? (3 mo size)
31.12.2019 - 02:38DROPS Design answered:
Dear Joni, these patterns are written to support DROPS yarns, so please understand that we cannot modify them for others. If you want to do it yourself, then compare the yarn qualities, knit some swatches and recalculate the stitch and row numbers. Happy Knitting!
31.12.2019 - 15:31
![]() Nasreen Syed wrote:
Nasreen Syed wrote:
Hi my question is that how many increases we are doing for the sleeves according to my understanding its 28 but total st are 42 but my decreases are not enough by the time i start with the increases that is 12 cm so confusing
24.12.2019 - 01:29
![]() Nasreen Syed wrote:
Nasreen Syed wrote:
So you are increasing 28 st for the sleeves but by the end of increasing for the sleeves my total number of decreases sre not completed as per the instructions And am i increasing after the 20 cm or after 12 cm please can you help its do very confusing it took me gor ever
24.12.2019 - 01:24DROPS Design answered:
Dear Mrs Syed, when piece measures 12 cm in the first size, you divide piece at the markers and work now each piece separately starting with right front piece casting on at the end of every RS row: 3 stitches a total of 4 times + 16 stitches one time = a total of 28 sts have been cast on. Happy knitting!
02.01.2020 - 10:42
![]() Carine wrote:
Carine wrote:
Bonjour je ne comprends pas si il faut 2 ou 4 cordons et comment le cache-cœur s’attache
24.11.2019 - 14:33DROPS Design answered:
Bonjour Carine, on réalise 2 cordons: 1 que l'on coud à l'intérieur du côté droit et 1 que l'on coud à l'extérieur du côté gauche (ils sont ensuite attachés avec ceux des pointes des devants). Bonnes finitions!
25.11.2019 - 09:57
![]() Bleue wrote:
Bleue wrote:
Hello, in the "body" section, there is "Work (3) 2-4-2-2 (2-2) stitches GARTER STITCH " in the begining; there isn't any garter stitch rows to be done. But in the picture, there are 3 garter stitch rows. Is it forgotten or we directly start with the garter sticthes and diagram?
01.11.2019 - 10:15DROPS Design answered:
Dear Blue, you will work these ridges when working the diagrams, ie you start and end the rows with (3) 2-4-2-2 (2-2) sts in garter stitch and in between you will work diagrams A.1 and A.2 (= 3 ridges, then lace pattern). Happy knitting!
05.11.2019 - 09:29
![]() Tuula wrote:
Tuula wrote:
Hei, tarvitsisin apua reunan virkkaukseen. Miten ensimmäinen rivi virkataan, en ymmärrä ohjeen tekstiä. Toiseen kerrokseen löysin ohjeen aiemmista kysymyksistä.
04.10.2019 - 13:29DROPS Design answered:
Hei, voit kysyä neuvoa paikan päällä lähimmässä DROPS liikkeessäsi, tai muussa lähelläsi sijaitsevassa käsityöliikkeessä.
18.12.2019 - 17:01
|
|||||||||||||||||||
Odeta#odetajacket |
|||||||||||||||||||
 |
 |
||||||||||||||||||
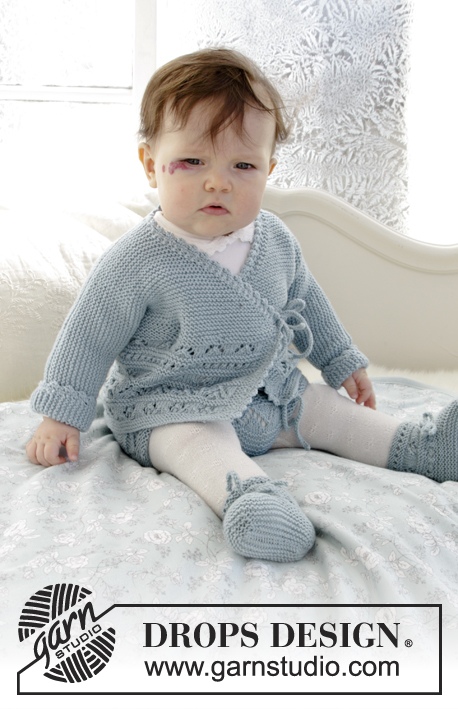
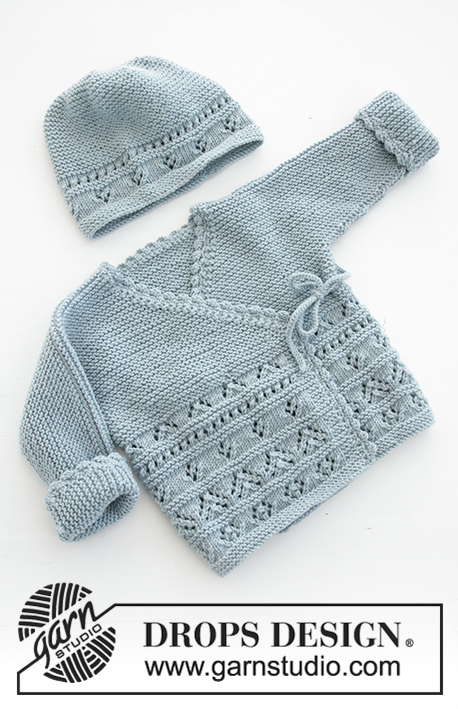
The set consists of: Knitted baby jacket and slippers with lace pattern and garter stitch. Sizes premature - 4 years. The set is worked in DROPS BabyMerino.
DROPS Baby 31-3 |
|||||||||||||||||||
|
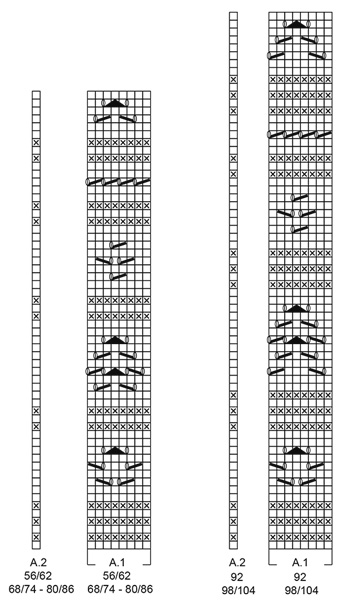
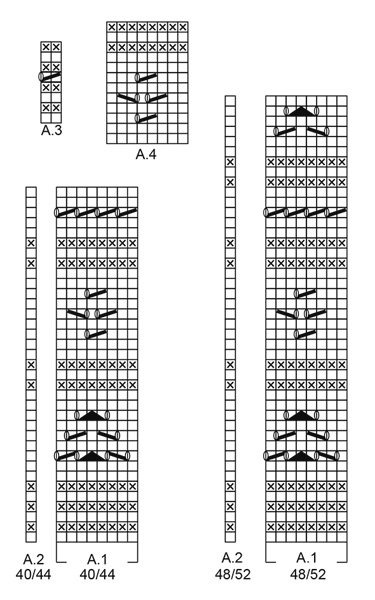
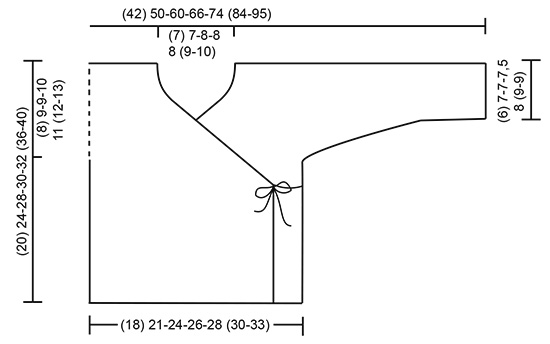
INFORMATION FOR THE PATTERN: RIDGE/GARTER STITCH (worked back and forth): 1 ridge = Knit 2 rows. PATTERN: Jacket: See diagrams A.1 and A.2. Choose diagram for your size. Slippers: See diagrams A.3 and A.4. The diagrams show all the rows in the pattern seen from the right side. DECREASE TIP (for jacket): Decrease inside the 1 band stitch in garter stitch. All decreases are made from the right side! Decrease as follows after the 1 band stitch: Slip 1 stitch as if to knit, knit 1, pass the slipped stitch over. Decrease as follows before the 1 band stitch: Knit 2 together. ---------------------------------------------------------- JACKET: The piece is worked back and forth with circular needle. The body is worked first, then stitches are cast on for sleeves and the front and back pieces are finished separately. BODY: Cast on (111) 125-145-157-173 (181-205) stitches with circular needle size 3 mm and BabyMerino. Work as follows from the right side: Work (3) 2-4-2-2 (2-2) stitches GARTER STITCH – see description above – (= band), work A.1 (= 8 stitches) over the next (104) 120-136-152-168 (176-200) stitches (= (13) 15-17-19-21 (22-25) times in width), work A.2 (= 1 stitch) and finish with (3) 2-4-2-2 (2-2) stitches garter stitch. REMEMBER THE KNITTING TENSION! On the last row in A.1 adjust the number of stitches to (112) 124-146-158-172 (182-204) stitches. When A.1 has been worked 1 time in height, continue in garter stitch to finished length. The piece measures approx. (10) 12-16-16-16 (19-19) cm or (4") 4 ¾"-6 ¼"-6 ¼"-6 ¼" (7 ½"-7 ½"). Insert 1 marker (34) 37-44-48-52 (55-62) stitches in from each side. Allow the markers to follow your work onwards, they mark the front and back pieces = (44) 50-58-62-68 (72-80) stitches on back piece. READ THE WHOLE OF THE NEXT SECTION BEFORE CONTINUING! DECREASE FOR NECK INSIDE 1 BAND STITCH IN EACH SIDE OF THE PIECE AT THE SAME TIME AS THE PIECE IS DIVIDED AND STITCHES ARE CAST ON FOR SLEEVES. DECREASE MID FRONT AS FOLLOWS: When the piece measures (10) 12-16-16-17 (20-23) cm or (4") 4 ¾"-6 ¼"-6 ¼"-6 ¾" (8"-9") – adjust so that the next row is worked from the right side, decrease 1 stitch for the neck inside the 1 band stitch in each side of the piece (= 2 stitches decreased) – read DECREASE TIP. Decrease like this every 2nd row a total of (18) 18-22-24-26 (28-32) times, then every 4th row a total of 2 times. THE PIECE IS NOW DIVIDED AND STITCHES ARE CAST ON FOR THE SLEEVES AS FOLLOWS: RIGHT FRONT PIECE: When the piece measures (12) 15-19-20-21 (24-27) cm or (4 ¾") 6"-7 ½"-8"-8 ¼" (9 ½"-10 ⅝"), divide the piece at the 2 markers and the front and back pieces are finished separately. Adjust so that the next row is from the right side. Now work over all the stitches as far as the first marker (= right front piece). Place the remaining stitches on a thread. Cast on new stitches at the end of each row from the right side (= towards the side) for the sleeve as follows: Cast on (3) 4-6-6-6 (6-6) stitches a total of (4) 4-4-5-6 (7-8) times and then (16) 19-19-18-19 (23-26) stitches 1 time. When all the stitches are cast on for the sleeve and the decreases to neck are finished, there are (42) 52-63-70-79 (90-102) stitches on the needle for shoulder/sleeve. Work garter stitch until the piece measures (20) 24-28-30-32 (36-40) cm or (8") 9 ½"-11"-11 ¾"-10 ½" (14 ¼"-15 ¾"). Cast off. LEFT FRONT PIECE: Work over the last stitches which were placed on the thread, as far as the marker in the side. Work as for the right front piece, but in reverse. In other words, cast on stitches for the shoulder/sleeve at the end of each row from the wrong side. Continue to decrease inside the 1 band stitch at the end of each row from the right side as before (towards neck). BACK PIECE: = (44) 50-58-62-68 (72-80) stitches. Cast on new stitches at the end of each row in each side of the piece for the sleeves as follows: Cast on (3) 4-6-6-6 (6-6) stitches a total of (4) 4-4-5-6 (7-8) times and then (16) 19-19-18-19 (23-26) stitches 1 time = (100) 120-144-158-178 (202-228) stitches. When the piece measures (19) 23-27-29-31 (35-39) cm or (7 ½") 9"-10 ⅝"-11 ⅜"-12 ¼" (13 ¾"-15 ¼") cast off the middle (16) 16-18-18-20 (22-24) stitches for neck and each shoulder/sleeve is finished separately = (42) 52-63-70-79 (90-102) stitches left on each shoulder/sleeve. Work until the piece measures (20) 24-28-30-32 (36-40) cm or (8") 9 ½"-11"-11 ¾"-10 ½" (14 ¼"-15 ¾"), adjust to match the front pieces. Cast off. Work the other shoulder/sleeve in the same way. ASSEMBLY: Sew the seams on top of sleeve with grafting stitches from the right side. Sew the seams under the sleeves edge to edge in the outermost loop of the outermost stitch. CROCHET EDGE: Crochet with hook size 2.5 mm/ US c/2 and BabyMerino around the whole jacket opening (i.e. work from the right front piece, up along the jacket opening, around the neck and down the opening to the cast on edge on the left front piece) as follows: ROW 1: Work 1 slip stitch in the cast on edge on the right front piece, * 1 chain stitch, skip approx. 2 stitches/rows, 1 single crochet in the next stitch/row *, work from *-* to the corner where the decreases for neck started. Work the cord as follows: 1 single crochet in the tip, then work chain stitches for approx. 20-25 cm (8"-9¾"), turn and work back with 1 slip stitch in each chain stitch, then work 1 single crochet in the tip of the front piece again, continue the crochet edge around the jacket and neck to the tip on the left front piece, work cord as on the right front piece, continue working down the left front piece and finish with 1 slip stitch in the cast on edge. ROW 2: Work 1 chain stitch, 1 single crochet around the first chain stitch on the previous row, * 4 chain stitches, 1 double crochet in the 4th chain stitch from the hook, skip 1 single crochet + 1 chain stitch + 1 single crochet, work 1 single crochet around the next chain stitch *, work from *-* (make sure you work over the cords so the cords lie underneath), finish with 1 slip stitch in the last stitch. Work rows 1 and 2 in the same way around the bottom of both sleeves (the rounds start with 1 chain stitch and finish with 1 slip stitch in the first chain stitch). Work 2 loose cords: Work chain stitches for approx. 20-25 cm or (8"-9 ¾"), turn and work back with 1 slip stitch in each chain stitch. Cut the strand and work 1 more cord in the same way. Sew 1 cord to the inside of the right side in the side and 1 cord on the outside of the left side in the side. Make sure the two cords are at the same height on each side. ---------------------------------------------------------- SLIPPER: The slipper is worked back and forth with circular needle from mid back, top down; i.e. you first work the leg then the foot. Cast on (36) 38-40-44-48 (52-56) stitches with circular needle size 2.5 mm and BabyMerino. Work 1 stitch in GARTER STITCH – see above, A.3 (= 2 stitches) until 1 stitch remains, work 1 stitch in garter stitch. When A.3 has been worked 1 time in height, work the next row from the right side as follows: Work (2) 3-0-2-0 (2-0) stitches stocking stitch, A.4 (= 8 stitches) a total of (4) 4-5-5-6 (6-7) times in width and finish with (2) 3-0-2-0 (2-0) stitches stocking stitch. REMEMBER THE KNITTING TENSION! When A.4 has been completed 1 time in height continue with A.3 as follows: work 1 stitch in garter stitch, A.3 until 1 stitch remains, and work 1 stitch in garter stitch (the cord is later thread through this row of holes). When A.3 has been completed in height, work 2 RIDGES – see description above and decrease (6) 8-6-6-6- (10-14) stitches evenly on the last row from the right side = (30) 30-34-38-38 (42-42) stitches. Cut the strand. Now place the first (11) 11-12-13-13 (15-15) stitches and the last (11) 11-12-13-13 (15-15) stitches on two separate threads. The piece is now worked in garter stitch to finished length. Work (3) 3½-4-4½-5½ (6½-8) cm or (1 ⅛")1 ¼"-1 ½"-1 ¾"-2 ⅛" (2 ¼"-3 ⅛"), over the middle (8) 8-10-12-12 (12-12) stitches (= mid top of slipper), cut the strand. The next row is worked as follows from the right side: Work the stitches from the one thread in the one side back onto the double pointed needles, knit up (7) 9-10-11-13 (16-21) stitches in the outermost loop of the outermost stitch along the side of the middle piece, work the (8) 8-10-12-12 (12-12) stitches on the needle (= front), knit up (7) 9-10-11-13 (16-21) stitches in the outermost loop of the outermost stitch along the other side of the middle piece and work the stitches from the other thread back onto the double pointed needles = (44) 48-54-60-64 (74-84) stitches on the needles. THE PIECE IS NOW MEASURED FROM HERE! Work a total of (2½) 3-3-4-5 (5-5) cm or (1") 1 ⅛"-1 ⅛"- 1 ½"-2" (2"-2") garter stitch over all stitches AT THE SAME TIME when you have worked approx. (1) 1½-1½-2-3 (3-3) cm or (⅜") ½"-½"-¾"-1 ⅛" (1 ⅛"-1 ⅛"), insert 1 marker (22) 24-27-30-32 (37-42) stitches in (= middle of slipper). Now decrease every 2nd row to finished length as follows: Knit 1 stitch, knit the next 2 stitches together (= 1 stitch decreased), knit until there are 2 stitches left before the marker, knit together the next 4 stitches, 2 and 2 (= 2 stitches decreased), knit until there are 3 stitches left, knit the next 2 stitches together (= 1 stitch decreased), knit 1 stitch (= 4 stitches decreased every 2nd row) = approx. (32) 36-42-48-52 (62-72) stitches. Cast off and sew the seam under the foot and up mid back in the outermost loop of the outermost stitch so the seam is flat. Work 1 more slipper in the same way. CORD: Work a cord as follows: Work chain stitches with hook size 2.5 mm and BabyMerino for approx. 30-40 cm (11 ¾"-15 ¾"), turn and work back with 1 slip stitch in each chain stitch. Cut and fasten the strand. Thread the cord in and out of the row of holes on the slipper (start and finish mid front of slipper). ---------------------------------------------------------- For shorts see DROPS number 31-4. ---------------------------------------------------------- |
|||||||||||||||||||
Diagram explanations |
|||||||||||||||||||
|
|||||||||||||||||||
 |
|||||||||||||||||||
 |
|||||||||||||||||||
 |
|||||||||||||||||||
Have you finished this pattern?Tag your pictures with #dropspattern #odetajacket or submit them to the #dropsfan gallery. Do you need help with this pattern?You'll find 26 tutorial videos, a Comments/Questions area and more by visiting the pattern on garnstudio.com. © 1982-2026 DROPS Design A/S. We reserve all rights. This document, including all its sub-sections, has copyrights. Read more about what you can do with our patterns at the bottom of each pattern on our site. |
|||||||||||||||||||


With over 40 years in knitting and crochet design, DROPS Design offers one of the most extensive collections of free patterns on the internet - translated to 17 languages. As of today we count 325 catalogs and 12298 patterns - 12288 of which are translated into English (US/in).
We work hard to bring you the best knitting and crochet have to offer, inspiration and advice as well as great quality yarns at incredible prices! Would you like to use our patterns for other than personal use? You can read what you are allowed to do in the Copyright text at the bottom of all our patterns. Happy crafting!
Post a comment to pattern DROPS Baby 31-3
We would love to hear what you have to say about this pattern!
If you want to leave a question, please make sure you select the correct category in the form below, to speed up the answering process. Required fields are marked *.