
Popular categories
Looking for a yarn?


Comments / Questions (34)
![]() Agnes Bartelds wrote:
Agnes Bartelds wrote:
Ik brei maat XL. Bij het lijf wordt er gezegd: breien tot een hoogte van 41 cm, maar als je bij 8 cm 4 steken moet minderen komt de hoogte hoger uit. Want eerst 12 cm dan 13 cm is al 25 cm en dan 3 x 8 cm =24 cm is samen al 49 cm. Op de tekening staat een hoogte van 74 cm. Hoe moet ik dit gaan toepassen?
27.02.2018 - 09:55DROPS Design answered:
Je begint met minderen vanaf een hoogte van 13 cm en dat is gemeten vanaf de onderkant. Als je dan 4 keer mindert in totaal met steeds 8 cm ertussen, zit je op ongeveer 37 cm (3x8 +13).
04.03.2018 - 19:38
![]() Martine Ligon wrote:
Martine Ligon wrote:
Bonjour. D'après le diagramme : 2 mailles ensembles = 1 diminution, 1 jeté = 1 augmentation. Donc j'arrive toujours au même nombre de mailles. Est-ce normal ? Ou peut-être ne pas tricoter le jeté ? Merci pour votre réponse.
26.02.2018 - 22:33DROPS Design answered:
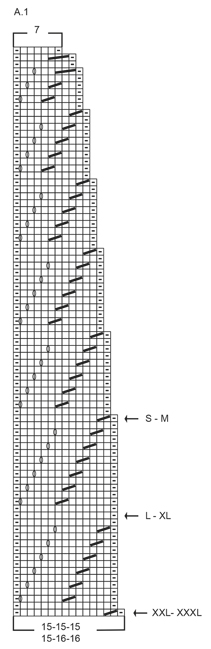
Bonjour Mme Ligon, tout à fait, dans le diagramme, on va tricoter le point ajouré (donc compensation des augmentations et des jetés), mais en même temps, on va diminuer sur certains tours en tricotant uniquement 2 m ens à l'end, sans faire de jeté (voir les 1ères diminutions aux flèches et/puis à la fin de chaque motif ajouré en hauteur). Ainsi, chaque A.1 se commence par 15-16 m (cf taille) et se termine avec seulement 7 m. Bon tricot!
27.02.2018 - 08:52
![]() Becque wrote:
Becque wrote:
Bonjour Vos modèles sont ils tous tricotés avec des aiguilles rondes? merci
21.01.2018 - 20:57DROPS Design answered:
Bonjour Mme Becque, certains de nos modèles, comme celui-ci, se tricotent en rond sur aiguille circulaire, vous pouvez lire ici comment adapter un modèle sur aiguilles droites. Il est parfois plus simple de bien suivre les explications, nos vidéos vous montrent comment apprendre à tricoter en rond sur aiguille circulaire. Bon tricot!
22.01.2018 - 10:23
![]() Françoise wrote:
Françoise wrote:
Dans la légende du diagramme, on parle de "glisser une maille à l'endroit, tricoter 1m endroit et passer la maille glissée pardessus la m tricotée" or je ne vois pas le signe correspondant à cela dans le diagramme. Est-ce une erreur ou un oubli ou.... Merci pour votre réponse.
16.01.2018 - 14:24DROPS Design answered:
Bonjour Françoise, il semble qu'effectivement cette diminution ne soit pas utilisée dans le diagramme, merci pour votre retour. Bon tricot!
16.01.2018 - 14:39
![]() PERNILLE wrote:
PERNILLE wrote:
Kan det passe, der er en fejl i den danske opskrift, sidst i afsnittet med ryg og forstykke, så der skal lukkes masker af i stedet for at tages ind?
06.01.2018 - 10:19DROPS Design answered:
Hej Pernille, det stemmer der skal lukkes af under hvert ärme. God fornöjelse!
11.01.2018 - 08:41
![]() Suzanne wrote:
Suzanne wrote:
Le dos diminuer 24m au 1er rang à intervalles réguliers est ce qu'on diminue toutes les 24m sur le même rang ouc'est à tous les 2 rang. J'attends votre réponse . Merci beaucoup bye Suzanne
18.12.2017 - 15:04DROPS Design answered:
Bonjour Suzanne, on diminue 24 m sur un même rang (= le 1er rang jersey sur l'endroit). Cliquez ici pour calculer comment placer ces diminutions. Bon tricot!
18.12.2017 - 15:19
![]() Paula wrote:
Paula wrote:
Hallo Ik probeer nogmaals dit patroonte printen maar het lukt me niet
08.09.2017 - 21:08DROPS Design answered:
Hallo Paula, Ik heb nogmaals geprobeerd om te printen en alle pagina's worden afgedrukt. Bij printopties moet pagina op 'alles' staan. Vannaf hier kan ik helaas niet kijken wat er precies aan de hand is waardoor het bij jou niet lukt. Misschien kun je iemand in de buurt om hulp vragen of iemand anders vragen om het af te drukken. Ik hoop dat het lukt!
13.09.2017 - 15:36
![]() Magali wrote:
Magali wrote:
I am thinking of knitting this sweater but in a longer version , more like a tunic , to wear over leggings .
29.08.2017 - 01:31
![]() Sandy Hostetter wrote:
Sandy Hostetter wrote:
There are no symbols for two of the instructions in the chart guide. Thank you.
23.07.2017 - 20:15DROPS Design answered:
Dear Sandy, You can always check the explanation of the symbols on the other English (UK) site. However if you still cannot see them here they are line by line (there are six symbols in th e pattern, and six line below. I hope this helps.: knit from the right side, purl from the wrong side purl from the right side, knit from the wrong side knit 2 together slip 1 stitch knitwise, knit 1 and pass slipped stitch over between 2 stitches make 1 yarn over knit 3 together
23.07.2017 - 22:09
![]() Sandy Hostetter wrote:
Sandy Hostetter wrote:
My diagram chart is not complete. I have two blank squares showing nothing. How do I proceed?
21.07.2017 - 19:49DROPS Design answered:
Dear Sandy, can you, please be more specific? You cannot see the whole diagram? or just part of it? it is missing something in specific rows? Since I do not see anything amiss in my screen, please give us more explanation, so we caould help you. Thank you.
23.07.2017 - 10:54
|
||||||||||||||||
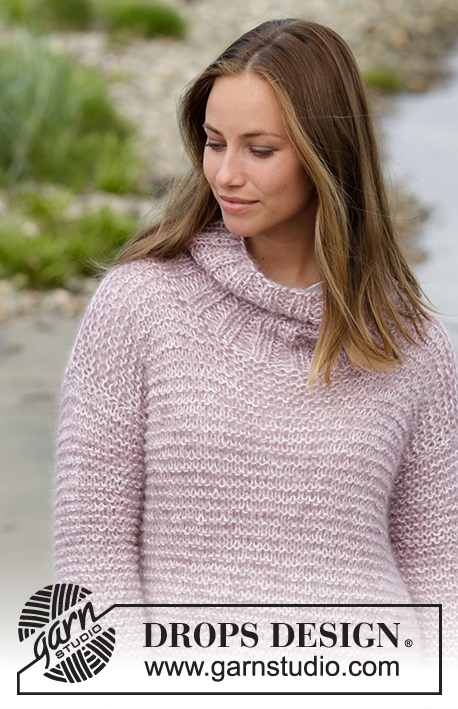
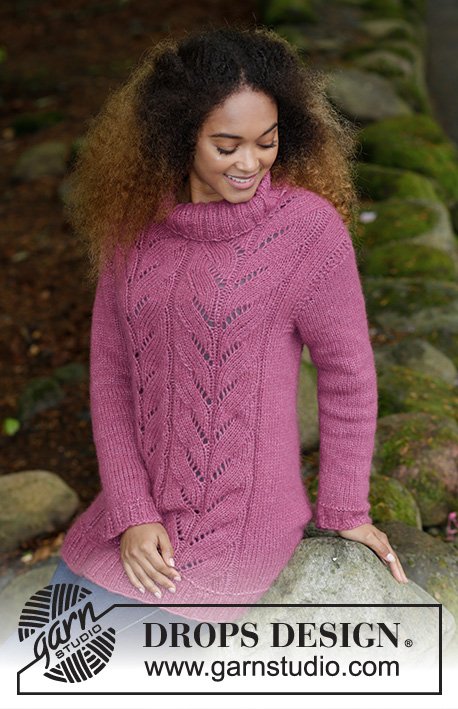
Winter Sea#winterseasweater |
||||||||||||||||
 |
 |
|||||||||||||||
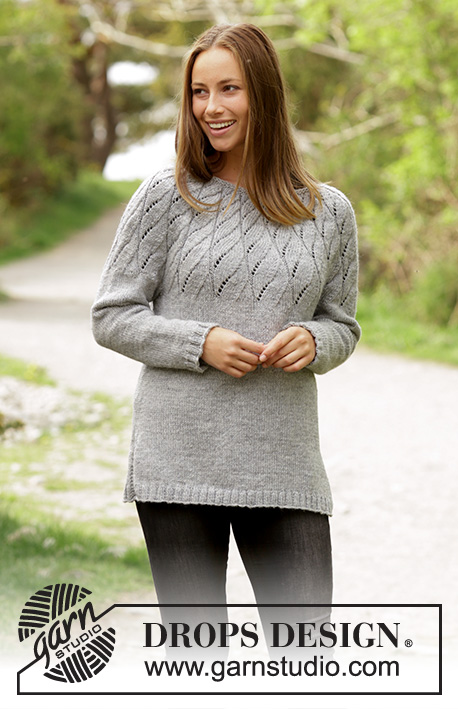
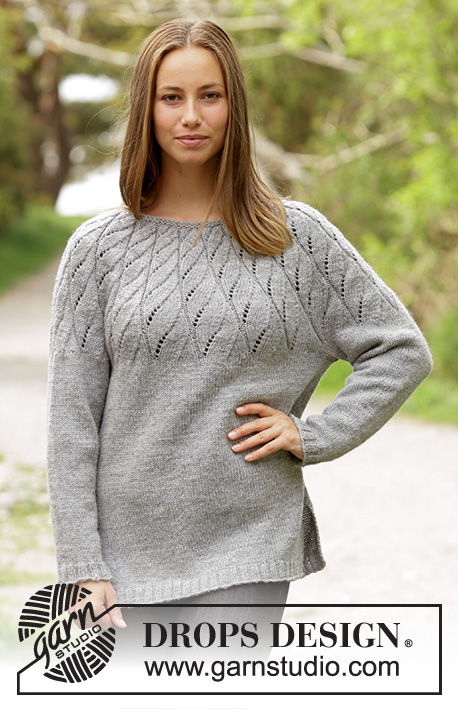
Knitted jumper with round yoke and lace pattern. Size: S - XXXL Piece is knitted in DROPS Karisma.
DROPS 179-6 |
||||||||||||||||
|
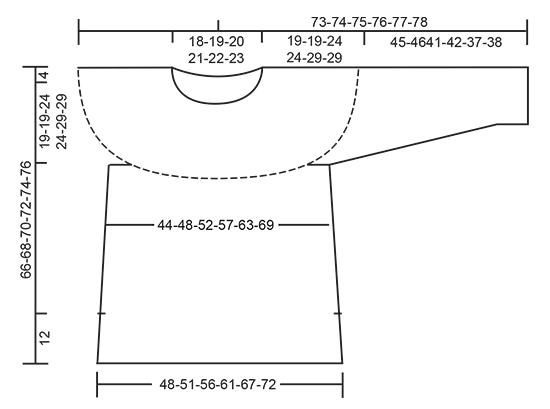
INFORMATION FOR PATTERN: GARTER STITCH (worked in the round): 1 ridge = 2 rounds. Knit 1 round and purl 1 round. PATTERN: See diagram A.1. Diagrams show all rows in pattern seen from the right side. See start arrow for size! DECREASE TIP: Begin 3 stitches before marker thread: Knit 2 stitches together, knit 2 (marker thread is between these stitches), slip 1 stitch knitwise, knit 1, pass slipped stitch over stitch worked. INCREASE TIP: Increase with 1 yarn over on each side of marker thread + 1 stitch. On next round knit yarn over twisted to avoid holes. ---------------------------------------------------------- JUMPER: Work from bottom up. There is a vent at the bottom of jumper, therefore work back piece and front piece back and forth separately, before slipping them on the same circular needle and continue in the round over all stitches. Then work sleeves, put all parts together and work round yoke. BACK PIECE: Cast on 120-132-140-152-168-184 stitches on circular needle size 3.5 mm / US 4 with Karisma. Purl 1 row from wrong side, then work as follows from right side: 3 stitches in GARTER STITCH - see explanation above - * knit 2/purl 2 *, repeat from *-* until 5 stitches remain, knit 2 and 3 stitches in garter stitch. Work rib for 3 cm / 1". Switch to circular needle size 4 mm / US 6, continue in stockinette stitch with 3 stitches in garter stitch in each side, on first row decrease 20-24-22-24-28-32 stitches evenly = 100-108-118-128-140-152 stitches. Work until piece measures 12 cm / 4¾", put piece aside and work front piece. FRONT PIECE: Cast on and work the same way as back piece. BODY: Slip the 2 parts together on same circular needle = 200-216-236-256-280-304 stitches. Continue in the round in stockinette stitch. Insert 1 marker thread in each side; 1 at the beginning of round and 1 after 100-108-118-128-140-152 stitches. When piece measures 13 cm / 5", decrease 1 stitch on each side of every marker thread - see explanation above (= 4 stitches decreased). Decrease like this every 8 cm / 3⅛" 4 times in total = 184-200-220-240-264-288 stitches. REMEMBER THE GAUGE! When piece measures 43-45-42-44-41-43 cm / 17"-17¾"-16½"-17¼"-16"-17", bind off 8-8-10-10-12-14 stitches in each side (= 4-4-5-5-6-7 stitches on each side of marker threads) = 168-184-200-220-240-260 stitches. Put piece aside and work the sleeves. SLEEVES: Work in the round on double pointed needles, switch to short circular needle when needed. Cast on 52-52-56-60-60-64 stitches on double pointed needles size 3.5 mm / US 4 with Karisma. Knit 1 round, then work rib = knit 2/purl 2. When piece measures 4 cm / 1½", switch to double pointed needles size 4 mm / US 6. Continue in stockinette stitch, on first round decrease 8-6-8-10-8-10 stitches evenly = 44-46-48-50-52-54 stitches. Insert 1 marker thread at beginning of round = mid under sleeve. Continue in stockinette stitch. When piece measures 6-6-10-10-6-6 cm / 2½"-2½"-4"-4"-2½"-2½", increase 1 stitch on each side of marker thread - READ INCREASE TIP. Increase every 3-2½-1½-1½-1½-1½ cm / 1⅛"-⅞"-½"-½"-½"-½" 12-15-18-19-20-21 times in total = 68-76-84-88-92-96 stitches. Continue until sleeve measures 45-46-41-42-37-38 cm / 17¾"-18"-16"-16½"-14½"-15". Now bind off 4-4-5-5-6-7 stitches on each side of marker thread = 60-68-74-78-80-82 stitches. Put piece aside and make another sleeve. YOKE: Slip all stitches on to same circular needle size 4 mm / US 6 = 288-320-348-376-400-424 stitches. Knit 1 round while decreasing 3-5-3-16-0-8 stitches evenly = 285-315-345-360-400-416 stitches. Then work A.1 over all stitches (= 19-21-23-24-25-26 repetitions in width). Continue pattern like this. Switch to a shorter circular needle when needed. When entire A.1 has been worked vertically, 133-147-161-168-175-182 stitches remain on round. Work 2 ridges in GARTER STITCH - see explanation above, on first ridge decrease 41-51-61-62-65-68 stitches evenly = 92-96-100-106-110-114 stitches. Then loosely bind off by knitting. ASSEMBLY: Sew the opening under the sleeves. |
||||||||||||||||
Diagram explanations |
||||||||||||||||
|
||||||||||||||||
 |
||||||||||||||||
 |
||||||||||||||||
Have you finished this pattern?Tag your pictures with #dropspattern #winterseasweater or submit them to the #dropsfan gallery. Do you need help with this pattern?You'll find 30 tutorial videos, a Comments/Questions area and more by visiting the pattern on garnstudio.com. © 1982-2026 DROPS Design A/S. We reserve all rights. This document, including all its sub-sections, has copyrights. Read more about what you can do with our patterns at the bottom of each pattern on our site. |
||||||||||||||||


With over 40 years in knitting and crochet design, DROPS Design offers one of the most extensive collections of free patterns on the internet - translated to 17 languages. As of today we count 324 catalogs and 12290 patterns - 12280 of which are translated into English (US/in).
We work hard to bring you the best knitting and crochet have to offer, inspiration and advice as well as great quality yarns at incredible prices! Would you like to use our patterns for other than personal use? You can read what you are allowed to do in the Copyright text at the bottom of all our patterns. Happy crafting!
Post a comment to pattern DROPS 179-6
We would love to hear what you have to say about this pattern!
If you want to leave a question, please make sure you select the correct category in the form below, to speed up the answering process. Required fields are marked *.