
Popular categories
Looking for a yarn?


Comments / Questions (47)
![]() Coutarel wrote:
Coutarel wrote:
En taille M/L pour la bordure en bas du top combien de fois faut il crocheter le motif ?
07.03.2016 - 08:44DROPS Design answered:
Bonjour Mme Coutarel, en fonction du nombre de mailles & de rangs que vous avez le long du bas du top, crochetez bien 1 B dans chaque B et 4 B autour des quadruples B des côtés, mais ajustez bien votre nombre de mailles pour qu'il soit multiple de 48 pour avoir suffisamment de mailles pour répéter le diagramme A.3. Bon crochet!
07.03.2016 - 10:48
![]() Coutarel wrote:
Coutarel wrote:
Ou ce trouvent les demies brides et picots ?
26.02.2016 - 14:37DROPS Design answered:
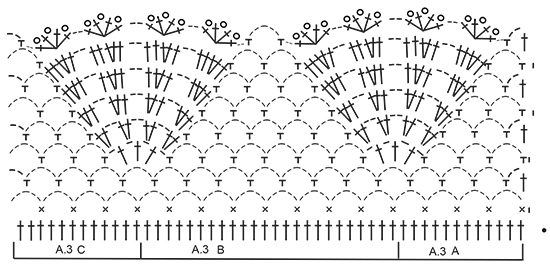
Bonjour Mme Coutarel, les picots (dernier symbole du diagramme) se font au dernier rang de A.3. Bon crochet!
02.03.2016 - 10:23
![]() Coutarel wrote:
Coutarel wrote:
Au 3 è me rang il faut faire 3 brides avec 3 picots c' est bien ça ?
26.02.2016 - 12:52DROPS Design answered:
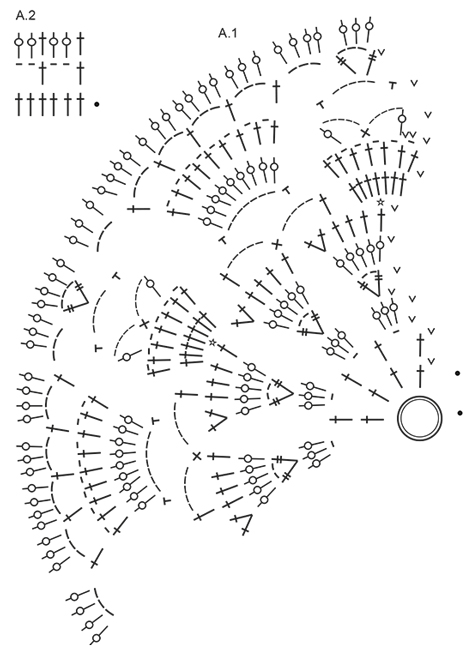
Bonjour Mme Courtarel, au 3ème rang de A.1, on a le 8ème symbole, soit 1 B autour de l'arceau, on va ainsi crocheter 3 B autour de chaque arceau d'1 ml du tour 2 - On trouve le symbole du picot (dernier symbole) au dernier rang de A.3 (1 rond (=1 picot) entre chaque B). Bon crochet!
26.02.2016 - 15:59
![]() Maria Bækkelund wrote:
Maria Bækkelund wrote:
Mangler der ikke mønster på side 5?
18.02.2016 - 15:15DROPS Design answered:
Hej Maria. Hvilken del af mönstret mener du?
24.02.2016 - 17:06
![]() Susanne Hill wrote:
Susanne Hill wrote:
Ein tolles shirt
17.12.2015 - 13:31
![]() Michelle Winther wrote:
Michelle Winther wrote:
Extra fina kanter.
13.12.2015 - 14:35
![]() Doris wrote:
Doris wrote:
Klasse Häkelshirt!
10.12.2015 - 13:55
|
|||||||||||||||||||||||||||||||||||||
Elvira#elviratop |
|||||||||||||||||||||||||||||||||||||
|
|
|||||||||||||||||||||||||||||||||||||
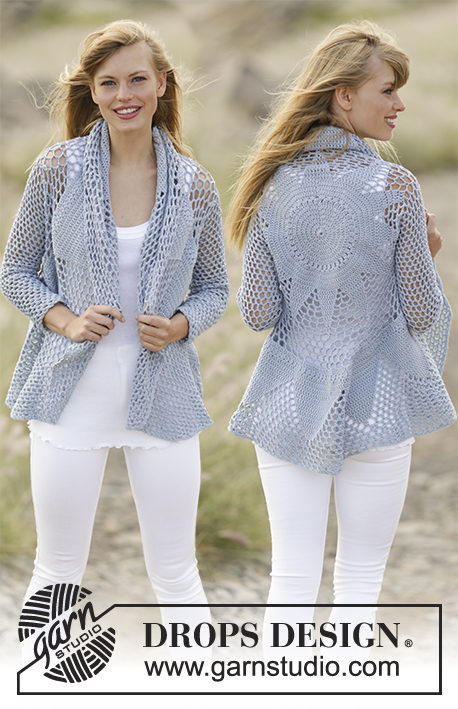
Crochet DROPS top with crochet squares in “Belle”. Size: S - XXL.
DROPS 168-11 |
|||||||||||||||||||||||||||||||||||||
|
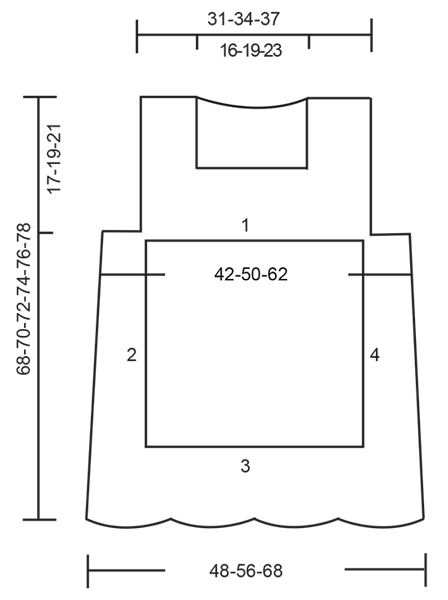
MAGIC CIRCLE: To avoid hole in the middle beg with this technique: Hold yarn end in the left hand and make a loop around left index finger (from left to right). Hold the loop with left thumb and index finger. Insert hook through loop, get the yarn from ball, pull yarn through loop, make 1 YO on hook and pull YO through st on hook = 1 sc, work ch 3, then work 11 dc around loop, finish with 1 sl st in third ch. Continue as explained in pattern – AT THE SAME TIME pull yarn end so that loop is tighten tog and the hole disappears. CROCHET INFO: Replace first sc on round with 1 ch. Finish round with one sl st in first ch. Replace first dc on round/row with 3 ch. Finish round with one sl st in third ch. Replace first tr on round with 4 ch. Finish round with one sl st in fourth ch. PATTERN: See diagrams A.1 to A.3. 4-TR: Make 4 YOs on hook, insert hook in first dc on row and pull yarn through first dc, * 1 YO on hook, pull yarn through the next 2 loops on hook *, repeat from *-* 4 more times = 1 st on hook. ---------------------------------------------------------- CROCHET TOP: Top is worked in 2 parts that are sewn tog in the sides and on shoulders, then work an edge at the bottom. FRONT PIECE: Work front piece in a circle, then as a square from mid front. Work a MAGIC CIRCLE on hook size 4 mm / G/6 with Belle – see explanation above = 12 dc around circle. Then work according to A.1, work A.1 3 times around the magic circle. NOTE: Sl sts show at beg of A.1 are worked at end of round. READ CROCHET INFO! REMEMBER THE CROCHET GAUGE! When A.1 has been worked 1 time vertically, there are 147 dc on circle. Continue to work as follows: ROUND 1: Work 1 dc in every dc AT THE SAME TIME inc 1 dc = 148 dc. ROUND 2: Work *1 sc in each of the first 8 dc, 1 hdc in each of the next 2 dc, 1 dc in each of the next 2 dc, 1 tr in each of the next 3 dc, 1 dtr in each of the next 3 dc, 1 4-tr – SEE EXPLANATION ABOVE, in next dc, ch 5, 1 4-tr in next dc, 1 dtr in each of the next 3 dc, 1 tr in each of the next 3 dc, 1 dc in each of the next 2 dc, 1 hdc in each of the next 2 dc, 1 sc in each of the next 7 dc *, repeat from *-* 3 more times. ROUND 3: Work 1 dc in every st, around ch-space in each corner work 3 dc + 3 ch + 3 dc = 172 dc (= 43 dc in each side). SIZE S/M: Finish square here. ROUND 4: Work 1 dc in every st, around ch-space in each corner work 3 dc + 3 ch + 3 dc = 196 dc (= 49 dc in each side). SIZE L/XL: Finish square here. ROUND 5: Work 1 dc in every st, around ch-space in each corner work 3 dc + 3 ch + 3 dc = 220 dc (= 55 dc in each side). SIZE XL/XXL: Finish square here. Square measures approx. 28-30-32 cm / 11"-11¾"-12½". Cut the yarn. Now work along side 2, 3 and 4 from crochet square (see chart). Beg in the second corner on square, work 3 dc around ch-space, work 1 dc in every dc until next corner, work 3 dc + 3 ch + 3 dc, work 1 dc in every dc until next corner, work 3 dc + 3 ch + 3 dc, work 1 dc in every dc until last corner, work 3 dc around ch-space. There are now 49-55-61 dc on each of the 3 sides. Work back and forth, now work according to A.2, finish with 1 dc in last dc before corner, in each of the two corners work 3 dc + 3 ch + 3 dc, work the new sts into A.2. Continue like this for approx. 7-10-15 cm / 2¾"-4"-6", piece now measures 42-50-62 cm / 16½"-19¾"-24"½ from side 2 to side 4, or adjust according to chest width. Then work a gusset in each side of top as follows: Beg along side 2 as follows (from RS). Work 1 sc in every dc until 52 dc remain, work 1 hdc in each of the next 8 dc, 1 dc in each of the next 8 dc, 1 tr in each of the next 12 dc, 1 dtr in each of the next 12 dc, 1 4-tr in each of the last 12 dc. Cut the yarn in size XS/S and M/L. SIZE XL/XXL: Turn and work 1 4-tr in every 4-tr, 1 dtr in every dtr, 1 tr in every tr, 1 dc in every dc, 1 hdc in every hdc and 1 sc in every sc. Cut the yarn. All sizes: Work a gusset the same way along side 4 (work from the top and down = from WS). Cut the yarn. Then work back and forth from side 1 on square as follows - from RS: Beg one row before square (i.e. in the first row worked over the other 3 sides), work 3 dc around the outermost dc in row, work 3 dc around corner on square, 1 dc in every dc, 3 dc around corner on square, and 3 dc around the outermost dc on next row = 55-61-67 dc. Then work back and forth according to A.2 (finish with 1 dc). When piece measures 7-9-11 cm / 2¾"-3½"-4½", work only over the first 13 dc on row (= left shoulder). Work A.2 (finish with 1 dc up towards neck) as before over these sts until piece measures 17-19-21 cm / 6¾"-7½"-8¼", fasten off. Now work over the last 13 dc on row (= right shoulder), work the same way as on left shoulder. 29-35-41 dc in the middle = neck. BACK PIECE: Work the same way as on front piece. When piece measures 15-17-19 cm / 6"-6¾"-7½", work only over the first 13 dc on row (= right shoulder). Work A.2 as before over these sts until piece measures 17-19-21 cm / 6¾"-7½"-8¼", fasten off. Now work over the last 13 dc on row (= left shoulder), work the same way as on right shoulder. 29-35-41 dc in the middle = neck. ASSEMBLY: Sew shoulder seams and sew side seams. CROCHET EDGE AT THE BOTTOM OF TOP: Work one sl st in one corner at the bottom of top, work 1 dc in every dc along bottom edge on top, around the 4-tr in the sides work 4 dc, AT THE SAME TIME adjust no of sts so that it is divisible by 48. Continue to work as follows: Work A.3A, repeat A.3B until 12 dc remain, work A.3C. Fasten off. CROCHET EDGE AROUND ARMHOLE: Beg between armhole and body. Work 1 sc,* skip approx. 2 cm / ¾", work 7 dc around next dc, skip approx. 2 cm / ¾", work 1 sc around next dc *, repeat from *-* and finish with one sl st at beg of round. Repeat around the other armhole. CROCHET EDGE AROUND NECK: Beg in the side of neck on back piece. Work 1 sc, * ch 3, skip approx. 1 cm / ⅜", work 1 sc *, repeat from *-* and finish with 1 sl st at beg of round. |
|||||||||||||||||||||||||||||||||||||
Diagram explanations |
|||||||||||||||||||||||||||||||||||||
|
|||||||||||||||||||||||||||||||||||||
 |
|||||||||||||||||||||||||||||||||||||
 |
|||||||||||||||||||||||||||||||||||||
 |
|||||||||||||||||||||||||||||||||||||
Have you finished this pattern?Tag your pictures with #dropspattern #elviratop or submit them to the #dropsfan gallery. Do you need help with this pattern?You'll find 12 tutorial videos, a Comments/Questions area and more by visiting the pattern on garnstudio.com. © 1982-2026 DROPS Design A/S. We reserve all rights. This document, including all its sub-sections, has copyrights. Read more about what you can do with our patterns at the bottom of each pattern on our site. |
|||||||||||||||||||||||||||||||||||||


With over 40 years in knitting and crochet design, DROPS Design offers one of the most extensive collections of free patterns on the internet - translated to 17 languages. As of today we count 324 catalogs and 12290 patterns - 12280 of which are translated into English (US/in).
We work hard to bring you the best knitting and crochet have to offer, inspiration and advice as well as great quality yarns at incredible prices! Would you like to use our patterns for other than personal use? You can read what you are allowed to do in the Copyright text at the bottom of all our patterns. Happy crafting!
Post a comment to pattern DROPS 168-11
We would love to hear what you have to say about this pattern!
If you want to leave a question, please make sure you select the correct category in the form below, to speed up the answering process. Required fields are marked *.