
Popular categories
Looking for a yarn?


|
|||||||||||||||||||||||||||||||||||||
Elvira |
|||||||||||||||||||||||||||||||||||||
|
|
|||||||||||||||||||||||||||||||||||||
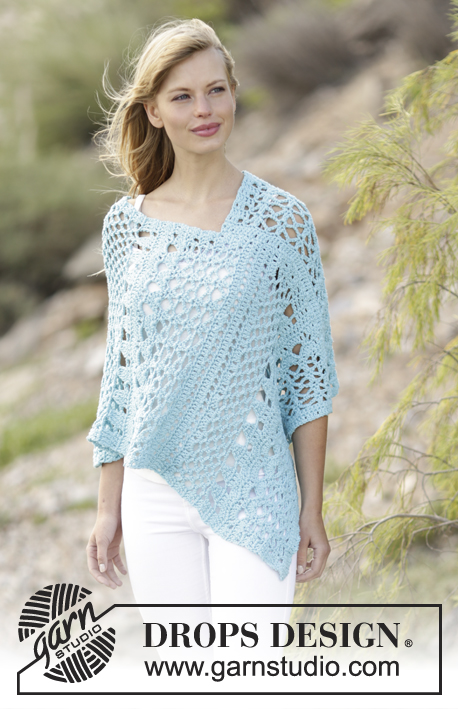
Crochet DROPS top with crochet squares in “Belle”. Size: S - XXL.
DROPS 168-11 |
|||||||||||||||||||||||||||||||||||||
|
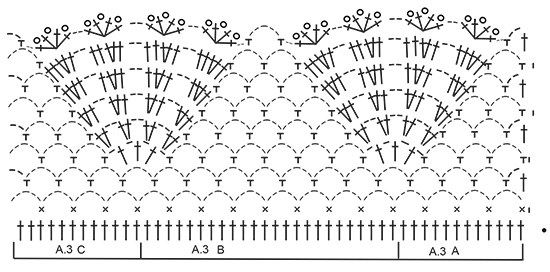
MAGIC CIRCLE: To avoid hole in the middle beg with this technique: Hold yarn end in the left hand and make a loop around left index finger (from left to right). Hold the loop with left thumb and index finger. Insert hook through loop, get the yarn from ball, pull yarn through loop, make 1 YO on hook and pull YO through st on hook = 1 dc, work 3 ch, then work 11 tr around loop, finish with 1 sl st in third ch. Continue as explained in pattern – AT THE SAME TIME pull yarn end so that loop is tighten tog and the hole disappears. CROCHET INFO: Replace first dc on round with 1 ch. Finish round with one sl st in first ch. Replace first tr on round/row with 3 ch. Finish round with one sl st in third ch. Replace first dtr on round with 4 ch. Finish round with one sl st in fourth ch. PATTERN: See diagrams A.1 to A.3. 4-DTR: Make 4 YOs on hook, insert hook in first tr on row and pull yarn through first tr, * 1 YO on hook, pull yarn through the next 2 loops on hook *, repeat from *-* 4 more times = 1 st on hook. ---------------------------------------------------------- CROCHET TOP: Top is worked in 2 parts that are sewn tog in the sides and on shoulders, then work an edge at the bottom. FRONT PIECE: Work front piece in a circle, then as a square from mid front. Work a MAGIC CIRCLE on hook size 4 mm with Belle – see explanation above = 12 tr around circle. Then work according to A.1, work A.1 3 times around the magic circle. NOTE: Sl sts show at beg of A.1 are worked at end of round. READ CROCHET INFO! REMEMBER THE CROCHET TENSION! When A.1 has been worked 1 time vertically, there are 147 tr on circle. Continue to work as follows: ROUND 1: Work 1 tr in every tr AT THE SAME TIME inc 1 tr = 148 tr. ROUND 2: Work *1 dc in each of the first 8 tr, 1 htr in each of the next 2 tr, 1 tr in each of the next 2 tr, 1 dtr in each of the next 3 tr, 1 triple tr in each of the next 3 tr, 1 4-dtr – SEE EXPLANATION ABOVE, in next tr, 5 ch, 1 4-dtr in next tr, 1 triple tr in each of the next 3 tr, 1 dtr in each of the next 3 tr, 1 tr in each of the next 2 tr, 1 htr in each of the next 2 tr, 1 dc in each of the next 7 tr *, repeat from *-* 3 more times. ROUND 3: Work 1 tr in every st, around ch-space in each corner work 3 tr + 3 ch + 3 tr = 172 tr (= 43 tr in each side). SIZE S/M: Finish square here. ROUND 4: Work 1 tr in every st, around ch-space in each corner work 3 tr + 3 ch + 3 tr = 196 tr (= 49 tr in each side). SIZE L/XL: Finish square here. ROUND 5: Work 1 tr in every st, around ch-space in each corner work 3 tr + 3 ch + 3 tr = 220 tr (= 55 tr in each side). SIZE XL/XXL: Finish square here. Square measures approx. 28-30-32 cm. Cut the yarn. Now work along side 2, 3 and 4 from crochet square (see chart). Beg in the second corner on square, work 3 tr around ch-space, work 1 tr in every tr until next corner, work 3 tr + 3 ch + 3 tr, work 1 tr in every tr until next corner, work 3 tr + 3 ch + 3 tr, work 1 tr in every tr until last corner, work 3 tr around ch-space. There are now 49-55-61 tr on each of the 3 sides. Work back and forth, now work according to A.2, finish with 1 tr in last tr before corner, in each of the two corners work 3 tr + 3 ch + 3 tr, work the new sts into A.2. Continue like this for approx. 7-10-15 cm, piece now measures 42-50-62 cm from side 2 to side 4, or adjust according to chest width. Then work a gusset in each side of top as follows: Beg along side 2 as follows (from RS). Work 1 dc in every tr until 52 tr remain, work 1 htr in each of the next 8 tr, 1 tr in each of the next 8 tr, 1 dtr in each of the next 12 tr, 1 triple tr in each of the next 12 tr, 1 4-dtr in each of the last 12 tr. Cut the yarn in size XS/S and M/L. SIZE XL/XXL: Turn and work 1 4-dtr in every 4-dtr, 1 triple tr in every triple tr, 1 dtr in every dtr, 1 tr in every tr, 1 htr in every htr and 1 dc in every dc. Cut the yarn. All sizes: Work a gusset the same way along side 4 (work from the top and down = from WS). Cut the yarn. Then work back and forth from side 1 on square as follows - from RS: Beg one row before square (i.e. in the first row worked over the other 3 sides), work 3 tr around the outermost tr in row, work 3 tr around corner on square, 1 tr in every tr, 3 tr around corner on square, and 3 tr around the outermost tr on next row = 55-61-67 tr. Then work back and forth according to A.2 (finish with 1 tr). When piece measures 7-9-11 cm, work only over the first 13 tr on row (= left shoulder). Work A.2 (finish with 1 tr up towards neck) as before over these sts until piece measures 17-19-21 cm, fasten off. Now work over the last 13 tr on row (= right shoulder), work the same way as on left shoulder. 29-35-41 tr in the middle = neck. BACK PIECE: Work the same way as on front piece. When piece measures 15-17-19 cm, work only over the first 13 tr on row (= right shoulder). Work A.2 as before over these sts until piece measures 17-19-21 cm, fasten off. Now work over the last 13 tr on row (= left shoulder), work the same way as on right shoulder. 29-35-41 tr in the middle = neck. ASSEMBLY: Sew shoulder seams and sew side seams. CROCHET EDGE AT THE BOTTOM OF TOP: Work one sl st in one corner at the bottom of top, work 1 tr in every tr along bottom edge on top, around the 4-dtr in the sides work 4 tr, AT THE SAME TIME adjust no of sts so that it is divisible by 48. Continue to work as follows: Work A.3A, repeat A.3B until 12 tr remain, work A.3C. Fasten off. CROCHET EDGE AROUND ARMHOLE: Beg between armhole and body. Work 1 dc,* skip approx. 2 cm, work 7 tr around next tr, skip approx. 2 cm, work 1 dc around next tr *, repeat from *-* and finish with one sl st at beg of round. Repeat around the other armhole. CROCHET EDGE AROUND NECK: Beg in the side of neck on back piece. Work 1 dc, * 3 ch, skip approx. 1 cm, work 1 dc *, repeat from *-* and finish with 1 sl st at beg of round. |
|||||||||||||||||||||||||||||||||||||
Diagram explanations |
|||||||||||||||||||||||||||||||||||||
|
|||||||||||||||||||||||||||||||||||||

|
|||||||||||||||||||||||||||||||||||||
|
|||||||||||||||||||||||||||||||||||||

|
|||||||||||||||||||||||||||||||||||||
|
Have you made this or any other of our designs? Tag your pictures in social media with #dropsdesign so we can see them! Do you need help with this pattern?You'll find tutorial videos, a Comments/Questions area and more by visiting the pattern on garnstudio.com. © 1982-2024 DROPS Design A/S. We reserve all rights. This document, including all its sub-sections, has copyrights. Read more about what you can do with our patterns at the bottom of each pattern on our site. |
|||||||||||||||||||||||||||||||||||||


With over 40 years in knitting and crochet design, DROPS Design offers one of the most extensive collections of free patterns on the internet - translated to 17 languages. As of today we count 304 catalogues and 11422 patterns - 11422 of which are translated into English (UK/cm).
We work hard to bring you the best knitting and crochet have to offer, inspiration and advice as well as great quality yarns at incredible prices! Would you like to use our patterns for other than personal use? You can read what you are allowed to do in the Copyright text at the bottom of all our patterns. Happy crafting!
Comments / Questions (45)
Bonjour, je dois crocheter les goussets des côtés 2 et 4 mais je ne comprends pas. Je n'ai que 52 B de chaque côté alors qu'il faut apparemment le double de chaque côté... Audepary il y avait 43B comment avoir plus du double fe brides en longueur apres A2 alors qu'on n'a pas crocheté le côté 1 pour l'instant? Je suis perdue Merci pour vos explications
21.05.2023 - 11:09DROPS Design answered:
Bonjour Peggy, on crochète d'abord le long des 3 côtés: 2, 3 et 4, avec A.2 et en augmentant dans chaque coin, pendant 7 cm (en S/M), vous crochetez ensuite uniquement le côté 2 en ms jusqu'à ce qu'il reste 52 mailles et vous terminez comme indiqué, en S/M, vous aurez naturellement moins de mailles à crocheter avant les 52 dernières mailles que dans les autres tailles, adaptez le nombre de mailles en haut à partir de l'emmanchure vers le bas, et crochetez les 52 dernières mailles comme indiqué. Crochetez ensuite le côté-4 de la même façon, en commençant sur l'envers, en haut ôté emmanchure. Bon crochet!
22.05.2023 - 12:56I was confused as the directions under FRONT PIECE say to work \"A.1 3 times around the magic circle.\" However, then it says that \"once A1 has been worked once\" you\'re directed to follow the instructions for rounds 1-5, then cut the yarn. So, actually, you only work A1 once and not 3 times as indicted at the beginning? Thank you for the lovely pattern and all you do for the global knitting/crochet community!
17.05.2021 - 18:31DROPS Design answered:
Dear Katie, "A.1 3 times around the magic circle" means that you do the pattern repeats beside each other three times, Later "once A1 has been worked once" means once the rows/rounds of A.1 patterns are worked once. I hope this helps. Happy Crafting!
17.05.2021 - 22:05Hoi, hoe groot is de cirkel als je het schema hebt gehaakt? Dus als je de 147 stokjes hebt gehaakt? Mijn cirkel ziet er namelijk kleiner uit dan de foto. Bedankt, Jellie
07.07.2019 - 12:00DROPS Design answered:
Dag Jellie,
Helaas weet ik niet hoe groot die cirkel precies is, maar als de stekenverhouding in de breedte en de hoogte klopt, dan zou het goed moeten komen. Het beeld op de foto kan altijd wat vertekend zijn vergeleken met je eigen haakwerk.
08.07.2019 - 09:59Jeg har hæklet denne top med glæde. God vejledning og diagrammer. Og jeg er meget tilfreds med det færdige udseende. MEN - jeg har hæklet i det anbefalede garn BELLE og mine mål har passet til opskriften og alligevel har jeg brugt 1,5 nøgler mere end der er oplyst. Det er jeg meget overrasket over og håber i vil rette opskriften til for fremtidige kunder. Tak for en god hjemmeside, som jeg ofte bruger.
04.07.2019 - 22:07Toujours sur les gousets, doit on considérer les 3 ml de l'arceau du rang précédent comme des brides ? Merci
13.01.2019 - 22:55DROPS Design answered:
Bonjour Mme Decloux, je compterai 2 quadruple-brides dans l'arceau du bas: 1 dans la bride et 1 dans l'arceau de 3 ml, vous pouvez éventuellement compter 2 dans l'arceau, et/ou ajuster la bordure du bas pour qu'elle soit jolie et bien nette. Bon crochet!
14.01.2019 - 12:42Pour être sûre de bien comprendre concernant les goussets : les quadruple brides sont en bas du top des 2 côtés ? Merci
13.01.2019 - 22:40DROPS Design answered:
Bonjour Mme Decloux, tout à fait, ce rang est crocheté pour former la forme trapèze du bas du top, en commençant par des ms en haut du côté 2 (emmanchure) on termine par des quadruples brides en bas du top, et pour le côté 4, on commence sur l'envers par des quadruples brides pour terminer par des ms côté emmanchure. Bon crochet!
14.01.2019 - 12:38Hallo, ik ben een beginnend haker en heb een vraag over het begin van het patroon. Bij de uitleg van de symbolen staat: ‘stokje in stokje’ betekent dat dat het aangegeven symbool meteen na de magic loop bestaat uit twee toeren stokjes? Omdat er daarboven nog een keer stokje in stokje staat, betekent dat dan in totaal vier rijen stokjes? O ja, we haken helemaal rond toch? Dus je haakt de toer steeds drie keer toch op de sluitsteek na dan. Thx, het is een prachtig patroon!
25.07.2018 - 11:28DROPS Design answered:
Dag Rosemarijn, Stokje in stokje betekent dat je het stokje haakt in het stokje van de vorige toer. De stokjes van de eerste toer haak je om de lossenring. Je haakt de toer inderdaad helemaal in de rondte. Kijk bij 'INFORMATIE VOOR HET HAKEN' hoe je de toeren begint en eindigt.
06.08.2018 - 11:15Buongiorno, ho finito il diagramma A2 e devo lavorare un bordo ai due lati del top.Non capisco come continuare cioè devo lavorare il lato 2 ,taglio il filo e ripeto sul lato 4?
23.07.2018 - 16:21DROPS Design answered:
Buongiorno Benedetta. Sì esatto, lavora prima sul lato 2 come indicato e a seconda della taglia. Taglia il filo e ripete sul lato 4. Buon lavoro!
23.07.2018 - 16:59Hallo, ik ben een beginnend haker en heb een vraag over het begin van het patroon. Bij de uitleg van de symbolen staat: ‘stokje in stokje’ betekent dat dat het aangegeven symbool meteen na de magic loop bestaat uit twee toeren stokjes? Omdat er daarboven nog een keer stokje in stokje staat, betekent dat dan in totaal vier rijen stokjes? O ja, we haken helemaal rond toch? Dus je haakt de toer steeds drie keer toch op de sluitsteek na dan. Thx, het is een prachtig patroon!
23.07.2018 - 12:19DROPS Design answered:
Dag Rozemarijn, De stokjes op de eerste toer (dus de toer nadat je de lossenring hebt gemaakt) haak je inderdaad in de lossenlus. Daarna, als er stokje in stokje, haak je het stokje in het stokje van de vorige toer. Je haakt inderdaad in de rondte, dus je sluit steeds de toer (Zie hiervoor ook bij 'INFORMATIE VOOR HET HAKEN')
29.07.2018 - 10:55Nicole wrote:
Goedendag. Tot mijn eigen verbazing is het mij, als beginnend haakster, gelukt om de cirkel te maken. En er daarna een vierkant van te maken. Ik ga nu beginnen aan het haken van de 3 zijde. Daarna staat er: haak heen en weer. En moet ik aan A2 beginnen. Nu ben ik de weg kwijt. Op de foto kan ik ook niet goed zien wat ik nu moet doen. Is er een foto van het voorpand waarbij het in zijn geheel te zien is? Groeten, Nicole
15.04.2018 - 14:54DROPS Design answered:
Hallo Nicole, Nadat je de de eerste toer hebt gehaakt over de 3 zijden volgens de beschrijving, haak je volgens tepatroon A.2 over de 3 zijden (waarbij de eerste toer van A.2 dus al is gehaakt). In de beschrijving staat aangegeven hoe je de hoeken haakt. (Er is helaas geen foto van een 'los' voorpand.)
16.04.2018 - 09:15