How to read crochet diagrams

A crochet diagram consists of symbols, 1 symbol = 1 stitch (or a group of stitches) - the symbol definition explains what kind of stitch it is/how it is worked. The diagram shows all stitches seen from the right side (unless otherwise specified).

A typical crochet diagram looks like this:
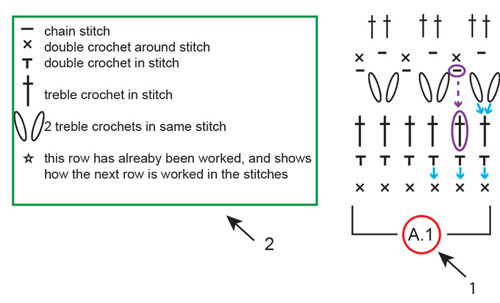
1: 1. A.1 is the name of the diagram and refers to the entire diagram - inside the square brackets. Everything inside the square brackets is 1 repeat of the diagram.
2: 2. This is the symbol definition, which explains how each symbol is worked.
Blue arrows: The symbol is worked in or around the stitch directly below itself in the diagram. Sometimes multiple stitches are worked in/around the same stitch.
Purple ovals and arrows: Not all stitches are worked in, for example: sometimes you work a chain stitch and the stitch below is skipped.

A crochet diagram is read opposite to how you would normally read: from right to left, from bottom to top. In other words: you start with the symbol in the bottom right corner, and work your way leftwards and upwards (see RED in diagram below).

If you are supposed to work several repeats of a diagram (ie: if it is to be repeated several times on the row/round), work until the end of the row of the diagram and begin again with the first symbol on the row.
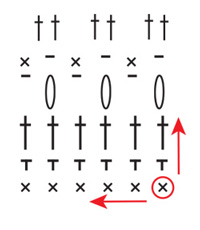
Back and forth:

When you’re working back and forth every other row is worked from the right side and every other row is worked from the wrong side. When working from the wrong side the diagram has to be read the opposite way: from left to right (see red arrow from right side, and blue arrow from wrong side below).

The row typically starts with a given number of chain stitches - the number equals the height of the following stitch, and are included to ensure you are starting from the top of the following stitch (see green circles below). If the chain stitches are included in the diagram (as in this example) all stitches are worked exactly as they appear. Sometimes the pattern includes CROCHET INFORMATION at the top of the instructions, which tells you how many chain stitches to work at the beginning of every row, and whether these chain stitches are replacing the first stitch on row (or in addition). If the chain stitches are NOT included in the diagram: follow instructions under CROCHET INFORMATION.

In the round:

When working in the round, all rounds are worked from the right side: from right to left (see red arrows below). How the round begins and ends are often displayed in a diagram of its own (see A.2 below - green square). Similar to when working back and forth, the round starts with a given number of chain stitches, equal to the height of the following stitch. At the end of the round you typically join the beginning and end of the round with a slip stitch in the last of the chain stitches at the beginning (see blue square below). In other words: the chain stitches in A.2 = the beginning of the round, while the slip stitch in A.2 = the end of the round.

If you are supposed to work several repeats of the diagram (A.1) (ie, it is repeated several times on the round) you work until the last stitch, and then begin again with the first stitch on the same row in A.1. NOTE: in this example it is ONLY A.1 that is repeated, A.2 shows how the beginning and end of the entire round is worked.

Several different diagrams worked consecutively on the row/round:

If you’re working several different diagrams after each other on the same row/round, work as follows: Work 1st row in diagram 1, continue with 1st row in diagram 2, then 1st row in diagram 3 etc. REMEMBER: if you’re working back and forth, the diagrams will have to be worked in the opposite order from the wrong side - ie: start with diagram 3, then diagram 2 and lastly diagram 1. They are also worked the opposite way, as usual.

Circular diagrams:

When working in a circle, ie you start in the middle and work your way outwards, this will often be displayed in a circular diagram. The diagram can either display the entire circle - in this case every symbol is worked exactly as it appears, or the diagram can display a fraction of a circle which is then repeated a given number of times to make a full circle.

Full circle:

In a full circle diagram you begin with the symbol in the middle of the circle: typically a small circle representing a given number of chain stitches, made into a ring with a slip stitch (see red circle below). Similar to when working in the round, the round begins with a given number of chain stitches (equal to the height of the next symbol) and ends with a slip stitch in the last of these chain stitches - ie: equivalent to A.2 in our previous example (see blue square) - NOTE: when the chain stitches are displayed in the diagram these do NOT replace any of the other symbols, and every symbol is worked exactly as they appear. If the chain stitches ARE replacing any stitch, this will have been removed from the diagram.

You work counter-clockwise: from right to left, 1 symbol after the other (see red arrow below). The stitches on the first round are typically worked AROUND the chain stitch ring, meaning you put the crochet hook THROUGH the middle of the chain stitch ring, pick up the strand and pull it back through the ring (working the stitch as usual) - You are not working the stitch IN any of the chain stitches, but rather AROUND the chain stitch ring. At the end of the round, join the beginning and end with a slip stitch, and start with the second round in the diagram: the second closest to the middle (se green arrow).

Fraction of a circle:

If the diagram is only a fraction of a circle, this is because the fraction is repeated a given number of times in the round, to make a full circle. You begin with the symbol at the bottom (see red circle) and work the same way as for FULL CIRCLE, but A.2 will be repeated a given number of times in the round. Similar to when working in the round there is typically a separate diagram illustrating how the round begins and ends (see A.1, blue square below). You begin with the diagram row closest to the chain stitch ring at the bottom, work the chain stitch(es) in A.1, then work the symbol(s) in A.2 (in the first round it is only 1 symbol) and repeat the symbol(s) in A.2 the number of times stated in the pattern.

At the end of the round you join the round with the slip stitch in A.1. When the first round is completed, continue with the next round: second closest to the chain stitch ring (see green arrow below).

Square diagrams / color diagrams:

Some crochet diagrams are displayed in a square diagram, where 1 square = 1 stitch. What type of stitch is worked will typically be explained in the pattern instructions, while the purpose of the diagram is to display what colors the stitches are worked in (see red circle below = symbol definition).

You work as explained above, depending on whether you work BACK AND FORTH, IN THE ROUND or a CIRCULAR DIAGRAM.

Comments (142)

Georgina Hamer wrote:

Thank you for the reply. My ambidextrous sister teases me with her right handed crocheting. I have tried and I believe it was amusing for her to watch me attempt to do so with my right hand. I attempting a pattern or two of the circular jackets and so far I am finding that maybe a tweak or two for the starting position to allow for the clockwise travel. It’s translating well

05.08.2024 - 19:41

Georgina wrote:

What is the recommendation for reading the crochet pattern diagrams if you are left handed? Clearly I will be working in opposition to the right to left, or anti-clockwise if in the round. Will the patterns allow for the same result if it is worked left to right? Thanks

01.08.2024 - 10:08

DROPS Design answered:

Hi Georgina, we have heard that most left handed are stille crocheting with the right hand :) If you can't do that, you can of course try to crochet from left to the right, we can't see why not - Enjoy :)

05.08.2024 - 13:42

Ayoub Goudini wrote:

I will share with you a book that will make you proud of yourself

17.04.2024 - 22:29

Judi Stuffins wrote:

Per my previous question and your reply (thank you). I am referring to 164-16.

18.02.2024 - 19:14

DROPS Design answered:

Dear Judi, you work A.2 once vertically (so only 1 repeat of all rows of A.2) but you work 6 repeats of A.2 on the round. This means that, on the first round of A.2, you will work the first row of the chart 6 times to work over all stitches (adding A.8 on the sides). You don't repeat A.2 over A.2 6 times vertically. This is shown in this lesson in the In the round section: "If you are supposed to work several repeats of the diagram (A.1) (ie, it is repeated several times on the round) you work until the last stitch, and then begin again with the first stitch on the same row in A.1. " Happy crochetting!

18.02.2024 - 19:22

Judi Stuffins wrote:

How do I work Row 1 of A2 after row 8 of A2? Row 1 doesn’t fit into the stitches of row 8 evenly. How can I do A2 six times if row 8 can’t go into row 1? Very confused. Thanks

18.02.2024 - 16:45

DROPS Design answered:

Dear Judi, this lesson is applied to all crochet patterns with charts. Could you indicate which pattern you are working so that we may better help you continue the pattern? Happy crochetting!

18.02.2024 - 19:10

Mathilde L wrote:

Som så mange andre har jeg problemer med at tyde et diagram, findes der ikke et alternativ hvor opskriften er nedskrevet? Jeg har forsøgt at læse instruktionerne til at tyde et diagram., men jeg bliver mere forvirret.

16.02.2024 - 10:40

DROPS Design answered:

Hei Mathilde. Vi prøver å tilfredstille alle våre brukere, noen foretrekker tekst andre kun diagram. Så du vil finne forskjellige oppskrifter, både tekst, diagram og noen med begge deler. Vi har dessverre ikke mulighet til å skrive tekst til våre oppskrifter med kun diagram, men får du problemer med et diagram, så send inn et spørsmål, så hjelper vi deg så godt vi kan. mvh DROPS Design

26.02.2024 - 08:07

Tammara wrote:

5 Must-Know Best Accident Attorneys Near Me-Practices You Need To Know For 2023 Best Accident Attorneys

09.02.2024 - 03:51

Jennifer Lackmann wrote:

Hallo liebes Drops-Team! Ich habe eine Frage zur Anleitung So Charming. In A.1B ist mitten durch das Rapport ein schwarzer Strich, der alle Reihen betrifft und oben eine Knick nach rechts macht. Was bedeutet dieser Strich? Viele Grüße Jenny

03.02.2024 - 15:13

DROPS Design answered:

Liebe Jenny, dieser Strich zeigt 1 Rapport in der Breite, dh die Maschen dazwischen gehören zu A.1B und sollen so wiederholt werden. Viel Spaß beim häkeln!

05.02.2024 - 09:49

Flo Pham wrote:

Merci beaucoup

18.01.2024 - 16:00

Andrea wrote:

On A.2 where it says (= 7 repetitions in width) does this mean “the next 7 rounds?” And when it says “AT THE SAME TIME on 1st round in A.2 dec 4 dc evenly = 112 dc.” Does this mean the last round should decrease to 112 dc?

04.01.2024 - 06:59

Susanne Munk wrote:

Hej. Hvorfor er et diagram nødvendigt ? Kan man ikke bare skrive hvordan maskerne skal hækles ? Jeg har rigtig mange problemer med at tyde et diagram, Vh. Susanne Munk

03.01.2024 - 07:50

DROPS Design answered:

Hei Susanne. Vi prøver å tilfredstille alle våre brukere, noen liker diagram andre ikke, noen liker kun tekst beskrivelse andre ikke. Mens noen liker begge deler. Har du problemer kan du klikke deg inn på TIPS & HJÆLP / DROPS Lektioner / Læs en opskrift. Kanskje det vil hjelpe deg å forstå et diagram bedre. mvh DROPS Design

08.01.2024 - 11:11

Donna Winsor wrote:

Hi - I’m having trouble reading a border that goes around a square. Inside the square are sc and dc but then there are one (or two) rows of sc and 3sc in the corners. Is there a symbol for 2sc in one stitch vs sc in one row and then sc in a second row? I can send a photo if it would help. Thanks

17.12.2023 - 03:17

DROPS Design answered:

Dear Donna, could you please indicate which pattern are you working, so that we may better help you? There is no option to send photos in your questions, but you can tell us the pattern number you are working and we can check it and advise you. Happy crochetting!

17.12.2023 - 17:30

Tymber wrote:

I've stared at this for over an hour and it still makes zero sense. Can you please include written instructions? I shouldn't need an engineering degree for a pattern. I've been crocheting for over 40 years and these "diagrams" look like alien language.

14.12.2023 - 18:35

DROPS Design answered:

Dear Tymber, could you please tell us which diagram you are working so that we can check together and try to help you. You can also ask your question under the questions section at the bottom of the pattern. Thanks for your comprehension.

15.12.2023 - 09:06

Debbie wrote:

Now work piece in the round without turning. Continue to work as follows: A.1, A.2 24-26-29-32-36-39 times in total in width, finish with A.3. This whole section starting with the words above ( now work piece ……) till the end , before sleeves starts. Could you please help as not understanding it especially 39 times in total in width

11.12.2023 - 14:43

Agnes wrote:

I can't find the answer on Google for what's in and what's around the stitch. Can you please explain the difference

03.10.2023 - 02:33

DROPS Design answered:

Dear Agnes, in this video we show how to crochet in or around a stitch, hope it can help you. Happy crocheting!

03.10.2023 - 08:20

Theresa Burnham wrote:

I am starting Drops Jewel Tide sweater, pattern r-808 Is there a written version of the charts as I have no clue what I am doing

16.08.2023 - 17:39

DROPS Design answered:

Dear Mrs Burnham, there are only diagrams to this pattern - follow this lesson to know how to read the diagrams, and then follow the order of the diagram in the pattern, for ex for right shoulder front, work from RS: A.1A (= 2 sts), repeat A.1B (6 sts) in width and end with A.1C (6 sts). From wrong side, work: A.1C, repeat A.1B reading from the left towards the right and end with A.1A. Happy crocheting!

17.08.2023 - 10:53

Eveyor wrote:

Qué significa la abreviación fo =

15.08.2023 - 21:45

DROPS Design answered:

Hola Eveyor, puedes indicarnos a qué patrón te refieres? Hay algunos diagramas antiguos que están en el idioma original noruego y pueden causar dudas.

20.08.2023 - 18:32

Alma Compernolle wrote:

Beste, Graag had ik een VIDEO ontvangen betreffende mijn aankoop van: Cathy bij DROPS Design. ttz. Gehaakte vest BIG MERINO - Drops 194-33. OOk bevestig ik dat bij mijn bestelling B666851 Datum: 3-8-2023 de naald 14 breed oog zonder punt - 1.90x60 mm ontbreekt!! Hopelijk nu een duidelijke uitleg? Deze naald is nergens te bespeuren en is ook niet geprikt op geen enkele manier! De rest van de bestelling is goed. Dank voor uw aandacht en begrip a.u.b.

08.08.2023 - 11:29

Ofra wrote:

The pattern that Jane was referring to (I think) isn't exactly entitled 'French Market Basket' but 'Market Day'. The number is 170-1 and the graph is ver complex... Being French I had to have a look at it! I was wondering what did it look like. 😁

02.08.2023 - 01:46

Rosebud wrote:

Did someone go to NASA to learn how to come up with this idea. I feel like I need a university degree to understand this type of pattern. Oh well! This is where I hit the delete button.

20.07.2023 - 08:16

Leave a comment or question to this lesson

Your email address will not be published. Required fields are marked *.