
Popular categories
Looking for a yarn?


Comments / Questions (112)
![]() Petra wrote:
Petra wrote:
Hallo, welche Nadelstärke wird für diese Jacke benötigt oder ist das egal? 80cm Rundnadeln gibt es ja mit verschiedenen Stärken. Danke im Voraus!
06.10.2018 - 10:49DROPS Design answered:
Liebe Petra, die benötigten Nadeln finden Sie unter der Kopfzeile, ie: Rundnadel Nr 8 und 7 - je 80 cm länge. Viel Spaß beim stricken!
08.10.2018 - 08:11
![]() Libby wrote:
Libby wrote:
I am coming close to the section to bind off for arm holes... for sizes S and M, so for me in the concept of row 1 is the first row I will bind off 3 Bind off 3 stitches 1 time - row 1 and row 2 Bind off 2 stitches 0 times and 1 stitch 1 (sm) and 2 (m) times... so to I got straight in to 1 stitch bind off on Row 2 since for bind off 2 is says 0 times? Thanks so much - hope I didn't confuse more with my logic
10.04.2018 - 19:34DROPS Design answered:
Dear Libby, your logic is perfect. Whenever the pattern says you have to bind off /decrease 0 stitches, you should just jump over to the next decrease / bind off. Happy Knitting!
11.04.2018 - 09:07
![]() Claudia wrote:
Claudia wrote:
Hallo Ich finde ESKIMO toll und würde gerne diese Jacke stricken! Nun habe ich überlegt, ob es möglich ist, diese zu filzen? Heisst, ich habe Grösse L, würde aber dann XXXL stricken und dann waschen und in Form ziehen. Hab ihr das schon mal ausprobiert? Liebe Grüsse und vielen Dank! Claudia
19.01.2018 - 10:15DROPS Design answered:
Liebe Claudia, diese Jacke wird nicht gefiltzt, dh Sie sollten dann die Anleitung total neu kalkulieren damit nach filzen alles stimmt. Viel Spaß beim stricken!
19.01.2018 - 11:04
![]() Pernille Hammerum wrote:
Pernille Hammerum wrote:
Jeg har forelsket mig i Big Merino. Jeg kan normalt ikke gå med uld, da det kradser som bare pokker. Kan jeg godt strikke denne jakke i Big Merino? Garnet er jo ret elastisk. Risikerer jeg at jakken kommer til at hænge og blive lang? Hvad skal jeg bruge af garn i forhold til original-opskrift. Tak 😊
05.01.2018 - 18:49DROPS Design answered:
Hei Pernille. Som du skriver er Big Merino elastisk og om man strikker for løst kan den strekke seg og bli lang. På denne modellen er det også strikket riller, da vil plagget også strekke seg noe. Med bruk av Big Merino er det viktig å ikke strikke for løst, bedre for stramt. Ved vask, husk å følge vaskeanvisningen og form plagget når det er vått. Du kan også bruke 2 tråder Air (også ull, men veldig lufting og mange syns ikke den klør). Sjekk ut andre kvaliteter vi har i garngruppe E (1 tråd til denne modellen) eller garngruppe C (2 tråder til denne modellen). God Fornøyelse!
10.01.2018 - 10:17
![]() Bettina wrote:
Bettina wrote:
Hallo, kurze Frage: kann ich die Jacke auch mit doppelten Faden Air stricken ? Spricht etwas dagegen?
05.10.2017 - 09:50DROPS Design answered:
Liebe Bettina, 2 Fäden Garngruppe C (Air) = 1 Faden Garngruppe E (Eskimo), so können sie auch 2 Fäden Air stricken, hier finden Sie noch weitere Auskünfte über Garnalternativen. Viel Spaß beim stricken!
05.10.2017 - 13:15
![]() Mette Bach Dyrhave wrote:
Mette Bach Dyrhave wrote:
Hej jeg ønsker at strikke denne lækre jakke i bigdeligt i stedet for ekskimo. i opskriften står der C+C som alternativ, betyder det at jeg skal strikke dobbelt så mange masker eller at jeg skal sno tåden
25.09.2017 - 08:28DROPS Design answered:
Hei Mette. DROPS Eskimo tilhører garngruppe E og Big Delight tilbører garngruppe C. Har du 2 tråder fra garngruppe C vil det får en samme tykkelse som 1 tråd i garngruppe E, altså: 1 tråd C + 1 tråd C (2 tråder C) = 1 tråd fra garngruppen E. Om du skal strikke jakken i 164-1 i Big Delight følger du oppskriften, men strikker med 2 tråder Big Delight istedenfor 1 tråd Eskimo, men HUSK å overholde strikkefastheten som er oppgitt i oppskriften. Og du må regne ut hvor mye garn du trenger, siden du skal strikke med dobbeltgarn. God Fornøyelse!
27.09.2017 - 08:46
![]() Ulrike wrote:
Ulrike wrote:
Hallo. Ich habe eine Frage zu den Ärmeln. Für Größe S muss ich laut Anleitung 6 x alle 7,5 cm zunehmen. Damit lande ich laut meiner Berechnung bei insgesamt 53 cm Länge. Ab 48 cm Länge soll jedoch schon abgekettet werden. Ist es also richtig, dass sich das abketten sowie die Zunahmen überschneiden? Für eine Antwort und damit ein wenig Sicherheit bei dem was ich hier tue wäre ich sehr dankbar. Und bisher bin ich super zurecht gekommen. Danke für die tolle Anleitung!
03.02.2017 - 13:49DROPS Design answered:
Liebe Ulrike, bei den Ärmeln werden Sie bei 8 cm, 15,5 cm, 23 cm, 30,5 cm, 38 cm und 45,5 cm (= 6 x jede 7,5 cm) zunehmen. Dann bis 48 cm stricken und dann wird wie beschrieben abgekettet. Viel Spaß beim stricken!
03.02.2017 - 14:56
![]() Emma wrote:
Emma wrote:
Bonjour, Je ne sais pas trop si j'apprécierai cette veste avec la laine Eskimo, aussi j'aimerai la faire avec la laine Andes, pensez-vous qu'elle aura la bonne tenue et rendra bien ?
11.01.2017 - 19:37DROPS Design answered:
Bonjour Emma, vous pouvez utiliser Andes qui est du même groupe qu'Eskimo. Cliquez ici pour en savoir plus sur les alternatives. Bon tricot!
12.01.2017 - 08:17
![]() CASTELAIN wrote:
CASTELAIN wrote:
Bonjour, je ne comprend pas comment tricoter la capuche , qui peut m'aider ? Merci d'avance Pascale
07.10.2016 - 14:25DROPS Design answered:
Bonjour Pascale, sur l'endroit, reprenez les 11-13 m (cf taille) en attente du devant droit, relever les mailles le long de l'encolure du devant droit, puis de l'encolure dos et de l'encolure devant gauche et reprenez les 11-13 m en attente du devant gauche, vous devez avoir approx. 46 à 58 m. Tricotez ensuite 1 rang end sur l'envers, en même temps, augmentez à intervalles réguliers pour avoir le bon nombre de mailles pour votre taille (n'augmentez pas dans les bordures de chaque côté). Bon tricot!
07.10.2016 - 15:57
![]() VUILLAUME Mireille wrote:
VUILLAUME Mireille wrote:
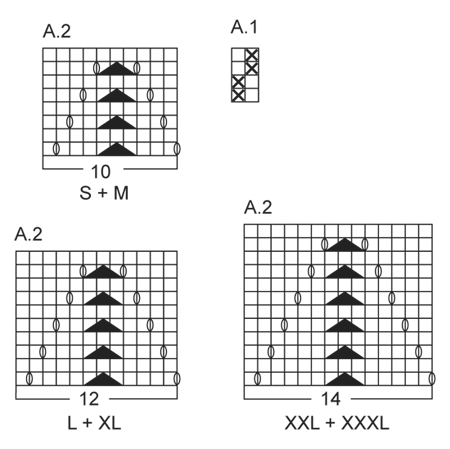
Bonjour, Pour tricoter le diagramme A2 taille M du modèle de veste drops 164-1 , sur le rang envers, doit on tricoter ou non les jetés du rang endroit. J'ai commencé mon tricot en tricotant ceux ci, mais je n'ai pas le "rendu" des trous des chaque côté comme sur le modèle vu en gros plan. Merci de vos explications.
07.06.2016 - 16:22DROPS Design answered:
Bonjour Mme Vuillaume, dans chaque diagramme, 1 case = 1 m x 1 rang, dans A.2, on tricote les jetés à l'env sur l'envers (= jersey). Bon tricot!
07.06.2016 - 17:03
|
|||||||||||||
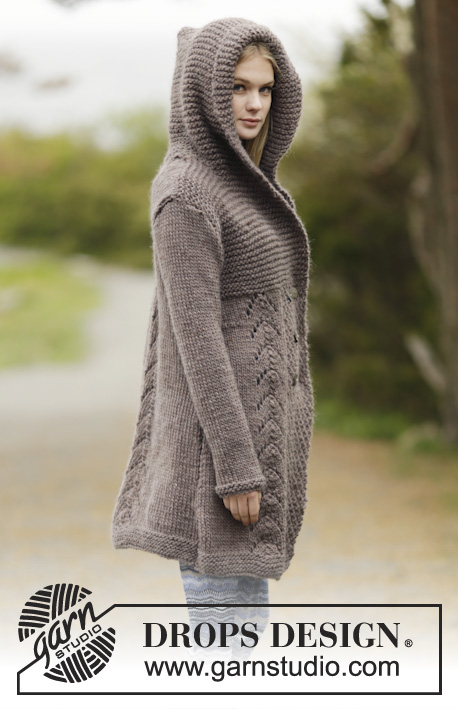
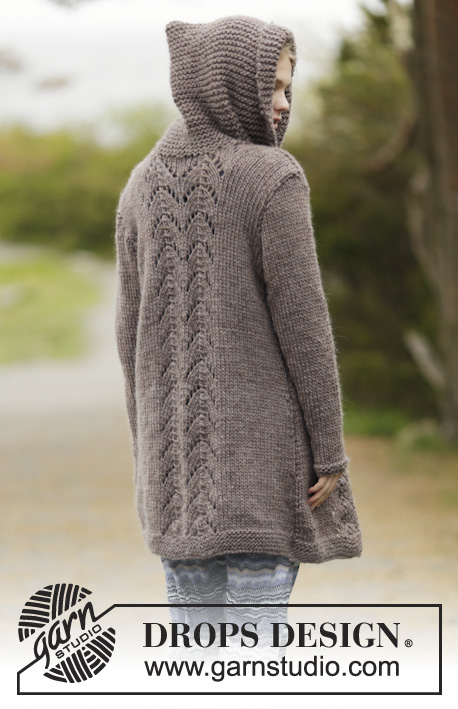
Into The Woods#intothewoodsjacket |
|||||||||||||
 |
 |
||||||||||||
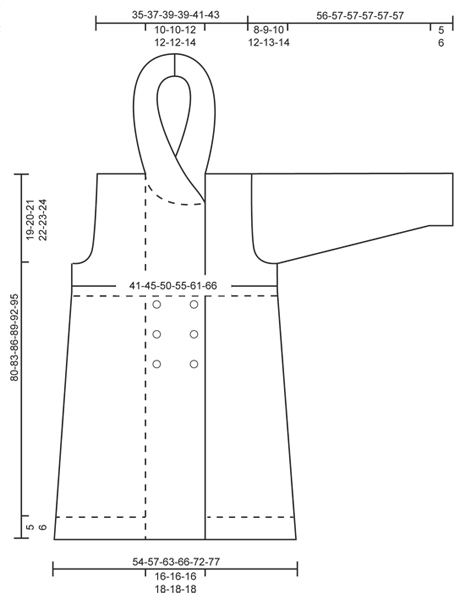
Knitted DROPS jacket in garter st, double seed st and lace pattern with hood in ”Snow”. Size: S - XXXL.
DROPS 164-1 |
|||||||||||||
|
GARTER ST (back and forth): K all rows. 1 ridge = K2 rows. PATTERN: See diagram A.1 and A.2 (choose diagram for correct size). The diagrams show all rows in pattern seen from RS. DECREASE TIP: All dec are done from RS! Dec inside 1 st K and 1 edge st in garter st. Dec as follows when 2 sts remain before 1 K st and 1 edge st in garter st: K 2 tog. Dec as follows after 1 sts in garter st and 1 sts: Slip 1 st as if to K, K 1, psso. INCREASE TIP: All inc are done from RS. Inc inside 1 edge st in garter st and 1 K by making 1 YO. On next row P YO twisted to avoid holes. MEASURING TIP 1 (applies for body and back piece): To get the correct proportions on the jacket make all length measurements when work lies flat. Because of the weight of the yarn and the garter sts on the yoke the work will stretch approx. 10 cm / 4" in total length to what is shown on the schematic drawing. MEASURING TIP 2 (applies for sleeves): Because of the weight of the yarn make all length measurements while holding the piece up. BUTTONHOLES: Dec for 6 buttonholes on right front piece (from RS): Work 4 sts, bind off 2 sts for button hole, work 6-6-6-8-8-8 sts, cast of the next 2 sts for buttonhole = 2 buttonholes on same row (4 sts remain on band). On next row cast on 2 new sts over the bind off sts. Dec for buttonholes when piece measures: SIZE S: 36, 45, 54 cm / 14¼", 17¾", 21¼" SIZE M: 38, 47, 56 cm / 15", 18½", 22" SIZE L: 40, 49, 58 cm / 15¾", 19¼", 22¾" SIZE XL: 42, 51, 60 cm / 16½", 20", 23½" SIZE XXL: 44, 53, 62 cm / 17¼", 21", 24½" SIZE XXXL: 46, 55, 64 cm / 18", 21½", 25¼" NOTE: Approx. 1 cm / ½" remains after last buttonhole before working in garter st over all sts. (on band). ---------------------------------------------------------- BACK PIECE: The piece is worked back and forth on circular needle because of no of sts. Cast on 61-65-71-75-81-87 sts (includes 1 edge st in each side) on circular needle size 7 mm / US 10.75 with Snow. Work in GARTER ST - see explanation above, for 5-5-5-6-6-6 cm / 2"-2"-2"-2⅜"-2⅜"-2⅜" (1st row = RS). Switch to circular needle size 8 mm / US 11 and work next row from RS as follows: 1 edge st in garter st, 20-22-23-25-26-29 sts in stockinette st, work pattern according to diagram A.2 2 times in total (choose diagram for correct size = 2 repetitions of 10-10-12-12-14-14 sts), work in stockinette st until 1 st remains on row and finish with 1 edge st in garter st. Continue like this with stockinette st, pattern and 1 edge st in garter st in each side. REMEMBER THE KNITTING GAUGE When piece measures 8-8-8-10-10-10 cm / 3"-3"-3"-4"-4"-4", dec 1 st in each side - READ DECREASE TIP (= 2 sts dec) and MEASURING TIP 1. Repeat dec in each side every 7-7-8-10-10-10 cm / 2¾"-2¾"-3"-4"-4"-4" a total of 7-7-7-6-6-6 times = 47-51-57-63-69-75 sts. Continue to work until piece measures 61-63-65-67-69-71 cm / 24"-24¾"-25½"-26⅜"-27⅛"-28". Now bind off for armholes at beg of every row in each side as follows: bind off 3 sts 1 time, 2 sts 0-0-1-2-3-4 times and 1 st 1-2-2-3-3-3 times = 39-41-43-43-45-47 sts. When piece measures 78-81-84-87-90-93 cm / 30¾"-32"-33"-34¼"-35½"-36½", bind off the middle 9-9-11-11-11-13 sts for neck and finish each shoulder separately. Continue to bind off 1 st on next row from neck = 14-15-15-15-16-16 sts remain on the shoulder. Loosely bind off all sts when piece measures 80-83-86-89-92-95 cm / 31½"-32¾"-33⅞"-35"-36¼"-37⅜". Repeat on the other shoulder. RIGHT FRONT PIECE: Worked back and forth on circular needle. Cast on 40-42-44-48-52-54 sts (includes 1 edge st in the side and 18-18-18-20-20-20 band sts towards mid front) on circular needle size 7 mm / US 10.75 with Snow. Work first row as follows from RS: Work A.1 over the first 18-18-18-20-20-20 sts (= band), then work in garter st over the remaining 22-24-26-28-32-34 sts. Continue with A.1 over band and garter st over the remaining sts for 5-5-5-6-6-6 cm / 2"-2"-2"-2⅜"-2⅜"-2⅜". Switch to circular needle size 8 mm / US 11 and work next row from RS as follows: A.1 over the first 18-18-18-20-20-20 sts as before, 2 sts in stockinette st, work A.2 (choose diagram for correct size = 1 repetition of 10-10-12-12-14-14 sts), work in stockinette st until 1 st remains on row and finish with 1 edge st in garter st. Continue like this with stockinette st, pattern and 1 edge st in garter st towards the side. When piece measures 8-8-8-10-10-10 cm / 3"-3"-3"-4"-4"-4", dec in the side as on back piece. Repeat dec 7-7-7-6-6-6 times in total = 33-35-37-42-46-48 sts. AT THE SAME TIME when piece measures 36-38-40-42-44-46 cm / 14¼"-15"-15¾"-16½"-17¼"-18", dec for BUTTONHOLES - see explanation above. When piece measures 55-57-59-61-63-65 cm / 21⅝"-22½"-23¼"-24"-24¾"-25½" - REMEMBER MEASURING TIP 1, work in garter st over all sts (also over the 18-18-18-20-20-20 band sts) until finished measurements. AT THE SAME TIME when piece measures 61-63-65-67-69-71 cm / 24"-24¾"-25½"-26⅜"-27⅛"-28", bind off for armhole at beg of every row from the side as on back piece = 29-30-30-32-34-34 sts on needle. When piece measures 74-77-80-82-85-88 cm / 29"-30½"-31½"-32¼"-33½"-34½", slip the outermost 11-11-11-12-13-13 sts towards mid front on 1 stitch holder for neck (work them before slipping them on stitch holder to avoid cutting the yarn). Continue to bind off for neck at beg of every row from neck as follows: bind off 2 sts 1 time and then 1 st 2-2-2-3-3-3 times in total = 14-15-15-15-16-16 sts remain on shoulder. Loosely bind off all sts when piece measures 80-83-86-89-92-95 cm / 31½"-32¾"-33⅞"-35"-36¼"-37⅜". LEFT FRONT PIECE: Cast on and work as right front piece but reversed. NOTE: Beg A.2 as follows from RS: Work 1 edge st in garter st, work in stockinette st until 29-29-31-33-35-35 sts remain on row, work pattern according to diagram A.2 (choose diagram for correct size = 1 repetition of 10-10-12-12-14-14 sts), work 1 st in stockinette st and continue A.1 over the remaining 18-18-18-20-20-20 sts (= band). Do not dec for buttonholes on left front piece. ASSEMBLY: Sew the shoulder seams. HOOD: Pick up approx. 46 to 58 sts around the neck (includes sts on stitch holders at the front) on circular needle size 8 mm / US 11 with Snow. K 1 row from WS while inc evenly to 66-68-70-72-74-76 sts - do not inc over bands. Then work in garter st back and forth over all sts until hood measures approx. 32-33-34-35-36-37 cm / 12½"-13½"-13⅜"-13¾"-14¼"-14½". Bind off. Fold the hood double and sew tog at the top with grafting/kitchener sts. SLEEVE: Worked back and forth on circular needle. Cast on 26-28-30-30-34-34 (includes 1 edge st in each side) on circular needle size 7 mm / US 10.75 with Snow. Work 2 ridges. Switch to circular needle size 8 mm / US 11 and work in stockinette st with 1 edge st in garter st in each side. When piece measures 8-8-8-8-10-12 cm / 3"-3"-3"-3"-4"-4¾", inc 1 st in each side - READ INCREASE TIP (= 2 sts inc) and MEASURING TIP 2. Repeat inc every 7½-6-6-5-4½-3½ cm / 2⅞"-2⅜"-2⅜"-2"-1¾"-1¼" 6-7-7-8-8-9 times in total = 38-42-44-46-50-52 sts. When piece measures 48-48-47-45-44-43 cm / 19"-19"-18½"-17¾"-17¼"-17" (NOTE: Shorter measurements in the larger sizes because of longer sleeve cap and wider shoulders), bind off for sleeve cap at beg of every row in each side as follows: bind off 3 sts 1 time, 2 sts 1-2-2-2-2-2 time and 1 st 2-2-3-3-3-3 times. Then bind off 2 sts at beg of every row in each side until piece measures approx. 55-56-56-56-56-56 cm / 21½"-22"-22"-22"-22"-22", then bind off 3 sts 1 time in each side. Bind off the remaining sts, piece measures approx. 56-57-57-57-57-57 cm / 22"-22½"-22½"-22½"-22½"-22½". Make another sleeve. ASSEMBLY: Sew in the sleeves inside 1 edge st. Sew underarm and side seams in one inside 1 edge st. Sew the buttons on to left front piece. |
|||||||||||||
Diagram explanations |
|||||||||||||
|
|||||||||||||
 |
|||||||||||||
 |
|||||||||||||
Have you finished this pattern?Tag your pictures with #dropspattern #intothewoodsjacket or submit them to the #dropsfan gallery. Do you need help with this pattern?You'll find 27 tutorial videos, a Comments/Questions area and more by visiting the pattern on garnstudio.com. © 1982-2026 DROPS Design A/S. We reserve all rights. This document, including all its sub-sections, has copyrights. Read more about what you can do with our patterns at the bottom of each pattern on our site. |
|||||||||||||


With over 40 years in knitting and crochet design, DROPS Design offers one of the most extensive collections of free patterns on the internet - translated to 17 languages. As of today we count 324 catalogs and 12290 patterns - 12280 of which are translated into English (US/in).
We work hard to bring you the best knitting and crochet have to offer, inspiration and advice as well as great quality yarns at incredible prices! Would you like to use our patterns for other than personal use? You can read what you are allowed to do in the Copyright text at the bottom of all our patterns. Happy crafting!
Post a comment to pattern DROPS 164-1
We would love to hear what you have to say about this pattern!
If you want to leave a question, please make sure you select the correct category in the form below, to speed up the answering process. Required fields are marked *.