
Popular categories
Looking for a yarn?


Comments / Questions (58)
Vaida wrote:
Hi, I am new to knitting and I have a problem with terms. I don't understand how I have to do this part "Round beg 10-10-8 (8-7) sts before mid back: cast off 21-21-17 (17-15) sts with K over K and P over P (= mid back)". Maybe you can explain me this part? Thank's
05.11.2015 - 17:32DROPS Design answered:
Dear Vaida, when you are to cast off, work previous row until 10-7 sts (see size) remain before end of round and cast off the next 21-15 sts (these sts are mid back on hat) and continue as stated. Happy knitting!
05.11.2015 - 18:57Maria wrote:
Thank you. It works well. Should I decrease this way (shown in the video tutorial) also at the earflap edges?
16.03.2015 - 06:50DROPS Design answered:
Dear Maria, that's correct you dec that way 1 st each side for the earflap. Happy knitting!
16.03.2015 - 09:57
![]() Ingrid Georgi wrote:
Ingrid Georgi wrote:
Nach - hier fehlt wohl, wonach das Abketten erfolgt, oder? 21-21-17 (17-15) M. re. über re. und li. über li. abk. (= Nacken)
09.12.2013 - 18:09DROPS Design answered:
Liebe Ingrid, das "nach" ist zuviel, die Maschen werden direkt an dieser Stelle abgekettet. Danke für dne Hinweis.
10.12.2013 - 08:30
![]() Kim wrote:
Kim wrote:
Bij de Nederlandse versie wordt als 'tip voor het meerderen' gezegd dat je een omslag moet maken. Dan krijg je echter twee omslagen achter elkaar (1 aan weerszijden van de markeerder). Ik heb even in de Engelse versie gekeken en daar staat iets wat me logischer in de oren klinkt: maak twee steken in een steek. Die methode heb ik dus gekozen . Misschien kunnen jullie dit aanpassen? Verder bedankt voor dit patroon, het is een leuk mutsje!
24.11.2013 - 09:18DROPS Design answered:
Hoi Kim. Je hebt gelijk. Ik heb net gekeken naar het originele Noorse patroon en dat is een fout in de vertaling. Het is aangepast. Bedankt voor het melden.
26.11.2013 - 15:35
![]() Sarah Biebas wrote:
Sarah Biebas wrote:
Hallo, ich verstehe nicht ganz, wie ich die Ohrenklappen arbeite, die Anleitung ist da irgendwie sehr verwirrend. Ich würde mich über schnelle Hilfe freuen.
04.11.2013 - 14:34DROPS Design answered:
Liebe Sarah, die Maschen für die Ohrenklappen werden zunächst auf Hilfsfäden gelegt und dann nach unten fertig gestrickt.
05.11.2013 - 09:10
![]() Francesca wrote:
Francesca wrote:
Grazie mille!
27.09.2013 - 16:09
![]() Francesca wrote:
Francesca wrote:
Non mi è chiaro il passaggio in cui si dice : "Inserire 5 segnapunti/fili nel lavoro con 3-4-5 (6-7) m tra ogni segno. Lavorare 1 giro a maglia rasata. Al giro successivo aumentare 1 m ad ogni lato del segnapunto/filo. Ripetere questi aumenti ogni 2 giri in totale 6 volte = 75-80-85 (90-95) m". Come devo suddividere gli aumenti e quanto ne devo fare? Seguendo le vostre indicazioni non riesco a far tornare il numero esatto di maglie (la misura che ho preso io è per i 4/5 anni. Grazie
26.09.2013 - 18:15DROPS Design answered:
Buonasera, penso che la taglia sia 3/4 anni, visto che è la più grande. Deve mettere 5 segnapunti in 35 m: lavora 7 m, segnapunti, lavora 7 m, segnapunti, e così via. Sul giro degli aumenti, deve aumentare 1 m a ogni lato di ogni segnapunti, quindi 2 aumenti per segnapunti, cioè 10 aumenti per giro. Ripetere gli aumenti a giri alterni per un totale di 6 v., cioè 60 aumenti. 35 m + 60 m = 95 m. Se non le tornano ancora i conti ci riscriva. Buon lavoro!!
26.09.2013 - 21:16
![]() Helen(caul) Breault And Family wrote:
Helen(caul) Breault And Family wrote:
How do i do the second earflap when i have already cast off the front.
22.02.2013 - 03:19
![]() Claudia wrote:
Claudia wrote:
Wenn ich beim Aufnehmen 2 M. in einer Masche stricke, dann sieht die neu aufgenommene Masche wie eine linke aus. Ist das hier so gewollt oder habe ich noch eine andere Möglichkeit, dass es wie eine rechte aussieht?
24.01.2013 - 18:56DROPS Design answered:
Liebe Claudia, die neu aufgenommene Masche soll nicht wie eine linke aussehen. Sie nehmen auf, indem Sie eine rechte Masche auf dem vorderen Maschenglied und dann eine re Masche aus dem hinteren Maschenglied stricken. Schauen Sie sich am besten unsere Videoanleitung dazu an. Der Link zum Video ist unter der Anleitung.
25.01.2013 - 09:09
![]() Deneuville wrote:
Deneuville wrote:
Il m'a été impossible d'imprimer les explications il manquait toujours une partie du texte du bonnet j'ai été obligé de le noter à la main
21.01.2013 - 19:45
|
|
Sky High#skyhighhat |
|
|
|
|
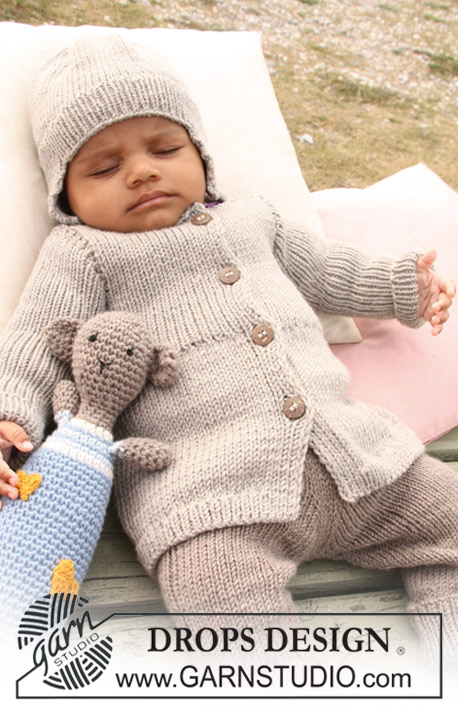
Knitted hat with rib and earflaps for baby and children in DROPS Merino Extra Fine
DROPS Baby 20-9 |
|
|
INCREASING TIP: Inc 1 st by working 2 sts in 1 st. ---------------------------------------------------------- HAT: Worked in the round, from top down. Cast on 8-10-13 (15-18) sts on double pointed needles size 4 mm / US 6 (leave a thread end to use when tightening the top tog afterwards). Work 1 round stockinette st, AT THE SAME TIME inc 7-10-12 (15-17) sts evenly – see INCREASING TIP! = 15-20-25 (30-35) sts. Insert 5 markers in piece with 3-4-5 (6-7) sts between each. Continue in stockinette st, AT THE SAME TIME on second round inc 1 st each side of all markers. Repeat the inc on every other round a total of 6 times = 75-80-85 (90-95) sts. Change to circular needle size 4 mm / US 6. REMEMBER THE GAUGE! Continue in stockinette st. When piece measures 11-12-13 (14-15) cm / 4⅜"-4¾"-5⅛" (5½"-6") inc 25-26-29 (30-31) sts evenly (inc between approx every 3rd st) = 100-106-114 (120-126) sts. Change to circular needle size 3.5 mm / US 4 and continue in rib K1/P1 on all sts. When rib measures 3 cm / 1⅛" bind off as follows - NOTE! Round beg 10-10-8 (8-7) sts before mid back: bind off 21-21-17 (17-15) sts with K over K and P over P (= mid back), slip the next 25-27-33 (35-39) sts on a stitch holder for earflap, bind off the next 29-31-31 (33-33) sts (= forehead). Now work earflap back and forth on the last 25-27-33 (35-39) sts as follows: continue in rib K1/P1, AT THE SAME TIME dec 1 st at beg of every row a total of 9-10-13 (14-16) times each side = 7 sts. On next row bind off remaining sts with K over K and P over P. Earflap measures approx 6-7-9 (10-11) cm / 2⅜"-2¾"-3½" (4"-4⅜"). Work the other earflap in the same way. Tighten the top of hat tog and fasten thread. TIE STRINGS: Cut 2 strands measuring 75 cm / 30" each and twist them hard. Pull string through bottom of earflap and fold it double to let it twist again. Tie a knot at the end of string. Repeat at the other earflap. |
|
Have you finished this pattern?Tag your pictures with #dropspattern #skyhighhat or submit them to the #dropsfan gallery. Do you need help with this pattern?You'll find 18 tutorial videos, a Comments/Questions area and more by visiting the pattern on garnstudio.com. © 1982-2026 DROPS Design A/S. We reserve all rights. This document, including all its sub-sections, has copyrights. Read more about what you can do with our patterns at the bottom of each pattern on our site. |


With over 40 years in knitting and crochet design, DROPS Design offers one of the most extensive collections of free patterns on the internet - translated to 17 languages. As of today we count 324 catalogs and 12290 patterns - 12280 of which are translated into English (US/in).
We work hard to bring you the best knitting and crochet have to offer, inspiration and advice as well as great quality yarns at incredible prices! Would you like to use our patterns for other than personal use? You can read what you are allowed to do in the Copyright text at the bottom of all our patterns. Happy crafting!
Post a comment to pattern DROPS Baby 20-9
We would love to hear what you have to say about this pattern!
If you want to leave a question, please make sure you select the correct category in the form below, to speed up the answering process. Required fields are marked *.