
Looking for a yarn?


Comments / Questions (100)
![]() Connie Kristholm wrote:
Connie Kristholm wrote:
Ja tak
14.06.2025 - 15:46
![]() Inger Lise Skogstad wrote:
Inger Lise Skogstad wrote:
"En kjempegod strikkebukse som man kan vokse i og som ikke strammer ved bruk,uansett kroppsform "
15.04.2025 - 14:13
![]() Astrid wrote:
Astrid wrote:
Guten Tag, ich habe schon etliche Male versucht die kostenlose Anleitung auszudrucken jedoch gelingt es mir nicht. Was mache ich falsch?
05.02.2025 - 11:39DROPS Design answered:
Liebe Astrid, die Anleitungen sollten Sie normaleweise ausdrucken; versuchen Sie mit einem anderen Browser / Gerät - seien Sie sicher daß alle auch aktualisert sind. Viel Spaß beim Stricken!
05.02.2025 - 13:30
![]() Jolanta wrote:
Jolanta wrote:
Proszę, co to jest marker?
23.01.2025 - 10:21DROPS Design answered:
Witaj Jolu, marker to jest taki pierścionek, który nakładasz na drut między oczkami lub w konkretne oczko, aby np. rozdzielić równo oczka, albo w miejscu, gdzie mamy dodawać/czy zamykać oczka. Typowe markery znajdziesz TUTAJ. Za marker może też służyć kawałek nitki, związany w pętelkę, aby nitka się nie wysuwała z robótki. Pozdrawiamy!
23.01.2025 - 14:21
![]() Brenda Arriaga wrote:
Brenda Arriaga wrote:
Disculpen los 18 cm seven de medir desde el resorte o después del resorte de la cintura ? Además cuáles son los tres puntos centrales ? Gracias estoy haciendo este pantalón de último momento 😀 para el bebé de mi hermana jeje ya nació ☺️
21.12.2024 - 04:48DROPS Design answered:
Hola Brenda, a no ser que se indique algo específico (como un marcapuntos que ponga medir desde aquí o en la propia frase, que ponga "Cuando la labor mida 18cm desde...") entonces suponemos que se mide desde el borde de montaje. El punto central en la parte delantera y trasera de los pantalones debería estar marcado con un marcapuntos, como se ha indicado previamente en las instrucciones. Entonces, cerrar los 3 puntos centrales significa cerrar este punto y el punto antes y después del punto con marcapuntos.
22.12.2024 - 19:21
![]() Jana wrote:
Jana wrote:
Hallo, da je für schnelle Antwort. D.h. wo befindet sich dann der „neue“ Rundenbeginn?
01.11.2024 - 05:46DROPS Design answered:
Liebe Jana, der Rundbeginn ist an der Seite von Anfang and und nicht an der hinteren Mitte. Viel Spaß beim Stricken!
01.11.2024 - 09:59
![]() Jana wrote:
Jana wrote:
Hallo, ich glaube ich bin zu 🤪 um diese Nötigung zu verstehen. Ich habe das Bündchen gestickt und auch die abnahmen gemacht. Jetzt soll ich Glatt mit je 15 M Bündchen stricken… wenn ich alles richtig gemacht habe, dann liegt aber (vorne und hinten) mein Markierungsfaden in den noch vorhandenen Bündchen
30.10.2024 - 18:46DROPS Design answered:
Liebe Jana, die Runden beginnen an der Seite, nicht an der hinteren Mitte, so sollen die Markierungen für vorne und hinten in der Mitte von den Glattrechts gestrickten Maschen liegen. Viel Spaß beim Stricken!
31.10.2024 - 09:14
![]() Michaela wrote:
Michaela wrote:
Hallo, ich stricke die Hose in 74/80. 100M/Nd. 3 für den Bund. Er würde mit mehr M zu weit werden. In der letzten Runde habe ich 14 M zugenommen, damit es der Gr. entspricht. Nun steht in der Anleitung, ich soll abnehmen. Irgendwie komme ich mit der Anleitung nicht zurecht, obwohl ich eine erfahrene Strickerin bin. Ich freue mich über eine Rückmeldung. Vielen Dank
29.09.2024 - 11:54DROPS Design answered:
Liebe Michaela, Größe 74/80 ist die 3. Größe so sollen Sie 104 Maschen nach den Abnahmen haben: 118 Maschen angeschlagen dann 6+8 Maschen abgenommen = 104 M übrig. Viel Spaß beim Stricken!
30.09.2024 - 09:17
![]() Regina Hapka wrote:
Regina Hapka wrote:
2. Frage: Ich hatte bei der Aufnahme der Maschen, es erst so verstanden, daß man bei den mittleren 3 M jeweils li. Und re. Je eine M aufnimmt. Nur dann komme ich nicht mit insgesamt 9x wiederholen nicht nur auf 114 M.
03.07.2024 - 17:21DROPS Design answered:
Siehe Antwort unten :)
04.07.2024 - 08:22
![]() Regina Hapka wrote:
Regina Hapka wrote:
Wenn ich jeweils in der Mitte der 3 M jede 2. R eine M aufnehmen soll, frag ich mich wo. Denn wenn ich eine ungerade Zahl habe, also 3, dann nehme ich die M li. Oder re. auf?
03.07.2024 - 17:16DROPS Design answered:
Liebe Frau Hapka, es wird jeweils 2 Maschen (1 beidseitig von den 3 mittleren Maschen vorne) insgesamt 9 Mal zugenommen = 18 + 96 Maschen davor = 114 Maschen. Die neuen Maschen stricken Sie glatt rechts (wie die mittleren Maschen vorne). Viel Spaß beim Stricken!
04.07.2024 - 08:21
|
|
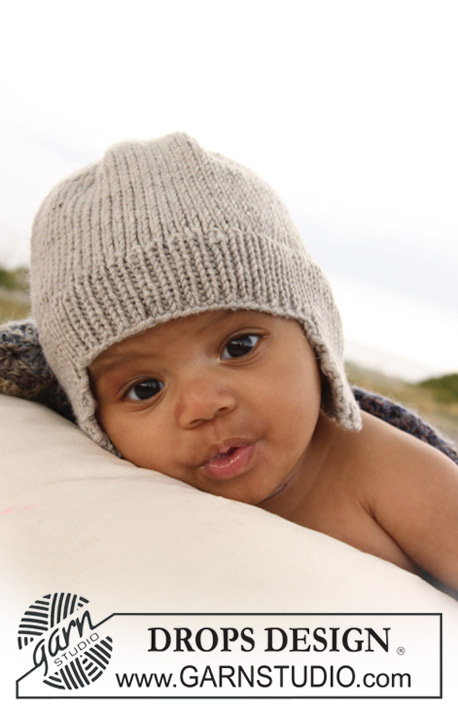
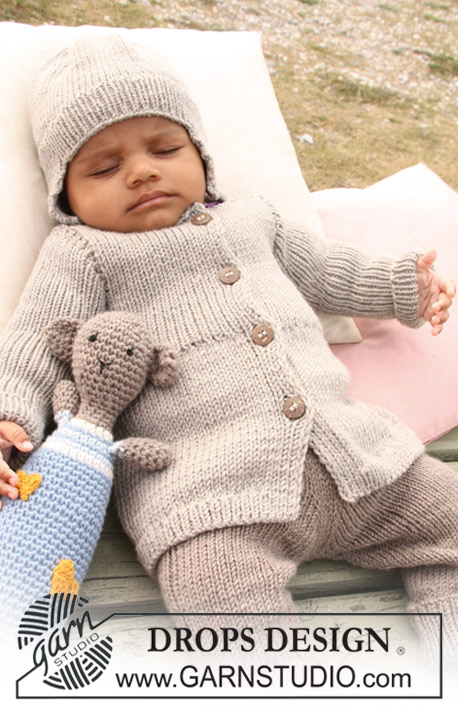
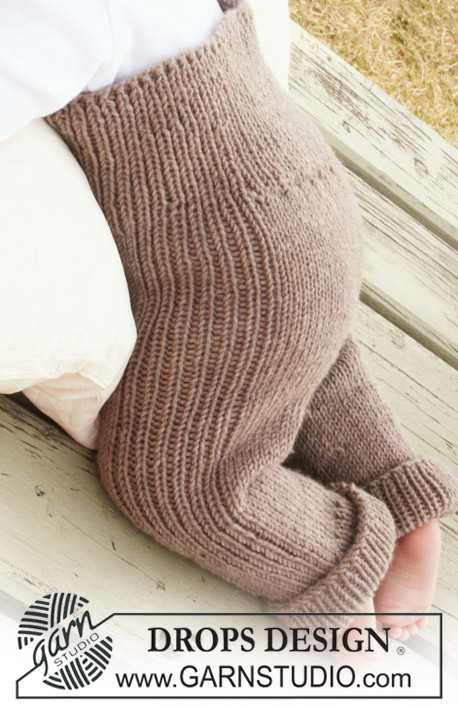
DROPS Baby 20-10 |
|
 |
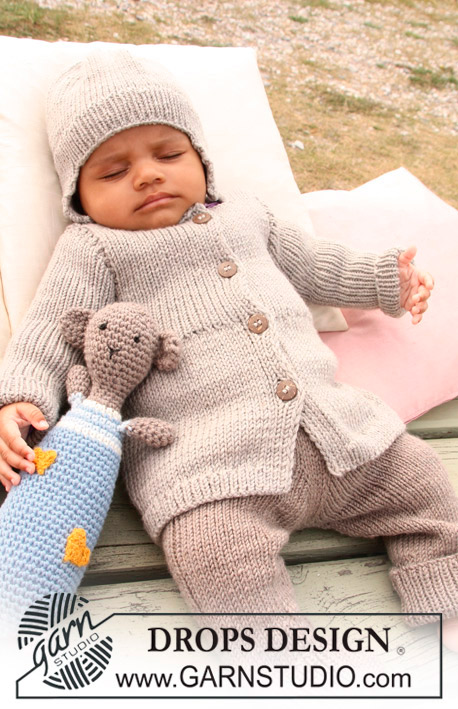 |
Knitted pants in with rib for baby and children in DROPS Merino Extra Fine
DROPS Baby 20-10 |
|
|
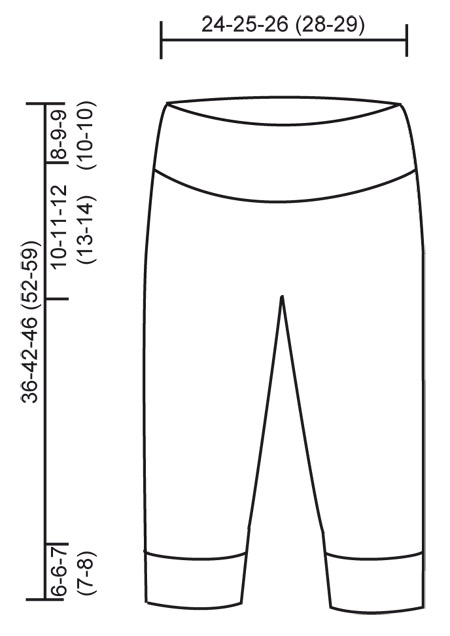
PANTS: DECREASING TIP: Dec as follows before marker: K2 tog. Dec as follows after marker: slip 1 st as if to K, K1, psso. --------------------------------------------------------- --------------------------------------------------------- PANTS: Worked in the round on needle from waist down. Cast on 110-114-118 (130-134) sts on circular needle size 3.5 mm / US 4 with light brown mix. Work rib, K1/P1 for 8-9-9 (10-10) cm / 3⅛"-3½"-3½" (4"-4"). Change to circular needle size 4.5 mm / US 7 and work next round as follows: * K1, P1 *, repeat from *-* a total of 4 times, work stockinette st on the next 39-41-43 (49-51) sts AT THE SAME TIME dec 6-6-6 (8-8) sts evenly = 33-35-37 (41-43) sts stockinette st, * P1, K1 *, repeat from *-* a total of 7 times, P1, stockinette st on the next 41-43-45 (51-53) sts AT THE SAME TIME dec 8-8-8 (10-10) sts evenly = 33-35-37 (41-43) sts stockinette st, * P1, K1 *, repeat from *-* a total of 3 times and finish with P1. There are now 96-100-104 (112-116) sts on needle. Insert 1 marker in the middle st at front and 1 marker in the middle st at back (= 47-49-51 (55-57) sts between sts with markers). Continue in the round in stockinette st and 15 sts in rib each side. REMEMBER THE GAUGE! When piece measures 11-13-14 (16-17) cm / 4⅜"-5⅛"-5½" (6¼"-6¾") inc 1 st each side of the 3 middle sts at front - inc by picking up st from previous round and K this. Repeat the inc on every other round a total of 9-9-9 (10-10) times = 114-118-122 (132-136) sts. After all inc piece measures approx 18-20-21 (23-24) cm / 7"-8"-8¼" (9"-9½"). On next round bind off the 3 middle sts at front and the 3 middle sts at back (i.e. st with marker and 1 st each side of this st) and work each leg separately. Slip the 54-56-58 (63-65) sts for one leg on a stitch holder and the 54-56-58 (63-65) sts for the other leg on double pointed needles size 4.5 mm / US 7. LEG: Continue in stockinette st in the round with 15 sts rib on the outside of leg as before – insert a marker at beg of round = inside of leg. When leg measures 2-2-2 (3-3) cm / ¾"-¾"-¾" (1⅛"-1⅛") dec 1 st on each side of marker – SEE DECREASING TIP! Repeat the dec on every 2-3-3.5 (4-5.5) cm / ¾"-1⅛"-1¼" (1½"-2¼") a total of 5 times = 44-46-48 (53-55) sts. When leg measures 12-16-18 (22-27) cm / 4¾"-6¼"-7" (8¾"-10⅝") change to double pointed needles size 3.5 mm / US 4. Work 1 round stockinette st, AT THE SAME TIME inc 4-4-6 (5-5) sts evenly – NOTE! Do not inc on rib sts at the side = 48-50-54 (58-60) sts. Continue in rib, K1/P1 in the round on all sts (make sure rib fits rib at the side). When leg measures 18-22-25 (29-35) cm / 7"-8¾"-9¾" (11⅜"-13¾") (pants measure a total of 36-42-46 (52-59) cm / 14¼"-16½"-18" (20½"-23¼") from the waist) bind off LOOSELY with K over K and P over P. Work the other leg in the same way. ASSEMBLY: Sew opening between legs. |
|
|
|
Have you finished this pattern?Tag your pictures with #dropspattern or submit them to the #dropsfan gallery. Do you need help with this pattern?You'll find 8 tutorial videos, a Comments/Questions area and more by visiting the pattern on garnstudio.com. © 1982-2025 DROPS Design A/S. We reserve all rights. This document, including all its sub-sections, has copyrights. Read more about what you can do with our patterns at the bottom of each pattern on our site. |
|


With over 40 years in knitting and crochet design, DROPS Design offers one of the most extensive collections of free patterns on the internet - translated to 17 languages. As of today we count 314 catalogs and 11821 patterns - 11811 of which are translated into English (US/in).
We work hard to bring you the best knitting and crochet have to offer, inspiration and advice as well as great quality yarns at incredible prices! Would you like to use our patterns for other than personal use? You can read what you are allowed to do in the Copyright text at the bottom of all our patterns. Happy crafting!
Post a comment to pattern DROPS Baby 20-10
We would love to hear what you have to say about this pattern!
If you want to leave a question, please make sure you select the correct category in the form below, to speed up the answering process. Required fields are marked *.